

How To Rebuild Your Small-Block Ford.pdf - Index of
How To Rebuild Your Small-Block Ford.pdf - Index of
How To Rebuild Your Small-Block Ford.pdf - Index of

Create successful ePaper yourself
Turn your PDF publications into a flip-book with our unique Google optimized e-Paper software.
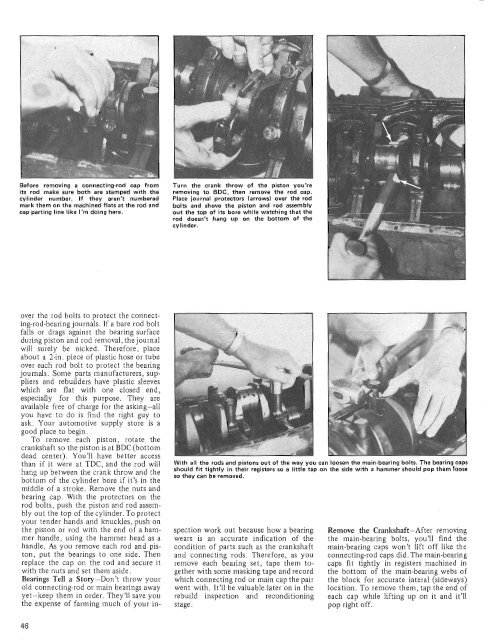
Before removing a connecting-rod cap from<br />
its rod make sure both are stamped with the<br />
Turn the crank throw <strong>of</strong> the piston you're<br />
removing to BDC. then remove the rod cap.<br />
cylinder number. If they aren't numbered Place joirnal protectors (arrows) over the rod<br />
mark them on the machined flats at the rod and bolts and shove the piston and rod assembly<br />
cap parting line like I'm doing here.<br />
out the top <strong>of</strong> its bore while watching that the<br />
rod doesn't hang up on the bottom <strong>of</strong> the<br />
cylinder.<br />
r<br />
especially for this purpose. They are<br />
available free <strong>of</strong> charge for the asking-all<br />
you have to do is find the right guy to -<br />
ask. <strong>Your</strong> automotive supply .--<br />
store is a<br />
good place to begin.<br />
<strong>To</strong> remove each piston, rotate the<br />
crankshaft so the piston is at BDC (bottom<br />
dead than if center). it were You'll at TDc, have and better the rod access will<br />
hang up between the crank throw and the<br />
bottom <strong>of</strong> the cylinder bore if it's in the<br />
middle <strong>of</strong> a stroke. Remove the nuts and<br />
bearing cap. With the protectors on the<br />
rod bolts, push the piston and rod assembly<br />
out the top <strong>of</strong> the cylinder. <strong>To</strong> protect<br />
your tender hands and knuckles, push on<br />
the piston or rod with the end <strong>of</strong> a hammer<br />
handle, using the hammer head as a<br />
handle. As you remove each rod and piston,<br />
put the bearings to one side. Then<br />
replace the cap on the rod and secure it<br />
with. the nuts and set them aside.<br />
Bearings Tell a Story-Don't throw your<br />
old connecting-rod or main bearings away<br />
yet-keep them in order. They'll save you<br />
the expense <strong>of</strong> farming much <strong>of</strong> your in-<br />
y<br />
With Iall the rods and pistons out <strong>of</strong> the way you can loosen the main-bearing bolts. The bearing caps<br />
should fit tightly in their registers so a little tap on the side with a hammer should pop them loose<br />
so they can be removed.<br />
spection work out because how a bearing<br />
wears is an accurate indication <strong>of</strong> the<br />
condition <strong>of</strong> parts such as the crankshaft<br />
and connecting rods. Therefore, as you<br />
remove each bearing set, tape them together<br />
with some masking tape and record<br />
which connecting rod or main cap the pair<br />
went with. It'll be valuable later on in the<br />
rebuild inspection and reconditioning<br />
stage.<br />
Remove the Crankshaft-After removing<br />
the main-bearing bolts, you'll find the<br />
main-bearing caps won't lift <strong>of</strong>f like the<br />
connecting-rod caps did. The main-bearing<br />
caps fit tightly in registers machined in<br />
the bottom <strong>of</strong> the main-bearing webs <strong>of</strong><br />
the block for accurate lateral (sideways)<br />
location. <strong>To</strong> remove them, tap the end <strong>of</strong><br />
each cap while lifting up on it and it'll<br />
pop right <strong>of</strong>f.


