Service Manual - Haldex
Service Manual - Haldex
Service Manual - Haldex

You also want an ePaper? Increase the reach of your titles
YUMPU automatically turns print PDFs into web optimized ePapers that Google loves.
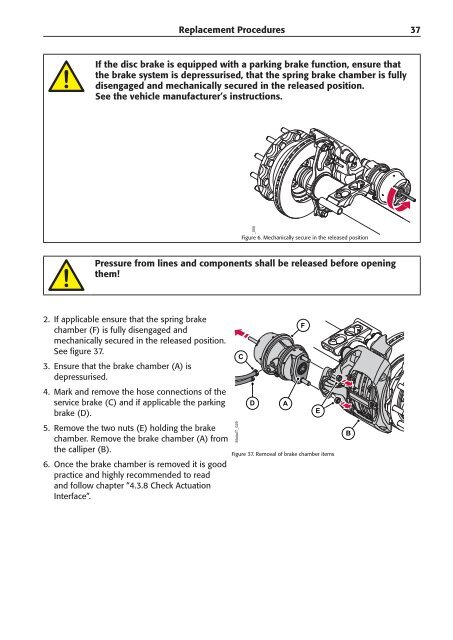
If the disc brake is equipped with a parking brake function, ensure that<br />
the brake system is depressurised, that the spring brake chamber is fully<br />
disengaged and mechanically secured in the released position.<br />
See the vehicle manufacturer’s instructions.<br />
T_055<br />
Figure 6. Mechanically secure in the released position<br />
Pressure from lines and components shall be released before opening<br />
them!<br />
2. If applicable ensure that the spring brake<br />
chamber (F) is fully disengaged and<br />
mechanically secured in the released position.<br />
See figure 37.<br />
3. Ensure that the brake chamber (A) is<br />
depressurised.<br />
4. Mark and remove the hose connections of the<br />
service brake (C) and if applicable the parking<br />
brake (D).<br />
5. Remove the two nuts (E) holding the brake<br />
chamber. Remove the brake chamber (A) from<br />
the calliper (B).<br />
6. Once the brake chamber is removed it is good<br />
practice and highly recommended to read<br />
and follow chapter “4.3.8 Check Actuation<br />
Interface”.<br />
Replacement Procedures<br />
ModulT_029 C<br />
D A<br />
Figure 37. Removal of brake chamber items<br />
F<br />
E<br />
B<br />
37