Service Manual - Haldex
Service Manual - Haldex
Service Manual - Haldex

You also want an ePaper? Increase the reach of your titles
YUMPU automatically turns print PDFs into web optimized ePapers that Google loves.
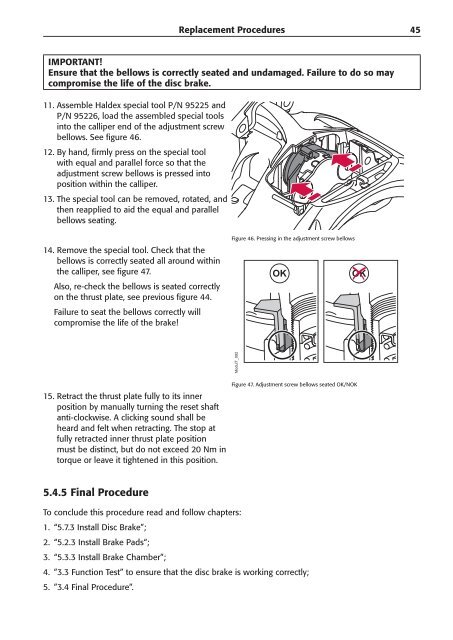
IMPORTANT!<br />
Ensure that the bellows is correctly seated and undamaged. Failure to do so may<br />
compromise the life of the disc brake.<br />
11. Assemble <strong>Haldex</strong> special tool P/N 95225 and<br />
P/N 95226, load the assembled special tools<br />
into the calliper end of the adjustment screw<br />
bellows. See figure 46.<br />
12. By hand, firmly press on the special tool<br />
with equal and parallel force so that the<br />
adjustment screw bellows is pressed into<br />
position within the calliper.<br />
13. The special tool can be removed, rotated, and<br />
then reapplied to aid the equal and parallel<br />
bellows seating.<br />
14. Remove the special tool. Check that the<br />
bellows is correctly seated all around within<br />
the calliper, see figure 47.<br />
Also, re-check the bellows is seated correctly<br />
on the thrust plate, see previous figure 44.<br />
Failure to seat the bellows correctly will<br />
compromise the life of the brake!<br />
15. Retract the thrust plate fully to its inner<br />
position by manually turning the reset shaft<br />
anti-clockwise. A clicking sound shall be<br />
heard and felt when retracting. The stop at<br />
fully retracted inner thrust plate position<br />
must be distinct, but do not exceed 20 Nm in<br />
torque or leave it tightened in this position.<br />
5.4.5 Final Procedure<br />
To conclude this procedure read and follow chapters:<br />
1. “5.7.3 Install Disc Brake”;<br />
2. “5.2.3 Install Brake Pads“;<br />
3. “5.3.3 Install Brake Chamber”;<br />
Figure 46. Pressing in the adjustment screw bellows<br />
ModulT_092<br />
OK<br />
Figure 47. Adjustment screw bellows seated OK/NOK<br />
4. ”3.3 Function Test” to ensure that the disc brake is working correctly;<br />
5. ”3.4 Final Procedure”.<br />
Replacement Procedures<br />
OK<br />
45