Message Center Installation Manual - Nevco
Message Center Installation Manual - Nevco
Message Center Installation Manual - Nevco

Create successful ePaper yourself
Turn your PDF publications into a flip-book with our unique Google optimized e-Paper software.
<strong>Installation</strong> Instructions<br />
<strong>Installation</strong> consists of four steps, Unpacking the Equipment, <strong>Message</strong> <strong>Center</strong> mounting, Connections, and<br />
Software setup. Be sure to read and understand all of the instructions before installing the equipment. Consult<br />
the “installer’s trouble shooting guide” following this section for verifications each step has been installed and<br />
is working correctly.<br />
1. Unpacking the Equipment<br />
Inspect the shipping container for damage. If any damage can be seen, contact the carrier<br />
immediately.<br />
Carefully remove all equipment from its packing carton. Do not pry against the message center<br />
in any way.<br />
2. <strong>Message</strong> <strong>Center</strong> Mounting<br />
<strong>Nevco</strong> strongly encourages you to check local codes before beginning the installation. You may<br />
wish to contact a local architect, contractor, or sign installer for assistance. Your <strong>Nevco</strong> Sales<br />
Representative may be able to assist you in finding professional installers who are familiar with<br />
this type of equipment.<br />
Always use good mechanical practices when mounting the message center.<br />
Use plated fastening devices to prevent rust or corrosion.<br />
Mount the optional temperature sensor / photocell out of direct sunlight to avoid an elevated<br />
reading.<br />
Mount the two wireless devices (if present) in clear line of sight with each other.<br />
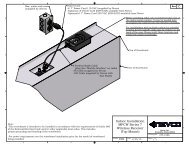
Your <strong>Message</strong> <strong>Center</strong> was designed so that it can be mounted in a variety of ways. Please<br />
examine the installation drawings to determine the best mounting method for your location.<br />
Access to all internal components is through the front, accessibility to the rear of the cabinet is<br />
NOT necessary. The standard mounting brackets are shipped on the <strong>Message</strong> <strong>Center</strong> in a<br />
“retracted” position and must be unbolted and rotated 180°, then reattached with the same bolts<br />
before starting the installation.<br />
Note: Please secure<br />
with two (2) fasteners at<br />
each mounting bracket<br />
location.<br />
Shipping Position<br />
Mounting Position<br />
Wall Mount<br />
135-0144 Page 1