Bravo Transom Assembly Specifications
Bravo Transom Assembly Specifications
Bravo Transom Assembly Specifications

You also want an ePaper? Increase the reach of your titles
YUMPU automatically turns print PDFs into web optimized ePapers that Google loves.
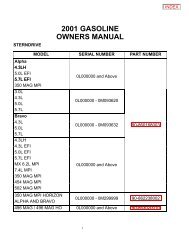
SERVICE MANUAL NUMBER 11<br />
SERVICE PROCEDURES REQUIRING MINOR DISASSEMBLY<br />
b. If diameter “a” is larger on the replacement shift cable than on the removed shift<br />
cable, proceed with the following instructions.<br />
a<br />
a<br />
70377<br />
a - Cable Diameter<br />
3. Slide the slotted hole of the drill bushing tool over the lowest stud closest to the bell housing<br />
shift cable bore.<br />
4. Install the alignment rod through the round 7/16 in. hole of the bushing tool and into the<br />
bell housing shift cable bore. Make sure that it is seated fully into the bore.<br />
5. Clamp the drill bushing tool into place using one of the nuts and washers that hold the<br />
sterndrive unit to the bell housing.<br />
a<br />
f<br />
e<br />
b<br />
a - Alignment Rod<br />
b - Nut<br />
c - Washer<br />
d - Drill Bushing Tool<br />
e - Bell Housing Stud<br />
f - Bell Housing Shift Cable Bore<br />
c<br />
d<br />
70376<br />
90-17431--4 MARCH 1998 Page 4A-27