Mini IDE Tutorial
Mini IDE Tutorial
Mini IDE Tutorial

You also want an ePaper? Increase the reach of your titles
YUMPU automatically turns print PDFs into web optimized ePapers that Google loves.
TUTORIAL<br />
How to download and verify the code in 68HC12 By using <strong>Mini</strong><strong>IDE</strong><br />
1. Create a Folder on the hard drive named it 68HC12. We will use this folder to save our codes<br />
and other related programs and files<br />
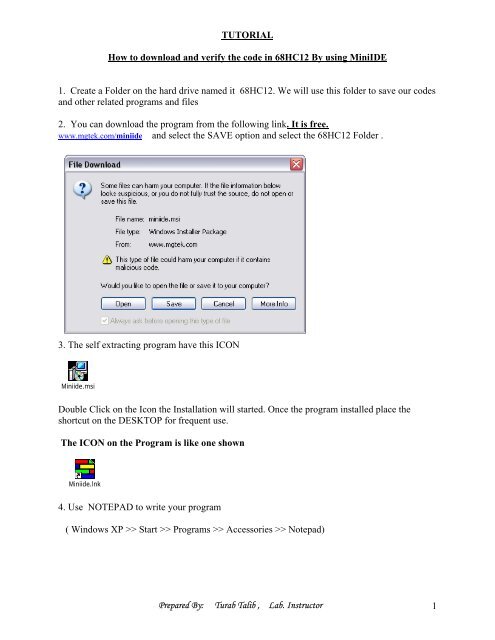
2. You can download the program from the following link. It is free.<br />
www.mgtek.com/miniide and select the SAVE option and select the 68HC12 Folder .<br />
3. The self extracting program have this ICON<br />
<strong>Mini</strong>ide.msi<br />
Double Click on the Icon the Installation will started. Once the program installed place the<br />
shortcut on the DESKTOP for frequent use.<br />
The ICON on the Program is like one shown<br />
<strong>Mini</strong>ide.lnk<br />
4. Use NOTEPAD to write your program<br />
( Windows XP >> Start >> Programs >> Accessories >> Notepad)<br />
Prepared By: Turab Talib , Lab. Instructor 1
5. Typed the following TEST program in the Notepad and SAVE AS test.asm in the 68HC12<br />
folder. You must typed the extension i.e. asm<br />
PROGRAM<br />
org $800 ;(RAM start location for user program)<br />
start: equ * ; Start the program from the beginning)<br />
ldaa #$4 ; # represent immediate, $ represent Hex<br />
ldab #$5<br />
end<br />
aba ; Add b to a then store result in a<br />
bra * ; Branch to the beginning of program<br />
6. To connect the uC with your computer, use BD9 cable (female end goes in the COM1 or<br />
COM2 port of your computer and other end with male DB9 connector in the Hardware ( UC<br />
Board).<br />
Prepared By: Turab Talib , Lab. Instructor 2
7. Apply 5V DC to the uC Positive lead is toward the BD 9 connector.<br />
9.Fire <strong>Mini</strong><strong>IDE</strong> program from the DeskTop<br />
<strong>Mini</strong>ide.lnk<br />
7.<br />
8. Press File from the tool bar, select your file i.e. test.asm, DO Not forget to type .asm<br />
Prepared By: Turab Talib , Lab. Instructor 3
The file will appear on the Top position of the <strong>Mini</strong><strong>IDE</strong>.<br />
9. Press the Build from the tool bar, Click on the “Set Project File” if not selected. Then, Again<br />
press Build and click on the “Build test.asm”.<br />
Some messages will appears on the second position of the screen, read the message and if you<br />
have reported an error/s correct them on the top window, then select the Build again and click on<br />
the “Set project file” if already selected then use the “Release project “ and again select the ”Set<br />
project”.<br />
Build your program again as per step 9.<br />
If no error are reported , Its mean that your program is successfully assembled.<br />
10. Print the test.lst file. It is store in the 68HC12 folder. Use the Note Pad to open this File<br />
Prepared By: Turab Talib , Lab. Instructor 4
11. To make the communication set up between the your Desktop and uC Board, Select the<br />
Terminal Tag in the OPTION of TERMINAL Tool Bar of <strong>Mini</strong><strong>IDE</strong><br />
You can change the COM port 2, if you are using it.<br />
11. Press the TERMINAL CONNECT/DICONNECT Icon on the <strong>Mini</strong><strong>IDE</strong> Tool Bar<br />
to connect your computer with the uC Board<br />
11. Press the RESET BUTTON of the uC Board and see the last window for the following<br />
message<br />
D-Bug12 v2.1.0b15<br />
Copyright 1996 - 1998 Motorola Semiconductor<br />
For Commands type "Help"<br />
It shows that you have successfully connected.<br />
11. Type help and press enter<br />
Prepared By: Turab Talib , Lab. Instructor 5
The help will show the commands of D-Bug12 Commands that you can use them to do a lot of<br />
useful thing.<br />
Press Any Key For More<br />
Prepared By: Turab Talib , Lab. Instructor 6
12. Type the LOAD COMMAND on the Prompt of the D-Bug12<br />
>load (then select the download icon<br />
the file<br />
FILENAME.s19)<br />
on the MINI<strong>IDE</strong> , Pop Up window appears, select<br />
( * will appear, If the file is successfully loaded in the uC.<br />
>rd ( register display command can be used to see the contents loaded in the uC.) Before that<br />
change the PC ( program counter to 800 location as our program is loaded from that position)<br />
PC SP X Y D = A:B CCR = SXHI NZVC<br />
0000 0A00 0000 0000 00:00 1001 0000<br />
0000 E00F SUBB 15,X<br />
>rm (register modified command will be used to change the PC from 0000 to 0800<br />
location)<br />
PC=0000<br />
SP=0A00<br />
IX=0000<br />
IY=0000<br />
Prepared By: Turab Talib , Lab. Instructor 7
A=00<br />
B=00<br />
CCR=90<br />
PC=0000 0800<br />
SP=0A00<br />
IX=0000<br />
IY=0000<br />
A=00<br />
B=00<br />
CCR=90 . ( . can be used to terminate rm command)<br />
>rd 0800<br />
( Again<br />
PC SP X Y D = A:B CCR = SXHI NZVC<br />
0800 0A00 0000 0000 00:00 1001 0000<br />
0800 860A LDAA #$0A<br />
>t ( TRACE COMMAND t will be used for next step by step operation)<br />
PC SP X Y D = A:B CCR = SXHI NZVC<br />
0802 0A00 0000 0000 0A:00 1001 0000<br />
0802 7A0821 STAA $0821<br />
>t<br />
PC SP X Y D = A:B CCR = SXHI NZVC<br />
0805 0A00 0000 0000 0A:00 1001 0000<br />
0805 C6CD LDAB #$CD<br />
>t<br />
PC SP X Y D = A:B CCR = SXHI NZVC<br />
0807 0A00 0000 0000 0A:CD 1001 1000<br />
0807 7B0822 STAB $0822<br />
>t<br />
PC SP X Y D = A:B CCR = SXHI NZVC<br />
080A 0A00 0000 0000 0A:CD 1001 1000<br />
080A 86A5 LDAA #$A5<br />
><br />
>t<br />
PC SP X Y D = A:B CCR = SXHI NZVC<br />
080C 0A00 0000 0000 A5:CD 1001 1000<br />
080C B6081E LDAA $081E<br />
>t<br />
PC SP X Y D = A:B CCR = SXHI NZVC<br />
080F 0A00 0000 0000 0A:CD 1001 0000<br />
Prepared By: Turab Talib , Lab. Instructor 8
080F F6081F LDAB $081F<br />
>t<br />
PC SP X Y D = A:B CCR = SXHI NZVC<br />
0812 0A00 0000 0000 0A:0C 1001 0000<br />
0812 1806 ABA<br />
>t<br />
PC SP X Y D = A:B CCR = SXHI NZVC<br />
0814 0A00 0000 0000 16:0C 1011 0000<br />
0814 8B01 ADDA #$01<br />
>t<br />
PC SP X Y D = A:B CCR = SXHI NZVC<br />
0816 0A00 0000 0000 17:0C 1001 0000<br />
0816 BB0820 ADDA $0820<br />
>t<br />
PC SP X Y D = A:B CCR = SXHI NZVC<br />
0819 0A00 0000 0000 19:0C 1001 0000<br />
0819 7A0823 STAA $0823<br />
>t<br />
PC SP X Y D = A:B CCR = SXHI NZVC<br />
081C 0A00 0000 0000 19:0C 1001 0000<br />
081C 20FE BRA $081C<br />
13. By using the mm ( memory modify) command insert the following number . At the cursor<br />
type<br />
>mm 0800<br />
(press enter)<br />
>0800 XX YY ( XX are any random alphanumeric number will be displayed actually these<br />
are the previous stored values at this memory location and you can insert the following new<br />
number at YY, one by one, where the cursor in blinking, press enter)<br />
45 , 4C , 54 , 4E , 20 , 32 , 33 , 31 , 38 , 20 , 4C , 61 , 62 , 20 , 20 , 20<br />
for example<br />
I am modifying the 0800 to onward memory location by 54 , 75 , 72 , 61 ,62<br />
>0800 42 54 ( Press Enter)<br />
>0801 4C 75 ( Press Enter)<br />
>0802 5E 72 ( Press Enter)<br />
>0803 2E 61 ( Press Enter)<br />
>0804 01 62 ( Press Enter)<br />
>0804 01 . ( insert dot to terminate the mm command then Press Enter)<br />
Prepared By: Turab Talib , Lab. Instructor 9
Enter the md (memory display command) as follow<br />
> md 0800 ( press Enter) md<br />
Look at the right hand side of the screen<br />
14. Turn Off the power of the uC and Turn On again<br />
press the reset button of the uC<br />
Type the md command<br />
> md 0800<br />
What happens to the data you stored at these location, Any Clue<br />
15. Display the memory content of location 0D00 by using md command<br />
> md 0D00 0D0F<br />
md ( Start Address) (End address)<br />
These memory location will be filled with some contents . NOW<br />
Type<br />
> BULK ( Press Enter)<br />
Again<br />
> md 0D00 0D0F<br />
What happened<br />
Repeat the step 13 & 14, But your memory location will 0D00 instead of 0800.<br />
What happened after step 14. Any Clue .<br />
16. By using the ASM command load the Accumalator A at location 0800 by immediate<br />
addressing with 09 then decrement this register 9 times. Set the Program counter PC to<br />
address of 0800 by using the Register modify command rm .Run your program. Watch what is<br />
happened after address 080C. The value in the A register .<br />
example for ASM Command<br />
D-Bug12 v2.1.0b15<br />
Copyright 1996 - 1998 Motorola Semiconductor<br />
For Commands type "Help"<br />
For Commands type "Help"<br />
>asm 0800<br />
0800 8609 LDAA #$09<br />
Prepared By: Turab Talib , Lab. Instructor 10
0802 43 DECA<br />
0803 43 DECA<br />
0804 43 DECA<br />
0805 43 DECA<br />
0806 43 DECA<br />
0807 43 DECA<br />
0808 43 DECA<br />
0809 43 DECA<br />
080A 43<br />
DECA<br />
080B 01 MEM >.<br />
>RM ( Changing the PC to 0800)<br />
PC=0000 0800<br />
SP=0A00<br />
IX=0000<br />
IY=0000 .<br />
>RD<br />
(Register Display)<br />
PC SP X Y D = A:B CCR = SXHI NZVC<br />
0800 0A00 0000 0000 00:00 1001 0000<br />
0800 8609 LDAA #$09<br />
>T ( Trace command )<br />
PC SP X Y D = A:B CCR = SXHI NZVC<br />
0802 0A00 0000 0000 09:00 1001 0000<br />
0802 43 DECA<br />
Keep using the Trace command until you reach the address 080B on the PC Register<br />
>T<br />
PC SP X Y D = A:B CCR = SXHI NZVC<br />
080A 0A00 0000 0000 01:00 1001 0000<br />
080A 43<br />
DECA<br />
>T<br />
PC SP X Y D = A:B CCR = SXHI NZVC<br />
080B 0A00 0000 0000 00:00 1001 0100<br />
080B 01<br />
MEM<br />
>T<br />
PC SP X Y D = A:B CCR = SXHI NZVC<br />
080C 0A00 0004 0001 00:00 1001 0100<br />
080C 8400 ANDA #$00<br />
At PC 080C you are start getting the values which you have not entered and your program is not<br />
ending. Again use the D-bug command and at this location insert the Break point command<br />
(BR). And rum your program by using G command .<br />
>BR 080C<br />
>G 0800<br />
You will see that your program is end nicely.<br />
To remove the Break point type NOBR. And run your program again. See the difference.<br />
Prepared By: Turab Talib , Lab. Instructor 11
Prepared By: Turab Talib , Lab. Instructor 12