impact / impact e wall mounted units technical manual - Heronhill Air ...
impact / impact e wall mounted units technical manual - Heronhill Air ...
impact / impact e wall mounted units technical manual - Heronhill Air ...

You also want an ePaper? Increase the reach of your titles
YUMPU automatically turns print PDFs into web optimized ePapers that Google loves.
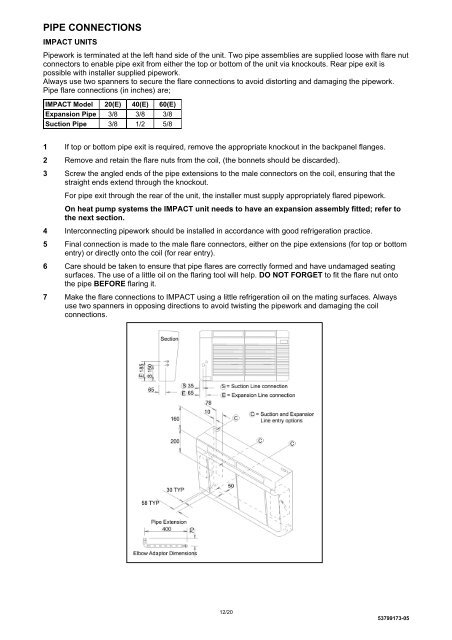
PIPE CONNECTIONS<br />
IMPACT UNITS<br />
Pipework is terminated at the left hand side of the unit. Two pipe assemblies are supplied loose with flare nut<br />
connectors to enable pipe exit from either the top or bottom of the unit via knockouts. Rear pipe exit is<br />
possible with installer supplied pipework.<br />
Always use two spanners to secure the flare connections to avoid distorting and damaging the pipework.<br />
Pipe flare connections (in inches) are;<br />
IMPACT Model 20(E) 40(E) 60(E)<br />
Expansion Pipe 3/8 3/8 3/8<br />
Suction Pipe 3/8 1/2 5/8<br />
1 If top or bottom pipe exit is required, remove the appropriate knockout in the backpanel flanges.<br />
2 Remove and retain the flare nuts from the coil, (the bonnets should be discarded).<br />
3 Screw the angled ends of the pipe extensions to the male connectors on the coil, ensuring that the<br />
straight ends extend through the knockout.<br />
For pipe exit through the rear of the unit, the installer must supply appropriately flared pipework.<br />
On heat pump systems the IMPACT unit needs to have an expansion assembly fitted; refer to<br />
the next section.<br />
4 Interconnecting pipework should be installed in accordance with good refrigeration practice.<br />
5 Final connection is made to the male flare connectors, either on the pipe extensions (for top or bottom<br />
entry) or directly onto the coil (for rear entry).<br />
6 Care should be taken to ensure that pipe flares are correctly formed and have undamaged seating<br />
surfaces. The use of a little oil on the flaring tool will help. DO NOT FORGET to fit the flare nut onto<br />
the pipe BEFORE flaring it.<br />
7 Make the flare connections to IMPACT using a little refrigeration oil on the mating surfaces. Always<br />
use two spanners in opposing directions to avoid twisting the pipework and damaging the coil<br />
connections.<br />
12/20<br />
53799173-05