impact / impact e wall mounted units technical manual - Heronhill Air ...
impact / impact e wall mounted units technical manual - Heronhill Air ...
impact / impact e wall mounted units technical manual - Heronhill Air ...

You also want an ePaper? Increase the reach of your titles
YUMPU automatically turns print PDFs into web optimized ePapers that Google loves.
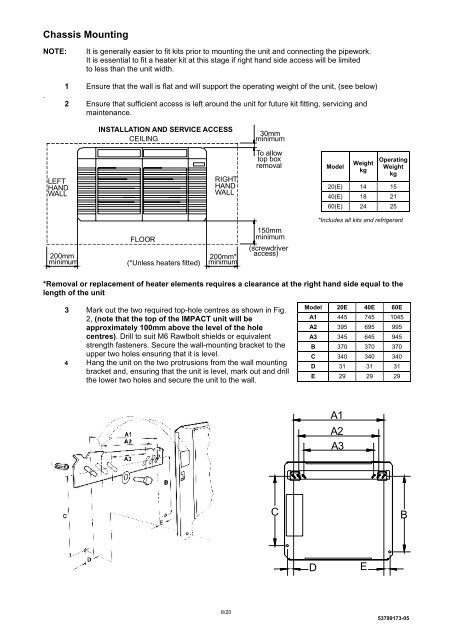
Chassis Mounting<br />
NOTE:<br />
It is generally easier to fit kits prior to mounting the unit and connecting the pipework.<br />
It is essential to fit a heater kit at this stage if right hand side access will be limited<br />
to less than the unit width.<br />
.<br />
1 Ensure that the <strong>wall</strong> is flat and will support the operating weight of the unit, (see below)<br />
2 Ensure that sufficient access is left around the unit for future kit fitting, servicing and<br />
maintenance.<br />
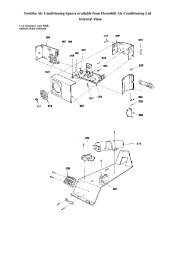
INSTALLATION AND SERVICE ACCESS<br />
CEILING<br />
30mm<br />
minimum<br />
LEFT<br />
HAND<br />
WALL<br />
RIGHT<br />
HAND<br />
WALL<br />
To allow<br />
top box<br />
removal<br />
Model<br />
Weight<br />
kg<br />
Operating<br />
Weight<br />
kg<br />
20(E) 14 15<br />
40(E) 18 21<br />
60(E) 24 25<br />
*Includes all kits and refrigerant<br />
200mm<br />
minimum<br />
FLOOR<br />
(*Unless heaters fitted)<br />
200mm*<br />
minimum<br />
150mm<br />
minimum<br />
(screwdriver<br />
access)<br />
*Removal or replacement of heater elements requires a clearance at the right hand side equal to the<br />
length of the unit<br />
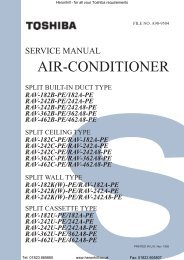
3 Mark out the two required top-hole centres as shown in Fig.<br />
2, (note that the top of the IMPACT unit will be<br />
approximately 100mm above the level of the hole<br />
centres). Drill to suit M6 Rawlbolt shields or equivalent<br />
strength fasteners. Secure the <strong>wall</strong>-mounting bracket to the<br />
upper two holes ensuring that it is level.<br />
4 Hang the unit on the two protrusions from the <strong>wall</strong> mounting<br />
bracket and, ensuring that the unit is level, mark out and drill<br />
the lower two holes and secure the unit to the <strong>wall</strong>.<br />
Model 20E 40E 60E<br />
A1 445 745 1045<br />
A2 395 695 995<br />
A3 345 645 945<br />
B 370 370 370<br />
C 340 340 340<br />
D 31 31 31<br />
E 29 29 29<br />
A1<br />
A2<br />
A3<br />
C<br />
B<br />
D<br />
E<br />
8/20<br />
53799173-05