Activating Your GAP Access Primary Administrator Account
Activating Your GAP Access Primary Administrator Account
Activating Your GAP Access Primary Administrator Account

You also want an ePaper? Increase the reach of your titles
YUMPU automatically turns print PDFs into web optimized ePapers that Google loves.
<strong>Activating</strong> <strong>Your</strong> <strong>GAP</strong> <strong>Access</strong> <strong>Primary</strong> <strong>Administrator</strong> <strong>Account</strong><br />
Only the High School Principal or Financial Aid Director of a school can register for a <strong>GAP</strong> <strong>Access</strong><br />
<strong>Primary</strong> <strong>Administrator</strong> account. Once you register, your name and affiliation to your school will<br />
be verified by ISAC’s School Services Department prior to the issuance of an acceptance e-mail.<br />
If you are the High School Principal or Financial Aid Director, follow the steps below.<br />
To Activate<br />
In order to establish yourself as the <strong>GAP</strong> <strong>Access</strong> <strong>Primary</strong> <strong>Administrator</strong> and activate your<br />
account, follow these steps:<br />
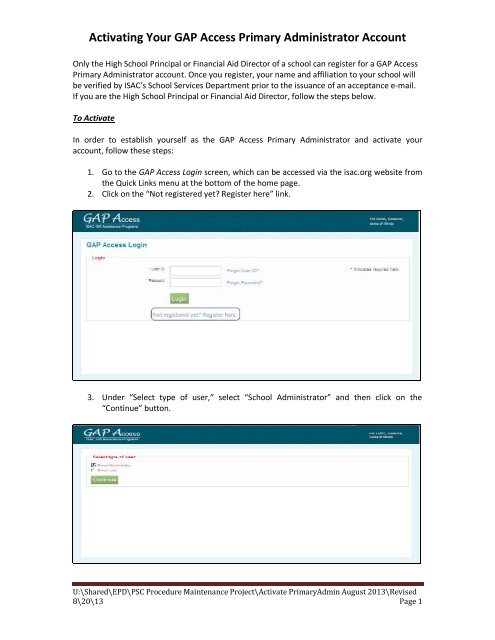
1. Go to the <strong>GAP</strong> <strong>Access</strong> Login screen, which can be accessed via the isac.org website from<br />
the Quick Links menu at the bottom of the home page.<br />
2. Click on the “Not registered yet? Register here” link.<br />
3. Under “Select type of user,” select “School <strong>Administrator</strong>” and then click on the<br />
“Continue” button.<br />
U:\Shared\EPD\PSC Procedure Maintenance Project\Activate <strong>Primary</strong>Admin August 2013\Revised<br />
8\20\13 Page 1
<strong>Activating</strong> <strong>Your</strong> <strong>GAP</strong> <strong>Access</strong> <strong>Primary</strong> <strong>Administrator</strong> <strong>Account</strong><br />
4. Fill in all fields on the User Registration <strong>Administrator</strong> Registration page, noting the<br />
following:<br />
a. All fields that have a red asterisk (*) are required.<br />
b. At this point, leave the “School Setup Code” field blank – this code will be<br />
provided to you by ISAC’s School Services Department later in the process.<br />
c. The “User ID” must be 10 characters or less, and must include at least one<br />
numeric digit.<br />
d. The “Password” must include at least one upper-case letter, one lower-case<br />
letter, one numeric digit, and one special character {!@#$%^&+=}. The<br />
password must be a minimum of 8 characters.<br />
5. After all fields have been completed on the <strong>Administrator</strong> Registration page, click on the<br />
“Confirm” button.<br />
6. A Registration Confirmation Page will appear. Review your data.<br />
a. If changes are needed, click on the “Make Corrections” button, correct as<br />
needed, and then click on the “Confirm” button again. Our recommendation is<br />
to print the confirmation page prior to submitting your information to ISAC, as<br />
your record of security question responses (which may be needed in the<br />
future should you need to change your password).<br />
b. If no further changes are needed, click on the “Submit” button.<br />
U:\Shared\EPD\PSC Procedure Maintenance Project\Activate <strong>Primary</strong>Admin August 2013\Revised<br />
8\20\13 Page 2
<strong>Activating</strong> <strong>Your</strong> <strong>GAP</strong> <strong>Access</strong> <strong>Primary</strong> <strong>Administrator</strong> <strong>Account</strong><br />
7. You will see a screen indicating that your registration is complete and that ISAC’s School<br />
Services Department will verify your registration and then send you a confirmation e-<br />
mail. At this point, you should close your browser window.<br />
8. You will receive two separate e-mails from ISAC’s School Services Department<br />
(isac.schoolservices@isac.illinois.gov). One e-mail will provide the link/URL that you will<br />
need to use in order to activate your account. The other e-mail will provide your School<br />
Setup Code (access code). You should wait to receive both e-mails before following the<br />
link that is provided in the first e-mail (because you will need both the link and the<br />
access code to activate your account).<br />
U:\Shared\EPD\PSC Procedure Maintenance Project\Activate <strong>Primary</strong>Admin August 2013\Revised<br />
8\20\13 Page 3
<strong>Activating</strong> <strong>Your</strong> <strong>GAP</strong> <strong>Access</strong> <strong>Primary</strong> <strong>Administrator</strong> <strong>Account</strong><br />
<strong>GAP</strong> <strong>Access</strong> <strong>Administrator</strong> Login and Set Privileges Instructions<br />
NOTE: if the <strong>GAP</strong> <strong>Access</strong> <strong>Administrator</strong> was provided the School Setup Code and entered it in<br />
step 4 of the “Other <strong>GAP</strong> <strong>Access</strong> <strong>Administrator</strong> Registration Instructions” section (above), then<br />
this step may be skipped.<br />
1. Once you have received both the URL/link and access code referenced in step 8 of the<br />
“To Activate” section (above), follow the URL/link to go to the <strong>GAP</strong> <strong>Access</strong> Login screen.<br />
a. IMPORTANT: the URL that you will receive via e-mail is valid for 48 hours – if the<br />
URL is not used to activate the account within 48 hours after the time-stamp on<br />
the e-mail, you will need to restart the process of creating and activating your<br />
<strong>GAP</strong> <strong>Access</strong> account.<br />
2. At the <strong>GAP</strong> <strong>Access</strong> Login screen, you will see a message indicating that your account has<br />
not yet been activated, and you will be prompted to enter your School Setup Code.<br />
Enter the access code (which was provided in an e-mail from ISAC’s School Services<br />
Department) into the “School Setup Code” field, and then click on the “Enter” button.<br />
a. IMPORTANT: as the school’s <strong>GAP</strong> <strong>Access</strong> <strong>Primary</strong> <strong>Administrator</strong>, you will be<br />
responsible for providing other users with this “School Setup Code” (or<br />
delegating that duty to another administrator) – keep this access code for<br />
future reference!<br />
U:\Shared\EPD\PSC Procedure Maintenance Project\Activate <strong>Primary</strong>Admin August 2013\Revised<br />
8\20\13 Page 4
<strong>Activating</strong> <strong>Your</strong> <strong>GAP</strong> <strong>Access</strong> <strong>Primary</strong> <strong>Administrator</strong> <strong>Account</strong><br />
3. The <strong>GAP</strong> <strong>Access</strong> Login screen will then indicate that your account has been activated,<br />
and you will be prompted to enter your User ID and Password. Be sure to enter the<br />
information exactly as you originally established it in step 4 of the “To Activate” section<br />
(above). Click on the “Login” button.<br />
U:\Shared\EPD\PSC Procedure Maintenance Project\Activate <strong>Primary</strong>Admin August 2013\Revised<br />
8\20\13 Page 5
<strong>Activating</strong> <strong>Your</strong> <strong>GAP</strong> <strong>Access</strong> <strong>Primary</strong> <strong>Administrator</strong> <strong>Account</strong><br />
4. You will see a screen indicating that your login was successful, and that this is your first<br />
login.<br />
a. Click the “Update Profile” button to go to the “Update User Profile” screen.<br />
Update any fields as needed, and then click the “Submit” button (or, if no<br />
changes are needed, click the “Back” button).<br />
b. If you need to change your Password, click on the “Change Password” link that<br />
appears at the bottom of the Update User Profile screen. Prior to changing your<br />
password, you will need to provide the security question responses that you<br />
entered when first creating your account. If you try to change your password<br />
but do not know your security question responses, you must contact ISAC’s<br />
School Services Department for assistance.<br />
5. Set your program privilege levels by doing the following:<br />
a. At the blue ribbon that appears along the top of the <strong>GAP</strong> <strong>Access</strong> screen, hover<br />
over (but do not click) “Administration” and then click on “User Administration.”<br />
U:\Shared\EPD\PSC Procedure Maintenance Project\Activate <strong>Primary</strong>Admin August 2013\Revised<br />
8\20\13 Page 6
<strong>Activating</strong> <strong>Your</strong> <strong>GAP</strong> <strong>Access</strong> <strong>Primary</strong> <strong>Administrator</strong> <strong>Account</strong><br />
b. At the School Users View screen, you will see a row that displays your User ID,<br />
your name, and your school’s name. Note that both the “Admin” and “Active”<br />
columns are pre-populated with a “Y,” and there is a check-mark in the<br />
“<strong>Primary</strong>” field (indicating that you are the school’s <strong>GAP</strong> <strong>Access</strong> <strong>Primary</strong><br />
<strong>Administrator</strong>). In addition, you will see the following three icons.<br />
i. The first icon looks like a key, and may be used to reset your password.<br />
ii. The second icon looks like a person, and may be used to assign user<br />
privileges.<br />
iii. The third icon looks like a garbage can, and may be used to delete<br />
users.<br />
c. Click on the second icon (Assign Privileges).<br />
d. Click on the Save button.<br />
U:\Shared\EPD\PSC Procedure Maintenance Project\Activate <strong>Primary</strong>Admin August 2013\Revised<br />
8\20\13 Page 7
<strong>Activating</strong> <strong>Your</strong> <strong>GAP</strong> <strong>Access</strong> <strong>Primary</strong> <strong>Administrator</strong> <strong>Account</strong><br />
HIGH SCHOOL PROGRAM PRIVILEGES SCREEN<br />
e. <strong>Your</strong> User ID will appear at the top of the new screen that appears (Admin Page<br />
will appear in the top right corner of the page).<br />
f. Under the “Program Privileges” section, a high school will see “SSP” listed in the<br />
“Program Name” column (“Program Privileges” information for colleges appears<br />
on page 8). Under the “Privileges” column, select either “None,” “Update” or<br />
“View.”<br />
i. “None” will grant you zero access to SSP data.<br />
ii. “Update” will grant you the ability to both edit and view SSP data.<br />
iii. “View” will grant you the ability to only view SSP data (i.e., no editing<br />
ability).<br />
g. After selecting your SSP Privilege level, click on the “Save” button.<br />
h. Under the “Existing Privileges” area of the “Other Privileges” section, these<br />
privileges have been set to view by ISAC as follows (these are the same settings<br />
for all <strong>GAP</strong> <strong>Access</strong> <strong>Primary</strong> <strong>Administrator</strong>s):<br />
i. Budget – High schools should disregard the Budget option. This option<br />
is only for colleges.<br />
ii. Demo – Update: this privilege level allows you to view and update your<br />
school’s demographic information. These privileges can be updated by<br />
an administrator at any time.<br />
i. Press Add to update the user privileges.<br />
j. After all changes have been made press the Save button.<br />
k. When you are done making updates, remember to log out of the system (by<br />
clicking on the “Logout” link that appears in the top right corner of the <strong>GAP</strong><br />
<strong>Access</strong> screen).<br />
U:\Shared\EPD\PSC Procedure Maintenance Project\Activate <strong>Primary</strong>Admin August 2013\Revised<br />
8\20\13 Page 8
<strong>Activating</strong> <strong>Your</strong> <strong>GAP</strong> <strong>Access</strong> <strong>Primary</strong> <strong>Administrator</strong> <strong>Account</strong><br />
POST SECONDARY INSTITUTION PROGRAM<br />
PRIVILEGES SCREEN<br />
l. <strong>Your</strong> User ID will appear at the top of the new screen that appears (Admin Page<br />
will appear in the top right corner of the page).<br />
m. Under the “Program Privileges” section, post secondary institutions will see<br />
“MAP” listed in the “Program Name” column. Under the “Privileges” column,<br />
select either “None,” “Update” or “View.”<br />
i. “None” will grant you zero access to MAP data.<br />
ii. “Update” will grant you the ability to both edit and view MAP data.<br />
iii. “View” will grant you the ability to only view MAP data (i.e., no editing<br />
ability).<br />
n. After selecting your MAP Privilege level, click on the “Save” button.<br />
i. Demo – Update: this privilege level allows you to view and update your<br />
school’s demographic information. These privileges can be updated by<br />
an administrator at any time.<br />
ii. Budget-Confirm: this privilege level allows you to view, update and<br />
confirm your schools budget information.<br />
o. Press Add to update the user privileges.<br />
p. After all changes have been made press on the Save button.<br />
q. As additional ISAC Gift Assistance Programs are connected to the <strong>GAP</strong> <strong>Access</strong><br />
portal, you will need to return to this screen to set your privilege levels for each<br />
program (and the privilege levels for all other <strong>GAP</strong> <strong>Access</strong> administrators and/or<br />
users will also need to be set).<br />
r. When you are done making updates, remember to log out of the system (by<br />
clicking on the “Logout” link that appears in the top right corner of the <strong>GAP</strong><br />
<strong>Access</strong> screen).<br />
U:\Shared\EPD\PSC Procedure Maintenance Project\Activate <strong>Primary</strong>Admin August 2013\Revised<br />
8\20\13 Page 9