OTR tyres product catalogue - Titan Distribution
OTR tyres product catalogue - Titan Distribution
OTR tyres product catalogue - Titan Distribution

Create successful ePaper yourself
Turn your PDF publications into a flip-book with our unique Google optimized e-Paper software.
Safety Information<br />
www.titan-intl.com<br />
Demounting Single Piece Wheel and Tire Assemblies<br />
(On-The-Vehicle)<br />
Tools Required: Cap and core removal tools, bead unseating<br />
tool, two 36” tire irons, two 18” tire irons, vegetable-based<br />
lubricant.<br />
If you have any doubt about the correct, safe<br />
method of performing any step in the demounting,<br />
mounting, adding or removing fill, or inflating process<br />
STOP! Seek out expert assistance from a qualified person.<br />
Demounting tools apply pressure to rim flanges to<br />
unseat tire beads. Keep your fingers clear. Always<br />
stand to one side when you apply hydraulic pressure.<br />
Due to the variety of vehicle/equipment configurations<br />
and the range of conditions and situations<br />
under which on-vehicle demounting (wheel/tire assembly<br />
still attached to vehicle or equipment) can occur, proper<br />
procedures for blocking, jacking, cribbing of the vehicle/<br />
equipment must be done in accordance with the manufacturers<br />
operator’s manual, maintenance manual or the<br />
information as provided by the vehicle/equipment manufacturer.<br />
Tools required: Jack, cribbing, blocking or other items as<br />
needed to jack and block the vehicle/equipment per the<br />
manufacturers instructions, hydraulic demounting tool,<br />
hooked tire iron, pry bar and lifting device or boom truck.<br />
1. Remove the fluid fill from the tire. Deflate the tire by<br />
removing the valve core housing. For tube-type tires,<br />
remove the rim nut and push the valve through the valve<br />
hole.<br />
Always completely deflate tire (both tires of a dual<br />
assembly) by removing valve core(s) from valve(s)<br />
before attempting any demounting operation. Check the<br />
valve stem by running a piece of wire through the stem to<br />
make sure it is not plugged.<br />
Stand clear of trajectory danger zone when deflating<br />
(page S:5).<br />
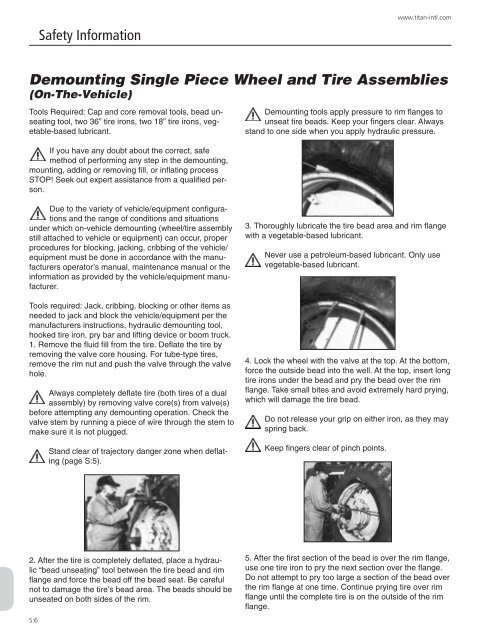
3. Thoroughly lubricate the tire bead area and rim flange<br />
with a vegetable-based lubricant.<br />
Never use a petroleum-based lubricant. Only use<br />
vegetable-based lubricant.<br />
4. Lock the wheel with the valve at the top. At the bottom,<br />
force the outside bead into the well. At the top, insert long<br />
tire irons under the bead and pry the bead over the rim<br />
flange. Take small bites and avoid extremely hard prying,<br />
which will damage the tire bead.<br />
Do not release your grip on either iron, as they may<br />
spring back.<br />
Keep fingers clear of pinch points.<br />
2. After the tire is completely deflated, place a hydraulic<br />
“bead unseating” tool between the tire bead and rim<br />
flange and force the bead off the bead seat. Be careful<br />
not to damage the tire’s bead area. The beads should be<br />
unseated on both sides of the rim.<br />
S:6<br />
5. After the first section of the bead is over the rim flange,<br />
use one tire iron to pry the next section over the flange.<br />
Do not attempt to pry too large a section of the bead over<br />
the rim flange at one time. Continue prying tire over rim<br />
flange until the complete tire is on the outside of the rim<br />
flange.