OTR tyres product catalogue - Titan Distribution
OTR tyres product catalogue - Titan Distribution
OTR tyres product catalogue - Titan Distribution

You also want an ePaper? Increase the reach of your titles
YUMPU automatically turns print PDFs into web optimized ePapers that Google loves.
800.USA.BEAR<br />
Safety Information<br />
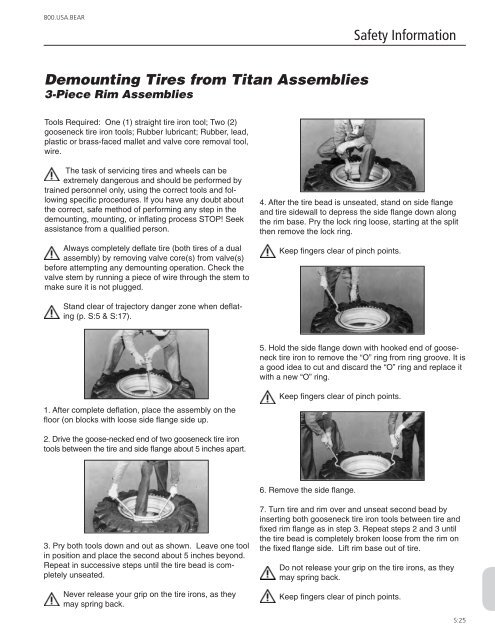
Demounting Tires from <strong>Titan</strong> Assemblies<br />
3-Piece Rim Assemblies<br />
Tools Required: One (1) straight tire iron tool; Two (2)<br />
gooseneck tire iron tools; Rubber lubricant; Rubber, lead,<br />
plastic or brass-faced mallet and valve core removal tool,<br />
wire.<br />
The task of servicing tires and wheels can be<br />
extremely dangerous and should be performed by<br />
trained personnel only, using the correct tools and following<br />
specific procedures. If you have any doubt about<br />
the correct, safe method of performing any step in the<br />
demounting, mounting, or inflating process STOP! Seek<br />
assistance from a qualified person.<br />
Always completely deflate tire (both tires of a dual<br />
assembly) by removing valve core(s) from valve(s)<br />
before attempting any demounting operation. Check the<br />
valve stem by running a piece of wire through the stem to<br />
make sure it is not plugged.<br />
4. After the tire bead is unseated, stand on side flange<br />
and tire sidewall to depress the side flange down along<br />
the rim base. Pry the lock ring loose, starting at the split<br />
then remove the lock ring.<br />
Keep fingers clear of pinch points.<br />
Stand clear of trajectory danger zone when deflating<br />
(p. S:5 & S:17).<br />
5. Hold the side flange down with hooked end of gooseneck<br />
tire iron to remove the “O” ring from ring groove. It is<br />
a good idea to cut and discard the “O” ring and replace it<br />
with a new “O” ring.<br />
1. After complete deflation, place the assembly on the<br />
floor (on blocks with loose side flange side up.<br />
Keep fingers clear of pinch points.<br />
2. Drive the goose-necked end of two gooseneck tire iron<br />
tools between the tire and side flange about 5 inches apart.<br />
6. Remove the side flange.<br />
3. Pry both tools down and out as shown. Leave one tool<br />
in position and place the second about 5 inches beyond.<br />
Repeat in successive steps until the tire bead is completely<br />
unseated.<br />
Never release your grip on the tire irons, as they<br />
may spring back.<br />
7. Turn tire and rim over and unseat second bead by<br />
inserting both gooseneck tire iron tools between tire and<br />
fixed rim flange as in step 3. Repeat steps 2 and 3 until<br />
the tire bead is completely broken loose from the rim on<br />
the fixed flange side. Lift rim base out of tire.<br />
Do not release your grip on the tire irons, as they<br />
may spring back.<br />
Keep fingers clear of pinch points.<br />
S:25