How to Setup OMS Studio Patches (1997) - House of Synth
How to Setup OMS Studio Patches (1997) - House of Synth
How to Setup OMS Studio Patches (1997) - House of Synth

You also want an ePaper? Increase the reach of your titles
YUMPU automatically turns print PDFs into web optimized ePapers that Google loves.
OPCODE<br />
<strong>OMS</strong> <strong>Studio</strong> <strong>Patches</strong>
TABLE OF CONTENTS<br />
Ch 1: <strong>Studio</strong> <strong>Patches</strong> Introduction 1<br />
What are <strong>Studio</strong> <strong>Patches</strong>?...................................................................................... 1<br />
Compatible MIDI Interfaces ............................................................................ 2<br />
Patch Documents ................................................................................................... 3<br />
Sequencing Patch Changes ................................................................................... 9<br />
Patch Edit Window ................................................................................................. 9<br />
Ch 2: Patch Modules 16<br />
Module Editing Basics .......................................................................................... 16<br />
MIDI Source Module............................................................................................. 17<br />
MIDI Destination Module ...................................................................................... 18<br />
Event Type Filter Module...................................................................................... 19<br />
Splitter Modules.................................................................................................... 21<br />
Transposer Module............................................................................................... 30<br />
Modifier Modules .................................................................................................. 32<br />
Control Number Mapper Module .......................................................................... 36<br />
Ch 3: Virtual Controllers and Virtual Instruments 38<br />
Using Virtual Controllers....................................................................................... 39<br />
Virtual Instruments................................................................................................ 44<br />
Ch 4: Program Change Sources 51<br />
Opening a Program Change Sources Edit Window ............................................. 51<br />
Program Change Sources Edit Window Terminology........................................... 52<br />
MIDI Source Module............................................................................................. 52<br />
Change <strong>Studio</strong> <strong>Patches</strong>........................................................................................ 53<br />
Enable <strong>Studio</strong> Patch Changes Module................................................................. 54<br />
Patch Chain Controls Module............................................................................... 56<br />
Ch 5: Patch Chains 58<br />
Opening a Patch Chain Edit Window ................................................................... 58<br />
Patch Chain Edit Window Terminology................................................................. 59<br />
Creating a Patch Chain ........................................................................................ 59<br />
Editing a Patch Chain ........................................................................................... 61<br />
Changing the Patch Document............................................................................. 63<br />
Using a Patch Chain............................................................................................. 64<br />
- i - <strong>Studio</strong> <strong>Patches</strong> Manual
Ch 6: Patch Sequences 66<br />
Creating/Editing Patch Sequences....................................................................... 66<br />
Sending All Notes Off Events ............................................................................... 70<br />
Patch Sequence Example .................................................................................... 71<br />
Defining the Start Sequence......................................................................... 71<br />
Defining the End Sequence .......................................................................... 73<br />
Ch 7: The Names Window 74<br />
Terminology .......................................................................................................... 74<br />
Name <strong>Setup</strong> Window............................................................................................ 76<br />
Names Menu ........................................................................................................ 82<br />
Patch Name Editing.............................................................................................. 84<br />
Patch Name Edi<strong>to</strong>r Ana<strong>to</strong>my ........................................................................ 85<br />
<strong>Patches</strong> Menu............................................................................................... 87<br />
Note and Control Names .............................................................................. 93<br />
Selecting Names .................................................................................................. 94<br />
Opening Files With Different Name <strong>Setup</strong>s.......................................................... 98<br />
Ch 8: Menu Reference 100<br />
File Menu............................................................................................................ 100<br />
Edit Menu ........................................................................................................... 101<br />
Patch Menu ........................................................................................................ 102<br />
Ch 9: Patch Ideas 105<br />
MIDI Merging ...................................................................................................... 105<br />
Band Routings .................................................................................................... 106<br />
<strong>Studio</strong> 5 Footswitch Ideas .................................................................................. 106<br />
Expressive Instruments ...................................................................................... 108<br />
One Finger Chords ............................................................................................. 109<br />
Bank Selection.................................................................................................... 109<br />
<strong>Studio</strong> Patch Problems ........................................................................................110<br />
- ii - <strong>Studio</strong> <strong>Patches</strong> Manual
CH 1:<br />
STUDIO PATCHES<br />
INTRODUCTION<br />
WHAT ARE STUDIO PATCHES?<br />
<strong>Studio</strong> <strong>Patches</strong> route (and process) MIDI data <strong>to</strong> and from instruments<br />
contained in your current <strong>Studio</strong> <strong>Setup</strong> document. <strong>Studio</strong><br />
<strong>Patches</strong>, which are created and edited with the <strong>Studio</strong> <strong>Patches</strong> Edi<strong>to</strong>r<br />
application, are s<strong>to</strong>red in Patch documents on your hard drive.<br />
Each Patch document may contain:<br />
• Up <strong>to</strong> 128 patches<br />
• Any number <strong>of</strong> Virtual Controllers<br />
• Any number <strong>of</strong> Virtual Instruments<br />
• Any number <strong>of</strong> Program Change Sources<br />
• A Patch Chain<br />
<strong>Patches</strong> can perform a wide range <strong>of</strong> MIDI processing and are constructed<br />
by connecting various modules <strong>to</strong>gether in the <strong>Studio</strong><br />
<strong>Patches</strong> Edi<strong>to</strong>r. The patch modules include splitters (for channels,<br />
note range, and velocities), modifiers (for velocity, mono/poly after<strong>to</strong>uch,<br />
and controller values), a transposer, and a control number<br />
mapper. The various patch modules are discussed in Chapter 2:<br />
Patch Modules.<br />
Virtual Controllers and Virtual Instruments are extremely powerful<br />
features <strong>of</strong> <strong>Studio</strong> <strong>Patches</strong>. A Virtual Controller is the output <strong>of</strong> a<br />
MIDI device plus some form <strong>of</strong> MIDI processing. A Virtual Instrument<br />
is some form <strong>of</strong> MIDI processing routed <strong>to</strong> one or more MIDI<br />
devices. Virtual Controllers and Virtual Instruments can be valuable<br />
aids for both sequencing and live performance. They’re discussed in<br />
Chapter 3: Virtual Controllers and Virtual Instruments.<br />
Program Change Sources allow you <strong>to</strong> specify various ways <strong>to</strong><br />
change <strong>Studio</strong> <strong>Patches</strong>. They’re discussed in Chapter 4: Program<br />
Change Sources.<br />
A Patch Chain is a sequence <strong>of</strong> patches that can be stepped through<br />
with a MIDI controller, or with the <strong>Studio</strong> 5’s optional footswitches.<br />
Ch 1: <strong>Studio</strong> <strong>Patches</strong> Introduction - 1 - <strong>Studio</strong> <strong>Patches</strong> Manual
<strong>Patches</strong> are strictly real-time, live-playing MIDI connections; they do<br />
not actually affect the MIDI data that an application sends or<br />
receives. MIDI applications will always receive from the sources <strong>to</strong><br />
which they are connected and be able <strong>to</strong> send <strong>to</strong> any destinations,<br />
regardless <strong>of</strong> what the current patch does.<br />
Since most sequencers provide MIDI thruing (routing) from within the<br />
application, you may wish <strong>to</strong> keep <strong>Studio</strong> Patch #1 as an “empty” or<br />
“do nothing” patch for use with sequencer programs.<br />
COMPATIBLE MIDI<br />
INTERFACES<br />
To use <strong>Studio</strong> <strong>Patches</strong> you must have an Opcode <strong>Studio</strong> 5, <strong>Studio</strong> 4,<br />
<strong>Studio</strong> 64X or <strong>Studio</strong> 64 XTC. Below are some important details, specific<br />
<strong>to</strong> each interface, that you should know.<br />
• <strong>Studio</strong> 5: The <strong>Studio</strong> 5 has built-in RAM that can s<strong>to</strong>re a <strong>Studio</strong> Patch<br />
document. This means that the <strong>Studio</strong> 5 can use <strong>Studio</strong> <strong>Patches</strong><br />
(recalled from its front panel) without being connected <strong>to</strong> a<br />
computer.<br />
• <strong>Studio</strong> 4: In order <strong>to</strong> use <strong>Studio</strong> <strong>Patches</strong>, this interface must be connected<br />
<strong>to</strong> your Macin<strong>to</strong>sh and an <strong>OMS</strong> application must be<br />
launched.<br />
<strong>Studio</strong> Patch processing occurs in addition <strong>to</strong> any processing performed<br />
by the <strong>Studio</strong> 4’s Routing, Channelizing and Muting<br />
Window. When first learning <strong>to</strong> use <strong>Studio</strong> <strong>Patches</strong>, you may want<br />
<strong>to</strong> disable all routings in this window.<br />
• <strong>Studio</strong> 64X, <strong>Studio</strong> 64 XTC: In order <strong>to</strong> use <strong>Studio</strong> <strong>Patches</strong>, this<br />
interface must be connected <strong>to</strong> your Macin<strong>to</strong>sh and an <strong>OMS</strong><br />
application must be launched.<br />
<strong>Studio</strong> Patch processing occurs in addition <strong>to</strong> any processing performed<br />
by the <strong>Studio</strong> 64X’s User/Preset Programs, as defined in the<br />
Program Edit Window. When first learning <strong>to</strong> use <strong>Studio</strong> <strong>Patches</strong>,<br />
you may want <strong>to</strong> disable all routings in this window.<br />
NOTE: Although <strong>Studio</strong> <strong>Patches</strong> require one <strong>of</strong> the above mentioned<br />
interfaces, you can use devices that aren’t attached <strong>to</strong> your interface<br />
(such as a SampleCell card) in Patch documents.<br />
Ch 1: <strong>Studio</strong> <strong>Patches</strong> Introduction - 2 - <strong>Studio</strong> <strong>Patches</strong> Manual
PATCH DOCUMENTS<br />
This section discusses the terminology and techniques for working<br />
with Patch documents.<br />
Balloon help is available from the <strong>Studio</strong> <strong>Patches</strong> Edi<strong>to</strong>r application.<br />
See your Macin<strong>to</strong>sh documentation if you don’t know how <strong>to</strong> access<br />
balloon help. In addition, you can hold down the shift, option, and<br />
command keys and point <strong>to</strong> any field, icon, but<strong>to</strong>n, or menu item for<br />
pop-up help.<br />
Open the <strong>Studio</strong> <strong>Patches</strong> Edi<strong>to</strong>r application by double-clicking its<br />
icon.<br />
OPENING A NEW<br />
PATCH DOCUMENT<br />
Open a new Patch document by choosing File>New Patch Document<br />
(or type command-N).<br />
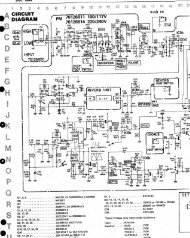
Figure 1: Patch Document Window<br />
Ch 1: <strong>Studio</strong> <strong>Patches</strong> Introduction - 3 - <strong>Studio</strong> <strong>Patches</strong> Manual
PATCH DOCUMENT<br />
WINDOW<br />
TERMINOLOGY<br />
When you open a new Patch Document Window, you’ll see four but<strong>to</strong>ns<br />
under the title bar. From left <strong>to</strong> right these represent Virtual<br />
Controllers, Virtual Instruments, Program Change Sources, and the<br />
Patch Chain. Each <strong>of</strong> these but<strong>to</strong>ns will be discussed later in this<br />
manual. Below the but<strong>to</strong>ns is a line for the first patch in the document.<br />
This line consists <strong>of</strong> a selec<strong>to</strong>r dot, a diamond <strong>to</strong> indicate the<br />
current patch, the program (or patch) number and a Name/Description<br />
field that can hold as much text as needed <strong>to</strong> describe the<br />
operation <strong>of</strong> that patch.<br />
<br />
<br />
<br />
<br />
<br />
Figure 2: Ana<strong>to</strong>my <strong>of</strong> a Patch Document Window<br />
Virtual Controllers But<strong>to</strong>n<br />
Virtual Instruments But<strong>to</strong>n<br />
Program Change Source But<strong>to</strong>n<br />
Patch Chain But<strong>to</strong>n<br />
Current Patch Selec<strong>to</strong>r<br />
Selec<strong>to</strong>r Dot<br />
Current Patch Indica<strong>to</strong>r<br />
Patch Number<br />
Patch Description Field<br />
You can have any number <strong>of</strong> Patch documents open at one time, but<br />
only one document can be the current Patch document. The current<br />
Patch document is indicated by a diamond next <strong>to</strong> its name.<br />
Ch 1: <strong>Studio</strong> <strong>Patches</strong> Introduction - 4 - <strong>Studio</strong> <strong>Patches</strong> Manual
Diamond indicates current Patch document<br />
No diamond indicates Patch document is not<br />
current<br />
Figure 3: Indicating Current Patch Document<br />
The current Patch document always reflects the exact state <strong>of</strong> the<br />
<strong>Studio</strong> <strong>Patches</strong> driver. Any changes made <strong>to</strong> a current Patch document<br />
take effect immediately in the connected interface.<br />
NOTE: When using a <strong>Studio</strong> 5, making a Patch document current<br />
sends the patches in that document immediately <strong>to</strong> the interface.<br />
Patch documents are based on the devices defined in the current<br />
<strong>Studio</strong> <strong>Setup</strong> document. If you make a different <strong>Studio</strong> <strong>Setup</strong> document<br />
current, your current Patch document may not know about the<br />
devices in the new <strong>Studio</strong> <strong>Setup</strong> document. Similarly, the new <strong>Studio</strong><br />
<strong>Setup</strong> document may not know about the devices referenced by the<br />
current Patch document.<br />
NOTE: If you create two identical <strong>Studio</strong> <strong>Setup</strong> documents, with<br />
identical names for identical instruments on identical ports, <strong>Studio</strong><br />
<strong>Patches</strong> will see the devices as different unless you copy and paste<br />
the devices between the two documents.<br />
Ch 1: <strong>Studio</strong> <strong>Patches</strong> Introduction - 5 - <strong>Studio</strong> <strong>Patches</strong> Manual
MAKING PATCH<br />
DOCUMENTS<br />
CURRENT<br />
Choose File>Save And Make Current <strong>to</strong> make a Patch document<br />
current.<br />
You’ll see a standard Macin<strong>to</strong>sh “Save As” dialog box. Save the file<br />
in the same folder as your <strong>Studio</strong> <strong>Patches</strong> Edi<strong>to</strong>r application. A diamond<br />
appears next <strong>to</strong> the Patch document’s name indicating that it<br />
is now the current Patch document.<br />
NOTE: If a Patch document has already been saved, the Save And<br />
Make Current command becomes a Make Current command.<br />
ADDING PATCHES<br />
TO A PATCH<br />
DOCUMENT<br />
Choose Patch>New Patch (or type command-P) <strong>to</strong> add a new patch<br />
<strong>to</strong> the document.<br />
Figure 4: Adding a Patch<br />
SELECTING<br />
PATCHES<br />
Unselected patches have a bullet dot <strong>to</strong> their far left. This is the patch<br />
selec<strong>to</strong>r dot. Selected patches have a small triangle instead <strong>of</strong> a bullet<br />
dot.<br />
Click a patch’s selec<strong>to</strong>r dot <strong>to</strong> select a patch; the bullet will turn in<strong>to</strong> a<br />
triangle.<br />
Figure 5: Selecting a Patch<br />
Shift-click other selec<strong>to</strong>r dots <strong>to</strong> select additional patches.<br />
Ch 1: <strong>Studio</strong> <strong>Patches</strong> Introduction - 6 - <strong>Studio</strong> <strong>Patches</strong> Manual
MAKING PATCHES<br />
CURRENT<br />
The diamond <strong>to</strong> the right <strong>of</strong> the selec<strong>to</strong>r dot is the current patch<br />
selec<strong>to</strong>r. You make a patch current by clicking in the column where<br />
the diamond would appear, or by selecting a patch and choosing<br />
Patch>Recall Patch (command-R).<br />
The current patch is the patch that is being used by <strong>Studio</strong> <strong>Patches</strong><br />
and the connected interface.<br />
Figure 6: Making a Patch the Current Patch<br />
COPYING AND<br />
PASTING PATCHES<br />
You can copy and paste patches <strong>to</strong> new locations. If, in the following<br />
example, you wanted <strong>to</strong> copy patch #3 as the basis for building a<br />
new patch, you would:<br />
Click Patch #3’s selec<strong>to</strong>r dot <strong>to</strong> select it and then choose Edit>Copy.<br />
Choose Edit>Paste.<br />
Patch #3 is copied <strong>to</strong> the next available patch location which, in this case, is<br />
Patch #4. Patch #4 is now an exact duplicate <strong>of</strong> Patch #3.<br />
Ch 1: <strong>Studio</strong> <strong>Patches</strong> Introduction - 7 - <strong>Studio</strong> <strong>Patches</strong> Manual
<strong>Patches</strong> can also be cut <strong>to</strong> the Clipboard, for pasting <strong>to</strong> another Patch<br />
document, or cleared.<br />
NOTE: When a Patch Document Window is active, the Paste command<br />
always pastes a patch <strong>to</strong> the first undefined patch. You cannot<br />
paste a copied patch <strong>to</strong> an existing patch.<br />
CHANGING PATCH<br />
ORDER<br />
You can rearrange patches by option-click-dragging a patch <strong>to</strong> a new<br />
location. In Figure 7, the Patch document shown in A is re-ordered<br />
by option-clicking Patch 2 (as shown in B), dragging it between<br />
<strong>Patches</strong> 4 and 5 (as shown in C), and releasing the mouse (as shown<br />
in D).<br />
A<br />
B<br />
C<br />
D<br />
Figure 7: Re-ordering <strong>Patches</strong><br />
If you want <strong>to</strong> view your Patch document in numerical order, select<br />
Patch>Sort by Patch Number. This places a check mark <strong>to</strong> the left <strong>of</strong><br />
the option. <strong>Patches</strong> will always be displayed in numerical order as<br />
long as Sort by Patch Number is checked. Selecting the command<br />
again will uncheck it. <strong>Patches</strong> can be displayed in any order when<br />
Sort by Patch Number is unchecked.<br />
Ch 1: <strong>Studio</strong> <strong>Patches</strong> Introduction - 8 - <strong>Studio</strong> <strong>Patches</strong> Manual
SEQUENCING PATCH CHANGES<br />
You can switch <strong>Studio</strong> <strong>Patches</strong> from an <strong>OMS</strong>-compatible MIDI<br />
sequencer.<br />
If <strong>Studio</strong> <strong>Patches</strong> is installed, <strong>OMS</strong> always adds a device called<br />
“<strong>Studio</strong> <strong>Patches</strong> pgm chg” <strong>to</strong> your <strong>Studio</strong> <strong>Setup</strong> document. You can<br />
send program changes <strong>to</strong> this device on MIDI channel 16 <strong>to</strong> change<br />
the current <strong>Studio</strong> Patch. The main purpose <strong>of</strong> this device is <strong>to</strong> let<br />
you sequence <strong>Studio</strong> Patch changes from a sequencer. To do so:<br />
Launch an <strong>OMS</strong>-compatible sequencer.<br />
Choose the “<strong>Studio</strong> <strong>Patches</strong> pgm chg” device as the record sequence’s MIDI<br />
destination.<br />
Record MIDI program changes in<strong>to</strong> the sequencer.<br />
Play back the sequence. <strong>Studio</strong> <strong>Patches</strong> will change with each MIDI Program<br />
change.<br />
PATCH EDIT WINDOW<br />
This section discusses the terminology and techniques for working<br />
with Patch Edit Windows.<br />
OPENING A<br />
PATCH EDIT<br />
WINDOW<br />
Select a patch and choose Patch>Edit Patch, or double-click its selec<strong>to</strong>r<br />
dot. A Patch Edit Window will open.<br />
Figure 8: Empty Patch Edit Window<br />
PATCH EDIT<br />
WINDOW<br />
TERMINOLOGY<br />
Module Icons<br />
Patch Editing Area<br />
Modules<br />
Connections (all the connections in the patch editing<br />
area comprise one “patch.”)<br />
Figure 9: Ana<strong>to</strong>my <strong>of</strong> a Patch Edit Window<br />
Ch 1: <strong>Studio</strong> <strong>Patches</strong> Introduction - 9 - <strong>Studio</strong> <strong>Patches</strong> Manual
Figure 9 illustrates a basic Patch Edit Window. The window contains<br />
a row <strong>of</strong> module icons across the <strong>to</strong>p <strong>of</strong> the screen. Each <strong>of</strong> these<br />
icons represents a MIDI Source, MIDI Destination, or MIDI Processing<br />
module. The row <strong>of</strong> module icons is called a module palette. The<br />
patch editing area contains “connections,” each <strong>of</strong> which comprises a<br />
MIDI Source module and all modules connected <strong>to</strong> its right. Any<br />
amount <strong>of</strong> MIDI processing can be applied <strong>to</strong> any connection. A<br />
patch is made up <strong>of</strong> all the connections in the patch editing area.<br />
IMPORTANT: Since most sequencers control MIDI thruing (routing)<br />
from within the application, it’s useful <strong>to</strong> keep patch #1 as an “empty”<br />
or “do nothing” patch for use with sequencer programs.<br />
CREATING<br />
CONNECTIONS<br />
This section discusses the techniques needed <strong>to</strong> create connections.<br />
Don’t worry if you don’t understand the function <strong>of</strong> each module,<br />
they’ll be discussed in Chapter 2: Patch Modules.<br />
Click the leftmost module icon in the module palette.<br />
This is the MIDI Source (or controller) icon. When you click it, its name is shown <strong>to</strong><br />
the right <strong>of</strong> the module palette.<br />
Move the cursor in<strong>to</strong> the patch editing area.<br />
The cursor becomes a MIDI Source module icon.<br />
Click in the patch editing area <strong>to</strong> create an undefined connection.<br />
A connection appears as a selec<strong>to</strong>r dot along with some number <strong>of</strong> connected<br />
modules. Every connection needs both a MIDI Source and a MIDI Destination<br />
module (MIDI Source and Destination modules are explained in Chapter 2: Patch<br />
Modules). When a MIDI Source module is first placed in the patch editing area,<br />
Ch 1: <strong>Studio</strong> <strong>Patches</strong> Introduction - 10 - <strong>Studio</strong> <strong>Patches</strong> Manual
oth an undefined MIDI Source module and an undefined MIDI Destination module<br />
appear. Each module contains a question mark until you choose a device from its<br />
pop-up menu.<br />
Click on the triangle <strong>to</strong> the right <strong>of</strong> the MIDI Source module’s question mark <strong>to</strong> see<br />
a pop-up menu <strong>of</strong> devices defined in your current <strong>Studio</strong> <strong>Setup</strong> document.<br />
Select a device from the pop-up menu.<br />
Click the pop-up menu in the MIDI Destination module and choose a destination<br />
device.<br />
You’ve created a simple connection; the K2000 sends MIDI data<br />
directly <strong>to</strong> Channel 1 <strong>of</strong> the CZ-101. When you play the K2000, the<br />
CZ-101 will play on MIDI Channel 1.<br />
ADDING MIDI<br />
PROCESSING<br />
Use MIDI processing modules <strong>to</strong> filter, split, transpose, modify or<br />
map MIDI data in a variety <strong>of</strong> ways. In the following example, you’ll<br />
add a Velocity Modifier module <strong>to</strong> your connection. Velocity Modifier<br />
modules (and other MIDI processing modules) are discussed in<br />
Chapter 2: Patch Modules.<br />
Ch 1: <strong>Studio</strong> <strong>Patches</strong> Introduction - 11 - <strong>Studio</strong> <strong>Patches</strong> Manual
Click the Velocity Modifier module icon (the little hammer) in the module palette. Its<br />
name is shown <strong>to</strong> the right <strong>of</strong> the module palette.<br />
Move the cursor in<strong>to</strong> the patch editing area. The cursor will become a Velocity<br />
Modifier module icon (little hammer).<br />
Position the cursor over the space between the MIDI Source and MIDI Destination<br />
modules. The area becomes highlighted.<br />
Click the mouse <strong>to</strong> insert the module.<br />
SELECTING<br />
MODULES AND<br />
CONNECTIONS<br />
You can select a module or group <strong>of</strong> modules for cutting, copying, or<br />
pasting. To select a module, click anywhere within it that isn’t a control<br />
(like a device menu or channel numerical). A selected MIDI<br />
Source or MIDI Destination module will have a thick border. A<br />
selected MIDI processing module becomes highlighted.<br />
Figure 10: Unselected Modules<br />
Figure 11: Single Selected Module<br />
Ch 1: <strong>Studio</strong> <strong>Patches</strong> Introduction - 12 - <strong>Studio</strong> <strong>Patches</strong> Manual
Shift-clicking a second module when one is already selected will<br />
select the second module and all modules between it and the first<br />
one.<br />
Figure 12: Shift-Clicking a Second Module<br />
You can also select multiple modules by clicking in the white space<br />
around them and dragging a rectangle. All modules that intersect<br />
the rectangle become selected.<br />
Figure 13: Dragging <strong>to</strong> Select Modules<br />
You can select all modules in a connection by clicking the selec<strong>to</strong>r<br />
dot <strong>to</strong> the left <strong>of</strong> the modules.<br />
Figure 14: Selecting All Modules<br />
Command-clicking modules either adds or removes them from the<br />
selection. An unselected module becomes selected, a selected<br />
module becomes deselected. In the example, below, command-click<br />
the Velocity Modifier module <strong>to</strong> deselect it.<br />
Figure 15: Command-Click <strong>to</strong> Deselect Modules<br />
Ch 1: <strong>Studio</strong> <strong>Patches</strong> Introduction - 13 - <strong>Studio</strong> <strong>Patches</strong> Manual
COPYING/PASTING<br />
MODULES AND<br />
CONNECTIONS<br />
You may cut, copy, or clear selected modules. You cannot, however,<br />
cut or clear a Splitter module if it has more than one output. To<br />
remove a Splitter module, you must first remove either all or all but<br />
one <strong>of</strong> its outputs.<br />
You can paste a copied module <strong>to</strong> a new location by clicking the<br />
desired location and selecting Edit>Paste. The contents <strong>of</strong> the Clipboard<br />
are inserted in<strong>to</strong> the selected space.<br />
Click on the Velocity Modifier module <strong>to</strong> select it, then choose Edit>Copy.<br />
Place an insertion point between the Splitter module and the Morpheus<br />
Destination module by clicking the blank space between them (the space becomes<br />
highlighted).<br />
Choose Edit>Paste <strong>to</strong> paste a copy <strong>of</strong> the Velocity Modifier module (with all <strong>of</strong> its<br />
parameters).<br />
You may copy and paste entire connections without selecting a paste<br />
destination. The pasted connection appears below all other connections<br />
in the patch editing area.<br />
You may also clear selected modules and connections, or cut them <strong>to</strong><br />
the Clipboard.<br />
CHANGING<br />
CONNECTION<br />
ORDER<br />
You can rearrange the patch editing area by option-dragging any<br />
connection’s selec<strong>to</strong>r dot.<br />
Option-click the <strong>to</strong>p connection’s selec<strong>to</strong>r dot.<br />
Ch 1: <strong>Studio</strong> <strong>Patches</strong> Introduction - 14 - <strong>Studio</strong> <strong>Patches</strong> Manual
While still holding the mouse but<strong>to</strong>n, drag the entire connection below the lower<br />
connection. Release the mouse but<strong>to</strong>n <strong>to</strong> see the new connection order.<br />
SOURCE/<br />
DESTINATION<br />
MUTING<br />
You can mute any number <strong>of</strong> MIDI Source or Destination modules.<br />
Muting Source and Destination modules allows you <strong>to</strong> concentrate<br />
on specific sections <strong>of</strong> complex patches.<br />
To mute a MIDI Source module or MIDI Destination module,<br />
double-click its device icon. The module is dimmed. To unmute the<br />
module, double-click its device icon again.<br />
As an example, suppose you have the connection shown in<br />
Figure 16.<br />
Figure 16: Simple Connection<br />
Double-click the DR-660 device icon <strong>to</strong> mute the module.<br />
When you play the K2000, only the Morpheus is heard.<br />
Double-click the DR-660 device icon <strong>to</strong> enable the module, then double-click the<br />
K2000 device icon <strong>to</strong> mute that MIDI Source module.<br />
Anything you play or do on the K2000 is ignored by the Morpheus and DR-660<br />
modules.<br />
NOTE: To mute a source or destination, be sure <strong>to</strong> double-click the<br />
device icon, not the device name.<br />
The Solo and Unsolo commands in the Patch menu are also useful in<br />
this regard. Soloing mutes all other destinations in the connection.<br />
When you are done soloing, choose Unsolo <strong>to</strong> re-enable all destinations<br />
in a patch.<br />
Ch 1: <strong>Studio</strong> <strong>Patches</strong> Introduction - 15 - <strong>Studio</strong> <strong>Patches</strong> Manual
CH 2:<br />
PATCH MODULES<br />
This chapter describes how <strong>to</strong> configure and use each <strong>of</strong> the modules<br />
in the Module Palette.<br />
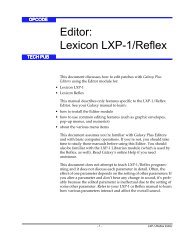
Note Range Splitter<br />
Simple Splitter<br />
Pitch Bend Modifier<br />
After<strong>to</strong>uch Modifier<br />
MIDI Source<br />
Transposer<br />
Control Number Mapper<br />
Event Type Filter Velocity Splitter<br />
Channel Splitter Velocity Modifier<br />
Poly After<strong>to</strong>uch Modifier<br />
Figure 17: Ana<strong>to</strong>my <strong>of</strong> a Module Palette<br />
MIDI Destination<br />
Control Value Modifier<br />
MODULE EDITING BASICS<br />
You can edit a module once it’s part <strong>of</strong> a connection. Adding modules<br />
<strong>to</strong> connections was discussed in Chapter 1: <strong>Studio</strong> <strong>Patches</strong><br />
Introduction. To access the editing window <strong>of</strong> any module (except<br />
the MIDI Source module, MIDI Destination module, or Simple Splitter<br />
module) simply double-click the module in a connection.<br />
You can edit most modules using numerical editing techniques (as<br />
discussed in your <strong>OMS</strong> manual). You can also edit the following<br />
parameters from a MIDI controller:<br />
• Control number selection in any highlighted control number pop-up<br />
menu<br />
• Transposer map note numbers<br />
• Note numbers in a Note Range Splitter module<br />
• Velocity levels in a Velocity Splitter module<br />
Select the device (or devices) you’ll use for MIDI editing by choosing<br />
Windows>Controllers for MIDI Editing. This produces a dialog<br />
containing a list <strong>of</strong> all devices defined in your current <strong>Studio</strong> <strong>Setup</strong><br />
document. Select (highlight) those items you wish <strong>to</strong> enable for MIDI<br />
data entry. If you don’t plan <strong>to</strong> use a MIDI controller <strong>to</strong> edit patches,<br />
it’s best <strong>to</strong> disable all controllers. That way you can’t accidentally<br />
edit a module by playing your MIDI controller.<br />
The following sections discuss each module in detail.<br />
Ch 2: Patch Modules - 16 - <strong>Studio</strong> <strong>Patches</strong> Manual
MIDI SOURCE MODULE<br />
Figure 18: MIDI Source Module<br />
As its name implies, a MIDI Source module represents a source <strong>of</strong><br />
MIDI data. Use the MIDI Source module <strong>to</strong> choose which device’s<br />
MIDI output you wish <strong>to</strong> route <strong>to</strong> other devices. When you first<br />
insert a MIDI Source module, a question mark appears. To define a<br />
MIDI Source module:<br />
Click anywhere <strong>to</strong> the right <strong>of</strong> the question mark <strong>to</strong> open a pop-up source menu.<br />
This menu contains all sources as defined in the current <strong>Studio</strong> <strong>Setup</strong> document. It<br />
also contains any Virtual Controllers that are defined in the current Patch document<br />
(Virtual Controllers are discussed in Chapter 3: Virtual Controllers and Virtual<br />
Instruments).<br />
Choose a source from the pop-up menu <strong>to</strong> define the MIDI Source module.<br />
A <strong>Studio</strong> <strong>Patches</strong> compatible interface can also be a source <strong>of</strong> MIDI<br />
data, which can come from timing information (MTC, DTL, DTLe),<br />
footswitches (FS1, FS2), and foot controllers (FC1). The <strong>Studio</strong> 5 can<br />
even act as a note source when Audio In is enabled and in use. Select<br />
the interface as the MIDI source if you wish <strong>to</strong> use timing data, footswitches,<br />
the foot controller, or Audio Input in a <strong>Studio</strong> Patch.<br />
You can change the source assigned <strong>to</strong> a MIDI Source module at any<br />
time by clicking the name and choosing a new source from the<br />
pop-up menu.<br />
REFERENCING<br />
NON-CURRENT<br />
STUDIO SETUP<br />
DOCUMENTS<br />
MIDI Source modules reference the devices in the current <strong>Studio</strong><br />
<strong>Setup</strong> document. If the device name in a MIDI Source module is italicized,<br />
then the Patch document being edited probably references a<br />
non-current <strong>Studio</strong> <strong>Setup</strong> document. You can re-define the module<br />
by:<br />
• making the old <strong>Studio</strong> <strong>Setup</strong> document current, or<br />
• by selecting a different device for every module that is italicized.<br />
If you want <strong>to</strong> use the current Patch document with your new current<br />
<strong>Studio</strong> <strong>Setup</strong> document, copy the devices from your original<br />
<strong>Studio</strong> <strong>Setup</strong> document in<strong>to</strong> your current <strong>Studio</strong> <strong>Setup</strong> document, or<br />
just rename the devices in the new <strong>Studio</strong> <strong>Setup</strong> <strong>to</strong> match the old<br />
ones.<br />
Ch 2: Patch Modules - 17 - <strong>Studio</strong> <strong>Patches</strong> Manual
MIDI DESTINATION MODULE<br />
Figure 19: MIDI Destination Module<br />
A MIDI Destination module represents the device (or virtual destination)<br />
that is the final recipient <strong>of</strong> MIDI data. When you first insert<br />
a MIDI Destination module, a question mark appears. To define a<br />
MIDI destination:<br />
• Click anywhere <strong>to</strong> the right <strong>of</strong> the question mark <strong>to</strong> open a pop-up<br />
destination menu. This menu contains all destinations as defined in<br />
the current <strong>Studio</strong> <strong>Setup</strong> document. It also contains any Virtual<br />
Instruments that are defined in the current Patch document (Virtual<br />
Instruments are discussed in Chapter 3: Virtual Controllers and Virtual<br />
Instruments).<br />
• Choose a device or virtual destination from the pop-up menu <strong>to</strong><br />
define the MIDI Destination module.<br />
You can change the device or virtual destination assigned <strong>to</strong> a MIDI<br />
Destination module at any time by clicking the name and choosing a<br />
new destination from the pop-up menu.<br />
Use the MIDI Destination module’s channel numerical <strong>to</strong> channelize<br />
MIDI data. Set it <strong>to</strong> a value <strong>of</strong> 1-16 <strong>to</strong> channelize the incoming MIDI<br />
data. Set it <strong>to</strong> dash (“-”) if you do not want <strong>to</strong> change the incoming<br />
MIDI channel number. Figure 20 illustrates use <strong>of</strong> the MIDI channel<br />
numerical.<br />
Ch 5<br />
Ch 5 input gets changed <strong>to</strong> Ch 8.<br />
The ProMaker/1 plays the voice<br />
assigned <strong>to</strong> MIDI Ch 8.<br />
Ch 5<br />
Ch 5 input does not get changed.<br />
The ProMaker/1 plays the voice<br />
assigned <strong>to</strong> MIDI Ch 5.<br />
Figure 20: Destination Module Channelizing Example<br />
MIDI Destination modules, like MIDI Source modules, reference the<br />
current <strong>Studio</strong> <strong>Setup</strong> document. If device names are italicized, the<br />
MIDI Destination module probably references a non-current <strong>Studio</strong><br />
<strong>Setup</strong> document. See Referencing Non-Current <strong>Studio</strong> <strong>Setup</strong> Documents,<br />
pg. 17 for more details.<br />
Ch 2: Patch Modules - 18 - <strong>Studio</strong> <strong>Patches</strong> Manual
EVENT TYPE FILTER MODULE<br />
Figure 21: Event Type Filter Module<br />
An Event Type Filter module removes various types <strong>of</strong> MIDI events<br />
from the data stream. Double-click its icon after inserting it in<strong>to</strong> the<br />
connection. You’ll see a dialog box similar <strong>to</strong> the one shown in<br />
Figure 22.<br />
Figure 22: Event Type Filter Edit Window<br />
The three radio but<strong>to</strong>ns control whether the filter will Pass All<br />
events (useful for temporarily disabling the filter), Pass Only certain<br />
types <strong>of</strong> events, or Pass All Except certain events.<br />
Checked boxes remove those event types when Pass All Except is<br />
chosen. Checked boxes pass those event types through the filter<br />
when Pass Only is chosen.<br />
In Figure 23, only notes are passed through the Event Type Filter<br />
module. All other MIDI events are filtered out.<br />
Figure 23: Passing Only Notes Through Filter<br />
You can filter up <strong>to</strong> seven MIDI continuous controls; choose them<br />
from the pop-up menus next <strong>to</strong> the rightmost column <strong>of</strong> check boxes.<br />
Ch 2: Patch Modules - 19 - <strong>Studio</strong> <strong>Patches</strong> Manual
Most message types are self-explana<strong>to</strong>ry. “Beat Clock” includes<br />
Song Position Pointer, Song Select, Timing Clock, Start, S<strong>to</strong>p, and<br />
Continue messages. “Misc. System” includes Tune Request, System<br />
Reset, and undefined MIDI status bytes 0xF4, 0xF5, 0xF9, and 0xFD.<br />
TIP: The Event Type Filter module is useful for “thinning” the MIDI<br />
data stream prior <strong>to</strong> sending it <strong>to</strong> a Splitter module (discussed in the<br />
following section). A Splitter module can and <strong>of</strong>ten does increase the<br />
amount <strong>of</strong> MIDI data, so it’s desirable <strong>to</strong> remove unwanted data<br />
before it’s duplicated by a Splitter module.<br />
NOTE: DTL, DTLe, Full Messages and User Bits messages will not<br />
pass properly through an Event Type Filter unless System Exclusive<br />
events are allowed <strong>to</strong> pass. Also, DTL and DTLe will not pass<br />
through unless clock is also passed.<br />
EVENT TYPE<br />
FILTER MODULE<br />
EXAMPLE<br />
Assume that you want your K2000 keyboard <strong>to</strong> play the Morpheus,<br />
but that you don’t want the Morpheus <strong>to</strong> respond <strong>to</strong> polyphonic<br />
after<strong>to</strong>uch data.<br />
Choose Patch>New Patch.<br />
Double-click the new patch’s selec<strong>to</strong>r dot <strong>to</strong> open a blank Patch Edit Window.<br />
Click the MIDI Source module, then move the cursor in<strong>to</strong> the patch editing area<br />
and click. You will create an undefined connection.<br />
Choose the K2000 from the pop-up MIDI source menu and the Morpheus from the<br />
pop-up MIDI destination menu (these synthesizers may not be in your <strong>Studio</strong><br />
<strong>Setup</strong> document, but are presented here as an example).<br />
Click the Event Type Filter module, and move the cursor between the Source and<br />
Destination modules. The area becomes highlighted.<br />
Click the mouse <strong>to</strong> insert the Event Type Filter module.<br />
Double-click the Event Type Filter module <strong>to</strong> open its edit window.<br />
Ch 2: Patch Modules - 20 - <strong>Studio</strong> <strong>Patches</strong> Manual
Choose Pass All Except and check the Poly After<strong>to</strong>uch box <strong>to</strong> pass all MIDI<br />
events except polyphonic after<strong>to</strong>uch through <strong>to</strong> the Morpheus sound module.<br />
Figure 24: Filtering Poly After<strong>to</strong>uch<br />
Choose File>Save.<br />
In the future, when you need <strong>to</strong> play the Morpheus with polyphonic<br />
after<strong>to</strong>uch data filtered out, you can select this patch.<br />
SPLITTER MODULES<br />
Figure 25: Splitter Module Group<br />
A Splitter module takes a single MIDI source and sends it <strong>to</strong> multiple<br />
destinations. There are four kinds <strong>of</strong> Splitter modules:<br />
• Simple<br />
• Channel<br />
• Note Range<br />
• Velocity<br />
If any Splitter module routes two or more <strong>of</strong> its outputs <strong>to</strong> the same<br />
channel <strong>of</strong> the same device, <strong>Studio</strong> <strong>Patches</strong> ensures that the destination<br />
device and channel do not receive duplicate MIDI data. If,<br />
however, you modify one <strong>of</strong> the splitter output’s MIDI data streams,<br />
then the destination device and channel receives both the original<br />
MIDI stream and the modified events generated by the second MIDI<br />
stream from the splitter.<br />
For example, if you simply split a MIDI data stream in<strong>to</strong> two separate<br />
streams then route both streams <strong>to</strong> the same device and channel,<br />
<strong>Studio</strong> <strong>Patches</strong> ensures that only one stream reaches the destination.<br />
But, if you modify one <strong>of</strong> the streams (such as transposing a stream<br />
up an octave) before routing both streams <strong>to</strong> the same device and<br />
Ch 2: Patch Modules - 21 - <strong>Studio</strong> <strong>Patches</strong> Manual
channel, <strong>Studio</strong> <strong>Patches</strong> allows both MIDI data streams <strong>to</strong> reach their<br />
destination since they are no longer identical. In this example, notes<br />
and polyphonic after<strong>to</strong>uch events are both affected by transposition<br />
and are both sent <strong>to</strong> the destination; other events (such as sustain<br />
pedal or pitch bend) are sent <strong>to</strong> the destination only once.<br />
If, for any reason, you wish <strong>to</strong> send duplicate MIDI events <strong>to</strong> the<br />
same channel <strong>of</strong> the same device, split the controller in<strong>to</strong> two Virtual<br />
Controllers and route them separately. Virtual Controllers are discussed<br />
in Chapter 3: Virtual Controllers and Virtual Instruments.<br />
This discussion on Splitter modules will first cover common Splitter<br />
editing techniques and then describe each <strong>of</strong> the four Splitter modules<br />
in detail.<br />
ADDING OUTPUTS<br />
TO A SPLITTER<br />
MODULE<br />
When you first insert a Splitter module in<strong>to</strong> a connection, it doesn’t<br />
perform as a splitter since it has only one output. <strong>How</strong>ever, you may<br />
still use it <strong>to</strong> limit the range <strong>of</strong> notes, velocities or channels sent <strong>to</strong> a<br />
single device.<br />
Figure 26: Note Range Splitter With One Output<br />
To create a second output from the Splitter module:<br />
Click any module icon in the palette (except the MIDI Source module icon).<br />
Position the cursor below the Splitter module <strong>to</strong> highlight the area.<br />
Figure 27: Adding Additional Splitter Outputs<br />
Click the mouse and the connection appears as shown in Figure 28.<br />
Figure 28: Splitter With Two Outputs<br />
Choose a device for the second destination module.<br />
You can add as many outputs as necessary underneath the splitter<br />
using the same techniques.<br />
Ch 2: Patch Modules - 22 - <strong>Studio</strong> <strong>Patches</strong> Manual
Assume, for example, that your <strong>Studio</strong> <strong>Setup</strong> document looks like<br />
the one shown in Figure 31, and that you want <strong>to</strong> edit Note Range<br />
Splitter modules and Velocity Splitter modules using either your<br />
K2000 keyboard or your Octapad.<br />
Figure 31: Sample <strong>Studio</strong> <strong>Setup</strong> Document<br />
In the <strong>Studio</strong> <strong>Patches</strong> Edi<strong>to</strong>r, choose Windows>Controllers for MIDI Editing <strong>to</strong><br />
open a dialog containing a list <strong>of</strong> all devices defined in your current <strong>Studio</strong> <strong>Setup</strong><br />
document.<br />
Figure 32: MIDI Entry Controller Selection Window<br />
Select the K2000 and Octapad by clicking them. Checked devices are enabled for<br />
MIDI entry <strong>of</strong> notes and velocities. Unchecked devices are not enabled.<br />
Figure 33: Selecting Controllers for MIDI Entry <strong>of</strong> Notes and Velocities<br />
Ch 2: Patch Modules - 24 - <strong>Studio</strong> <strong>Patches</strong> Manual
You can now use either the K2000 or Octapad <strong>to</strong> enter note and<br />
velocity data in<strong>to</strong> patch editing modules. Simply highlight a note or<br />
velocity numerical and hit a note on either controller—this will set<br />
the numerical <strong>to</strong> the MIDI value generated by the master controller.<br />
GANG EDITING<br />
NOTE RANGE AND<br />
VELOCITY<br />
SPLITTERS<br />
In both the Note Range and Velocity splitter modules, you can edit<br />
multiple outputs simultaneously by holding down the shift key<br />
while you make changes <strong>to</strong> one <strong>of</strong> the outputs. This is called “gang<br />
editing.” Gang editing affects those outputs that are either equal <strong>to</strong><br />
or within a value <strong>of</strong> “1” from the edited output. This makes gang<br />
editing particularly useful for editing one splitter output’s high limit<br />
by the same amount as the other output’s low limit.<br />
Suppose, for example, that you have designed the patch shown in<br />
Figure 34, but that the velocity split point (set at 63/64) is <strong>to</strong>o low.<br />
You want <strong>to</strong> raise the split point <strong>to</strong> 85/86.<br />
Figure 34: Velocity Split Patch<br />
Shift-click the <strong>to</strong>p output’s Hi velocity value and drag the mouse up<br />
until the numerical is set for 85. The bot<strong>to</strong>m output’s Lo velocity<br />
value changes au<strong>to</strong>matically <strong>to</strong> a value <strong>of</strong> 86.<br />
Figure 35: Gang Editing Velocity Split Points<br />
SIMPLE SPLITTER<br />
MODULE<br />
Figure 36: Simple Splitter Module<br />
A Simple Splitter module sends one MIDI source <strong>to</strong> multiple destinations.<br />
A Simple Splitter module has no edit window.<br />
Ch 2: Patch Modules - 25 - <strong>Studio</strong> <strong>Patches</strong> Manual
CHANNEL<br />
SPLITTER MODULE<br />
Figure 37: Channel Splitter Module<br />
The Channel Splitter module splits the MIDI data by channel and, if<br />
desired, changes each output’s MIDI channel. To open an edit window,<br />
insert a Channel Splitter module in<strong>to</strong> a connection, then<br />
double-click the module.<br />
Figure 38: Channel Splitter Edit Window<br />
Each row in the window controls which channels in the MIDI data<br />
stream are passed through <strong>to</strong> the corresponding splitter output. A<br />
checked channel passes data, an unchecked channel does not. Sys<br />
includes all MIDI System messages—system exclusive, MIDI Time<br />
Code, song select, tune request, clock, and system reset. The Channelize<br />
To numerical lets you change all the events passed <strong>to</strong> an<br />
output <strong>to</strong> the same MIDI channel. The “–” character means that the<br />
data is passed through without having its channel changed.<br />
Read through the following examples <strong>to</strong> gain a better understanding<br />
<strong>of</strong> the Channel Splitter module.<br />
CHANNEL SPLITTER MODULE EXAMPLES<br />
Follow the signal path through these next two connections <strong>to</strong> understand<br />
Channel Splitter modules and channelizing.<br />
Example 1: Look at Figure 39. Notice that the <strong>to</strong>p <strong>of</strong> the Channel<br />
Splitter receives data on MIDI Channel 1. It is not channelized, so it<br />
exits the Splitter module on MIDI Channel 1. The <strong>to</strong>p MIDI Destination<br />
module channelizes the MIDI data from Channel 1 <strong>to</strong> Channel 4.<br />
This means that the Morpheus plays the voice assigned <strong>to</strong> MIDI<br />
Ch 2: Patch Modules - 26 - <strong>Studio</strong> <strong>Patches</strong> Manual
Channel 4. The bot<strong>to</strong>m half <strong>of</strong> the Channel Splitter module receives<br />
data on MIDI Channel 2 and channelizes it <strong>to</strong> MIDI Channel 3. The<br />
DR--660 MIDI Destination module is set <strong>to</strong> Channel “-”, meaning<br />
that data received at its input is not channelized. Therefore, the<br />
DR-660 plays the voice assigned <strong>to</strong> MIDI Channel 3.<br />
Figure 39: First Channel Splitter Example<br />
Example 2: Look at Figure 40. The <strong>to</strong>p half <strong>of</strong> the connection hasn’t<br />
changed, but the bot<strong>to</strong>m half is different. Notice that data is still<br />
received by the Channel Splitter module on Channel 2, channelized<br />
<strong>to</strong> MIDI Channel 3, and sent out the Splitter module. The DR-660<br />
MIDI Destination module is now set <strong>to</strong> MIDI Channel 1. This means<br />
that data entering the MIDI Destination module is channelized again<br />
<strong>to</strong> MIDI Channel 1, and that the DR-660 plays the voice assigned <strong>to</strong><br />
MIDI Channel 1.<br />
Figure 40: Second Channel Splitter Example<br />
NOTE RANGE<br />
SPLITTER MODULE<br />
Figure 41: Note Range Splitter Module<br />
The Note Range Splitter module limits the range <strong>of</strong> MIDI notes (and<br />
polyphonic after<strong>to</strong>uch events) routed <strong>to</strong> each output <strong>of</strong> the splitter.<br />
To open its edit window, insert a Note Range Splitter module in<strong>to</strong> a<br />
connection, then double-click the module.<br />
Figure 42: Note Range Splitter Edit Window<br />
Ch 2: Patch Modules - 27 - <strong>Studio</strong> <strong>Patches</strong> Manual
The edit window contains one line for each <strong>of</strong> the Splitter’s outputs.<br />
You can edit each output’s note range with the numericals, the<br />
graphic keyboard, or MIDI entry. When you click the lower half <strong>of</strong><br />
the keyboard, all notes below the click point disappear, and the<br />
numericals indicate the new note range. Similarly, clicking high on<br />
the keyboard removes notes above the click point. Clicking and<br />
dragging changes the note range as you move the mouse back and<br />
forth across the keyboard. You can change split points by “gang editing”<br />
as discussed earlier.<br />
MIDI events other than notes and polyphonic after<strong>to</strong>uch pass<br />
through <strong>to</strong> all outputs <strong>of</strong> the splitter.<br />
NOTE RANGE SPLITTER MODULE EXAMPLE<br />
Assume, for example, that you want <strong>to</strong> split your K2000 keyboard <strong>to</strong><br />
produce a right-hand melody sound on Channel 1 <strong>of</strong> the Morpheus<br />
and a left-hand bass sound on Channel 1 <strong>of</strong> the DX7 II.<br />
Create a new patch and define your Source and Destination modules as discussed<br />
previously.<br />
Add a Note Range Splitter module between the MIDI Source and MIDI Destination<br />
modules.<br />
Click the MIDI Destination module icon and move the cursor below the Note<br />
Range Splitter module. The area below the Splitter module becomes highlighted.<br />
Click the mouse <strong>to</strong> add a new, undefined MIDI Destination module.<br />
Select DX7 II from the MIDI Destination module’s pop-up device menu.<br />
Select MIDI Channel 1 in the MIDI Destination module’s Channel numerical.<br />
Ch 2: Patch Modules - 28 - <strong>Studio</strong> <strong>Patches</strong> Manual
Double-click the Note Range Splitter module and enter note ranges for each<br />
Splitter module output.<br />
As shown here, all notes from C#4 <strong>to</strong> G9 will be played by the upper MIDI Destination<br />
module (the Morpheus) and all notes from C-1 <strong>to</strong> C4 will be played by the<br />
bot<strong>to</strong>m MIDI Destination module (the DX7 II).<br />
VELOCITY<br />
SPLITTER MODULE<br />
Figure 43: Velocity Splitter Module<br />
The Velocity Splitter module allows notes with only specific ranges<br />
<strong>of</strong> note-on key velocities <strong>to</strong> pass through <strong>to</strong> each output <strong>of</strong> the Splitter<br />
module. To open an editing window, insert a Velocity Splitter<br />
module in<strong>to</strong> a connection, then double-click the module.<br />
Figure 44: Velocity Splitter Edit Window<br />
Like the Channel and Note Range Splitter modules, each row corresponds<br />
<strong>to</strong> one output <strong>of</strong> the splitter. You can enter velocity values<br />
with either numerical or MIDI input. You can “gang edit” multiple<br />
velocity values as discussed previously. Only notes with velocities<br />
within the specified range will pass through <strong>to</strong> the Splitter module’s<br />
output.<br />
MIDI events other than notes are passed through <strong>to</strong> all outputs <strong>of</strong> the<br />
splitter.<br />
NOTE: Some notes may be cut <strong>of</strong>f early when transposing the outputs<br />
<strong>of</strong> a velocity splitter and playing chords.<br />
Ch 2: Patch Modules - 29 - <strong>Studio</strong> <strong>Patches</strong> Manual
TRANSPOSER MODULE<br />
Figure 45: Transposer Module<br />
Use the Transposer module <strong>to</strong> transpose note and polyphonic after<strong>to</strong>uch<br />
events. You can edit the Transposer module with either a<br />
simple edit window or a map edit window.<br />
OPENING AND<br />
USING A SIMPLE<br />
TRANSPOSER EDIT<br />
WINDOW<br />
To open a simple Transposer edit window:<br />
Insert a Transposer module in<strong>to</strong> a connection.<br />
Double-click the module.<br />
A simple Transposer edit window opens as shown in Figure 46.<br />
Figure 46: Simple Transposer Edit Window<br />
The transposition interval is expressed musically, not as a number <strong>of</strong><br />
half-steps. If you prefer thinking in terms <strong>of</strong> half-steps, type the<br />
number <strong>of</strong> half steps in<strong>to</strong> the numerical, then hit the Return or Enter<br />
keys. Negative values transpose downward and positive values<br />
transpose upward. The Transposer module in Figure 46 transposes<br />
the MIDI note values up 1 octave plus a Major 2nd (14 half-steps).<br />
Figure 47 shows the relationship between intervals and half-step<br />
values.<br />
m2<br />
M2<br />
m3<br />
M3<br />
P4<br />
#4<br />
P5<br />
m6<br />
M6<br />
m7<br />
M7<br />
+1 oct<br />
minor second<br />
major second<br />
minor third<br />
major third<br />
perfect fourth<br />
sharp fourth (tri<strong>to</strong>ne)<br />
perfect fifth<br />
minor sixth<br />
major sixth<br />
minor seventh<br />
major seventh<br />
up one octave<br />
1 half-step<br />
2 half-steps<br />
3 half-steps<br />
4 half-steps<br />
5 half-steps<br />
6 half-steps<br />
7 half-steps<br />
8 half-steps<br />
9 half-seps<br />
10 half-steps<br />
11 half steps<br />
12 half steps<br />
Figure 47: Relation <strong>of</strong> Intervals <strong>to</strong> Half-Steps<br />
Ch 2: Patch Modules - 30 - <strong>Studio</strong> <strong>Patches</strong> Manual
NOTE: Transposer modules change MIDI note numbers. They do<br />
not actually alter the internal tuning <strong>of</strong> your synthesizers. The musical<br />
intervals expressed in the Transposer module are based on<br />
standard Equal Temperament. Actual tuning amounts will change if<br />
you use alternate synthesizer tuning scales.<br />
OPENING AND<br />
USING A MAP<br />
TRANSPOSER EDIT<br />
WINDOW<br />
To open a map Transposer edit window:<br />
Click the Map but<strong>to</strong>n in the simple Transposer edit window.<br />
A map Transposer edit window opens <strong>to</strong> show the current conditions <strong>of</strong> the simple<br />
Transposer (as seen in Figure 48).<br />
This Simple<br />
Transposer edit<br />
window setting<br />
...opens this Map<br />
Transposer Edit<br />
Window when you<br />
click the Map<br />
but<strong>to</strong>n.<br />
Figure 48: Opening the Map Transposer Edit Window<br />
The scrolling keyboard along the right edge <strong>of</strong> the window lets you<br />
map any MIDI note <strong>to</strong> any other MIDI note. Use the To numerical <strong>to</strong><br />
transpose each individual note (you can set each numerical using<br />
MIDI entry, see Module Editing Basics, pg. 16).<br />
The controls in the left half <strong>of</strong> the window allow you <strong>to</strong> duplicate the<br />
transpositions defined in one note range for any other note range.<br />
For example, the default setting lets you create a transposition map<br />
for the twelve notes <strong>of</strong> one octave, then duplicate these transpositions<br />
for all octaves. Use the four numericals <strong>to</strong> set the two ranges,<br />
then click the Extend but<strong>to</strong>n <strong>to</strong> perform the extension.<br />
NOTE: You may want <strong>to</strong> define some commonly used transposition<br />
maps as either Virtual Controllers or Virtual Instruments and use<br />
them instead <strong>of</strong> a map in your <strong>Studio</strong> <strong>Patches</strong>. Virtual Controllers<br />
and Virtual Instruments are discussed in Chapter 3: Virtual Controllers<br />
and Virtual Instruments.<br />
Maps use a relatively large amount <strong>of</strong> memory, so if you find yourself<br />
using the same map in multiple places in the same Patch document,<br />
you’ll use less memory by putting maps in<strong>to</strong> Virtual Controllers or Virtual<br />
Instruments.<br />
Ch 2: Patch Modules - 31 - <strong>Studio</strong> <strong>Patches</strong> Manual
CHOOSING<br />
BETWEEN A<br />
SIMPLE OR MAP<br />
TRANSPOSITION<br />
If you click the map edit window’s close box, the map edit window<br />
closes and the Transposer module will use that map <strong>to</strong> transpose<br />
MIDI data. The map edit window opens the next time you doubleclick<br />
that Transposer module.<br />
If you click the No Map but<strong>to</strong>n, you’ll delete your cus<strong>to</strong>m map, close<br />
the map edit window, and re-open the simple edit window. The<br />
Transposer module will use the settings in the simple edit window<br />
<strong>to</strong> transpose MIDI data.<br />
MODIFIER MODULES<br />
Figure 49: Modifier Module Group<br />
Use Modifier modules <strong>to</strong> alter note-on velocities, mono after<strong>to</strong>uch,<br />
poly after<strong>to</strong>uch, pitch bend and MIDI control values. Each Modifier<br />
module uses either a simple Modifier edit window or a map Modifier<br />
edit window <strong>to</strong> modify MIDI data.<br />
OPENING AND<br />
USING A SIMPLE<br />
MODIFIER EDIT<br />
WINDOW<br />
To open a simple Modifier edit window:<br />
Insert a Modifier module in<strong>to</strong> a connection.<br />
Double-click the new module.<br />
A simple Modifier edit window opens as shown in Figure 50.<br />
Figure 50: Typical Simple Modifier Edit Window<br />
Each Modifier module’s simple edit window contains a pop-up<br />
menu <strong>of</strong> modifiers. The choices are Add, Scale, Invert, Max Limit,<br />
Min Limit, Set To, and Filter Out. The modification amount is set by<br />
the numerical <strong>to</strong> the right.<br />
• Add: Adds the specified number <strong>to</strong> each MIDI data value. Positive<br />
and negative values may be used.<br />
• Scale: Scales the value by the specified percentage: 100% is<br />
unchanged, 50% halves each value, 199% (the maximum) nearly<br />
doubles each value (you cannot have values greater than 127 or less<br />
than 0, however).<br />
Ch 2: Patch Modules - 32 - <strong>Studio</strong> <strong>Patches</strong> Manual
• Invert: Changes 127->0, 126->1, 125->2, 1->126, and 0->127 except in<br />
the case <strong>of</strong> velocity where 0 (a note <strong>of</strong>f) is left unchanged.<br />
• Max Limit: Reduces all values higher than the specified value down<br />
<strong>to</strong> the limit you enter.<br />
• Min Limit: Increases all values lower than the specified value up <strong>to</strong><br />
the limit you enter.<br />
• Set To: Changes all values <strong>to</strong> the one you enter.<br />
• Filter Out: Removes the event type completely (not allowed for<br />
velocity).<br />
OPENING AND<br />
USING A MAP<br />
MODIFIER EDIT<br />
WINDOW<br />
To open a Modifier module’s map edit window, click the Map<br />
but<strong>to</strong>n in the Simple Modifier edit window. A map Modifier edit<br />
window opens <strong>to</strong> show the current conditions <strong>of</strong> the Simple Modifier<br />
(as seen in Figure 51).<br />
This Simple<br />
Modifier edit<br />
window setting...<br />
...opens this Map<br />
Modifier edit<br />
window when you<br />
click the Map<br />
but<strong>to</strong>n.<br />
Figure 51: Opening a Map Modifier Edit Window<br />
Click and drag inside the mapping area <strong>to</strong> create a new modifier<br />
map. The current cursor location’s input value is shown below the<br />
map and its re-mapped value is shown <strong>to</strong> the left. MIDI data entering<br />
the Modifier module gets modified according <strong>to</strong> the curve.<br />
Figure 52 illustrates a simple S-curve map—low and high input<br />
values result in very little output change, but middle input values<br />
create great changes in output values. Notice, as an example, that a<br />
value <strong>of</strong> 76 entering the Modifier module gets remapped <strong>to</strong> 95 before<br />
leaving the module.<br />
Ch 2: Patch Modules - 33 - <strong>Studio</strong> <strong>Patches</strong> Manual
Figure 52: Simple S-Curve Modifier Map<br />
To draw a straight line between two points, click at one end point,<br />
then shift-click at the other end point (see Figure 53).<br />
(a)<br />
(b)<br />
(c)<br />
a) Click a beginning point.<br />
b) Shift-click an endpoint..<br />
c) A straight line is drawn<br />
between the two points.<br />
Figure 53: Drawing Straight Lines<br />
NOTE: You may want <strong>to</strong> define some commonly used transposition<br />
maps as either Virtual Controllers or Virtual Instruments and use<br />
them instead <strong>of</strong> a map in your <strong>Studio</strong> <strong>Patches</strong>. Virtual Controllers<br />
and Virtual Instruments are discussed in Chapter 3: Virtual Controllers<br />
and Virtual Instruments.<br />
Maps use a relatively large amount <strong>of</strong> memory, so if you find yourself<br />
using the same map in multiple places in the same Patch document,<br />
you’ll use less memory by putting maps in<strong>to</strong> Virtual Controllers or Virtual<br />
Instruments.<br />
Ch 2: Patch Modules - 34 - <strong>Studio</strong> <strong>Patches</strong> Manual
CHOOSING<br />
BETWEEN SIMPLE<br />
AND MAP<br />
MODIFIERS<br />
If you click the map edit window’s close box, the map edit window<br />
closes and the Modifier module will use that map <strong>to</strong> modify MIDI<br />
data. The map edit window opens the next time you double-click<br />
that Modifier module.<br />
If you click the No Map but<strong>to</strong>n, you’ll delete your cus<strong>to</strong>m curve,<br />
close the map edit window, and re-open the simple edit window.<br />
The Modifier module will use the simple edit window settings <strong>to</strong><br />
modify MIDI data.<br />
VELOCITY<br />
MODIFIER<br />
Double-click the Velocity Modifier module <strong>to</strong> open its edit window.<br />
You can modify velocity values using either the simple or map edit<br />
windows. You cannot filter out velocity data, nor can you invert a<br />
note-<strong>of</strong>f value <strong>of</strong> 0 (zero).<br />
AFTERTOUCH<br />
MODIFIER<br />
Double-click the After<strong>to</strong>uch Modifier module <strong>to</strong> open its edit window.<br />
You can modify mono after<strong>to</strong>uch values using either the<br />
simple or map edit windows.<br />
POLY<br />
AFTERTOUCH<br />
MODIFIER<br />
Double-click the Polyphonic After<strong>to</strong>uch Modifier module <strong>to</strong> open its<br />
edit window. You can modify poly after<strong>to</strong>uch values using either the<br />
simple or map edit windows.<br />
PITCH BEND<br />
MODIFIER<br />
Double-click the Pitch Bend Modifier module <strong>to</strong> open its edit window.<br />
You can modify pitch bend values using either the simple or<br />
map edit windows.<br />
Ch 2: Patch Modules - 35 - <strong>Studio</strong> <strong>Patches</strong> Manual
CONTROL<br />
NUMBER MAPPER<br />
MODULE EXAMPLE<br />
Assume, for example, that you wanted <strong>to</strong> play your Morpheus from<br />
your K2000 keyboard, and that you wanted <strong>to</strong> control the Morpheus’<br />
volume with the K2000 modulation wheel.<br />
Create a connection with the K2000 as the MIDI source and the Morpheus as the<br />
MIDI destination.<br />
Insert the Control Number Mapper module in<strong>to</strong> the connection, then double-click it<br />
<strong>to</strong> open its edit window.<br />
Choose Mod Wheel (1) from the upper pop-up menu.<br />
Choose Volume (7) from the lower pop-up menu.<br />
Figure 57: Mapping Mod Wheel <strong>to</strong> Volume<br />
The K2000 modulation wheel now controls the Morpheus output<br />
volume.<br />
Ch 2: Patch Modules - 37 - <strong>Studio</strong> <strong>Patches</strong> Manual
CH 3:<br />
VIRTUAL CONTROLLERS AND<br />
VIRTUAL INSTRUMENTS<br />
Virtual Controllers and Virtual Instruments are extremely powerful<br />
features <strong>of</strong> <strong>Studio</strong> <strong>Patches</strong>. Basically, they’re enhanced versions <strong>of</strong><br />
the MIDI devices defined in your current <strong>Studio</strong> <strong>Setup</strong> document.<br />
Any number <strong>of</strong> Virtual Controllers and Virtual Instruments can be<br />
s<strong>to</strong>red within a Patch document.<br />
A Virtual Controller is the output <strong>of</strong> a MIDI device plus some form<br />
<strong>of</strong> MIDI processing. A Virtual Controller is treated the same as any<br />
other MIDI controller defined in your current <strong>Studio</strong> <strong>Setup</strong> document,<br />
except that it enhances the performance <strong>of</strong> a MIDI controller<br />
by adding MIDI processing. Virtual Controllers have two important<br />
uses:<br />
• They are used when common MIDI processing connections need <strong>to</strong><br />
be used in multiple <strong>Studio</strong> <strong>Patches</strong>.<br />
• They are used as sequencer inputs when you need <strong>to</strong> record a MIDI<br />
controller with some processing applied.<br />
Basically, Virtual Controllers are additional sources <strong>of</strong> MIDI data<br />
(just like real MIDI controllers). You create these new sources by<br />
combining your real MIDI controllers with MIDI processing.<br />
A Virtual Instrument is some form <strong>of</strong> MIDI processing routed <strong>to</strong> one<br />
or more MIDI devices. A Virtual Instrument is treated the same as<br />
any other MIDI destination defined in your current <strong>Studio</strong> <strong>Setup</strong><br />
document, except that it enhances performance by stacking, splitting<br />
or layering various devices and adding MIDI processing. Virtual<br />
Instruments have two important uses:<br />
• They are used when common MIDI processing connections need <strong>to</strong><br />
be used in multiple <strong>Studio</strong> <strong>Patches</strong>.<br />
• They are used as sequencer destination instruments—allowing the<br />
sequenced tracks <strong>to</strong> play in<strong>to</strong> a MIDI processed stream.<br />
Basically, Virtual Instruments are additional destinations <strong>of</strong> MIDI<br />
data (just like real MIDI sound modules). You create these new destinations<br />
by combining your real MIDI sound modules with MIDI<br />
processing.<br />
Ch 3: Virtual Controllers and Virtual Instruments - 38 - <strong>Studio</strong> <strong>Patches</strong> Manual
NOTE: MIDI data can sometimes get very dense when working with<br />
Virtual Controllers and Virtual Instruments. Therefore, when designing<br />
your patches, it’s a good idea <strong>to</strong> use Event Type Filter Modules <strong>to</strong><br />
remove any unnecessary data.<br />
The following sections discuss Virtual Instruments and Virtual Controllers:<br />
why you may wish <strong>to</strong> use them, how <strong>to</strong> set them up, and<br />
how <strong>to</strong> access them within Opcode’s Vision and <strong>Studio</strong> Vision.<br />
USING VIRTUAL CONTROLLERS<br />
A Virtual Controller is the output <strong>of</strong> a MIDI device plus some form <strong>of</strong><br />
MIDI processing. Let’s look at an example <strong>of</strong> a Virtual Controller.<br />
Assume that your keyboard is <strong>to</strong>o sensitive <strong>to</strong> after<strong>to</strong>uch. Pushing<br />
just slightly on the keys causes it <strong>to</strong> send very high after<strong>to</strong>uch values.<br />
You can design a Virtual Controller that processes the after<strong>to</strong>uch<br />
data before sending it <strong>to</strong> your sequencer or MIDI devices.<br />
Click the Virtual Controllers but<strong>to</strong>n or choose Patch>Edit Virtual Controllers <strong>to</strong><br />
open a Virtual Controllers Edit Window.<br />
Figure 58: Virtual Controllers but<strong>to</strong>n<br />
You’ll see that the Virtual Controllers Edit Window looks very similar <strong>to</strong> the Patch<br />
Edit Window. Use the Virtual Controllers Edit Window <strong>to</strong> create and s<strong>to</strong>re as many<br />
Virtual Controllers as memory will allow.<br />
Figure 59: Virtual Controllers Edit Window<br />
Click the MIDI Source module icon. The cursor will turn in<strong>to</strong> the MIDI Source icon.<br />
Click anywhere in the space below the Module Palette <strong>to</strong> create an undefined<br />
connection.<br />
Notice that this connection looks very similar <strong>to</strong> an undefined patch connection; the<br />
only difference is that the MIDI Destination module is replaced by a Virtual Controller<br />
module.<br />
Choose your master keyboard from the MIDI Source module’s pop-up menu.<br />
Ch 3: Virtual Controllers and Virtual Instruments - 39 - <strong>Studio</strong> <strong>Patches</strong> Manual
Insert a Mono After<strong>to</strong>uch Modifier module between the MIDI Source module and<br />
the Virtual Controller module.<br />
Double-click the Mono After<strong>to</strong>uch Modifier module <strong>to</strong> open its editing window.<br />
Choose Scale from the Modifier module’s pop-up menu and enter a value <strong>of</strong> 50%<br />
in<strong>to</strong> the Modifier module’s numerical.<br />
This will scale the Mono After<strong>to</strong>uch output by 50%, resulting in the desired<br />
decrease in Mono After<strong>to</strong>uch sensitivity.<br />
Click the Virtual Controller Module. Its border will become thick and it will contain a<br />
flashing text-insertion cursor.<br />
Type a suitable name for your new Virtual Controller.<br />
Close the Virtual Controllers Edit Window.<br />
If you open a patch in the Patch Edit Window, you’ll see that “Master w/A.T. Scaling”<br />
has been added <strong>to</strong> your list <strong>of</strong> possible MIDI sources. Now, instead <strong>of</strong> using<br />
the K2000 as a controller, you can use the improved Virtual Controller as your<br />
MIDI source.<br />
The previous example provided a graphic illustration <strong>of</strong> the Virtual<br />
Controller definition—Virtual Controllers are the output <strong>of</strong> a MIDI<br />
device plus some form <strong>of</strong> MIDI processing.<br />
Virtual Controllers are edited similarly <strong>to</strong> patches, except that<br />
instead <strong>of</strong> MIDI Destination Modules, there are Virtual Controller<br />
Modules.<br />
Ch 3: Virtual Controllers and Virtual Instruments - 40 - <strong>Studio</strong> <strong>Patches</strong> Manual
All <strong>of</strong> the modules and connections <strong>to</strong> the left <strong>of</strong> the Virtual Controller<br />
Module are used <strong>to</strong> define the output <strong>of</strong> that Virtual Controller.<br />
There may be any number <strong>of</strong> Virtual Controllers for each real<br />
controller.<br />
Virtual Controllers appear in the pop-up MIDI source menus when<br />
you edit a patch. If you choose a Virtual Controller, it has the same<br />
appearance in the Patch Edit Window as in the Virtual Controllers<br />
Edit Window, except that you can’t edit its name.<br />
EFFICIENT USE OF<br />
VIRTUAL<br />
CONTROLLERS<br />
There are two kinds <strong>of</strong> Virtual Controller connections:<br />
• Those that do not “multiply” MIDI data.<br />
In this type <strong>of</strong> a connection, no one MIDI event from a source reaches<br />
more than one Virtual Controller. You make non-multiplying Virtual<br />
Controller connections either by avoiding multi-output splitter modules<br />
or by extensive use <strong>of</strong> filtering. An example <strong>of</strong> two different<br />
non-multiplying connections is shown in Figure 60.<br />
Figure 60: Non-Multiplying Virtual Controller Connections<br />
• Those that do “multiply” MIDI data.<br />
In this type <strong>of</strong> connection, a single MIDI event from a source reaches<br />
more than one Virtual Controller. Connections that use unfiltered,<br />
multi-output splitter modules multiply MIDI data by sending duplicate<br />
data <strong>to</strong> numerous Virtual Controllers. An example <strong>of</strong> a<br />
multiplying connection is shown in Figure 61.<br />
Figure 61: Multiplying Virtual Controller Connection<br />
The connection shown in Figure 61 doubles all MIDI events (pitch<br />
bend, controls, mono after<strong>to</strong>uch, etc.) except for notes and polyphonic<br />
after<strong>to</strong>uch events.<br />
Ch 3: Virtual Controllers and Virtual Instruments - 41 - <strong>Studio</strong> <strong>Patches</strong> Manual
When you design patches using Virtual Controllers created in a<br />
“multiplying” connection, avoid using the Virtual Controllers independently.<br />
Either use all <strong>of</strong> the Virtual Controllers created in a<br />
multiplying connection or don't use any at all. If you don't use all <strong>of</strong><br />
a multiple connection's Virtual Controllers, you will waste microprocessor<br />
power since you'll send MIDI data <strong>to</strong> Virtual Controllers that<br />
aren't in your patch.<br />
For example, if you wanted <strong>to</strong> create a patch where your left hand<br />
controls one module and your right hand controls another, you<br />
could use the two Virtual Controllers shown in Figure 62.<br />
Figure 62: Patch Using Virtual Controllers from Multiplying Connection<br />
If, however, you wanted <strong>to</strong> create a patch where only your left hand<br />
controlled a module, you should use the “LH: B3&DOWN” Virtual<br />
Controller shown in Figure 63.<br />
Figure 63: Patch Using Virtual Controllers from Non-Multiplying Connection<br />
If, instead <strong>of</strong> using the “LH: B3&DOWN” Virtual Controller in the<br />
patch, you used the “LH: C4 Split” Virtual Controller shown in<br />
Figure 62, you would waste processing power since all MIDI events<br />
generated by the K2000 (other than notes and poly after<strong>to</strong>uch) are<br />
sent <strong>to</strong> both the “LH: C4 Split” and “RH: C4 Split” Virtual Controllers.<br />
Since this patch doesn’t use the “RH: C4 Split” Virtual<br />
Controller, this would be an inefficient use <strong>of</strong> Virtual Controllers and<br />
your interface’s microprocessor.<br />
USING VIRTUAL<br />
CONTROLLERS<br />
WITH VISION<br />
<strong>OMS</strong> applications such as Vision and <strong>Studio</strong> Vision (versions 1.3 or<br />
later) treat Virtual Controllers as they would any other MIDI input<br />
device.<br />
Ch 3: Virtual Controllers and Virtual Instruments - 42 - <strong>Studio</strong> <strong>Patches</strong> Manual
Let’s look at an example showing how <strong>to</strong> use Virtual Controllers<br />
with Vision. Assume that your <strong>Studio</strong> <strong>Setup</strong> document looks like<br />
Figure 64, and that you have defined a Virtual Controller like the one<br />
shown in Figure 65.<br />
Figure 64: <strong>Studio</strong> <strong>Setup</strong> Document Example<br />
Figure 65: Virtual Controller Example<br />
Launch Vision.<br />
Choose <strong>Setup</strong>s>Enable Input Devices.<br />
You’ll see a dialog box listing all possible MIDI input devices, including any Virtual<br />
Controllers, as defined by the current <strong>Studio</strong> Patch document.<br />
Figure 66: Vision’s “Enable Input Device” Dialog Box<br />
Ch 3: Virtual Controllers and Virtual Instruments - 43 - <strong>Studio</strong> <strong>Patches</strong> Manual
Notice, in this example, that the Virtual Controller named “Master<br />
w/A.T. Scaling” is available as a MIDI input source. You enable<br />
input devices by clicking them. In the following example, “Master<br />
w/A.T. Scaling” is checked and, therefore, is enabled as an input<br />
device.<br />
Figure 67: Enabling a Virtual Controller in Vision<br />
By using the specially designed “Master w/A.T. Scaling” Virtual<br />
Controller as an input device, you can record data with satisfac<strong>to</strong>ry<br />
after<strong>to</strong>uch values directly in<strong>to</strong> Vision.<br />
NOTE: Since Virtual Controllers use real MIDI input devices, it’s possible<br />
<strong>to</strong> accidentally enable an input device twice. For example, if you<br />
enable both “K2000” and “Master w/A./T. Scaling,” you will get two<br />
notes for every one you play. For this reason, make sure that you<br />
only enable one input for each real, physical device.<br />
VIRTUAL INSTRUMENTS<br />
A Virtual Instrument is made up <strong>of</strong> one or more MIDI destinations<br />
plus some form <strong>of</strong> MIDI processing. Virtual Instruments are basically<br />
the opposite <strong>of</strong> Virtual Controllers. Let’s look at an example <strong>of</strong> a Virtual<br />
Instrument.<br />
Assume that it’s common for you <strong>to</strong> “stack” instruments <strong>to</strong>gether <strong>to</strong><br />
get a really big MIDI sound—particularly your K2000 and Morpheus<br />
sound modules playing on MIDI Channel 2. Using Virtual Instruments,<br />
you can create that stack and always have it available as a<br />
MIDI destination.<br />
Click the Virtual Instruments but<strong>to</strong>n in the Patch Document Window, or choose<br />
Patch>Edit Virtual Instruments <strong>to</strong> open a Virtual Instruments Edit Window.<br />
Figure 68: Virtual Instruments but<strong>to</strong>n<br />
Ch 3: Virtual Controllers and Virtual Instruments - 44 - <strong>Studio</strong> <strong>Patches</strong> Manual
You’ll see that the Virtual Instruments Edit Window looks very similar <strong>to</strong> the Patch<br />
Edit Window. Use the Virtual Instruments Edit Window <strong>to</strong> create and s<strong>to</strong>re as many<br />
Virtual Instruments as memory will allow.<br />
Figure 69: Virtual Instruments Edit Window<br />
Click the Virtual Instrument module icon.<br />
Figure 70: Virtual Instrument Module Icon<br />
Click in the blank space below the Module Palette <strong>to</strong> create an undefined Virtual<br />
Instrument connection.<br />
Notice that this connection looks very similar <strong>to</strong> an undefined patch connection; the<br />
only difference is that the MIDI Source module is replaced by a Virtual Instrument<br />
module.<br />
Insert a Simple Splitter module between the Virtual Instrument and the MIDI<br />
Destination modules.<br />
Add a second MIDI Destination module by clicking its icon and inserting it below<br />
the Simple Splitter module.<br />
Choose the K2000 from the upper MIDI Destination module’s pop-up menu, and<br />
the Morpheus from the lower MIDI Destination module’s pop-up menu. Set their<br />
MIDI channels <strong>to</strong> 2.<br />
Click the Virtual Instrument module <strong>to</strong> select it.<br />
Ch 3: Virtual Controllers and Virtual Instruments - 45 - <strong>Studio</strong> <strong>Patches</strong> Manual
Type in the name <strong>of</strong> your new Virtual Instrument and hit the Enter key.<br />
Close the Virtual Instruments Edit Window.<br />
If you open a patch in the Patch Edit Window, you’ll see that “HippoStack”<br />
has been added <strong>to</strong> your list <strong>of</strong> MIDI destinations.<br />
Whenever you want <strong>to</strong> play a stack made up <strong>of</strong> the K2000 and Morpheus<br />
synthesizers on MIDI Channel 2, simply choose this Virtual<br />
Instrument as the MIDI destination.<br />
The previous example provided a graphic illustration <strong>of</strong> the Virtual<br />
Instrument definition—Virtual Instruments are made up <strong>of</strong> one or<br />
more MIDI destinations plus some form <strong>of</strong> MIDI processing.<br />
Like Virtual Controllers, Virtual Instruments are edited similarly <strong>to</strong><br />
patches with only minor exceptions. The Virtual Instruments Edit<br />
Window contains connections from Virtual Instruments <strong>to</strong> devices.<br />
Instead <strong>of</strong> MIDI Source modules, there are Virtual Instrument<br />
modules:<br />
Virtual Instruments appear in the pop-up MIDI destination menus<br />
when you edit a patch. If you choose a Virtual Instrument, it has the<br />
same appearance in the Patch Edit Window as in the Virtual Instruments<br />
Edit Window, except that you can’t edit its name.<br />
NOTE: System Exclusive messages should always be sent directly<br />
<strong>to</strong> the intended device. Sending System Exclusive <strong>to</strong> a Virtual Instrument<br />
containing a Splitter module and different devices thickens the<br />
MIDI data stream unnecessarily. Sending System Exclusive <strong>to</strong> a Virtual<br />
Instrument consisting <strong>of</strong> a Splitter module routed <strong>to</strong> different<br />
channels <strong>of</strong> the same device may corrupt the data.<br />
Ch 3: Virtual Controllers and Virtual Instruments - 46 - <strong>Studio</strong> <strong>Patches</strong> Manual
USING VIRTUAL<br />
INSTRUMENTS<br />
WITH VISION<br />
<strong>OMS</strong> applications such as Vision and <strong>Studio</strong> Vision (versions 1.3 or<br />
later) treat Virtual Instruments as they would any other MIDI destination<br />
device.<br />
Let’s look at an example showing how <strong>to</strong> use Virtual Instruments<br />
with Vision. Assume that your <strong>Studio</strong> <strong>Setup</strong> document looks like<br />
Figure 71, and that you have defined a Virtual Controller like the one<br />
shown in Figure 72.<br />
Figure 71: <strong>Studio</strong> <strong>Setup</strong> Document Example<br />
Figure 72: Virtual Instrument Example<br />
Launch Vision.<br />
Choose Windows>Instruments.<br />
Choose New Instrument from the Instruments menu.<br />
A new Instrument will be added <strong>to</strong> the MIDI Instruments list as shown in Figure 73.<br />
Figure 73: Adding an Instrument in Vision<br />
Choose “HippoStack” from the MIDI Output Device pop-up menu.<br />
This menu displays all MIDI destinations as defined in your current <strong>Studio</strong> <strong>Setup</strong><br />
document as well as the Virtual Instruments in your current <strong>Studio</strong> Patch<br />
document.<br />
Figure 74: Selecting a MIDI Output Device in Vision<br />
Ch 3: Virtual Controllers and Virtual Instruments - 47 - <strong>Studio</strong> <strong>Patches</strong> Manual
Choose Channel 2 from the MIDI Output Channel pop-up menu (since<br />
“HippoStack” was designed <strong>to</strong> play on MIDI Channel 2).<br />
The MIDI Instrument’s name becomes “HippoStack-2,” indicating that it uses the<br />
Virtual Instrument named “HippoStack,” and that it is set <strong>to</strong> receive on MIDI Channel<br />
2. You can keep this name or type another.<br />
Figure 75: Newly Defined Instrument in Vision<br />
Click on the Thru Instrument setting at the left side <strong>of</strong> Vision’s Control Bar (the little<br />
keyboard).<br />
You’ll see a pop-up menu <strong>of</strong> MIDI Instruments as defined in Vision’s Instruments<br />
Window.<br />
Figure 76: Choosing a Virtual Instrument in Vision<br />
Choose “HippoStack-2.”<br />
The Thru Instrument will now play the Virtual Instrument named<br />
“HippoStack,” which is the combined sound <strong>of</strong> the K2000 and Morpheus<br />
sound modules on MIDI Channel 2.<br />
Virtual Instruments can be used <strong>to</strong> define any number <strong>of</strong> MIDI<br />
Instruments within Vision. You can choose instruments within any<br />
<strong>of</strong> Vision’s MIDI Instrument pop-up menus (as found in the Tracks<br />
Window, List Window, Graphic Window, and so on).There are two<br />
important advantages <strong>to</strong> using Virtual Instruments with Vision:<br />
• You wish <strong>to</strong> play a sequence using an interesting <strong>Studio</strong> Patch.<br />
To do so, simply create a Virtual Instrument consisting <strong>of</strong> the entire<br />
patch connection (except for the source module) and use it as<br />
Vision’s Thru Instrument. This is detailed in the following section.<br />
Ch 3: Virtual Controllers and Virtual Instruments - 48 - <strong>Studio</strong> <strong>Patches</strong> Manual
• You wish <strong>to</strong> have a sound made up <strong>of</strong> several channels on several<br />
devices playing the same part.<br />
(This applies <strong>to</strong> <strong>Studio</strong> 5’s only.) Without Virtual Instruments, you<br />
would have the Macin<strong>to</strong>sh send a separate MIDI event <strong>to</strong> each destination<br />
channel on each device. Using a Virtual Instrument allows the<br />
Macin<strong>to</strong>sh <strong>to</strong> send just one MIDI event <strong>to</strong> the Virtual Instrument,<br />
which actually exists inside the interface. This reduces the density <strong>of</strong><br />
the MIDI data stream, making timing more efficient.<br />
It also transfers the Macin<strong>to</strong>sh’s work load <strong>to</strong> the interface, which<br />
gives the Macin<strong>to</strong>sh more processing time for other events.<br />
CREATING<br />
VIRTUAL<br />
INSTRUMENTS<br />
FROM EXISTING<br />
PATCHES<br />
If you create an interesting <strong>Studio</strong> Patch and decide you want <strong>to</strong> use<br />
it as a Virtual Instrument in a MIDI sequence, you can simply copy<br />
the connection (less the MIDI Source module) from the Patch Edit<br />
Window and paste it in<strong>to</strong> the Virtual Instruments Edit Window. To<br />
do so:<br />
Open the Patch Edit Window for the patch you want <strong>to</strong> turn in<strong>to</strong> a Virtual<br />
Instrument.<br />
Select every part <strong>of</strong> the connection except the MIDI Source module.<br />
There are two ways <strong>to</strong> do this: 1) click the selec<strong>to</strong>r dot <strong>to</strong> the left <strong>of</strong> the connection<br />
(selecting all modules), then option-click the MIDI Source module <strong>to</strong> deselect it; or<br />
2) drag a rectangle around all the modules except the MIDI Source module.<br />
Choose Edit>Copy.<br />
Open the Virtual Instruments Edit Window.<br />
Click the Virtual Instrument module icon, then click in the blank space below the<br />
Module Palette <strong>to</strong> create an undefined Virtual Instrument connection.<br />
In the new connection, click the MIDI Destination module <strong>to</strong> select it and hit the<br />
Delete key <strong>to</strong> remove the MIDI Destination module from the connection.<br />
Ch 3: Virtual Controllers and Virtual Instruments - 49 - <strong>Studio</strong> <strong>Patches</strong> Manual
Click the MIDI Destination module icon, then move the cursor just <strong>to</strong> the right <strong>of</strong> the<br />
Virtual Instrument module. Do not click the mouse!<br />
Notice that the area <strong>to</strong> the right <strong>of</strong> the Virtual Instrument module becomes<br />
highlighted.<br />
Highlighting<br />
Choose Edit>Paste <strong>to</strong> paste the contents <strong>of</strong> the clipboard in<strong>to</strong> the highlighted<br />
area.<br />
Type a name in<strong>to</strong> the Virtual Instrument module and save it.<br />
You’re now ready <strong>to</strong> use this newly created virtual instrument in your sequencing<br />
program.<br />
Ch 3: Virtual Controllers and Virtual Instruments - 50 - <strong>Studio</strong> <strong>Patches</strong> Manual
CH 4:<br />
PROGRAM CHANGE<br />
SOURCES<br />
Use the Program Change Sources Window <strong>to</strong> specify various ways<br />
<strong>to</strong> change <strong>Studio</strong> <strong>Patches</strong>. You can design Program Change Sources<br />
<strong>to</strong>:<br />
• Change <strong>Studio</strong> <strong>Patches</strong> from a MIDI controller.<br />
• Change <strong>Studio</strong> <strong>Patches</strong> from a MIDI controller only if an additional<br />
MIDI control is activated.<br />
• Step through a pre-determined Patch Chain using a MIDI controller.<br />
Program Change Sources make it convenient <strong>to</strong> change <strong>Studio</strong><br />
<strong>Patches</strong> from a MIDI controller when you’re working within other<br />
MIDI applications. You don’t have <strong>to</strong> use the Patch Document<br />
Window <strong>to</strong> change <strong>Studio</strong> <strong>Patches</strong>. A Patch document can contain<br />
any number <strong>of</strong> Program Change Sources.<br />
OPENING A PROGRAM CHANGE SOURCES EDIT WINDOW<br />
Click the Program Change Sources but<strong>to</strong>n in the Patch Document<br />
Window, or choose Patch>Edit Program Change Sources <strong>to</strong> open<br />
the Program Change Sources Window.<br />
Figure 77: Program Change Sources but<strong>to</strong>n<br />
You’ll see that the Program Change Sources Window looks similar <strong>to</strong><br />
the Patch Edit Window, except that the module palette is different.<br />
Figure 78: Empty Program Change Sources Window<br />
Ch 4: Program Change Sources - 51 - <strong>Studio</strong> <strong>Patches</strong> Manual
PROGRAM CHANGE SOURCES EDIT WINDOW TERMINOLOGY<br />
Figure 79 shows the terminology for the Program Change Sources<br />
Window.<br />
Change <strong>Patches</strong><br />
Module icon<br />
MIDI Source<br />
Module icon<br />
Module<br />
Palette<br />
Patch Chain Controls<br />
Module icon<br />
Enable Patch<br />
Changes Module icon<br />
Program Change Source<br />
(You can have as many<br />
Program Change Sources<br />
as you need)<br />
Editing Area<br />
Modules<br />
Figure 79: Ana<strong>to</strong>my <strong>of</strong> a Program Change Sources Window<br />
Module placement and editing techniques are similar <strong>to</strong> those used<br />
for the Patch Edit Window. The following sections discuss each<br />
module in detail.<br />
MIDI SOURCE MODULE<br />
Figure 80: MIDI Source Module<br />
The MIDI Source module in the Program Change Sources Window is<br />
very similar <strong>to</strong> the MIDI Source module in the Patch Edit Window.<br />
The only difference is that this MIDI Source module contains a MIDI<br />
channel numerical; the Patch Edit Window’s MIDI Source module<br />
does not.<br />
Use this MIDI Source module <strong>to</strong> specify which device and MIDI<br />
channel will control program changes using the other modules <strong>to</strong><br />
which it's connected.<br />
To insert and define a MIDI Source module:<br />
Click the MIDI Source module icon. The cursor will change in<strong>to</strong> a MIDI Source<br />
module icon.<br />
Click in the blank space below the Module Palette <strong>to</strong> create an undefined Program<br />
Change connection.<br />
Ch 4: Program Change Sources - 52 - <strong>Studio</strong> <strong>Patches</strong> Manual
Choose a MIDI source from the MIDI Source module’s pop-up menu.<br />
Use the Channel numerical <strong>to</strong> set a MIDI transmission channel. A dash (“-”) means<br />
that the MIDI source data can come from any channel.<br />
You will not yet be able <strong>to</strong> change <strong>Studio</strong> <strong>Patches</strong> via MIDI, since the<br />
MIDI Source module’s only purpose is <strong>to</strong> define the source and<br />
channel <strong>of</strong> MIDI data. See the following sections <strong>to</strong> learn how <strong>to</strong><br />
change <strong>Studio</strong> <strong>Patches</strong> using several different methods.<br />
CHANGE STUDIO PATCHES<br />
Figure 81: Change <strong>Studio</strong> <strong>Patches</strong> Module<br />
If you want <strong>Studio</strong> <strong>Patches</strong> <strong>to</strong> receive MIDI program changes from a<br />
MIDI device, you must use the Change <strong>Studio</strong> <strong>Patches</strong> module (<strong>to</strong><br />
change <strong>Studio</strong> <strong>Patches</strong> using MIDI program changes sent from an<br />
<strong>OMS</strong> application, send <strong>to</strong> the “<strong>Studio</strong> <strong>Patches</strong> pgm chg” device,<br />
described in Sequencing Patch Changes, pg. 9).<br />
Place a Change <strong>Studio</strong> <strong>Patches</strong> module <strong>to</strong> the right <strong>of</strong> the MIDI<br />
Source module using techniques discussed previously.<br />
Figure 82: Adding a Change <strong>Studio</strong> <strong>Patches</strong> Module<br />
In the example shown in Figure 82, MIDI program changes transmitted<br />
by the K2000 on Channel 1 will change the <strong>Studio</strong> Patch number.<br />
EDITING THE<br />
CHANGE STUDIO<br />
PATCHES MODULE<br />
Double-click the Change <strong>Studio</strong> <strong>Patches</strong> module <strong>to</strong> open its edit<br />
window.<br />
Figure 83: Change <strong>Studio</strong> <strong>Patches</strong> Module Edit Window<br />
Ch 4: Program Change Sources - 53 - <strong>Studio</strong> <strong>Patches</strong> Manual
The edit window contains a single check box. When the box is<br />
unchecked, <strong>Studio</strong> <strong>Patches</strong> recognizes MIDI program changes<br />
directly. When the box is checked, the status <strong>of</strong> an additional MIDI<br />
controller (typically a footswitch or but<strong>to</strong>n) determines whether<br />
<strong>Studio</strong> <strong>Patches</strong> recognizes the program change message.<br />
Uncheck the box if you want <strong>Studio</strong> <strong>Patches</strong> <strong>to</strong> always change<br />
patches when it receives a MIDI program change message. Often,<br />
however, it’s undesirable <strong>to</strong> change the <strong>Studio</strong> Patch every time you<br />
send program changes from your master keyboard. If you check the<br />
check box, <strong>Studio</strong> <strong>Patches</strong> change only when an additional MIDI control<br />
event is received. This allows you <strong>to</strong> send program changes <strong>to</strong><br />
MIDI devices without changing the <strong>Studio</strong> Patch.<br />
If you check the check box, you’ll need <strong>to</strong> use an Enable <strong>Studio</strong> Patch<br />
Changes module (see the following section).<br />
ENABLE STUDIO PATCH CHANGES MODULE<br />
Figure 84: Enable <strong>Studio</strong> Patch Changes Module<br />
If you checked the check box in the Change <strong>Studio</strong> <strong>Patches</strong> module<br />
edit window, you must use the Enable <strong>Studio</strong> Patch Changes<br />
module <strong>to</strong> change <strong>Studio</strong> <strong>Patches</strong>.<br />
Add a new MIDI Source module <strong>to</strong> the Program Change Sources Window.<br />
Figure 85: Adding a Second Connection<br />
Choose a MIDI Source and channel, then place an Enable <strong>Studio</strong> Patch Changes<br />
module <strong>to</strong> the right <strong>of</strong> the MIDI Source module.<br />
Figure 86: Defining <strong>Studio</strong> Patch Change Enabling Source<br />
Ch 4: Program Change Sources - 54 - <strong>Studio</strong> <strong>Patches</strong> Manual
EDITING THE<br />
ENABLE STUDIO<br />
PATCH CHANGES<br />
MODULE<br />
Double-click the Enable <strong>Studio</strong> Patch Changes module <strong>to</strong> open its<br />
edit window.<br />
Figure 87: Enable <strong>Studio</strong> Patch Changes Module Edit Window<br />
Use the pop-up menu <strong>to</strong> specify which MIDI control message<br />
enables <strong>Studio</strong> <strong>Patches</strong> program changes. You can choose whether<br />
the control message needs <strong>to</strong> be “on” or “<strong>of</strong>f” in order <strong>to</strong> enable program<br />
changes.<br />
In the connection shown in Figure 88, the Masterman-88 will change<br />
<strong>Studio</strong> <strong>Patches</strong> only if you send the program change while holding<br />
down the <strong>Studio</strong> 5’s Footswitch #1. Program Change messages from<br />
the Masterman-88 will not affect <strong>Studio</strong> Patch selection if the<br />
<strong>Studio</strong> 5 footswitch is not down (on).<br />
Figure 88: Example <strong>of</strong> an <strong>Studio</strong> Patch Change Connection<br />
NOTE: Remember that <strong>Studio</strong> 5 footswitch and foot controller data is<br />
sent on MIDI Channel 15.<br />
Ch 4: Program Change Sources - 55 - <strong>Studio</strong> <strong>Patches</strong> Manual
USING A SINGLE<br />
STUDIO PATCH<br />
CHANGE AND<br />
ENABLE SOURCE<br />
If you wish <strong>to</strong> use a single MIDI source for both <strong>Studio</strong> Patch<br />
changes and enabling, you’ll use only one connection.<br />
Assume, for example, that you wanted <strong>to</strong> send <strong>Studio</strong> Patch changes<br />
from your Masterman-88 controller while holding down its sustain<br />
pedal. You would create the connection shown in Figure 89.<br />
Figure 89: Single <strong>Studio</strong> Patch Change and Enable Source<br />
PATCH CHAIN CONTROLS MODULE<br />
Figure 90: Patch Chain Controls Module<br />
Use this module <strong>to</strong> select a pair <strong>of</strong> MIDI controls <strong>to</strong> step up or down<br />
through a pre-defined Patch Chain. You define the Patch Chain in<br />
the Patch Chain Edit Window (see Chapter 5: Patch Chains).<br />
Place a Patch Chain Controls module <strong>to</strong> the right <strong>of</strong> a MIDI Source<br />
module using techniques discussed previously.<br />
Figure 91: Adding a Patch Chain Controls Module<br />
Ch 4: Program Change Sources - 56 - <strong>Studio</strong> <strong>Patches</strong> Manual
EDITING THE<br />
PATCH CHAIN<br />
CONTROLS<br />
MODULE<br />
Double-click the Patch Chain Controls module <strong>to</strong> open its edit window.<br />
Figure 92: Patch Chain Controls Module Edit Window<br />
Choose (from the Forward pop-up menu) the MIDI control you wish <strong>to</strong> use <strong>to</strong> step<br />
forward through the Patch Chain.<br />
Choose (from the Backward pop-up menu) the MIDI control you wish <strong>to</strong> use <strong>to</strong> step<br />
backward through the Patch Chain.<br />
For the example shown in Figure 92, you would use the <strong>Studio</strong> 5’s<br />
Footswitch #1 <strong>to</strong> step forward through a Patch Chain, and the<br />
<strong>Studio</strong> 5’s Footswitch #2 <strong>to</strong> step backward through a Patch Chain.<br />
Patch Chains wrap around. When you reach the last patch in a chain,<br />
the next step will return you <strong>to</strong> the first patch in the chain.<br />
See Chapter 5: Patch Chains <strong>to</strong> learn how <strong>to</strong> set up a Patch Chain.<br />
NETWORKING NOTE: If you’re using multiple interfaces, Opcode<br />
recommends you connect all MIDI devices defined as Patch Chain<br />
control sources <strong>to</strong> the same interface. The reason is that each microprocessor<br />
(whether it’s in the Macin<strong>to</strong>sh or an interface) has its own<br />
concept <strong>of</strong> the current location in the Patch Chain. If you use different<br />
devices connected <strong>to</strong> different interfaces <strong>to</strong> advance a Patch Chain,<br />
you may get unexpected results.<br />
Ch 4: Program Change Sources - 57 - <strong>Studio</strong> <strong>Patches</strong> Manual
CH 5:<br />
PATCH CHAINS<br />
The Patch Chain Edit Window creates a list <strong>of</strong> patches used by the<br />
Patch Chain Controls module (discussed in Chapter 4: Program<br />
Change Sources). The Patch Chain Controls module (found in the<br />
Program Change Sources Window) lets you step through a predetermined<br />
patch sequence using an external MIDI controller.<br />
This chapter discusses creating and editing a Patch Chain.<br />
OPENING A PATCH CHAIN EDIT WINDOW<br />
Click the Patch Chain but<strong>to</strong>n in the Patch Document Window, or<br />
choose Edit>Patch Chain <strong>to</strong> open the Patch Chain Edit Window.<br />
Figure 93: Patch Chain But<strong>to</strong>n<br />
Figure 94: Empty Patch Chain Edit Window<br />
Ch 5: Patch Chains - 58 - <strong>Studio</strong> <strong>Patches</strong> Manual
PATCH CHAIN EDIT WINDOW TERMINOLOGY<br />
Figure 95 shows the terminology for the Patch Chain Edit Window.<br />
<br />
<br />
<br />
<br />
<br />
Figure 95: Ana<strong>to</strong>my <strong>of</strong> a Patch Chain Edit Window<br />
Insert Patch Chain Steps But<strong>to</strong>n<br />
Patch Document List<br />
Patch Chain List (each item in the list is called a Step)<br />
Selec<strong>to</strong>r Dot<br />
Insertion Point<br />
The Patch Chain Edit Window is divided in<strong>to</strong> two scrolling lists. The<br />
list on the left is a copy <strong>of</strong> the current Patch document. It lists all the<br />
current patches and shows the first line <strong>of</strong> each patch description.<br />
The list on the right is the Patch Chain.<br />
CREATING A PATCH CHAIN<br />
You create a Patch Chain by defining an insertion point in the Patch<br />
Chain List and selecting patches from the Patch Document List.<br />
The Patch Chain List is blank when you first open an empty Patch<br />
Chain Edit Window.<br />
Click the selec<strong>to</strong>r dot <strong>of</strong> a patch in the Patch Document List.<br />
Figure 96: Select Patch from Patch Document List<br />
Click the Insert Patch Chain Steps but<strong>to</strong>n <strong>to</strong> insert the patch in the Patch Chain<br />
List.<br />
Ch 5: Patch Chains - 59 - <strong>Studio</strong> <strong>Patches</strong> Manual
Figure 97: Click Patch Chain Steps But<strong>to</strong>n<br />
Notice that the insertion point moves <strong>to</strong> follow the step just inserted.<br />
SHORTCUT: Double-click a selec<strong>to</strong>r dot in the Patch Document List<br />
<strong>to</strong> insert that patch in<strong>to</strong> the Patch Chain List au<strong>to</strong>matically. When you<br />
double-click a patch selec<strong>to</strong>r dot, you do not have <strong>to</strong> click the Insert<br />
Patch Chain Steps but<strong>to</strong>n <strong>to</strong> insert the patch.<br />
SELECTING<br />
MULTIPLE<br />
PATCHES<br />
You can insert multiple patches in<strong>to</strong> the Patch Chain List by selecting<br />
more than one patch at a time from the Patch Document List.<br />
Shift-click two or more patches in the Patch Document List.<br />
Figure 98: Shift-Clicking Multiple <strong>Patches</strong><br />
Click the Insert Patch Chain Steps but<strong>to</strong>n <strong>to</strong> insert the selected patches at the<br />
insertion point in the Patch Chain List.<br />
Figure 99: Inserting Multiple <strong>Patches</strong><br />
USING THE “ALL<br />
PATCHES IN<br />
ORDER” CHECK<br />
BOX<br />
The All <strong>Patches</strong> In Order check box, when checked, replaces the current<br />
Patch Chain with a chain containing all patches in the Patch<br />
document. <strong>Patches</strong> appear in numerical order (not necessarily in the<br />
order they appear in the Patch Document List). If you add, remove,<br />
or renumber patches in a Patch document when All <strong>Patches</strong> In<br />
Order is checked, the Patch Chain will change <strong>to</strong> always reflect your<br />
Patch document.<br />
Ch 5: Patch Chains - 60 - <strong>Studio</strong> <strong>Patches</strong> Manual
You may not make changes directly <strong>to</strong> the Patch Chain List when All<br />
<strong>Patches</strong> In Order is checked. If you want <strong>to</strong> make changes <strong>to</strong> a Patch<br />
Chain List, first uncheck All <strong>Patches</strong> In Order.<br />
Assume, for example, that you had the Patch Chain shown in<br />
Figure 100.<br />
Figure 100: Patch Chain before Checking All <strong>Patches</strong> In Order<br />
Click the All <strong>Patches</strong> In Order check box <strong>to</strong> check it. Your Patch<br />
Chain now lists, in numerical order, all the patches in your current<br />
Patch document (see Figure 101).<br />
Figure 101: Patch Chain after Checking All <strong>Patches</strong> In Order<br />
EDITING A PATCH CHAIN<br />
You may cut, copy, paste and clear Patch Chain Steps. Cut and<br />
copied Patch Chain Steps appear in the Clipboard window. The following<br />
example shows how <strong>to</strong> copy and paste a Patch Chain Step.<br />
Click the selec<strong>to</strong>r dot next <strong>to</strong> the Patch Chain Step you wish <strong>to</strong> copy.<br />
Choose Edit>Copy.<br />
Figure 102: Select and Copy a Patch Chain Step<br />
Ch 5: Patch Chains - 61 - <strong>Studio</strong> <strong>Patches</strong> Manual
Click between Patch Chain Steps <strong>to</strong> select a new insertion point.<br />
Figure 103: Defining an Insertion Point<br />
Choose Edit>Paste <strong>to</strong> paste the copied Patch Chain Step at the insertion point.<br />
Figure 104: Pasting a Patch Chain Step<br />
If you paste a Patch Chain Step without selecting an insertion point,<br />
it will be inserted at the end <strong>of</strong> the Patch Chain List. For example:<br />
Copy a Patch Chain Step <strong>to</strong> the Clipboard as shown in Figure 105.<br />
Figure 105: Copying a Patch Chain Step<br />
Paste the Patch Chain Step without choosing an insertion point. Look at<br />
Figure 106 <strong>to</strong> see that the Patch Chain Step was pasted <strong>to</strong> the end <strong>of</strong> the Patch<br />
Chain List.<br />
Figure 106: Pasting <strong>to</strong> the End <strong>of</strong> the Patch Chain List<br />
NOTE: If the Insert Patch Chain Steps but<strong>to</strong>n is dimmed, it means<br />
you have not defined an insertion point. If you paste a Patch Chain<br />
Step without selecting an insertion point, it will appear at the end <strong>of</strong><br />
the Patch Chain List.<br />
Ch 5: Patch Chains - 62 - <strong>Studio</strong> <strong>Patches</strong> Manual
CHANGING THE PATCH DOCUMENT<br />
If the Patch Chain references a patch that you later remove from the<br />
Patch Document Window, the Patch Chain continues <strong>to</strong> reference<br />
the patch by its number.<br />
Follow this example <strong>to</strong> see how deleting a patch affects the Patch<br />
Chain:<br />
Look at the Patch Chain Window shown in Figure 107. Notice the position <strong>of</strong><br />
Patch #8 in both the Patch Document List and the Patch Chain List.<br />
Figure 107: Typical Patch Chain Window<br />
Open the current Patch Document Window and select Patch #8.<br />
Figure 108: Selecting a Patch in the Patch Document Window<br />
Ch 5: Patch Chains - 63 - <strong>Studio</strong> <strong>Patches</strong> Manual
Choose Edit>Clear <strong>to</strong> remove Patch #8.<br />
Figure 109: Clearing a Patch in the Patch Document Window<br />
Look at the Patch Chain Window. Notice that Patch #8 has disappeared from the<br />
Patch Document List. Notice that the Patch Chain List still references the missing<br />
patch, but indicates that the patch has been removed.<br />
Figure 110: Patch Chain after Deleting a Patch<br />
USING A PATCH CHAIN<br />
To use the Patch Chain, you must define a connection using a Patch<br />
Chain Controls module in the Program Change Sources Window.<br />
See Chapter 4: Program Change Sources for details.<br />
NETWORKING NOTE: If using multiple interfaces, Opcode recommends<br />
you connect all MIDI devices defined as Patch Chain control<br />
sources <strong>to</strong> the same interface. The reason is that each microprocessor<br />
(whether it’s in the Macin<strong>to</strong>sh or an interface) has its own<br />
concept <strong>of</strong> the current location in the Patch Chain. If you use different<br />
devices connected <strong>to</strong> different interfaces <strong>to</strong> advance a Patch Chain,<br />
you may get unexpected results.<br />
Ch 5: Patch Chains - 64 - <strong>Studio</strong> <strong>Patches</strong> Manual
USING THE<br />
“CHANGING<br />
PATCHES SETS<br />
CURRENT STEP”<br />
CHECK BOX<br />
There may be times that you want <strong>to</strong> interrupt a pre-determined<br />
Patch Chain <strong>to</strong> use a different patch. The check box for “Changing<br />
<strong>Patches</strong> Sets Current Step” determines how changing a patch affects<br />
your position in the Patch Chain.<br />
If the check box for “Changing <strong>Patches</strong> Sets Current Step” is<br />
unchecked, then the current Patch Chain step will be unaffected by<br />
changing patches. Any manual patch changes will not affect the current<br />
Patch Chain step. This could be useful if, in a live performance,<br />
you want <strong>to</strong> deviate from your pre-determined sequence and then<br />
return <strong>to</strong> the Patch Chain exactly at the point you left.<br />
If “Changing <strong>Patches</strong> Sets Current Step” is checked, then the current<br />
Patch Chain step will jump <strong>to</strong> the next step that matches the new<br />
patch. If the newly selected patch isn’t contained in the Patch Chain,<br />
then the Patch Chain step does not change. This could be useful if, in<br />
a live performance, you want <strong>to</strong> jump around within your Patch<br />
Chain <strong>to</strong> change the order <strong>of</strong> your performance.<br />
The following table illustrates how various changes affect the current<br />
Patch Chain step with and without the “Changing <strong>Patches</strong> Sets<br />
Current Step” option checked.<br />
Assume your Patch document contains the following patches: 1 2 3 4 5 6 7 8<br />
and that your Patch Chain is as follows: 2 5 6 4 8 6. THEN...<br />
If you current<br />
Patch Chain<br />
step is:<br />
And you<br />
change the<br />
patch <strong>to</strong>:<br />
Then, when you<br />
advance the<br />
Patch Chain with<br />
“Changing<br />
<strong>Patches</strong> Sets<br />
Current Step”<br />
checked, your<br />
chain advances <strong>to</strong><br />
step:<br />
When you<br />
advance the<br />
Patch Chain with<br />
“Changing<br />
<strong>Patches</strong> Sets<br />
Current Step”<br />
unchecked, your<br />
chain advances <strong>to</strong><br />
step:<br />
2 5 6 4 8 6 8 2 5 6 4 8 6 2 5 6 4 8 6<br />
2 5 6 4 8 6 6 2 5 6 4 8 6 2 5 6 4 8 6<br />
2 5 6 4 8 6 6 2 5 6 4 8 6 2 5 6 4 8 6<br />
2 5 6 4 8 6 3 2 5 6 4 8 6 2 5 6 4 8 6<br />
Ch 5: Patch Chains - 65 - <strong>Studio</strong> <strong>Patches</strong> Manual
CH 6:<br />
PATCH SEQUENCES<br />
Each <strong>Studio</strong> Patch can contain a pair <strong>of</strong> sequences—the Start<br />
Sequence and the End Sequence. A patch’s Start Sequence is a short<br />
list <strong>of</strong> MIDI events sent <strong>to</strong> various devices when the patch is recalled.<br />
The patch’s End Sequence is a short list <strong>of</strong> events sent when a different<br />
patch is called up.<br />
Start Sequences are very useful for sending program changes,<br />
system exclusive patch data, initial controller values, or note <strong>of</strong>f<br />
commands <strong>to</strong> a device when a patch is selected. End Sequences are<br />
<strong>of</strong>ten used, when leaving a patch, <strong>to</strong> undo the effects <strong>of</strong> the start<br />
sequence.<br />
NOTE: Sequence events are sent one immediately after another.<br />
They do not contain timing information.<br />
CREATING/EDITING PATCH SEQUENCES<br />
Select a patch by clicking its selec<strong>to</strong>r dot.<br />
Choose Windows>Edit Patch Start Sequence or Windows>Edit Patch End<br />
Sequence.<br />
The Sequence Edit Window opens.<br />
Figure 111: Start Sequence Edit Window<br />
Ch 6: Patch Sequences - 66 - <strong>Studio</strong> <strong>Patches</strong> Manual
The seven but<strong>to</strong>ns across the <strong>to</strong>p <strong>of</strong> the Sequence Edit Window represent<br />
different MIDI events. These are, from left <strong>to</strong> right: Program<br />
Change, Control, Mono After<strong>to</strong>uch, Poly After<strong>to</strong>uch, Pitch Bend,<br />
System Exclusive, and All Notes Off.<br />
Poly After<strong>to</strong>uch<br />
Control<br />
System Exclusive<br />
Program Change<br />
Pitch Bend<br />
Mono After<strong>to</strong>uch<br />
Figure 112: Sequence Event But<strong>to</strong>ns<br />
All Notes Off<br />
Click each but<strong>to</strong>n and an undefined corresponding event appears in<br />
the space below the Module Palette.<br />
Figure 113: Undefined Start Sequence Events<br />
Clicking a sequence event’s selec<strong>to</strong>r dot selects that event. Shiftclicking<br />
sequence events selects more than one event for cutting,<br />
copying, or clearing. Sequence events can be rearranged by optionclicking<br />
their selec<strong>to</strong>r dots and dragging them <strong>to</strong> new locations.<br />
EDITING EVENTS<br />
You define and edit most MIDI events by choosing MIDI destinations<br />
and MIDI control numbers from pop-up menus. Select MIDI<br />
channels and event values by their corresponding numericals.<br />
PROGRAM CHANGE EVENTS<br />
Program change events show up as numbers, names, or both. You<br />
can change the patch by clicking on it and choosing a new one from<br />
the Patch pop-up. For instructions on getting names <strong>to</strong> show up, see<br />
Chapter 7: The Names Window.<br />
Figure 114: Patch Change Event<br />
Ch 6: Patch Sequences - 67 - <strong>Studio</strong> <strong>Patches</strong> Manual
If the device isn’t subscribed <strong>to</strong> a Patch Name document via the<br />
Name Manager, you will be able <strong>to</strong> click on the rightmost part <strong>of</strong> the<br />
patch line <strong>to</strong> display the following pop-up menu:<br />
Using this menu you can access the five different types <strong>of</strong> patch<br />
change messages. The different types allow you <strong>to</strong> change patches<br />
on synths that access more than 128 patches via bank select messages,<br />
or multiple program change messages. In all cases, there will<br />
be numericals next <strong>to</strong> the boxed icons that you can set <strong>to</strong> the appropriate<br />
values. If you are using the Name Manager <strong>to</strong> provide patch<br />
names, you won’t need <strong>to</strong> set the numericals manually; they are<br />
filled in au<strong>to</strong>matically whenever you select a patch.<br />
Here are the five types <strong>of</strong> patch change messages:<br />
• PC: Sends a program change message only.<br />
• PC PC: Sends two program changes in rapid succession. Some<br />
synths use the first message <strong>to</strong> set the hundreds digits and the<br />
second message <strong>to</strong> set the tens and ones digit. For example, PC 105<br />
PC 38 would set the channel <strong>to</strong> program 538.<br />
• B0 PC: Sends a bank select (controller) 0 message followed by a program<br />
change.<br />
• B32 PC: Sends a bank select (controller) 32 message followed by a<br />
program change.<br />
• B0 B32 PC: Sends a bank select 0 message, a bank select 32 message,<br />
and a program change.<br />
Check your synthesizer’s documentation <strong>to</strong> find out what sort <strong>of</strong><br />
patch change message(s) it requires.<br />
Ch 6: Patch Sequences - 68 - <strong>Studio</strong> <strong>Patches</strong> Manual
THE SYSTEM EXCLUSIVE EVENT<br />
To edit a system exclusive event:<br />
Click the area <strong>to</strong> the right <strong>of</strong> the “F0” icon <strong>to</strong> open an Edit Event Window.<br />
Figure 115: Empty Edit Event Window<br />
Type in the desired hexadecimal data.<br />
Figure 116: Entering Data In<strong>to</strong> Edit Event Dialog<br />
Click the close box <strong>to</strong> return <strong>to</strong> the Sequence Edit Window. The data is displayed<br />
in the MIDI Event column.<br />
Figure 117: Sequence Edit Window w/SysEx Event Defined<br />
You may enter any MIDI event in<strong>to</strong> the system exclusive edit dialog.<br />
System exclusive data must be four bytes or more and end with F7.<br />
Non-system exclusive data must start with a value between 80 and<br />
FF (except F5 which is reserved) and it must be three bytes or less.<br />
Ch 6: Patch Sequences - 69 - <strong>Studio</strong> <strong>Patches</strong> Manual
You can paste system exclusive data from the Mac Clipboard. If you<br />
have a large string <strong>of</strong> system exclusive data (like a patch dump), it<br />
can be copied <strong>to</strong> the Clipboard from within Vision (or <strong>Studio</strong> Vision)<br />
and then pasted in<strong>to</strong> the Edit Event Window.<br />
NOTE: System Exclusive messages in a Start or End Sequence<br />
should always be sent directly <strong>to</strong> the intended device. Sending<br />
SysEx <strong>to</strong> a Virtual Instrument containing a splitter module and different<br />
devices thickens the MIDI data stream unnecessarily. Sending<br />
SysEx <strong>to</strong> a Virtual Instrument consisting <strong>of</strong> a splitter module routed <strong>to</strong><br />
different channels <strong>of</strong> the same device may corrupt the data.<br />
VIEWING<br />
SEQUENCE EVENT<br />
TYPES<br />
You can move the cursor over a sequence event in a Sequence Edit<br />
Window and see the event type’s name displayed. This makes it<br />
easier <strong>to</strong> edit long Start or End Sequences.<br />
1. Move the cursor over an event, and...<br />
...2. the type <strong>of</strong> event is diplayed, here.<br />
Figure 118: Viewing a Sequence’s Event Type<br />
You will also see the event name displayed when you move the<br />
cursor over any <strong>of</strong> the sequence event but<strong>to</strong>ns.<br />
SENDING ALL NOTES OFF EVENTS<br />
<strong>OMS</strong> does not au<strong>to</strong>matically send note <strong>of</strong>f commands when you<br />
change patches. If you hold notes and change patches, any devices<br />
not used in the new patch will not receive note <strong>of</strong>f commands. This is<br />
useful in live performance for changing patches while sustaining<br />
chords or synth pads. If you wish any held notes <strong>to</strong> turn <strong>of</strong>f when<br />
you change patches, you should send an All Notes Off event in a<br />
Patch End Sequence.<br />
Ch 6: Patch Sequences - 70 - <strong>Studio</strong> <strong>Patches</strong> Manual
There are two ways <strong>to</strong> send an All Notes Off event <strong>to</strong> your devices:<br />
use the MIDI All Notes Off command or use the All Notes Off but<strong>to</strong>n.<br />
If your device responds <strong>to</strong> the MIDI All Notes Off command,<br />
insert a Control Patch Sequence event, and select Control 123. If your<br />
device does not respond <strong>to</strong> the MIDI All Notes Off command, you<br />
should use the All Notes Off but<strong>to</strong>n—this sends actual note <strong>of</strong>f commands<br />
<strong>to</strong> all 128 MIDI notes on the specified channel (and,<br />
consequently, takes a couple more seconds).<br />
PATCH SEQUENCE EXAMPLE<br />
Let’s assume, for example, that you’re performing in a live situation<br />
and need <strong>to</strong> define Patch #2 as a MIDI “stack” that combines a modulated<br />
vibe sound from the ProMaker/1 with a s<strong>of</strong>t organ sound<br />
from the Vec<strong>to</strong>rific.<br />
DEFINING THE<br />
START SEQUENCE<br />
Define the patch using the techniques discussed in previous chapters.<br />
You must now define a Start Sequence that sets the ProMaker/1 and Vec<strong>to</strong>rific <strong>to</strong><br />
the proper sounds, volumes and modulations.<br />
Choose Patch>Edit Patch Start Sequence <strong>to</strong> open a Start Sequence Edit<br />
Window.<br />
Assume that the ProMaker/1 has Patch #12 defined as a Vibe sound.<br />
Click the Program Change sequence event but<strong>to</strong>n <strong>to</strong> place an undefined Program<br />
Change sequence event in the edit area.<br />
Choose the ProMaker/1 from the Destination pop-up menu.<br />
Figure 119: Selecting a Destination Device<br />
Ch 6: Patch Sequences - 71 - <strong>Studio</strong> <strong>Patches</strong> Manual
Select Patch #12 as the Program Change number from the MIDI Event pop-up<br />
menu.<br />
Figure 120: Selecting a Program Change Number<br />
Click the Control sequence event but<strong>to</strong>n, choose the ProMaker/1 as the<br />
destination, the Mod Wheel as the MIDI Event and 127 as its value. This sets the<br />
vibe sound’s modulation <strong>to</strong> full value.<br />
Figure 121: Setting a Control Event<br />
Choose the desired organ patch for the Vec<strong>to</strong>rific and set each synthesizer’s<br />
volume level using MIDI Volume Control.<br />
The final start sequence would look as shown in Figure 122.<br />
Figure 122: Fully Defined Start Sequence<br />
Now, whenever you recall Patch #2, your Masterman-88 keyboard<br />
will control a stack that combines the ProMaker/1 (Channel 1,<br />
Patch #12 with full modulation and volume) with the Vec<strong>to</strong>rific<br />
(Channel 1, Patch #63 and a MIDI volume level <strong>of</strong> 40).<br />
Ch 6: Patch Sequences - 72 - <strong>Studio</strong> <strong>Patches</strong> Manual
DEFINING THE END<br />
SEQUENCE<br />
You’ll need <strong>to</strong> create an End Sequence <strong>to</strong> undo the effects <strong>of</strong> the Start<br />
Sequence. The End Sequence will play whenever you recall a patch<br />
other than Patch #2.<br />
To create an End Sequence:<br />
Choose Patch>Edit Patch End Sequence <strong>to</strong> open an End Sequence Edit<br />
Window.<br />
Define Program Change and Control events <strong>to</strong> undo the effects <strong>of</strong> the patch’s Start<br />
Sequence.<br />
Figure 123: Fully Defined End Sequence<br />
The End Sequence shown in Figure 123 will reset the ProMaker/1<br />
and Vec<strong>to</strong>rific <strong>to</strong> Patch #0, their volumes <strong>to</strong> 127, and the ProMaker/<br />
1’s Mod Wheel value <strong>to</strong> zero whenever you select a different <strong>Studio</strong><br />
Patch.<br />
Ch 6: Patch Sequences - 73 - <strong>Studio</strong> <strong>Patches</strong> Manual
CH 7:<br />
THE NAMES WINDOW<br />
Choosing Windows>Device Patch Names opens the <strong>OMS</strong> Name<br />
Manager.<br />
The Name Manager integrates patch documents from a variety <strong>of</strong><br />
sources:<br />
• Galaxy Bundles<br />
• <strong>Studio</strong> Patch documents<br />
• Typed-in Patch Name documents<br />
• Documents from other <strong>OMS</strong>-2 compatible librarians<br />
Once you set up the Name Manager, the <strong>Studio</strong> <strong>Patches</strong> Edi<strong>to</strong>r’s<br />
pop-up menus display the names <strong>of</strong> your synthesizer patches, not<br />
just their numbers. The Name Manager also takes care <strong>of</strong> the housekeeping<br />
involved when you open a file that uses a different set <strong>of</strong><br />
patch names.<br />
TERMINOLOGY<br />
Every MIDI device manufacturer seems <strong>to</strong> use different terminology<br />
<strong>to</strong> describe similar features in their devices. For example, different<br />
synthesizer manufacturers use the terms “patch,” “voice,” “part,”<br />
“program,” or “sound” <strong>to</strong> mean the same thing—a collection <strong>of</strong> programmable<br />
parameters that work <strong>to</strong>gether <strong>to</strong> create a unique sound.<br />
Because Opcode has no way <strong>of</strong> knowing which MIDI devices you<br />
own, we must describe certain Name Manager functions generically.<br />
The following mini-glossary lists the terms we’ll use in describing<br />
the Name Manager.<br />
PATCH<br />
A collection <strong>of</strong> parameters in a device that define the sound played<br />
when recalled. For example, one patch might create a trumpet sound<br />
and another might create a guitar sound.<br />
Ch 7: The Names Window - 74 - <strong>Studio</strong> <strong>Patches</strong> Manual
BANK<br />
A collection <strong>of</strong> patches s<strong>to</strong>red in a MIDI device. Most modern MIDI<br />
devices have s<strong>to</strong>rage for hundreds (or even thousands) <strong>of</strong> different<br />
patches. <strong>How</strong>ever, the MIDI specification only provides patch<br />
change messages for 128 patches. In order <strong>to</strong> access more than 128<br />
patches, a device must s<strong>to</strong>re them in banks, which are accessed via<br />
bank select messages. The actual bank select messages vary from<br />
device <strong>to</strong> device.<br />
MODE<br />
The state <strong>of</strong> a device that determines how MIDI program changes are<br />
interpreted.<br />
Imagine a synthesizer with three different modes:<br />
• Patch Mode: Individual sounds, such as “Electric Piano,” “Acoustic<br />
Guitar,” or “Flute.”<br />
• Effect Mode: Effects programs such as “Hall Reverb,” “Slap Delay,”<br />
or “Flange.”<br />
• Performance Mode: A combination <strong>of</strong> several individual sounds<br />
with an effects patch, such as an “Electric Piano” patch layered with<br />
a “Flute” patch and assigned <strong>to</strong> a “Hall Reverb” effect.<br />
Usually devices access the different modes by interpreting patch<br />
change messages differently for different channels. For instance,<br />
General MIDI devices have “patch” channels and “drum” channels.<br />
Sending program change #1 <strong>to</strong> a channel in “patch mode” calls up a<br />
piano, whereas sending program change #1 <strong>to</strong> a channel in “drum<br />
mode” calls up a standard drum kit.<br />
By using different device modes, <strong>OMS</strong> applications can display and<br />
select any patch type contained in your MIDI device.<br />
Do not confuse modes with banks; a bank <strong>of</strong> patches for one mode<br />
might contain an entirely different number <strong>of</strong> patches than a bank<br />
for a different mode.<br />
PATCH NAME<br />
DOCUMENT<br />
A document that s<strong>to</strong>res and provides patch names and device modes<br />
for one or more devices. There are subtle differences in the way the<br />
Name Manager handles different types <strong>of</strong> document; these will be<br />
noted throughout the rest <strong>of</strong> this chapter.<br />
CURRENT PATCH<br />
NAME DOCUMENT<br />
If a Patch Name document is current, <strong>OMS</strong> thinks that the patches in<br />
the document are loaded in<strong>to</strong> the device. You can manually make a<br />
document current, or a librarian program like Galaxy might au<strong>to</strong>matically<br />
do it for you when sending sounds <strong>to</strong> a device.<br />
Ch 7: The Names Window - 75 - <strong>Studio</strong> <strong>Patches</strong> Manual
PATCH NAME<br />
PROVIDER<br />
An application that can create a Patch Name document readable by<br />
the <strong>OMS</strong> Name Manager.<br />
NAME SETUP<br />
A mapping that associates each MIDI device in your current <strong>OMS</strong><br />
<strong>Studio</strong> <strong>Setup</strong> document with a specified Patch Name document.<br />
There is only one Name <strong>Setup</strong> active at a time, and it “lives” inside<br />
<strong>OMS</strong>, not the application.<br />
Since the Name <strong>Setup</strong> is handled by <strong>OMS</strong>, changes made <strong>to</strong> the<br />
Name <strong>Setup</strong> in one application affect the names seen in other <strong>OMS</strong><br />
2.0-compatible applications.<br />
When you save a <strong>Studio</strong> <strong>Patches</strong> document, the current Name <strong>Setup</strong><br />
is saved along with it.<br />
NAME SETUP WINDOW<br />
To open the Names Window, choose Windows>Device Patch<br />
Names in the <strong>Studio</strong> <strong>Patches</strong> Edi<strong>to</strong>r application.<br />
<br />
<br />
<br />
Figure 124: Ana<strong>to</strong>my <strong>of</strong> the Names Window<br />
NAMES WINDOW<br />
ANATOMY<br />
As you can see in Figure 124, the Names Window contains numerous<br />
elements:<br />
Device column: This column shows the name <strong>of</strong> each MIDI device<br />
contained in your current <strong>OMS</strong> <strong>Studio</strong> <strong>Setup</strong> document. You cannot<br />
edit the contents <strong>of</strong> this column. Its contents change whenever the<br />
current <strong>Studio</strong> <strong>Setup</strong> document changes.<br />
Devices s<strong>to</strong>red in a Name <strong>Setup</strong> but not defined in the current <strong>Studio</strong><br />
<strong>Setup</strong> appear in italics.<br />
Ch 7: The Names Window - 76 - <strong>Studio</strong> <strong>Patches</strong> Manual
Patch Name Document column: This column shows the Patch<br />
Name document referred <strong>to</strong> by each <strong>of</strong> the devices. For more information,<br />
see Patch Name Document Column (pg. 77).<br />
Device Mode column: If a device supports multiple modes, then this<br />
column shows which mode it is using. You can change the mode<br />
directly in this column’s pop-up menu.<br />
MIDI Channel column: Some MIDI devices let you select different<br />
modes on different MIDI channels. This column shows which MIDI<br />
channel uses the mode shown in the Device Mode column. For more<br />
information, see Channel and Device Mode Columns (pg. 80).<br />
Name <strong>Setup</strong> control: Use this pop-up menu <strong>to</strong> determine how<br />
changes made in other applications affect the Name <strong>Setup</strong>. For more<br />
information, see Name <strong>Setup</strong> Control (pg. 80).<br />
The information contained in this window is saved with the <strong>Studio</strong><br />
<strong>Patches</strong> document when using the File>Save or File>Save As<br />
commands.<br />
The following sections discuss the Names Window in greater detail.<br />
PATCH NAME<br />
DOCUMENT<br />
COLUMN<br />
Use this column <strong>to</strong> select which Patch Name document is referenced<br />
by each MIDI device. This is called subscribing <strong>to</strong> a document. To<br />
subscribe <strong>to</strong> a Patch Name document:<br />
Click in the Patch Name Document column next <strong>to</strong> a MIDI device.<br />
Select Names>Subscribe.<br />
A standard Open dialog box appears.<br />
In the following dialog, navigate <strong>to</strong> and select the desired Patch Name document.<br />
Then click OK.<br />
The column now shows the Patch Name document <strong>to</strong> which you subscribed.<br />
NOTE: If you don’t know where <strong>to</strong> find Patch Name documents, read<br />
the following section.<br />
Ch 7: The Names Window - 77 - <strong>Studio</strong> <strong>Patches</strong> Manual
WHERE TO FIND PATCH NAME DOCUMENTS<br />
There are three sources for Patch Name documents:<br />
• The Name Manager recognizes Bundles created by Galaxy and other<br />
<strong>OMS</strong>-2.0 compatible librarians as Patch Name documents.<br />
• You can create your own “typed-in” Patch Name documents directly<br />
from the Name Manager.<br />
To do so, double-click in the Patch Name column <strong>to</strong> open the Patch<br />
Name Edi<strong>to</strong>r. Use the Patch Name Edi<strong>to</strong>r <strong>to</strong> create or edit a Patch<br />
Name document as described in Patch Name Editing (pg. 84).<br />
Figure 125: Blank Patch Name Edi<strong>to</strong>r Window<br />
• Opcode supplies a collection <strong>of</strong> “fac<strong>to</strong>ry” Patch Name documents for<br />
many popular synthesizers. If there is a fac<strong>to</strong>ry Patch Name document<br />
for your device, choosing Names>Use Fac<strong>to</strong>ry/GM Names<br />
enables it. See Use Fac<strong>to</strong>ry/General MIDI Names (pg. 82).<br />
Ch 7: The Names Window - 78 - <strong>Studio</strong> <strong>Patches</strong> Manual
CURRENT AND MISSING DOCUMENTS<br />
Figure 126: Name <strong>Setup</strong> showing current and missing documents<br />
The Patch Name Document column displays additional information<br />
about subscribed documents by using italicized text and the small<br />
diamond icon:<br />
• A small diamond appears before the name <strong>of</strong> each current Patch<br />
Name document. A current Patch Name document is the document<br />
that the Name Manager uses <strong>to</strong> supply names <strong>to</strong> all <strong>OMS</strong> 2.0-compatible<br />
applications. For more information, see Name <strong>Setup</strong> Control<br />
(pg. 80).<br />
In Figure 126, the MU80’s Patch Name document is not current. This<br />
means that the patches actually resident in the MU80 don’t match<br />
those currently subscribed.<br />
• The Patch Name document is italicized if the Name Manager can’t<br />
locate the document. In Figure 126, the document for the<br />
Wavestation SR is missing.<br />
Ch 7: The Names Window - 79 - <strong>Studio</strong> <strong>Patches</strong> Manual
NAME SETUP<br />
CONTROL<br />
Name <strong>Setup</strong> control<br />
Since the <strong>OMS</strong> Name Manager only references one Name <strong>Setup</strong> at a<br />
time, changes made <strong>to</strong> the Name <strong>Setup</strong> in other applications can<br />
affect the <strong>Studio</strong> <strong>Patches</strong> Edi<strong>to</strong>r. Use the Name <strong>Setup</strong> control <strong>to</strong><br />
determine what happens when changes are made <strong>to</strong> the Name<br />
<strong>Setup</strong>:<br />
• Always use current patches: Making Patch Name documents current<br />
in another application changes the Name <strong>Setup</strong> in the <strong>Studio</strong><br />
<strong>Patches</strong> Edi<strong>to</strong>r <strong>to</strong> match.<br />
• Keep using these patches: “Locks in” the current Name <strong>Setup</strong>. Subscriptions<br />
can’t be changed in the <strong>Studio</strong> <strong>Patches</strong> Edi<strong>to</strong>r by changing<br />
them in another <strong>OMS</strong> 2.0-compatible application.<br />
This setting is not remembered between sessions. Whenever you<br />
reopen the <strong>Studio</strong> <strong>Patches</strong> Edi<strong>to</strong>r, the control is reset <strong>to</strong> Always use<br />
current patches.<br />
CHANNEL AND<br />
DEVICE MODE<br />
COLUMNS<br />
The Channel and Device Mode functions are interrelated and are<br />
described here <strong>to</strong>gether.<br />
If a device supports multiple device modes, then the Device Mode<br />
column contains a pop-up menu listing all possible modes.<br />
Device mode pop-up list<br />
Since each MIDI channel can access a different device mode, the Ch<br />
(Channel) column displays which MIDI channels access which<br />
device modes. You can view every enabled MIDI channel or just a<br />
summary <strong>of</strong> all MIDI channels by clicking the desired device’s selec<strong>to</strong>r<br />
icon, then choosing Names>Show Channels.<br />
Ch 7: The Names Window - 80 - <strong>Studio</strong> <strong>Patches</strong> Manual
Show Channels is a <strong>to</strong>ggle whose value is changed by choosing it<br />
repeatedly.<br />
• When Show Channels is checked (on), the Names Window displays<br />
a separate row for every MIDI channel in that device (as assigned in<br />
the <strong>OMS</strong> <strong>Studio</strong> <strong>Setup</strong> document). You can then select a device mode<br />
for each MIDI channel.<br />
Different Device<br />
Modes assigned<br />
<strong>to</strong> different MIDI<br />
channels<br />
• When Show Channels is not checked (<strong>of</strong>f), the Names Window displays<br />
a single row for that MIDI device and the Ch column is labeled<br />
all. Changing the device mode affects all channels simultaneously.<br />
The word all in<br />
the Ch column<br />
indicates that<br />
Show Channels<br />
is <strong>of</strong>f.<br />
The word various in the<br />
Device Mode column indicates<br />
that not all channels<br />
are in the same mode.<br />
Figure 127: Channel mode indica<strong>to</strong>rs<br />
EDITING DEVICE MODES WHEN SHOW CHANNELS IS OFF<br />
If Show Channels is <strong>of</strong>f and every MIDI channel is set <strong>to</strong> the same<br />
device mode, then that mode appears in the Device Mode column.<br />
Same device mode used by<br />
all MIDI channels<br />
Ch 7: The Names Window - 81 - <strong>Studio</strong> <strong>Patches</strong> Manual
If Show Channels if <strong>of</strong>f and different MIDI channels use different<br />
device modes, then the device mode column displays various, indicating<br />
more than one device mode is active for this device (see<br />
Figure 127).<br />
EDITING PATCH NAME DOCUMENTS FOR MULTI-MODE DEVICES<br />
If different MIDI channels reference different device modes, there is<br />
only one way <strong>to</strong> edit each mode’s Patch Name document:<br />
Double-click a number in the Ch column.<br />
A Patch Name Edi<strong>to</strong>r opens for that MIDI channel’s mode. Patch Name Editing is<br />
discussed in Patch Name Edi<strong>to</strong>r Ana<strong>to</strong>my (pg. 85).<br />
IMPORTANT: This is the only way <strong>to</strong> edit the patch names for a<br />
device with multiple modes.<br />
NAMES MENU<br />
The Names Menu is available whenever a Names Window is active.<br />
Figure 128: Name Window Menu<br />
The following sections describe each command in the Names Menu.<br />
SUBSCRIBE<br />
This command selects a Patch Name document <strong>to</strong> which all selected<br />
devices are subscribed.<br />
USE FACTORY/<br />
GENERAL MIDI<br />
NAMES<br />
If you’re using a General MIDI synth, choose this command <strong>to</strong> subscribe<br />
<strong>to</strong> the General MIDI Patch Name document located in the<br />
Fac<strong>to</strong>ry Names folder (in the <strong>OMS</strong> Folder inside the System Folder).<br />
Ch 7: The Names Window - 82 - <strong>Studio</strong> <strong>Patches</strong> Manual
<strong>OMS</strong> also provides Fac<strong>to</strong>ry Name documents for many popular<br />
instruments. If your device is supported, this command subscribes <strong>to</strong><br />
these names.<br />
If the device doesn’t have an associated Fac<strong>to</strong>ry Name file, the General<br />
MIDI patch names are used instead.<br />
COPY<br />
SUBSCRIPTION<br />
This command copies the subscription for the selected device(s) <strong>to</strong><br />
the Clipboard.<br />
PASTE<br />
SUBSCRIPTION<br />
This command pastes subscriptions from the Clipboard on<strong>to</strong> the<br />
selected device(s). Any previous subscription is replaced and the<br />
new Patch Name document becomes current.<br />
CLEAR<br />
SUBSCRIPTION<br />
Removes the subscription information from selected device(s).<br />
MAKE CURRENT<br />
When choosing this command, the following alert appears:<br />
Clicking Don’t Make Current retains the previous subscription.<br />
If the Send the patches option is available and checked, the Name<br />
Manager attempts <strong>to</strong> transmit the patches <strong>to</strong> the device when you<br />
click the Make Current but<strong>to</strong>n. The application that created the<br />
Patch Name document must be capable <strong>of</strong> this operation. For example,<br />
names obtained from a Galaxy Bundle can be sent (if Galaxy is<br />
available on your system), but typed-in name documents cannot and<br />
the Send the patches option won’t appear in the alert.<br />
USE CURRENT<br />
INSTEAD<br />
Use Current Instead replaces the selected device(s)’ non-current<br />
subscriptions with subscriptions <strong>to</strong> the current Patch Name<br />
document(s).<br />
NEW PATCH<br />
DOCUMENT<br />
Creates a blank, untitled Patch Name document for the selected<br />
device(s).<br />
Ch 7: The Names Window - 83 - <strong>Studio</strong> <strong>Patches</strong> Manual
VIEW / EDIT<br />
PATCH NAMES<br />
Selecting a device and choosing this command is equivalent <strong>to</strong><br />
double-clicking a device’s Patch Name document column.<br />
TELL PATCH<br />
PROVIDER<br />
This menu item contains a sub-menu listing the commands that can<br />
be sent <strong>to</strong> the Patch Name Provider.<br />
If the Patch Name Provider understands the selected message, it performs<br />
that action. For example, if patch names come from a Galaxy<br />
Bundle and Send <strong>Patches</strong> To Device is the selected command,<br />
Galaxy sends the bundled patches <strong>to</strong> the selected device.<br />
SHOW CHANNELS<br />
Show Channels controls whether the Names Window displays one<br />
row per MIDI channel or a single row representing all MIDI channels.<br />
To assign different device modes <strong>to</strong> different MIDI channels,<br />
this option must be enabled (checked). For more information, see<br />
Channel and Device Mode Columns (pg. 80).<br />
PATCH NAME EDITING<br />
Use the Patch Name Edi<strong>to</strong>r <strong>to</strong> display or edit Patch Name<br />
documents.<br />
OPENING THE<br />
PATCH NAME<br />
EDITOR<br />
To open a Patch Name Edi<strong>to</strong>r:<br />
In the Names Window, double-click in the Patch Name Document column next <strong>to</strong> a<br />
device.<br />
Figure 129: Double-click <strong>to</strong> open a Patch Name Edi<strong>to</strong>r<br />
Ch 7: The Names Window - 84 - <strong>Studio</strong> <strong>Patches</strong> Manual
A Patch Name Edi<strong>to</strong>r opens for that Patch Name document. The Edi<strong>to</strong>r shows all<br />
the Patch Names for that device.<br />
<br />
<br />
Figure 130: Typical Patch Name Edi<strong>to</strong>r<br />
If you open a Patch Name Edi<strong>to</strong>r for an unsubscribed device, a blank Patch Name<br />
Edi<strong>to</strong>r opens, which you may use <strong>to</strong> create a Patch Name document. Documents<br />
created this way are called “Typed-In” Patch Name documents.<br />
NOTE: If a Patch Name document contains multiple device modes,<br />
the Patch Name Edi<strong>to</strong>r displays names only for the selected channel’s<br />
current device mode. For more information, see Channel and<br />
Device Mode Columns (pg. 80).<br />
PATCH NAME<br />
EDITOR ANATOMY<br />
Figure 130 shows the various elements in the Patch Name Edi<strong>to</strong>r.<br />
These are:<br />
MIDI Program Number: The MIDI column in the Patch Name<br />
Edi<strong>to</strong>r displays MIDI representations <strong>of</strong> patches in the form bank0/<br />
bank32/patch number (0-127). For example, if the current bank<br />
requires a bank32 message with value “1” <strong>to</strong> be sent <strong>to</strong> access the<br />
patches, each patch will have “1/x” as its program number, where x<br />
is the number within the bank.<br />
bank0 and bank32 are each omitted when not used, which is the case<br />
for the default first bank. Consult your synthesizer’s documentation<br />
<strong>to</strong> determine how bank0 and bank32 messages affect patch selection.<br />
These numbers can’t be changed directly, and if the Patch Name document<br />
comes from an external librarian, they can’t be changed at all.<br />
If the document in question is a Typed-In Patch Name document, the<br />
numbers are affected by settings in the Bank Select/Numbering<br />
dialog box. See Bank Select/Numbering (pg. 92).<br />
Ch 7: The Names Window - 85 - <strong>Studio</strong> <strong>Patches</strong> Manual
Device Program Number: This column shows how the MIDI<br />
device’s internal program numbering corresponds <strong>to</strong> the actual MIDI<br />
program number.<br />
For example, some devices number their internal programs 1-128,<br />
which corresponds <strong>to</strong> MIDI programs 0-127. This results in the pattern<br />
shown in Figure 131 in the MIDI and Numbers column.<br />
The device shown in this example, organizes its programs in banks<br />
<strong>of</strong> 50, which are numbered 0-49.<br />
This column numbers patches as they<br />
appear in the actual device.<br />
Figure 131: MIDI and device numbering<br />
Patch Name: This column shows the name <strong>of</strong> each patch. New patch<br />
names can be typed directly in<strong>to</strong> this column if this Patch Name document<br />
was created in the Name Manager (i.e. Galaxy and other<br />
librarian documents can’t be edited from here). These names appear<br />
wherever patch names are seen in any <strong>OMS</strong> 2.0-compatible<br />
application.<br />
GM Equivalent: If this patch corresponds <strong>to</strong> a General MIDI patch,<br />
choose the relevant GM patch from the pop-up menu in this column.<br />
The Name Manager applies all attributes and benefits <strong>of</strong> General<br />
MIDI groupings <strong>to</strong> that patch.<br />
For example, assume you have a piano sound in your Patch Name<br />
document, and you assign “GrandPno1” as its GM Equivalent. Then,<br />
if you choose <strong>to</strong> display patch names by General MIDI Groups, this<br />
piano sound appears whenever you ask <strong>to</strong> see all the piano sounds<br />
in your MIDI device. For more information about selecting patches<br />
by General MIDI Group, see Using Patch Groupings (pg. 96).<br />
Ch 7: The Names Window - 86 - <strong>Studio</strong> <strong>Patches</strong> Manual
Note Name Indica<strong>to</strong>r: The <strong>OMS</strong> Name Manager can s<strong>to</strong>re cus<strong>to</strong>m<br />
MIDI note names along with patch names. Cus<strong>to</strong>m note names have<br />
many uses. For example, names can be assigned <strong>to</strong> the notes in a<br />
drum kit patch, causing edit windows <strong>to</strong> display notes named<br />
“kick,” or “snare,” instead <strong>of</strong> “C3” or “D3.”<br />
This column uses a small note icon <strong>to</strong> indicate that a patch has<br />
cus<strong>to</strong>m note names. The Note Name Edi<strong>to</strong>r can be opened by<br />
double-clicking in this column. For more information, see Note and<br />
Control Names (pg. 93).<br />
Control Name Indica<strong>to</strong>r: The <strong>OMS</strong> Name Manager allows s<strong>to</strong>rage <strong>of</strong><br />
cus<strong>to</strong>m MIDI control names along with the name <strong>of</strong> the patch.<br />
Cus<strong>to</strong>m control names have many uses. For example, a MIDI effects<br />
device might use MIDI control numbers <strong>to</strong> edit its internal parameters.<br />
By entering cus<strong>to</strong>m control names, edit windows display<br />
controls named “Reverb Time,” or “Pre-Delay,” instead <strong>of</strong> “Control<br />
48,” or “Control 37,” making it easier <strong>to</strong> edit these devices within<br />
<strong>OMS</strong> 2.0-compatible applications.<br />
This column indicates that a patch has cus<strong>to</strong>m control names if it<br />
contains a small knob icon. The Control Name Edi<strong>to</strong>r can be opened<br />
by double-clicking in this column. For more information, see Note<br />
and Control Names (pg. 93).<br />
Program Selec<strong>to</strong>r Dot: If you are pasting names in<strong>to</strong> a typed-in<br />
name document, you can select the range where the names will be<br />
pasted by shift-clicking or dragging over the Program Selec<strong>to</strong>r Dots.<br />
If no dots are selected, names are pasted starting at the <strong>to</strong>p and<br />
working down until the names on the Clipboard are exhausted. See<br />
Paste Name List (pg. 89) for more information.<br />
PATCHES MENU<br />
The <strong>Patches</strong> Menu is available whenever a Patch Edi<strong>to</strong>r is active.<br />
Figure 132: <strong>Patches</strong> Menu<br />
Ch 7: The Names Window - 87 - <strong>Studio</strong> <strong>Patches</strong> Manual
NOTE: Most <strong>of</strong> these menu items apply only <strong>to</strong> typed-in Patch Name<br />
documents; they’re disabled for Patch Name documents that come<br />
from other applications, such as Galaxy.<br />
SAVE<br />
Choose this command <strong>to</strong> save any changes you’ve made <strong>to</strong> the current<br />
Patch Name document. If you’ve previously saved a document,<br />
then the Save command replaces the old document with the new<br />
version. If you haven’t yet saved the active document, choosing Save<br />
opens the Save As dialog box, in which you name the document and<br />
select a location in which <strong>to</strong> s<strong>to</strong>re it.<br />
This command behaves differently depending on where the document<br />
comes from:<br />
• Typed-In Patch Name documents are saved normally.<br />
• Documents from Galaxy or other <strong>OMS</strong>-compatible Patch Name providers<br />
are converted <strong>to</strong> Typed-In Patch Name documents. For this<br />
reason, the Save command is not available when you are in a librarian’s<br />
document. In this situation, only the Save As command is<br />
available.<br />
SAVE AS<br />
Use this command <strong>to</strong> save a copy <strong>of</strong> the active document using a different<br />
name. Choosing Save As opens the Save As dialog box, in<br />
which you name the document and select a location in which <strong>to</strong> s<strong>to</strong>re<br />
it.<br />
SAVING NOTE / CONTROL NAMES<br />
If Note or Control Names have been added <strong>to</strong> a document created by<br />
another application, the Save Note/Control Names command<br />
becomes available. This command adds the note and control name<br />
information <strong>to</strong> the saved Patch Name document.<br />
Ch 7: The Names Window - 88 - <strong>Studio</strong> <strong>Patches</strong> Manual
COPY NAME LIST<br />
Choose Copy Name List <strong>to</strong> copy the list <strong>of</strong> Patch Names from a<br />
Patch Name document on<strong>to</strong> the Clipboard.<br />
Names are copied <strong>to</strong> the Clipboard as text, and can be pasted in<strong>to</strong><br />
other applications. For example, you can paste names in<strong>to</strong> a word<br />
processor or database <strong>to</strong> format, search, or print name lists. Each line<br />
is copied as:<br />
Patch Number Patch Name<br />
PASTE NAME LIST<br />
Choose Paste Name List <strong>to</strong> copy text from the Clipboard in<strong>to</strong> the<br />
Patch Name Edi<strong>to</strong>r. If the lines <strong>of</strong> text contain tabs, they are interpreted<br />
as:<br />
Patch Number Patch Name<br />
Otherwise, each line <strong>of</strong> text becomes a patch name. If you have<br />
access <strong>to</strong> a scanner and OCR (optical character recognition) s<strong>of</strong>tware,<br />
you can scan patch name lists for your synthesizers, convert them <strong>to</strong><br />
word processing files, then paste them in<strong>to</strong> the Patch Name Edi<strong>to</strong>r.<br />
If any patches in the Patch Name Edi<strong>to</strong>r are selected (that is, their<br />
selec<strong>to</strong>r dots are black), then pasting names overwrites only the<br />
selected patches. For example, if you have ten patch names on the<br />
Clipboard, but select only three patches, only the first three names<br />
on the Clipboard are used (see Figure 133).<br />
Figure 133: Only patches 1-3 will be pasted, regardless <strong>of</strong> the Clipboard’s contents<br />
CLEAR NAME LIST<br />
This command erases the currently selected name list, should you<br />
wish <strong>to</strong> start with a “clean slate.”<br />
Ch 7: The Names Window - 89 - <strong>Studio</strong> <strong>Patches</strong> Manual
ADD MODE<br />
Choose Add Mode <strong>to</strong> create an entirely new device mode for the<br />
document, and open a new window <strong>to</strong> display it.<br />
REMOVE MODE<br />
Choose Remove Mode <strong>to</strong> delete the device mode displayed in the<br />
active window.<br />
MODE NAME<br />
Choose Mode Name <strong>to</strong> name (or rename) the device mode displayed<br />
in the active window. The mode name appears on the <strong>to</strong>p line <strong>of</strong> the<br />
window.<br />
Mode name<br />
DEFAULT MODES<br />
Choose Default Modes <strong>to</strong> open a window in which you select a<br />
default mode for each channel. Whenever this Patch Name document<br />
is subscribed, the channels are set <strong>to</strong> the modes designated in<br />
this window.<br />
Ch 7: The Names Window - 90 - <strong>Studio</strong> <strong>Patches</strong> Manual
For example: General MIDI devices have two modes: standard and<br />
drums. Channel 10 is always in drums mode, and all other channels<br />
are in standard mode. Figure 134 shows the default mode screen set<br />
up for a General MIDI device.<br />
Figure 134: Default Mode Window<br />
ADD BANK<br />
Choose Add Bank <strong>to</strong> create a new bank <strong>of</strong> 128 patches following the<br />
bank containing the currently selected patch, or at the end <strong>of</strong> the document<br />
if there is no selected patch. When you choose this command,<br />
the Bank Select/Numbering dialog box opens as discussed in Bank<br />
Select/Numbering (pg. 92).<br />
REMOVE BANK<br />
Choose Remove Bank <strong>to</strong> delete the bank in which the selected patch<br />
resides.<br />
NOTE: If the device has less than 128 patches in a bank, leave the<br />
unused patches blank—blank patches won’t be displayed in patch<br />
selection menus and dialog boxes.<br />
Ch 7: The Names Window - 91 - <strong>Studio</strong> <strong>Patches</strong> Manual
BANK SELECT/NUMBERING<br />
Adding a bank or choosing the Bank Select/Numbering command<br />
opens the Bank Select/Numbering dialog box:<br />
<br />
<br />
<br />
<br />
Figure 135: Bank Select/Numbering dialog box<br />
Figure 135 displays the various elements in the Bank Select/Numbering<br />
dialog box. Specifically:<br />
A Bank Select message may be specified by checking one or both <strong>of</strong><br />
the Bank Select checkboxes, and by entering a bank select value in<br />
the box <strong>to</strong> the right. Consult your synthesizer’s documentation <strong>to</strong><br />
determine the appropriate values for these boxes.<br />
IMPORTANT: Each bank must have a unique combination <strong>of</strong> bank<br />
select messages. A warning message appears if two banks have the<br />
same bank select combination.<br />
If the Au<strong>to</strong>matically number patches in bank option is checked, the<br />
patches are au<strong>to</strong>matically numbered according <strong>to</strong> the selected numbering<br />
convention:<br />
• 0-127: Used for synthesizers with a “0 based” numbering<br />
convention.<br />
• 1-128: Used for synthesizers with a “1 based” numbering<br />
convention.<br />
• A11-B88: Used for synthesizers with a “bank based” numbering convention<br />
(most Roland devices use this scheme).<br />
Ch 7: The Names Window - 92 - <strong>Studio</strong> <strong>Patches</strong> Manual
Patch prefixes can be entered in the Prefix box. For example, a synth<br />
may use banks with names such as “RAM1.” The patches could be<br />
numbered “RAM1-0” thru “RAM1-127” by entering “RAM1-” in the<br />
Prefix box and selecting 0-127.<br />
End <strong>of</strong> first bank<br />
Beginning <strong>of</strong> second bank<br />
Figure 136: Using the Prefix feature<br />
If the Assign GM equivalents <strong>to</strong> all patches option is checked, each<br />
patch is assigned a General MIDI patch equivalent. This sets each<br />
patches’ number equal <strong>to</strong> the GM equivalent. This is useful <strong>to</strong> configure<br />
a bank <strong>to</strong> match the GM defaults without changing the names.<br />
NOTE AND<br />
CONTROL NAMES<br />
Double-click the Cntls column in the Patch Name Edi<strong>to</strong>r <strong>to</strong> open a<br />
Control Names Window. Similarly, double-click the Notes column<br />
<strong>to</strong> open a Note Names Window.<br />
Figure 137: Note Names Window<br />
Saving note names or control names adds them <strong>to</strong> the Patch Name<br />
document, regardless <strong>of</strong> whether it is typed-in or from another<br />
application.<br />
Ch 7: The Names Window - 93 - <strong>Studio</strong> <strong>Patches</strong> Manual
Note names are useful for drum machines or samplers. For example,<br />
it’s easier <strong>to</strong> edit MIDI data for a drum machine if notes appear<br />
named “Kick” or “Snare” rather than “C2” or “D2.” Similarly, if<br />
you’re using a sampler <strong>to</strong> trigger sound effects, notes named<br />
“Crash” or “Gunshot” are more useful than notes named “G3” or<br />
“D5.”<br />
Control names are useful if you perform real-time edits <strong>to</strong> synthesizer<br />
or effects patches. For example, it’s easier <strong>to</strong> edit controllers<br />
named “RevTime” or “HPFiltr” than controllers named “Control 41”<br />
or “Control 73.”<br />
DEFAULT NOTE AND CONTROL NAMES<br />
At the <strong>to</strong>p <strong>of</strong> every Patch Name document is a line marked Default.<br />
You can add a set <strong>of</strong> default note and controller names <strong>to</strong> a Patch<br />
Name document by double clicking in the appropriate column and<br />
typing names in<strong>to</strong> the Note Names Window or Control Names Window.<br />
These default Names are used for every patch that doesn’t<br />
specifically override them.<br />
Default Note and Control Names row<br />
Figure 138: Default Note and Control Names<br />
In Figure 138, there is a set <strong>of</strong> default Note Names. All the patches in<br />
this bank use these note names. <strong>How</strong>ever, the note icon in the row<br />
for patch number 2 indicates that it has its own set <strong>of</strong> Note Names<br />
that override the defaults.<br />
SELECTING NAMES<br />
Once the various name lists are set up properly, the <strong>Studio</strong> <strong>Patches</strong><br />
Edi<strong>to</strong>r will display names in all appropriate places (such as in Program<br />
Change events in Patch Start Sequences).<br />
There are two ways <strong>to</strong> choose names:<br />
• A simple pop-up menu <strong>of</strong> choices, either sorted alphabetically or<br />
numerically. This appears when you click on a name field.<br />
Ch 7: The Names Window - 94 - <strong>Studio</strong> <strong>Patches</strong> Manual
• The Name Browser. This is a more sophisticated window where you<br />
can view names numerically or alphabetically—or even group them<br />
by keyword or patch type. The Name Browser Window appears<br />
when you command- or option-click a name field.<br />
Figure 139 shows the pop-up menu that appears when you click on a<br />
patch name field.<br />
Figure 139: Pop-up Patch Name Menu<br />
NAME BROWSER<br />
If you option or shift-click on a name field, the Browser Window<br />
opens:<br />
Figure 140: Patch Name Browser<br />
The Name Manager sends the necessary command (program<br />
change/bank select) each time a patch is selected. The By number/<br />
By name radio but<strong>to</strong>ns sort the list by number or name; this is global<br />
and applies <strong>to</strong> pop-up menus as well.<br />
Ch 7: The Names Window - 95 - <strong>Studio</strong> <strong>Patches</strong> Manual
USING PATCH<br />
GROUPINGS<br />
The Grouping pop-up menu allows you <strong>to</strong> choose a grouping assignment<br />
for the current patch document. For example, the General<br />
MIDI patch names contains the groupings None, General MIDI<br />
Groups and General MIDI <strong>Patches</strong>. If you select General MIDI<br />
Groups from the Grouping pop-up menu, you will be presented<br />
with this list <strong>of</strong> groupings in the Browser Window:<br />
Figure 141: General MIDI Groups<br />
Selecting an item from this list narrows the list <strong>of</strong> available patches <strong>to</strong><br />
show only those patches that belong <strong>to</strong> the selected group. For example,<br />
patches in the Piano group include Grand Piano, Brite Piano,<br />
and so forth.<br />
An additional advantage <strong>to</strong> using groupings is that patch selection<br />
menus display their contents hierarchically; that is, arranged by<br />
group (as shown in Figure 142).<br />
Figure 142: Hierarchical Patch Selection<br />
You can create your own groupings with Galaxy, Opcode’s patch<br />
librarian application. Also, Galaxy au<strong>to</strong>matically provides groupings<br />
for certain synthesizers. You cannot create groupings with typed-in<br />
Patch Name documents.<br />
Ch 7: The Names Window - 96 - <strong>Studio</strong> <strong>Patches</strong> Manual
BROWSER MENU<br />
Figure 143: Browser Menu<br />
When you use the Name Browser, the menu shown in Figure 143<br />
becomes available.<br />
SORT BY NUMBER/SORT BY NAME<br />
These commands duplicate the function <strong>of</strong> the “By Name/By Number”<br />
but<strong>to</strong>ns in the Browser Window.<br />
SHOW PATCHES IN ANY/ALL SELECTED GROUP(S)<br />
With “any selected group” selected, shift-clicking multiple groupings<br />
in the browser displays patches that belong <strong>to</strong> any <strong>of</strong> the<br />
selected groups (if you have programming experience, think <strong>of</strong> this<br />
as the “or” condition).<br />
With “all selected groups” selected, shift-clicking multiple groupings<br />
in the browser only displays patches that belong <strong>to</strong> all <strong>of</strong> the<br />
groups (programmers can think <strong>of</strong> this as the “and” condition).<br />
As an example, imagine you have a grouping for “bright” and a<br />
grouping for “piano.” With “all selected groups” chosen, you would<br />
see only bright pianos listed, whereas with “any selected group,”<br />
you would see all bright patches and all piano patches listed<br />
<strong>to</strong>gether.<br />
EDIT SELECTED PATCH<br />
Tells the patch provider <strong>to</strong> open an edit window for the selected<br />
patch, if the application supports the command.<br />
Ch 7: The Names Window - 97 - <strong>Studio</strong> <strong>Patches</strong> Manual
OPENING FILES WITH DIFFERENT NAME SETUPS<br />
The <strong>Studio</strong> <strong>Patches</strong> Edi<strong>to</strong>r saves Name <strong>Setup</strong>s in its Patch document<br />
files. When you open a file that references a different name setup,<br />
you have <strong>to</strong> answer some questions <strong>to</strong> let the Name Manager know<br />
how you want <strong>to</strong> handle the different assignments. This section<br />
walks you through the possible outcomes.<br />
First, you see the following dialog box:<br />
Figure 144: Different Name <strong>Setup</strong>s - first dialog box<br />
You have two choices at this point. The following sections describe<br />
these choices.<br />
MAKE CURRENT<br />
This choice overrides all current Name <strong>Setup</strong> information with the<br />
information in the file being opened.<br />
Usually if you want <strong>to</strong> change subscriptions, you also want <strong>to</strong> send<br />
the new patches <strong>to</strong> your synthesizers, and the Name Manager<br />
assumes that this is what you want <strong>to</strong> do. You will see a dialog box<br />
similar <strong>to</strong> the following, letting you know that transmission is going<br />
<strong>to</strong> start:<br />
Figure 145: “Getting Ready To Send” dialog box<br />
Typed-in patch documents have an asterisk (*) next <strong>to</strong> their name,<br />
letting you know that they can’t be sent au<strong>to</strong>matically. You should<br />
load up your devices with these patches in whatever manner is<br />
appropriate.<br />
Ch 7: The Names Window - 98 - <strong>Studio</strong> <strong>Patches</strong> Manual
Documents that can’t be found are displayed in italics.<br />
When you are ready, you can click...<br />
• Send: <strong>to</strong> send the bundles <strong>to</strong> the devices.<br />
• Don’t Send: <strong>to</strong> proceed without sending any data.<br />
• Go Back: <strong>to</strong> return <strong>to</strong> the previous dialog box.<br />
DON’T MAKE<br />
Clicking Don’t Make leaves the current patches current. <strong>How</strong>ever,<br />
you still have a choice <strong>to</strong> make: do you want <strong>to</strong> change the document<br />
being opened <strong>to</strong> use the current Name Manager subscriptions, or do<br />
you want <strong>to</strong> leave the file alone?<br />
Figure 146: “Don’t Make Current” dialog box<br />
If you click...<br />
• Keep: the document is unchanged.<br />
• Change: the document is updated <strong>to</strong> use the current Name Manager<br />
subscriptions. If you save the file without changing its name, any<br />
record <strong>of</strong> the old subscriptions is lost.<br />
• Go Back: returns <strong>to</strong> the previous dialog box.<br />
Ch 7: The Names Window - 99 - <strong>Studio</strong> <strong>Patches</strong> Manual
CH 8:<br />
MENU REFERENCE<br />
This chapter documents each menu item and its function.<br />
FILE MENU<br />
Figure 147: File Menu<br />
NEW PATCH<br />
DOCUMENT<br />
Creates a blank, untitled Patch document.<br />
OPEN<br />
Presents a direc<strong>to</strong>ry dialog box in which you can locate a previouslysaved<br />
Patch document <strong>to</strong> open. If the new document contains a<br />
name setup that differs from the current name setup, you are asked<br />
how you want <strong>to</strong> handle this situation. See Opening Files With Different<br />
Name <strong>Setup</strong>s (pg. 98) for more information.<br />
OPEN CURRENT<br />
PATCH DOCUMENT<br />
Au<strong>to</strong>matically finds and opens the current Patch document.<br />
CLOSE<br />
Closes the currently open Patch document.<br />
SAVE/SAVE AS<br />
Writes the current Patch document <strong>to</strong> disk. If the document has<br />
never been saved, Save and Save As both present direc<strong>to</strong>ry dialog<br />
boxes, allowing you <strong>to</strong> choose a folder and name for the new file. If<br />
the file has already been saved, Save overwrites it without<br />
prompting.<br />
Ch 8: Menu Reference - 100 - <strong>Studio</strong> <strong>Patches</strong> Manual
SAVE AND MAKE<br />
CURRENT<br />
Like Save (above), only it makes the document current at the same<br />
time. If the document doesn’t need <strong>to</strong> be saved, this command<br />
appears just as Make Current.<br />
PAGE SETUP<br />
Opens the Page <strong>Setup</strong> dialog box for the currently chosen printer.<br />
PRINT<br />
Prints a list <strong>of</strong> the patches in the open Patch document, along with<br />
their numbers.<br />
EDIT MENU<br />
Figure 148: Edit Menu<br />
UNDO<br />
Reverses the previous operation, if possible.<br />
CUT<br />
Erases the current selection and puts it on the clipboard (presumably<br />
for pasting somewhere else).<br />
COPY<br />
Copies the current selection <strong>to</strong> the clipboard.<br />
PASTE<br />
Pastes the contents <strong>of</strong> the clipboard at the selection point, if the data<br />
is compatible (you can’t, for instance, paste a copied patch in<strong>to</strong> a<br />
patch’s name field).<br />
CLEAR<br />
Erases the current selection completely (you can still undo if you<br />
make a mistake).<br />
SHOW CLIPBOARD<br />
Shows the current contents <strong>of</strong> the clipboard.<br />
Ch 8: Menu Reference - 101 - <strong>Studio</strong> <strong>Patches</strong> Manual
MOVE UP<br />
Moves the selected item up the screen. Useful for rearranging patch<br />
lists or the patches themselves, <strong>to</strong> group similar entries <strong>to</strong>gether, for<br />
example.<br />
MOVE DOWN<br />
Moves the selected item down the screen.<br />
<strong>OMS</strong> STUDIO<br />
SETUP<br />
Opens the <strong>OMS</strong> <strong>Setup</strong> application. See the <strong>OMS</strong> manual for a<br />
detailed description <strong>of</strong> this program.<br />
<strong>OMS</strong> MIDI SETUP<br />
Opens the <strong>OMS</strong> MIDI <strong>Setup</strong> dialog box. See the <strong>OMS</strong> manual for a<br />
detailed description <strong>of</strong> this dialog box.<br />
ALL NOTES OFF<br />
(PANIC)<br />
Sends an “All Notes Off” message <strong>to</strong> every channel <strong>of</strong> every device<br />
on every interface. Useful for getting rid <strong>of</strong> stuck or hung notes.<br />
PATCH MENU<br />
Figure 149: Patch Menu<br />
NEW PATCH<br />
Choose New Patch <strong>to</strong> add a new empty patch <strong>to</strong> the Patch document.<br />
Each Patch document can hold up <strong>to</strong> 128 patches.<br />
EDIT PATCH<br />
Choose Edit Patch <strong>to</strong> open a Patch Edit Window. This is the same as<br />
double-clicking a patch selec<strong>to</strong>r dot in the Patch Document Window.<br />
RECALL PATCH<br />
Choosing Recall Patch is the same as clicking in a patch’s diamond<br />
column. It makes the selected patch the current patch. After choosing<br />
Recall Patch, you will see a diamond next <strong>to</strong> the patch number <strong>to</strong><br />
indicate that it is the current patch.<br />
SORT BY PATCH<br />
NUMBER<br />
Choose the Sort by Patch Number command <strong>to</strong> view your Patch<br />
document in numerical order. When the command is enabled<br />
(checked), patches will always be displayed in numerical order.<br />
When the command is unchecked, patches can be in any order.<br />
Ch 8: Menu Reference - 102 - <strong>Studio</strong> <strong>Patches</strong> Manual
REBUILD ALL<br />
Choose this command <strong>to</strong> rebuild all your patches. You will need <strong>to</strong><br />
use Rebuild All only if your patches, virtual controllers, virtual<br />
instruments or program change sources aren’t working, and the<br />
device menus in the appropriate windows don’t contain italicized<br />
choices. This situation is most likely <strong>to</strong> occur if you switch between<br />
two very similar <strong>Studio</strong> <strong>Setup</strong>s (for example, one with a <strong>Studio</strong> 4 on<br />
the modem port, and another with the same devices, but with the<br />
<strong>Studio</strong> 4 on the printer port).<br />
SOLO<br />
Mutes all destinations in a patch except for the currently selected<br />
one(s).<br />
UNSOLO<br />
Unmutes all selected destinations in a patch.<br />
WINDOWS MENU<br />
Figure 150: Windows Menu<br />
EDIT VIRTUAL<br />
CONTROLLERS<br />
Choose Edit Virtual Controllers <strong>to</strong> open the active Patch document’s<br />
Virtual Controllers Edit Window. Choosing this menu item is<br />
the same as clicking the Virtual Controllers but<strong>to</strong>n in the Patch Document<br />
Window. Virtual controller editing is discussed in Chapter 3:<br />
Virtual Controllers and Virtual Instruments.<br />
EDIT VIRTUAL<br />
INSTRUMENTS<br />
Choose Edit Virtual Instruments <strong>to</strong> open the active Patch document’s<br />
Virtual Instruments Edit Window. Choosing this menu item<br />
is the same as clicking the Virtual Instruments but<strong>to</strong>n in the Patch<br />
Document Window. Virtual Instrument editing is discussed in<br />
Chapter 3: Virtual Controllers and Virtual Instruments.<br />
Ch 8: Menu Reference - 103 - <strong>Studio</strong> <strong>Patches</strong> Manual
EDIT PROGRAM<br />
CHANGE SOURCES<br />
Choose Edit Program Change Sources <strong>to</strong> open the active Patch document’s<br />
Program Change Source Edit Window. Choosing this menu<br />
item is the same as clicking the Program Change Sources but<strong>to</strong>n in<br />
the Patch Document Window. Virtual Instrument editing is discussed<br />
in Chapter 4: Program Change Sources.<br />
EDIT PATCH CHAIN<br />
Choose Edit Patch Chain <strong>to</strong> open the active Patch document’s Patch<br />
Chain Edit Window. Choosing this menu item is the same as clicking<br />
the Patch Chain but<strong>to</strong>n in the Patch Document Window. Patch<br />
Chains are discussed in Chapter 5: Patch Chains.<br />
DEVICE PATCH<br />
NAMES<br />
This command opens the <strong>OMS</strong> Name Manager. See Chapter 7: The<br />
Names Window for more information.<br />
EDIT PATCH START<br />
SEQUENCE<br />
Choose this item <strong>to</strong> open a Patch Start Sequence Edit Window for the<br />
selected patch. For information on editing and using Start<br />
Sequences, see Chapter 6: Patch Sequences.<br />
EDIT PATCH END<br />
SEQUENCE<br />
Choose this item <strong>to</strong> open a Patch End Sequence Edit Window for the<br />
selected patch. For information on editing and using End Sequences,<br />
see Chapter 6: Patch Sequences.<br />
CONTROLLERS<br />
FOR MIDI EDITING<br />
Choose Controllers for MIDI Editing <strong>to</strong> produce a dialog containing<br />
a list <strong>of</strong> all devices defined in your current <strong>Studio</strong> <strong>Setup</strong><br />
document. In the dialog, select those devices you wish <strong>to</strong> use for<br />
MIDI entry <strong>of</strong> patch edit parameters.<br />
Ch 8: Menu Reference - 104 - <strong>Studio</strong> <strong>Patches</strong> Manual
CH 9:<br />
PATCH IDEAS<br />
This chapter contains some ideas on how <strong>to</strong> apply the various features<br />
<strong>of</strong> <strong>Studio</strong> <strong>Patches</strong>, and also some troubleshooting tips.<br />
MIDI MERGING<br />
An individual patch can contain more than one MIDI routing. As an<br />
example, let’s say that you (operating your Masterman-88 keyboard<br />
controller) and your drummer (playing his new GeoSkin MIDI percussion<br />
pads) both want <strong>to</strong> control the same Vec<strong>to</strong>rific sound<br />
module patch from your individual controllers. This is a classic<br />
example <strong>of</strong> MIDI merging.<br />
Choose Patch>New Patch and create a <strong>Studio</strong> Patch with the Masterman-88 as<br />
the MIDI source and the Vec<strong>to</strong>rific module as the MIDI destination.<br />
Click the MIDI Source module icon and create a second connection below the first.<br />
Choose the GeoSkin drums as the MIDI source and the Vec<strong>to</strong>rific as the MIDI<br />
destination.<br />
Figure 151: MIDI Merging Patch<br />
With this patch, both the Masterman-88 keyboard and the GeoSkin<br />
drums will play MIDI Channel 1 <strong>of</strong> the Vec<strong>to</strong>rific module.<br />
Ch 9: Patch Ideas - 105 - <strong>Studio</strong> <strong>Patches</strong> Manual
BAND ROUTINGS<br />
You can route your entire band through your MIDI interface. For<br />
instance, you could have the MIDI Tuba playing the Digiwhiz 2000,<br />
the GeoSkin drum pads playing the Banger Man II drum module,<br />
and the Masterman-88 keyboard playing a ProMaker/1 stacked with<br />
a Vec<strong>to</strong>rific. This configuration would have a Patch Edit Window<br />
similar <strong>to</strong> the one shown in Figure 152.<br />
Figure 152: A Band Routing Patch<br />
STUDIO 5 FOOTSWITCH IDEAS<br />
The <strong>Studio</strong> 5’s two footswitches (FS1, FS2) and one foot controller<br />
(FC1) can be used as controllers in a <strong>Studio</strong> Patch. To use the footswitches<br />
or foot controller in a patch, simply choose the <strong>Studio</strong> 5 as<br />
your MIDI source.<br />
VOLUME PEDAL<br />
A simple volume pedal is created in the following example. The<br />
Masterman-88 controls MIDI Channel 1 <strong>of</strong> the Vec<strong>to</strong>rific synth module.<br />
The foot controller (FC1) controls the volume <strong>of</strong> the Vec<strong>to</strong>rific.<br />
Figure 153: Volume Pedal<br />
NOTE: Make sure that <strong>Studio</strong> 5>Foot Controller In is checked<br />
(enabled) in the <strong>OMS</strong> <strong>Setup</strong> application so that Foot Controller information<br />
is recognized. Foot Controller status is saved within the<br />
<strong>Studio</strong> 5’s internal memory.<br />
Ch 9: Patch Ideas - 106 - <strong>Studio</strong> <strong>Patches</strong> Manual
IMPROVED<br />
VOLUME PEDAL<br />
You can improve upon the above example by adding an Event Type<br />
Filter module. Use the filter <strong>to</strong> pass only Opcode foot controller data<br />
from the <strong>Studio</strong> 5 <strong>to</strong> the Vec<strong>to</strong>rific as shown below. This prevents<br />
MIDI Time Code, if it’s in use, from being sent <strong>to</strong> the Vec<strong>to</strong>rific—<br />
thus thinning the MIDI data stream.<br />
Figure 154: Improved Volume Pedal<br />
VIRTUAL PEDALS<br />
As another example, assume that you want <strong>to</strong> use the <strong>Studio</strong> 5 foot<br />
controller (FC1) as a volume pedal, and a <strong>Studio</strong> 5 footswitch (FS1)<br />
as a sustain pedal. Using Virtual Controllers is the easiest and most<br />
efficient way <strong>to</strong> handle this task.<br />
Choose Patch>Edit Virtual Controllers or click the Virtual Controllers but<strong>to</strong>n in<br />
the current Patch Document Window <strong>to</strong> open the Virtual Controllers Edit Window.<br />
Design a Virtual Controller similar <strong>to</strong> the one shown in Figure 155.<br />
See Chapter 3: Virtual Controllers and Virtual Instruments <strong>to</strong> learn about Virtual<br />
Controllers and Virtual Instruments.<br />
Figure 155: Defining Virtual Pedals<br />
Ch 9: Patch Ideas - 107 - <strong>Studio</strong> <strong>Patches</strong> Manual
You can then use these Virtual Controllers in any patch, without<br />
worrying if they are sending MIDI Time Code <strong>to</strong> your MIDI output<br />
devices. The following example illustrates the use <strong>of</strong> these Virtual<br />
Controllers in a patch where the Masterman-88 plays Channel 1 <strong>of</strong><br />
the Vec<strong>to</strong>rific while the <strong>Studio</strong> 5’s foot controller controls Vec<strong>to</strong>rific<br />
volume and the <strong>Studio</strong> 5’s FS1 acts as a sustain pedal.<br />
Figure 156: Using Virtual Pedals<br />
EXPRESSIVE INSTRUMENTS<br />
You can use velocity switching <strong>to</strong> trigger different sounds—the triggered<br />
sound depends on the note-on velocity. Velocity switching can<br />
add greater dynamic realism <strong>to</strong> instruments, or provide startling<br />
special effects. You can design patches <strong>to</strong> perform velocity switching<br />
if your synthesizers don’t <strong>of</strong>fer it. Even if your synthesizers do <strong>of</strong>fer<br />
velocity splitting, <strong>Studio</strong> <strong>Patches</strong> provide the additional advantage<br />
<strong>of</strong> velocity switching between different devices.<br />
Assume, for example, that your Vec<strong>to</strong>rific sound module has a nice<br />
pianissimo piano sound, and that the Digiwhiz 2000 sampler has<br />
good mezzo-forte piano and forte piano sounds. Build a patch similar<br />
<strong>to</strong> the one shown in Figure 157.<br />
Figure 157: Velocity Switching<br />
Notice that a s<strong>of</strong>t <strong>to</strong>uch plays the Vec<strong>to</strong>rific piano sound, medium<br />
playing triggers a mezzo-forte piano sound on the Digiwhiz 2000<br />
(Ch. 1), and banging on the keys plays a forte piano sound on the<br />
Digiwhiz 2000 (Ch. 2).<br />
Ch 9: Patch Ideas - 108 - <strong>Studio</strong> <strong>Patches</strong> Manual
ONE FINGER CHORDS<br />
To ease the pressure during a live performance or <strong>to</strong> compensate for<br />
a short reach, you can use splitters and transposers <strong>to</strong> build onefinger<br />
chords.<br />
The patch example shown in Figure 158 produces a minor ninth<br />
chord from just one note.<br />
Figure 158: One Finger Chord<br />
If you hit a C, then your sound module would produce the chord<br />
shown in Figure 159.<br />
Figure 159: Cm9 Chord<br />
BANK SELECTION<br />
You can use the Start and End Sequences <strong>to</strong> send bank select messages<br />
<strong>to</strong> your synthesizers. For each bank in your synthesizer, simply<br />
design a <strong>Studio</strong> Patch that recalls and plays that bank.<br />
Ch 9: Patch Ideas - 109 - <strong>Studio</strong> <strong>Patches</strong> Manual
The Patch document shown in Figure 160 contains 10 different<br />
patches for playing the Matrix-1000 synthesizer. Each patch contains<br />
a Start Sequence with a system exclusive event that selects and locks<br />
a Matrix-1000 bank. The End Sequence unlocks the bank when you<br />
leave the patch.<br />
Figure 160: <strong>Studio</strong> Patch Selects Matrix-1000 Bank<br />
STUDIO PATCH PROBLEMS<br />
A MIDI SOURCE OR DESTINATION MODULE CONTAINS A QUESTION MARK<br />
Question marks indicate undefined modules. Click anywhere <strong>to</strong> the<br />
right <strong>of</strong> the question mark <strong>to</strong> open a pop-up menu <strong>of</strong> MIDI devices<br />
as defined in your current <strong>Studio</strong> <strong>Setup</strong> document. See Chapter 2:<br />
Patch Modules for more details.<br />
ONE OR MORE MIDI DEVICES DO NOT APPEAR IN THE MIDI SOURCE<br />
POP-UP MENU<br />
The MIDI device is being used elsewhere within the same patch as a<br />
MIDI source.<br />
Ch 9: Patch Ideas - 110 - <strong>Studio</strong> <strong>Patches</strong> Manual
PATCHES DON’T WORK—MIDI SOURCE OR DESTINATIONS ARE<br />
ITALICIZED<br />
You probably have a Patch document that was created with a <strong>Studio</strong><br />
<strong>Setup</strong> document other than the one that is now current. Either make<br />
the other <strong>Studio</strong> <strong>Setup</strong> document current, make another Patch document<br />
current, or re-select any italicized MIDI Source or Destination<br />
modules in the current patch and save it. See Chapter 1: <strong>Studio</strong><br />
<strong>Patches</strong> Introduction for more information.<br />
PATCHES DON’T WORK—MIDI SOURCE OR DESTINATIONS ARE NOT<br />
ITALICIZED<br />
Choose Patch>Rebuild All <strong>to</strong> rebuild patches.<br />
Ch 9: Patch Ideas - 111 - <strong>Studio</strong> <strong>Patches</strong> Manual