Installation Instructions: U.S. Robotics 56K Modem ... - icemeister.net
Installation Instructions: U.S. Robotics 56K Modem ... - icemeister.net
Installation Instructions: U.S. Robotics 56K Modem ... - icemeister.net

You also want an ePaper? Increase the reach of your titles
YUMPU automatically turns print PDFs into web optimized ePapers that Google loves.
TECHNICAL BULLETIN<br />
Part #: 026-4809 Revision 0 Date: 03/04/2003<br />
<strong>Installation</strong> <strong>Instructions</strong>: U.S. <strong>Robotics</strong> <strong>56K</strong> <strong>Modem</strong> for<br />
Use With REFLECS and HALCOMM Control Products<br />
Overview<br />
Due to the previously used model of external modem going<br />
obsolete, CPC has changed vendors for external modems<br />
used with REFLECS and HALCOMM products. For<br />
remote communications with REFLECS sites, CPC now<br />
specs a U.S. <strong>Robotics</strong> external 56k modem (P/N 370-<br />
9600). The modem is identical in most respects to the<br />
modems CPC used to supply, but require a change to the<br />
default modem string in REFLECS and HALCOMM to<br />
allow them to communicate properly.<br />
Hardware Setup<br />
REFLECS<br />
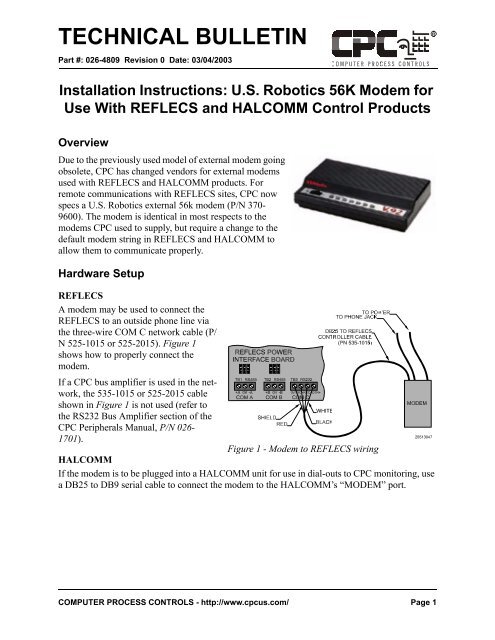
A modem may be used to connect the<br />
REFLECS to an outside phone line via<br />
the three-wire COM C <strong>net</strong>work cable (P/<br />
N 525-1015 or 525-2015). Figure 1<br />
shows how to properly connect the<br />
modem.<br />
If a CPC bus amplifier is used in the <strong>net</strong>work,<br />
the 535-1015 or 525-2015 cable<br />
shown in Figure 1 is not used (refer to<br />
the RS232 Bus Amplifier section of the<br />
CPC Peripherals Manual, P/N 026-<br />
1701).<br />
Figure 1 - <strong>Modem</strong> to REFLECS wiring<br />
HALCOMM<br />
If the modem is to be plugged into a HALCOMM unit for use in dial-outs to CPC monitoring, use<br />
a DB25 to DB9 serial cable to connect the modem to the HALCOMM’s “MODEM” port.<br />
COMPUTER PROCESS CONTROLS - http://www.cpcus.com/ Page 1
Technical Bulletin - <strong>Installation</strong> <strong>Instructions</strong>: U.S. <strong>Robotics</strong> <strong>56K</strong> <strong>Modem</strong> for Use With REFLECS<br />
and HALCOMM Control Products<br />
<strong>Modem</strong> Dip Switch Settings<br />
The rear side of the modem has a set of eight dip switches that<br />
control some aspects of modem communication. By default,<br />
most of these switches are set to their correct positions, but to<br />
communicate properly with REFLECS and CPC remote communications:<br />
• Set dip switch 4 to the DOWN position, and<br />
• Set dip switch 5 to the UP position.<br />
Double-check the default positions of all switches and make<br />
sure they are set as they appear in Figure 2.<br />
Changing the <strong>Modem</strong> Initialization String<br />
The modem string recommended by CPC for use with the U.S. <strong>Robotics</strong> modem is:<br />
AT&FE0S0=1&C1&D2&B1&W<br />
This string is different from the string used with our previous modem vendors, and it is not a<br />
selectable option in the REFLECS or HALCOMM system software. The modem string will have<br />
to be manually entered.<br />
Setting the <strong>Modem</strong> Init String for a REFLECS Site with no HALCOMM Present<br />
1. Locate the REFLECS unit that is set up as unit #1. This is the unit the string must be changed in.<br />
2. Log on to controller #1 as a Level 4 user.<br />
3. Press 7 to access the Configuration Menu.<br />
4. Select the Remote Communication menu option (press 4 for most REFLECS software versions; on<br />
some, it is option 5). The Communications Setup screen should be visible.<br />
5. Press the DOWN ARROW key to access the <strong>Modem</strong> Initialization screen.<br />
Figure 2 - <strong>Modem</strong> Dip Switches<br />
6. Press the RIGHT ARROW key until the cursor is highlighting the current modem string.<br />
7. Press CLEAR to erase the string. Type the new string into this field EXACTLY as shown above.<br />
Note that since there are no ‘&’ and ‘=’ characters on the REFLECS keypad, ‘&’ may be entered<br />
by typing a ‘%’ (BLUE key followed by the MINUS key) and ‘=’ may be entered by typing a ‘(‘<br />
(RED key followed by the CLR key).<br />
8. Press the UP ARROW key to enter and save the modem initialization string. Press the UP<br />
ARROW again to return to the Communications Setup screen.<br />
9. The string you entered should be visible in the Initialization String field. Double-check that this<br />
string is entered correctly. If not, repeat steps 4-6. If entered correctly, go to step 10.<br />
10. Press the RIGHT ARROW key several times to highlight the Send Now field. Press Y to send the<br />
modem initialization string to the modem. After a few seconds, an “OK” message should appear<br />
below the modem string in the “Response” field. If this field says “No Response,” attempt it again.<br />
If the second attempt doesn’t work, check all wiring and connections, and reverify the string.<br />
COMPUTER PROCESS CONTROLS - http://www.cpcus.com/ Page 2
Technical Bulletin - <strong>Installation</strong> <strong>Instructions</strong>: U.S. <strong>Robotics</strong> <strong>56K</strong> <strong>Modem</strong> for Use With REFLECS<br />
and HALCOMM Control Products<br />
Setting the <strong>Modem</strong> Init String for a REFLECS Site with HALCOMM Present<br />
If a HALCOMM is present at this site, the modem init string must be changed by ERS Monitoring.<br />
CALL ERS MONITORING at 770-425-7430 and tell them that a U.S. <strong>Robotics</strong> 56k modem has<br />
been installed, and that the modem initialization string must be changed. ERS Monitoring will dial in,<br />
change the string, and verify that the site is set up and communicating correctly.<br />
COMPUTER PROCESS CONTROLS - http://www.cpcus.com/ Page 3