(RF) Temperature Sensor System Installation and Operation Manual
(RF) Temperature Sensor System Installation and Operation Manual
(RF) Temperature Sensor System Installation and Operation Manual

You also want an ePaper? Increase the reach of your titles
YUMPU automatically turns print PDFs into web optimized ePapers that Google loves.
026-1702 Rev 5 9-17-04<br />
VeriFresh<br />
Radio Frequency (<strong>RF</strong>)<br />
<strong>Temperature</strong> <strong>Sensor</strong> <strong>System</strong><br />
<strong>Installation</strong> <strong>and</strong> <strong>Operation</strong><br />
<strong>Manual</strong>
1640 Airport Road, Suite 104<br />
Kennesaw, GA 31044<br />
Phone: (770) 425-2724<br />
Fax: (770) 425-9319<br />
ALL RIGHTS RESERVED<br />
The information contained in this manual has been carefully checked <strong>and</strong> is believed to be accurate. However, Computer<br />
Process Controls, Inc. assumes no responsibility for any inaccuracies that may be contained herein. In no event will<br />
Computer Process Controls, Inc. be liable for any direct, indirect, special, incidental, or consequential damages resulting<br />
from any defect or omission in this manual, even if advised of the possibility of such damages. In the interest of continued<br />
product development, Com-puter Process Controls, Inc. reserves the right to make improvements to this manual, <strong>and</strong> the<br />
products described herein, at any time without notice or obligation.<br />
This product is covered under one or more of the following Computer Process Controls U.S. patents: 6360553,<br />
6449968, 6378315, 6502409, <strong>and</strong> Alsenz U.S. patents 4612776, 4628700, <strong>and</strong> 4535602.<br />
FCC COMPLIANCE NOTICE<br />
NOTE: This equipment has been tested <strong>and</strong> found to comply with the limits for a Class B digital device, pursuant to<br />
Part 15 of the FCC Rules. These limits are designed to provide reasonable protection against harmful interference in a residential<br />
installation. This equipment generates, uses, <strong>and</strong> can radiate radio frequency energy <strong>and</strong>, if not installed <strong>and</strong> used<br />
in accordance with the instructions, may cause harmful interference to radio communications. However, there is no guarantee<br />
that interference will not occur in a particular installation. If this equipment does cause harmful interference to radio<br />
or television reception, which can be determined by turning the equipment off <strong>and</strong> on, the user is encouraged to try <strong>and</strong><br />
correct the interference by one or more of the following measures:<br />
-- Reorient or relocate the receiving antenna<br />
-- Increase the separation between the equipment <strong>and</strong> the receiver<br />
-- Connect the equipment into an outlet on a circuit different from that to which the receiver is connected<br />
-- Consult the dealer or an experienced radio/TV technician for help<br />
Warning! FCC Regulations state that any unauthorized<br />
changes or modifications to this equipment not expressly approved<br />
by the manufacturer could void the user's authorization<br />
to operate this equipment.<br />
READ ALL INSTRUCTIONS CAREFULLY<br />
If the equipment is not used in the manner specified by the manufacturer, the protection provided<br />
by the equipment may be impaired.<br />
SAVE THIS INSTRUCTION MANUAL<br />
This instruction manual contains important operating instructions for the Verifresh <strong>RF</strong> <strong>Sensor</strong> <strong>System</strong>.
European Environmental Ratings<br />
To conform with European Safety St<strong>and</strong>ard EN61010-1, all VeriFresh <strong>and</strong> VeriTemp product installations<br />
must follow the following specifications:<br />
• Indoor use only<br />
• Altitude: no higher than 2000m<br />
• Operating <strong>Temperature</strong>: -40°—65°C<br />
• Relative Humidity: 5%—95% non-condensing<br />
• <strong>Installation</strong> Category II
Table of Contents<br />
1 OVERVIEW ................................................................................................................................................................... 1<br />
1.1. HARDWARE COMPONENTS ........................................................................................................................................... 2<br />
1.1.1. <strong>Sensor</strong>s .................................................................................................................................................................. 2<br />
1.1.1.1. VeriTemp <strong>Sensor</strong>s............................................................................................................................................................... 2<br />
1.1.1.2. Discontinued <strong>Sensor</strong> Models .............................................................................................................................................. 3<br />
1.1.2. VeriFresh Receiver ............................................................................................................................................... 4<br />
1.1.3. VeriFresh Gateway ............................................................................................................................................... 4<br />
1.1.4. H<strong>and</strong>-Held Terminal............................................................................................................................................. 5<br />
1.1.5. The <strong>RF</strong> Service Tool (US <strong>and</strong> Canada Only)........................................................................................................ 5<br />
1.2. NEW VS. OLD VERIFRESH COMPATIBILITY ISSUES...................................................................................................... 6<br />
1.2.1. Dual-Thermistor Compatibility............................................................................................................................. 6<br />
1.2.2. New <strong>Sensor</strong> Features ........................................................................................................................................... 6<br />
1.2.3. <strong>RF</strong> Service Tool Compatibility.............................................................................................................................. 6<br />
2 INSTALLING THE VERIFRESH GATEWAY......................................................................................................... 7<br />
2.1. COMPATIBILITY WITH DUAL TEMPERATURE SENSORS ................................................................................................ 7<br />
2.2. MOUNTING THE VERIFRESH GATEWAY ....................................................................................................................... 7<br />
2.3. POWERING THE VERIFRESH GATEWAY........................................................................................................................ 7<br />
2.4. WIRING THE VERIFRESH GATEWAY TO A CPC SITE CONTROLLER (I/O NETWORK) ................................................. 8<br />
2.4.1. Wire Connection ................................................................................................................................................... 8<br />
2.4.2. Setting the Board Numbering Dip Switch............................................................................................................. 8<br />
2.4.3. Setting the Baud Rate Dip Switches...................................................................................................................... 9<br />
2.4.4. Setting the RS485 I/O Termination Jumpers......................................................................................................... 9<br />
2.5. NETWORKING GATEWAYS AND RECEIVERS (RECEIVER BUS NETWORK).................................................................. 10<br />
2.5.1. Wiring the Receiver Bus Network to the Gateway.............................................................................................. 10<br />
2.5.2. Setting the Receiver Bus Network Termination Jumpers.................................................................................... 11<br />
2.6. CHECKING GATEWAY SETTINGS USING THE HAND-HELD TERMINAL ...................................................................... 11<br />
2.6.1. Viewing Board Numbering <strong>and</strong> Baud Rate......................................................................................................... 11<br />
3 INSTALLING THE VERIFRESH RECEIVER....................................................................................................... 12<br />
3.1. COMPATIBILITY ISSUES WITH NEW VS. OLD VERIFRESH EQUIPMENT...................................................................... 12<br />
3.2. MOUNTING AND PLACEMENT OF THE VERIFRESH RECEIVER .................................................................................... 12<br />
3.2.1. Environmental Operating Conditions................................................................................................................. 12<br />
3.2.2. Placement............................................................................................................................................................ 12<br />
3.2.3. Mounting ............................................................................................................................................................. 12<br />
3.3. POWERING THE VERIFRESH RECEIVER....................................................................................................................... 12<br />
3.3.1. Powering the 418MHZ (US & Canada) Receivers............................................................................................ 12<br />
3.3.2. Powering the 433MHz (UK & Australia) Receivers........................................................................................... 13<br />
3.4. WIRING THE VERIFRESH RECEIVER TO A CPC SITE CONTROLLER ........................................................................... 13<br />
3.4.1. Wire Connection ................................................................................................................................................. 13<br />
3.4.2. Setting the Receiver Bus Network Termination Jumpers.................................................................................... 14<br />
3.4.3. Setting the Receiver Numbering Dip Switch....................................................................................................... 14<br />
3.4.4. Setting the Baud Rate Dip Switch ....................................................................................................................... 14<br />
4 INSTALLING THE VERITEMP SENSOR.............................................................................................................. 16<br />
4.1. PLACEMENT OF VERITEMP SENSORS ......................................................................................................................... 16<br />
4.1.1. Line-of-Sight........................................................................................................................................................ 16<br />
4.1.2. Orientation.......................................................................................................................................................... 16<br />
4.2. MOUNTING VERITEMP/VERIFRESH SENSORS ............................................................................................................ 17<br />
Table of Contents • vii
4.2.1. Right-Angle Mounting Kit (P/N 603-0100)......................................................................................................... 17<br />
4.2.2. Wire Shelf Mounting Kit (P/N 603-0101) ........................................................................................................... 18<br />
4.2.3. Thin Shelf Mounting Kit (P/N 603-0102)............................................................................................................ 18<br />
4.3. ACTIVATION................................................................................................................................................................ 18<br />
4.3.1. Verifying Active State.......................................................................................................................................... 19<br />
4.4. DIGITAL INPUT WIRING.............................................................................................................................................. 19<br />
5 COMMISSIONING THE VERITEMP SENSORS.................................................................................................. 20<br />
5.1. WHAT IS COMMISSIONING? ........................................................................................................................................ 20<br />
5.2. MANUAL ENTRY METHOD.......................................................................................................................................... 21<br />
5.2.1. Entering the ID Numbers on the VeriFresh Gateway......................................................................................... 21<br />
5.3. SERVICE BUTTON METHOD ........................................................................................................................................ 22<br />
5.3.1. Setting up the VeriFresh Gateway to Receive ID Transmissions........................................................................ 22<br />
5.3.2. H<strong>and</strong>-Held Terminal Screen Navigation Tips..................................................................................................... 24<br />
5.4. VERIFYING SUCCESSFUL COMMISSIONING ................................................................................................................. 24<br />
5.5. DECOMMISSIONING A SENSOR FROM THE VERIFRESH GATEWAY ............................................................................. 24<br />
5.5.1. Decommissioning <strong>Manual</strong>ly Entered ID Numbers.............................................................................................. 24<br />
5.5.2. Decommissioning ID Numbers Entered By Service Button ................................................................................ 24<br />
5.6. SETTING THE SENSOR FAILURE TIMEOUT .................................................................................................................. 25<br />
6 CONNECTING SENSORS TO E2/EINSTEIN/REFLECS..................................................................................... 26<br />
6.1. THE LOW BATTERY SIGNAL....................................................................................................................................... 26<br />
7 OPERATION AND MAINTENANCE OF THE VERITEMP SENSOR SYSTEM ............................................. 27<br />
7.1. STATUS LEDS............................................................................................................................................................. 27<br />
7.1.1. VeriTemp <strong>Sensor</strong>s................................................................................................................................................ 27<br />
7.1.2. VeriFresh Receivers ............................................................................................................................................ 27<br />
7.1.2.1. The Status LED................................................................................................................................................................. 27<br />
7.1.2.2. The <strong>RF</strong> LED...................................................................................................................................................................... 27<br />
7.1.2.3. The Receiver Bus LED ..................................................................................................................................................... 27<br />
7.1.3. VeriFresh Gateway ............................................................................................................................................. 28<br />
7.1.3.1. The General Status LED ................................................................................................................................................... 28<br />
7.1.3.2. The Alarm LED ................................................................................................................................................................ 28<br />
7.1.3.3. RS485 I/O Network Status LED....................................................................................................................................... 28<br />
7.1.3.4. Receiver Bus Network Status LED................................................................................................................................... 28<br />
7.2. BATTERY LIFE AND REPLACEMENT............................................................................................................................ 28<br />
7.2.1. Reactivating the VeriTemp <strong>Sensor</strong> ...................................................................................................................... 29<br />
7.3. VIEWING STATUS USING THE HAND-HELD TERMINAL.............................................................................................. 29<br />
7.3.1. Viewing Update Counts....................................................................................................................................... 30<br />
7.3.1.1. Resetting the <strong>Sensor</strong> Update Count .................................................................................................................................. 30<br />
7.4. VERITEMP SENSOR SLEEP MODE ............................................................................................................................... 31<br />
APPENDIX B: SENSOR PLACEMENT GUIDELINES........................................................................................... 35<br />
GENERAL MOUNTING AND PLACEMENT GUIDELINES ...................................................................................................... 35<br />
• SENSOR AND TRANSMITTER MOUNTING GUIDELINES .................................................................................................... 35<br />
• RECEIVER MOUNTING AND PLACEMENT GUIDELINES.................................................................................................... 36<br />
APPENDIX C: TROUBLESHOOTING GUIDELINES............................................................................................ 37<br />
viii • VeriFresh <strong>RF</strong> <strong>Sensor</strong> <strong>System</strong> I&O <strong>Manual</strong> 026-1702 Rev 5 9-17-04
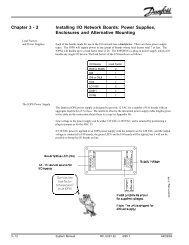
1 Overview<br />
CPC’s VeriFresh Radio Frequency (<strong>RF</strong>)<br />
<strong>Temperature</strong> <strong>Sensor</strong> <strong>System</strong> provides refrigerated<br />
case temperature monitoring <strong>and</strong> control<br />
without the time <strong>and</strong> expense required to wire<br />
multiple temperature sensors from the cases<br />
back to the site controllers. All sensors in the<br />
VeriFresh family are completely wireless, transmitting<br />
their values to receivers in the store area<br />
that pass them back to the site controllers.<br />
DAIRY<br />
MEAT<br />
BEER<br />
VeriFresh<br />
Receiver<br />
RADIUS OF RECEPTION<br />
VeriFresh Receiver<br />
PRODUCE<br />
FROZEN<br />
FOOD<br />
= VeriFresh Product Simulator<br />
= VeriTemp <strong>Sensor</strong><br />
STORE FLOOR<br />
<strong>RF</strong> GATEWAY<br />
<strong>RF</strong> GATEWAY<br />
<strong>RF</strong> GATEWAY<br />
16AI<br />
16AI<br />
16AI<br />
RS485 NETWORK<br />
RS485 NETWORK<br />
RS485 NETWORK<br />
8RO<br />
8RO<br />
8RO<br />
SITE CONTROLLERS (E2/EINSTEIN OR REFLECS)<br />
Figure 1-1 - VeriFresh <strong>System</strong> Diagram<br />
Overview • 1
1.1. Hardware Components<br />
1.1.1. <strong>Sensor</strong>s<br />
1.1.1.1. VeriTemp <strong>Sensor</strong>s<br />
Figure 1-2 - Ambient <strong>Temperature</strong> <strong>Sensor</strong> (809-3542, 809-3544<br />
pictured)<br />
The VeriTemp <strong>Sensor</strong> is an enclosure with a<br />
built-in broadcast antenna. This sensor may be<br />
mounted anywhere within a refrigerated case, as<br />
long as it is within 150 feet of a VeriFresh<br />
Receiver <strong>and</strong> within a clear line-of-sight to the<br />
receiver’s antenna.<br />
16 models of the VeriTemp <strong>Sensor</strong> are available.<br />
Each model has either internal or external<br />
temperature sensing elements, <strong>and</strong> with or without<br />
external general-purpose digital inputs.<br />
Models are also available with two temperature<br />
sensor inputs, allowing control or monitoring of<br />
two cases with a single VeriTemp transmitter.<br />
Table 1-1 lists all VeriTemp Ambient <strong>Temperature</strong><br />
<strong>Sensor</strong> models along with their characteristics<br />
for US <strong>and</strong> Canada only (418 MHz), <strong>and</strong><br />
Table 1-2 lists all VeriTemp Ambient <strong>Temperature</strong><br />
<strong>Sensor</strong> models along with their characteristics<br />
for Europe, Australia, <strong>and</strong> New Zeal<strong>and</strong><br />
(433 MHz).<br />
Part<br />
Number<br />
<strong>Sensor</strong>s for US <strong>and</strong> Canada<br />
Case<br />
Color/<br />
Wire<br />
Color<br />
Description<br />
809-3550 White VeriTemp Transmitter with<br />
809-3551 Black<br />
External NSF-Approved <strong>Sensor</strong><br />
<strong>and</strong> Digital Input 418MHz,<br />
with external NSF-Approved<br />
stainless steel bullet sensor connected<br />
to 20’ neoprene leads,<br />
also with a second pair of 20’<br />
neoprene external leads for connection<br />
to digital input.<br />
809-3552 White VeriTemp <strong>Sensor</strong> with Internal<br />
NSF-Approved <strong>Sensor</strong> <strong>and</strong><br />
809-3553 Black<br />
Digital Defrost Input 418MHz,<br />
with sensor element mounted<br />
inside enclosure <strong>and</strong> external<br />
leads for connection to digital<br />
input.<br />
809-3554 White VeriTemp Transmitter with<br />
809-3555 Black<br />
External Thermistor Connector<br />
<strong>and</strong> Digital Defrost Input<br />
418MHz, with Molex connector<br />
for connection to an external<br />
temperature sensor (purchased<br />
separately) <strong>and</strong> 20’ NSFapproved<br />
neoprene leads for connection<br />
to digital input.<br />
809-3558 White VeriTemp Transmitter with<br />
809-3559 Black<br />
Dual Thermistor Connectors,<br />
418MHz, with two Molex connectors<br />
for connection to external<br />
temperature sensors<br />
(purchased separately).<br />
Table 1-1 - VeriTemp <strong>Sensor</strong> Models for US <strong>and</strong> Canada<br />
2 • VeriFresh <strong>RF</strong> <strong>Sensor</strong> <strong>System</strong> I&O <strong>Manual</strong> 026-1702 Rev 5 9-17-04
<strong>Sensor</strong>s for Europe, Australia, <strong>and</strong> NZ<br />
Part Color <strong>Sensor</strong> Description<br />
Number<br />
809-3650 White VeriTemp Transmitter with<br />
809-3651 Black<br />
External NSF-Approved <strong>Sensor</strong><br />
<strong>and</strong> Digital Input 433MHz,<br />
with external NSF-Approved<br />
stainless steel bullet sensor connected<br />
to 20’ neoprene leads,<br />
also with a second pair of 20’<br />
neoprene external leads for connection<br />
to digital input.<br />
809-3652 White VeriTemp <strong>Sensor</strong> with Internal<br />
NSF-Approved <strong>Sensor</strong> <strong>and</strong><br />
809-3653 Black<br />
Digital Defrost Input 433MHz,<br />
with sensor element mounted<br />
inside enclosure <strong>and</strong> external<br />
leads for connection to digital<br />
input.<br />
809-3654 White VeriTemp Transmitter with<br />
809-3655 Black External Thermistor Connector<br />
<strong>and</strong> Digital Defrost Input<br />
433MHz, with Molex connector<br />
for connection to an external<br />
temperature sensor (purchased<br />
separately) <strong>and</strong> 20’ NSFapproved<br />
neoprene leads for connection<br />
to digital input.<br />
809-3658 White VeriTemp Transmitter with<br />
809-3659 Black<br />
Dual Thermistor Connectors,<br />
433MHz, with two Molex connectors<br />
for connection to external<br />
temperature sensors<br />
(purchased separately).<br />
Table 1-2 - VeriTemp <strong>Sensor</strong> Models for Europe, Australia, NZ<br />
1.1.1.2. Discontinued <strong>Sensor</strong> Models<br />
Table 1-3 lists models of VeriTemp <strong>and</strong> VeriFresh<br />
sensors that are no longer available for<br />
order from CPC. These sensors are still fully<br />
compatible with the CPC VeriFresh <strong>RF</strong> <strong>Temperature</strong><br />
<strong>Sensor</strong> system, <strong>and</strong> do not require field<br />
replacement in a retrofit of new VeriFresh <strong>RF</strong><br />
Receivers <strong>and</strong> <strong>RF</strong> Gateways.<br />
Discontinued Products<br />
Part Color Description<br />
Number<br />
809-3548 White <strong>RF</strong> Product Simulator<br />
809-3549 Black<br />
418MHz<br />
809-3648 White <strong>RF</strong> Product Simulator<br />
809-3649 Black 433MHz<br />
809-3542 White VeriTemp <strong>Sensor</strong> with Internal<br />
Thermistor 418 MHz, with<br />
809-3543 Black<br />
internal clean switch.<br />
809-3544 White VeriTemp Transmitter with<br />
809-3545 Black External Thermistor on 20’<br />
NSF-approved leads 418 MHz,<br />
with 20’ NSF-approved neoprene<br />
leads for external clean<br />
switch.<br />
809-3556 White VeriTemp Transmitter with<br />
809-3557 Black<br />
Molex Connector for External<br />
Thermistor 418 MHz, with 20’<br />
NSF-approved neoprene leads<br />
for external clean switch.<br />
809-3642 White VeriTemp <strong>Sensor</strong> with Internal<br />
Thermistor 433 MHz, with<br />
809-3643 Black<br />
internal clean switch.<br />
809-3644 White VeriTemp Transmitter with<br />
809-3645 Black External Thermistor on 20’<br />
NSF-approved leads 433 MHz,<br />
with 20’ NSF-approved neoprene<br />
leads for external clean<br />
switch.<br />
809-3656 White VeriTemp Transmitter with<br />
809-3657 Black Molex Connector for External<br />
Thermistor 433 MHz, with 20’<br />
NSF-approved neoprene leads<br />
for external clean switch.<br />
Table 1-3 - Discontinued VeriTemp <strong>Sensor</strong> Models<br />
Hardware Components Overview • 3
1.1.2. VeriFresh Receiver<br />
1.1.3. VeriFresh Gateway<br />
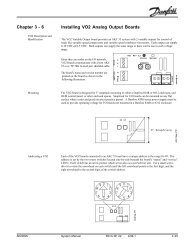
Figure 1-3 - VeriFresh Receiver<br />
The VeriFresh Receiver is an antenna that<br />
mounts to the ceiling of the sales area or on top<br />
of a refrigerated case. The VeriFresh Receiver<br />
accepts transmissions from VeriTemp <strong>Sensor</strong>s<br />
<strong>and</strong> VeriFresh Product Simulators. It passes the<br />
sensor readings it receives to the VeriFresh<br />
Gateway by way of an RS485 network connection.<br />
Up to six VeriFresh Receivers may be<br />
mounted within a single building.<br />
VeriFresh Receiver Models<br />
Part Color Description<br />
Number<br />
809-3510 White VeriFresh Receiver, white casing,<br />
809-3510 Black<br />
418MHz.<br />
809-3610 White VeriFresh Receiver, black casing,<br />
809-3610 Black<br />
433MHz<br />
Figure 1-4 - VeriFresh Gateway Board<br />
The VeriFresh Gateway (P/N 810-3500) is<br />
an RS485 peripheral board compatible with E2,<br />
Einstein, <strong>and</strong> REFLECS (RMCC, BEC, <strong>and</strong><br />
BCU) systems. The VeriFresh Gateway serves<br />
as an interface between the VeriFresh Receivers,<br />
which send messages from the sensors <strong>and</strong> the<br />
site controllers, which use the sensor values for<br />
logging, controlling, <strong>and</strong> alarming. Each E2,<br />
Einstein, or REFLECS controller that will read<br />
values from VeriTemp <strong>Sensor</strong>s must be<br />
equipped with a VeriFresh Gateway.<br />
<strong>Sensor</strong>s <strong>and</strong> product simulators that will be<br />
used by an E2 or Einstein must be “commissioned”<br />
in the VeriFresh Gateway’s software.<br />
Once a sensor is commissioned, the gateway<br />
then assigns the sensor to a virtual “board <strong>and</strong><br />
point” address. This allows the site controller to<br />
tie application inputs to VeriTemp <strong>Sensor</strong> values<br />
in the same way traditional 16AI board <strong>and</strong> point<br />
inputs are set up.<br />
4 • VeriFresh <strong>RF</strong> <strong>Sensor</strong> <strong>System</strong> I&O <strong>Manual</strong> 026-1702 Rev 5 9-17-04
1.1.4. H<strong>and</strong>-Held Terminal<br />
1.1.5. The <strong>RF</strong> Service Tool (US <strong>and</strong><br />
Canada Only)<br />
Figure 1-5 - H<strong>and</strong>-Held Terminal (HHT)<br />
The H<strong>and</strong>-Held Terminal (HHT) (P/N 811-<br />
3110), shown in Figure 1-5, connects directly to<br />
the RJ11 jack on a VeriFresh Gateway <strong>and</strong> is<br />
used to commission VeriTemp <strong>Sensor</strong>s <strong>and</strong> view<br />
the status of the system.<br />
Figure 1-6 - The <strong>RF</strong> Service Tool<br />
The <strong>RF</strong> Service Tool (P/N 811-1000) is an<br />
installation aid <strong>and</strong> troubleshooting tool for service<br />
<strong>and</strong> installation technicians. For testing<br />
VeriTemp sensors <strong>and</strong> VeriFresh Product Simulators,<br />
the <strong>RF</strong> Service Tool has a receiver<br />
antenna <strong>and</strong> a display mode that shows analog<br />
<strong>and</strong> digital values. For troubleshooting the<br />
RS485 <strong>and</strong> Receiver Bus networks, the <strong>RF</strong> Service<br />
Tool can be wired in-line with your networks<br />
<strong>and</strong> detect wiring or equipment problems<br />
or “listen” to network traffic.<br />
More information about the functions of the<br />
<strong>RF</strong> Service Tool is available in the <strong>RF</strong> Service<br />
Tool Operator’s Guide, P/N 026-1703.<br />
Hardware Components Overview • 5
1.2. New vs. Old VeriFresh<br />
Compatibility Issues<br />
In 2004, CPC updated the design of all Veri-<br />
Fresh sensors, VeriFresh Receivers, <strong>and</strong> the VeriFresh<br />
Gateway. For the most part, all new<br />
VeriFresh designs are functionally compatible<br />
with previous versions of VeriFresh equipment,<br />
but there are some exceptions, as well as new<br />
features in the new products that will not work<br />
with older-style hardware.<br />
1.2.1. Dual-Thermistor Compatibility<br />
The dual-thermistor VeriFresh sensors (809-<br />
3558, 809-3559, 809-3658, <strong>and</strong> 809-3659) are<br />
not compatible with old-style VeriFresh Receivers<br />
or VeriFresh Gateways. If you are installing<br />
a dual-thermistor VeriFresh sensor in a site<br />
where existing VeriFresh hardware is installed:<br />
• Verify the logo sticker on the top of the Veri-<br />
Fresh Receiver enclosure is a domed plastic<br />
label with the VeriFresh logo in blue lettering.<br />
This indicates the VeriFresh Receiver is<br />
the new version <strong>and</strong> is capable of communicating<br />
with the dual-thermistor sensors. If<br />
any VeriFresh Receivers in the store have a<br />
flat plastic label with a green logo, they must<br />
be replaced with new VeriFresh receivers.<br />
• Verify the VeriFresh Gateway is version<br />
1.30 or greater. Any Gateway before version<br />
1.30 is not compatible with dual-thermistor<br />
sensors. The version number of the Gateway<br />
can be determined by plugging a H<strong>and</strong>-Held<br />
Terminal into the HHT port <strong>and</strong> reading the<br />
version number on the opening screen.<br />
1.2.2. New <strong>Sensor</strong> Features<br />
All VeriTemp sensors versions 2.0 or greater<br />
have new features not present in older version<br />
sensors. They are:<br />
Low Battery Notification<br />
A VeriTemp sensor will send a signal to<br />
indicate its battery is low. This signal may be<br />
read by a VeriFresh Gateway <strong>and</strong> passed along<br />
to the site controller as a digital input.<br />
This features can only be used if the Veri-<br />
Fresh Gateway is version 1.30 or greater. Any<br />
Gateway version below 1.30 must be upgraded<br />
or replaced if you wish to use low battery notification.<br />
Version Number Display<br />
<strong>Sensor</strong>s that are version 2.0 or greater will<br />
send the VeriFresh Gateway its version number<br />
during the commissioning process. This will be<br />
read by the Gateway <strong>and</strong> is displayed in the sensor’s<br />
information screen in the Gateway’s H<strong>and</strong>-<br />
Held Terminal interface.<br />
<strong>Sensor</strong> version numbers can be read only be<br />
used if all VeriFresh Receivers are the new style<br />
receivers (i.e. a blue logo with a domed plastic<br />
label on the top of the enclosure) <strong>and</strong> if the VeriFresh<br />
Gateway is version 1.30 or greater. If one<br />
or more VeriFresh receivers are the old style<br />
receivers (flat label with green logo), they will<br />
need to be replaced with new receivers to take<br />
advantage of the low battery <strong>and</strong> version number<br />
capabilities. Likewise, any Gateway version<br />
below 1.30 must be upgraded or replaced.<br />
1.2.3. <strong>RF</strong> Service Tool Compatibility<br />
The <strong>RF</strong> Service Tool must be version 2.0<br />
firmware or greater if you wish to read dualthermistor<br />
VeriTemp sensors. Also, only the<br />
version 2.0 or greater <strong>RF</strong> Service Tools are capable<br />
of reading <strong>and</strong> displaying the version number<br />
of a VeriTemp sensor.<br />
6 • VeriFresh <strong>RF</strong> <strong>Sensor</strong> <strong>System</strong> I&O <strong>Manual</strong> 026-1702 Rev 5 9-17-04
2 Installing the Veri-<br />
Fresh Gateway<br />
Installing the VeriFresh Gateway device for<br />
a site controller involves mounting <strong>and</strong> powering<br />
the device, connecting to the CPC controller’s<br />
RS485 network, <strong>and</strong> networking the<br />
VeriFresh Gateway with other gateways <strong>and</strong><br />
receivers on-site.<br />
2.1. Compatibility with Dual<br />
<strong>Temperature</strong> <strong>Sensor</strong>s<br />
In order to support the new dual temperature<br />
sensors (809-3558, 809-3559, 809-3658, or 809-<br />
3659), the VeriFresh Gateway firmware was<br />
updated. If you are using these sensors, your<br />
VeriFresh Gateway must be version 1.30 or<br />
higher.<br />
To check the version number, plug a h<strong>and</strong>held<br />
terminal into the HHT port while the Gateway<br />
is powered up. The version number will be<br />
visible on the opening screen.<br />
2.2. Mounting the VeriFresh<br />
Gateway<br />
The VeriFresh Gateway is typically mounted<br />
in the same area as the site controller, near the<br />
controller’s 16AI, 8RO, <strong>and</strong> other RS485 network<br />
peripherals. The VeriFresh Gateway is<br />
designed to fit into a st<strong>and</strong>ard 3" snap track (supplied<br />
with the board) or may be mounted in a<br />
panel or on st<strong>and</strong>-offs. Follow the dimensions in<br />
Figure 2-1 for panel mounting.<br />
Figure 2-1 - VeriFresh Gateway Board Mounting Dimensions<br />
The VeriFresh Gateway should be mounted<br />
in an environment with ambient temperature<br />
between -40°F <strong>and</strong> 150°F, with a non-condensing<br />
relative humidity between 5% <strong>and</strong> 95%.<br />
2.3. Powering the VeriFresh<br />
Gateway<br />
Input Voltage<br />
Power<br />
24VAC, Class 2, 50/60Hz<br />
5VA<br />
Table 2-1 - VeriFresh Gateway Power Requirements<br />
The VeriFresh Gateway requires 24VAC<br />
power from a Class 2 center-tapped transformer.<br />
CPC supplies several sizes of center-tapped<br />
transformers for powering multiple 16AIs,<br />
8ROs, <strong>and</strong> other RS485 peripheral boards of the<br />
E2, Einstein, <strong>and</strong> REFLECS systems.<br />
Refer to your controller’s user manual for<br />
information on how to use the center-tapped<br />
transformers listed in Table 2-1 to power multiple<br />
RS485 I/O devices for the US <strong>and</strong> Canada.<br />
NOTE: European, Australian, <strong>and</strong> New<br />
Zeal<strong>and</strong>er customers must purchase their<br />
own transformers. The Transformer must be<br />
9VDC with a positive center pin <strong>and</strong> negative shield.<br />
Compatibility with Dual <strong>Temperature</strong> <strong>Sensor</strong>s Installing the VeriFresh Gateway • 7
Figure 2-1 shows how to connect the 56VA<br />
<strong>and</strong> 80VA transformers to the VeriFresh Gateway<br />
power connector.<br />
Three-Board Six-Board<br />
P/N 640-0056 640-0080<br />
Power Rating 56 VA 80 VA<br />
Table 2-1-US <strong>and</strong> Canada Power Ratings for CPC Transformers<br />
2.4.1. Wire Connection<br />
Using shielded three-conductor network<br />
cable (Belden #8641 or equivalent), connect the<br />
RS485 I/O Network wire to the three-terminal<br />
connector on the VeriFresh Gateway board as<br />
shown in Figure 2-2. For further information<br />
about how RS485 networks are configured, refer<br />
to your site controller’s user manual.<br />
Figure 2-1 - Pinout for the 56VA (640-0056) <strong>and</strong> 80VA (640-<br />
0080) Transformers<br />
2.4. Wiring the VeriFresh<br />
Gateway to a CPC Site<br />
Controller (I/O Network)<br />
Each E2, Einstein, or REFLECS site controller<br />
that will receive a temperature value from a<br />
VeriTemp <strong>Sensor</strong> must have a VeriFresh Gateway<br />
installed on its RS485 I/O Network. For E2<br />
<strong>and</strong> Einstein controllers, this means the Veri-<br />
Fresh Gateway will be installed on the I/O Network;<br />
for RMCC, BEC, BCU, <strong>and</strong> other<br />
REFLECS products, the VeriFresh Gateway will<br />
be installed on the COM A or COM D network.<br />
Figure 2-2 - Connecting the VeriFresh Gateway to the RS485<br />
Network<br />
2.4.2. Setting the Board Numbering<br />
Dip Switch<br />
The E2, Einstein, or REFLECS controller<br />
interprets the VeriFresh Gateway board as a<br />
series of four 16AI Analog Input boards numbered<br />
in succession. Addressing the “boards”<br />
represented by the VeriFresh Gateway is<br />
achieved by setting dip switches 1 through 4 to<br />
the first board number to be used. When this<br />
number is set, the VeriFresh Gateway will also<br />
use the next three board numbers above the first<br />
board number. For example, if a VeriFresh Gateway<br />
dip switch is set to board number 3, the VeriFresh<br />
Gateway will use board numbers 3, 4, 5,<br />
<strong>and</strong> 6 on the I/O Network.<br />
Note that because the VeriFresh Gateway<br />
reserves four 16AI Board numbers for its own<br />
use, an I/O network with a VeriFresh Gateway is<br />
limited to 12 16AI boards. Note also that since<br />
16 is the highest board number possible, a Veri-<br />
Fresh Gateway’s dip switch may not be set to<br />
any number above 13.<br />
8 • VeriFresh <strong>RF</strong> <strong>Sensor</strong> <strong>System</strong> I&O <strong>Manual</strong> 026-1702 Rev 5 9-17-04
Figure 2-3 - VeriFresh Gateway Dip Switch Numbering<br />
2.4.3. Setting the Baud Rate Dip<br />
Switches<br />
Dip switches 6 <strong>and</strong> 7 control the baud rate at<br />
which the VeriFresh Gateway communicates<br />
with the site controller on the RS485 Network.<br />
These switches must be set to the same baud rate<br />
setting as the E2, Einstein, or REFLECS (usually<br />
9600 baud).<br />
Dip switch 8 controls the baud rate at which<br />
the VeriFresh Gateway communicates with the<br />
other devices on the Receiver Bus Network. This<br />
baud rate may only be set to either 9600 baud<br />
(switch DOWN) or 19200 baud (switch UP). All<br />
VeriFresh Gateways <strong>and</strong> VeriFresh Receivers on<br />
the Receiver Bus Network must have the same<br />
baud rate dip switch setting. It is recommended<br />
you use 9600 baud as the Receiver Bus Network<br />
baud rate.<br />
Figure 2-4 - Dip Switch Setting for Numbering VeriFresh<br />
Gateway<br />
2.4.4. Setting the RS485 I/O Termination<br />
Jumpers<br />
As part of a site controller’s RS485 I/O<br />
(COM A or COM D) Network, a VeriFresh<br />
Gateway must be terminated if it is the end<br />
device of a daisy chain. Refer to the controller’s<br />
user manual for information about daisy chain<br />
networks <strong>and</strong> how they are terminated.<br />
To terminate the VeriFresh Gateway, set the<br />
I/O Network Jumpers to the RIGHT position as<br />
shown in Figure 2-5. To unterminate the Veri-<br />
Fresh Gateway, set the jumpers to the LEFT<br />
position.<br />
Wiring the VeriFresh Gateway to a CPC Site Controller (I/O Network) Installing the VeriFresh Gateway • 9
Figure 2-5 - VeriFresh Gateway RS485 I/O Network<br />
Termination<br />
2.5. Networking Gateways<br />
<strong>and</strong> Receivers (Receiver<br />
Bus Network)<br />
The RS485 Receiver Bus Network interconnects<br />
all VeriFresh Gateways <strong>and</strong> Receivers on<br />
the site. Like the RS485 I/O Networks that interconnect<br />
the site controllers, input boards, output<br />
boards, <strong>and</strong> VeriFresh Gateways, the Receiver<br />
Bus Network must be set up in a daisy chain<br />
configuration. All devices must be wired<br />
together in a single chain as shown in Figure 2-<br />
6, with no branches <strong>and</strong> with no device connected<br />
to more than two other devices.<br />
Figure 2-6 - Daisy Chain Configuration - Receiver Bus Network<br />
2.5.1. Wiring the Receiver Bus Network<br />
to the Gateway<br />
Using shielded three-conductor cable<br />
(Belden #8641 or equivalent), wire the Veri-<br />
Fresh Gateway to the Receiver Bus Network as<br />
shown in Figure 2-7.<br />
Figure 2-7 - Receiver Bus Network Wiring<br />
10 • VeriFresh <strong>RF</strong> <strong>Sensor</strong> <strong>System</strong> I&O <strong>Manual</strong> 026-1702 Rev 5 9-17-04
2.5.2. Setting the Receiver Bus<br />
Network Termination Jumpers<br />
As shown in Figure 2-6, the Receiver Bus<br />
daisy chain must be terminated at the two<br />
devices at the end of the chain. The location of<br />
the termination jumpers on the VeriFresh Gateway<br />
are shown in Figure 2-8. To terminate a<br />
VeriFresh Gateway, set the jumpers to the<br />
RIGHT position. To unterminate the VeriFresh<br />
Gateway, set the jumpers to the LEFT position.<br />
The opening screen will display the part<br />
number <strong>and</strong> version of the Gateway firmware.<br />
The last line of the opening screen will display<br />
any alarm conditions pertaining to Gateway<br />
operation.<br />
2.6.1. Viewing Board Numbering<br />
<strong>and</strong> Baud Rate<br />
From the opening screen, pressing the<br />
DOWN ARROW key once will display a screen<br />
showing the 16AI board numbering <strong>and</strong> network<br />
baud rates set for this Gateway.<br />
16AI: 1 TO 4<br />
I/O BAUD: 9600<br />
RCV BAUD: 9600<br />
TIMEOUT-MIN: 60<br />
The top line shows the 16AI board numbers<br />
represented by this Gateway on the site controller’s<br />
I/O network. These numbers are determined<br />
by setting of the network address dip<br />
switch, <strong>and</strong> are not changeable from this screen.<br />
Figure 2-8 - RS485 Receiver Bus Network Termination<br />
2.6. Checking Gateway Settings<br />
Using the H<strong>and</strong>-<br />
Held Terminal<br />
When the VeriFresh Gateway is powered<br />
<strong>and</strong> networked with both the site controller <strong>and</strong><br />
the VeriFresh Receiver(s), you may check the<br />
status of the Gateway with the H<strong>and</strong>-Held Terminal<br />
(HHT).<br />
Plug the H<strong>and</strong>-Held Terminal into the HHT<br />
jack on the VeriFresh Gateway. The HHT<br />
should power up <strong>and</strong> display the opening screen.<br />
CPC - <strong>RF</strong> GATEWAY<br />
810-3500<br />
VER: 1.30F01-01<br />
FAIL: USER CFG<br />
The second <strong>and</strong> third line show the baud rate<br />
settings for the I/O network <strong>and</strong> the Receiver<br />
Bus network. These values are also set by the dip<br />
switches, <strong>and</strong> are not changeable from this<br />
screen.<br />
The last line sets the minimum amount of<br />
time a <strong>RF</strong> sensor must fail to report a value<br />
before the VeriFresh Gateway considers the sensor<br />
failed (<strong>and</strong> generates an alarm). This parameter<br />
may be changed with the HHT. Press the<br />
RIGHT ARROW to move the cursor to the TIM-<br />
EOUT-MIN parameter, <strong>and</strong> enter a value from<br />
20 to 999 minutes. Press the DOWN ARROW<br />
key to save your changes.<br />
Checking Gateway Settings Using the H<strong>and</strong>-Held Terminal Installing the VeriFresh Gateway • 11
3 Installing the Veri-<br />
Fresh Receiver<br />
Installing a VeriFresh Receiver requires<br />
mounting the receiver, powering the receiver,<br />
<strong>and</strong> networking the receiver together with other<br />
receivers <strong>and</strong> gateways on the RS485 Receiver<br />
Bus Network.<br />
3.1. Compatibility Issues<br />
With New vs. Old Veri-<br />
Fresh Equipment<br />
The VeriFresh Receiver currently sold by<br />
CPC, which features the VeriFresh logo in blue<br />
lettering with a plastic dome label, has a different<br />
hardware <strong>and</strong> firmware design that allows it<br />
to communicate with the new VeriTemp dual<br />
temperature sensors (809-3558, 809-3559, 809-<br />
3658, 809-3659).<br />
Older versions of the VeriFresh Receiver,<br />
which feature a flat label with the VeriFresh<br />
logo in green, are not compatible with the Veri-<br />
Temp dual temperature sensors.<br />
If you are installing dual temperature sensors<br />
in a site with the old-version VeriFresh Receiver<br />
(with the green label), you will need to replace<br />
all VeriFresh receivers with new VeriFresh<br />
Receivers with the domed blue label.<br />
3.2. Mounting <strong>and</strong> Placement<br />
of the VeriFresh Receiver<br />
3.2.1. Environmental Operating<br />
Conditions<br />
The VeriFresh Receiver should be mounted<br />
in an environment with ambient temperature<br />
between 30°F <strong>and</strong> 120°F, with a non-condensing<br />
relative humidity between 5% <strong>and</strong> 95%.<br />
3.2.2. Placement<br />
The VeriFresh Receiver must be placed<br />
above the sales floor within 150 feet of the sensors<br />
it will receive transmissions from. Each<br />
VeriTemp <strong>Sensor</strong> in the store must be no more<br />
than 150 feet from a VeriFresh Receiver, so for<br />
installations that require multiple receivers,<br />
make sure each VeriFresh Receiver is placed so<br />
that all VeriTemp <strong>Sensor</strong>s have a receiver within<br />
the maximum distance.<br />
3.2.3. Mounting<br />
The receiver may be mounted either against<br />
the ceiling (with the antenna pointing toward the<br />
floor) or on top of a case (with the antenna pointing<br />
directly toward the ceiling). Alternately, the<br />
receiver may be mounted sideways (e.g., on a<br />
riser or a wall), but this will limit the range of<br />
reception to only those VeriTemp <strong>Sensor</strong>s that<br />
are within the 180° arc of the direction the<br />
antenna is pointing (i.e., it may not pick up sensors<br />
located behind the receiver base).<br />
Note the status LEDs <strong>and</strong> wire connections<br />
are located on the bottom of the receiver enclosure;<br />
try to mount the receiver so that these connections<br />
are accessible.<br />
3.3. Powering the VeriFresh<br />
Receiver<br />
3.3.1. Powering the 418MHZ (US &<br />
Canada) Receivers.<br />
The VeriFresh Receiver models for the US<br />
& Canada (809-3510 <strong>and</strong> 809-3511) require a<br />
9VDC power source. A 110VAC to 9VDC<br />
transformer is supplied with the VeriFresh<br />
Receiver. Plug the adapter into the receiver base,<br />
<strong>and</strong> connect the transformer to a 110VAC line.<br />
12 • VeriFresh <strong>RF</strong> <strong>Sensor</strong> <strong>System</strong> I&O <strong>Manual</strong> 026-1702 Rev 5 9-17-04
3.3.2. Powering the 433MHz (UK &<br />
Australia) Receivers<br />
The VeriFresh Receiver models for the UK<br />
& Australia (809-3610 <strong>and</strong> 809-3611) are not<br />
supplied by CPC with supply transformers. Customers<br />
purchasing these receivers must obtain a<br />
9VDC center-pin positive transformer rated for<br />
200mA or greater.<br />
Figure 3-1 shows the dimensions the power<br />
supply connector must conform to when selecting<br />
a transformer.<br />
3.4.1. Wire Connection<br />
Connect the Receiver Bus Network wire to<br />
the three-terminal connector on the VeriFresh<br />
Receiver board as shown in Figure 3-2.<br />
Figure 3-1<br />
3.4. Wiring the VeriFresh Receiver<br />
to a CPC Site Controller<br />
Each VeriFresh Receiver passes along sensor<br />
values it receives to a VeriFresh Gateway on its<br />
RS485 Receiver Bus Network.<br />
Figure 3-2 - Connecting the VeriFresh Receiver to the RS485<br />
Network<br />
Wiring the VeriFresh Receiver to a CPC Site Controller Installing the VeriFresh Receiver • 13
3.4.2. Setting the Receiver Bus<br />
Network Termination Jumpers<br />
The devices at each end of the Receiver Bus<br />
Network daisy chain must be terminated. To terminate<br />
the Receiver Bus Network at the Veri-<br />
Fresh Receiver, set the jumpers to the UP<br />
position, as shown in Figure 3-3. To unterminate<br />
the VeriFresh Gateway, set the jumpers to<br />
the DOWN position.<br />
To assign a VeriFresh Receiver a number on<br />
the VeriFresh Gateway network, set switches 1-<br />
5 to the desired number. See Figure 3-4.<br />
Figure 3-3 - VeriFresh Receiver Receiver Bus Termination<br />
Settings<br />
3.4.3. Setting the Receiver Numbering<br />
Dip Switch<br />
The VeriFresh Receiver must be identified<br />
with a unique number on the VeriFresh Gateway<br />
network. This allows VeriFresh Gateways to<br />
determine the source of incoming temperature<br />
readings. VeriFresh Receivers must be numbered<br />
sequentially, starting with #1 <strong>and</strong> continuing<br />
to the maximum number of receivers<br />
allowed (currently 6).<br />
Figure 3-4 - Dip Switch Setting for Numbering VeriFresh<br />
Receiver<br />
3.4.4. Setting the Baud Rate Dip<br />
Switch<br />
Dip switches 6 <strong>and</strong> 7 control the baud rate at<br />
which the VeriFresh Receiver communicates<br />
with the site controller on the Receiver Bus Network.<br />
These switches should be set to the same<br />
position as all other Receiver Bus Network<br />
devices so they will communicate at the same<br />
baud rate. It is recommended the baud rate be set<br />
at 9600 baud for all Receiver Bus devices.<br />
14 • VeriFresh <strong>RF</strong> <strong>Sensor</strong> <strong>System</strong> I&O <strong>Manual</strong> 026-1702 Rev 5 9-17-04
Figure 3-5 - Dip Switch Setting for VeriFresh Receiver Baud<br />
Rate<br />
Wiring the VeriFresh Receiver to a CPC Site Controller Installing the VeriFresh Receiver • 15
4 Installing the Veri-<br />
Temp <strong>Sensor</strong><br />
Figure 4-1 demonstrates a few examples of<br />
difficult sensor placements <strong>and</strong> some ideas on<br />
how to provide a clear line-of-sight.<br />
This section details how to install the various<br />
models of VeriTemp <strong>Sensor</strong>s, including mounting<br />
<strong>and</strong> placement, activation, <strong>and</strong> clean switch<br />
<strong>and</strong> defrost termination wiring.<br />
4.1. Placement of VeriTemp<br />
<strong>Sensor</strong>s<br />
Ideally, all VeriTemp <strong>Sensor</strong> models should<br />
be located somewhere within a refrigerated case<br />
where a clear line-of-sight exists between itself<br />
<strong>and</strong> a VeriFresh Receiver. In any case, the signal<br />
path between the VeriTemp <strong>Sensor</strong> <strong>and</strong><br />
the VeriFresh Receiver should not be blocked<br />
by large amounts of product or thick metal<br />
case walls.<br />
4.1.1. Line-of-Sight<br />
Clear line-of-sight from the sensor to the<br />
receiver is important to proper transmission <strong>and</strong><br />
reception of signals from the VeriTemp sensor.<br />
When radio transmissions from the sensor<br />
encounter metal or other obstructions, the signal<br />
will be blocked or reflected, making reception of<br />
the signal less likely. The only way to assure a<br />
sensor’s signal will always successfully be<br />
received is to maintain an unobstructed path<br />
between the sensor <strong>and</strong> receiver.<br />
Figure 4-1 - <strong>Sensor</strong> Placement for Line-Of-Sight To Receiver<br />
In the first door case lineup, burying the sensor<br />
too far back in the case causes line-of-sight<br />
between sensor <strong>and</strong> receiver to be blocked by the<br />
top of the case. Bringing it forward in the case<br />
provides a line-of-sight that is only obstructed<br />
by the glass doors, which will result in better<br />
communication.<br />
In the second door case lineup, the receiver<br />
is directly over the sensors, <strong>and</strong> there is no way<br />
to place the sensor in the cases to provide a clear<br />
line-of-sight. This can be overcome by using<br />
sensor transmitters with external temperature<br />
probes. The probes can be mounted anywhere in<br />
the case, <strong>and</strong> the transmitters may be placed<br />
somewhere external to the case to provide clear<br />
line-of-sight.<br />
4.1.2. Orientation<br />
The orientation of a sensor in a refrigerated<br />
case can affect its transmission performance.<br />
16 • VeriFresh <strong>RF</strong> <strong>Sensor</strong> <strong>System</strong> I&O <strong>Manual</strong> 026-1702 Rev 5 9-17-04
Mount VeriTemp sensors with the top facing<br />
down <strong>and</strong> with the front (button side) facing the<br />
rear of the case. If the sensor must be mounted<br />
vertically, mount with the front of the sensor facing<br />
up toward the top of the case. See Figure 4-<br />
2.<br />
4.2.1. Right-Angle Mounting Kit (P/<br />
N 603-0100)<br />
The Right-Angle Mounting Kit is designed<br />
for mounting a VeriTemp sensor to the side of a<br />
refrigerated case. Because of the large amounts<br />
of signal reflection that occur when the sensor is<br />
mounted closely against a large piece of sheet<br />
metal (like the side of a case), simply mounting<br />
the sensor’s mounting clip flat against the side of<br />
the case is not recommended. Instead, use the L-<br />
Bracket in the Right-Angle Mounting Clip to<br />
mount the sensor mounting clip as shown in Figure<br />
4-3. Bolt the clip to the bracket <strong>and</strong> then<br />
snap the sensor on the mounting clip.<br />
Figure 4-2 - VeriTemp <strong>Sensor</strong> Mounting Orientation<br />
4.2. Mounting VeriTemp/Veri-<br />
Fresh <strong>Sensor</strong>s<br />
The VeriTemp <strong>Sensor</strong> <strong>and</strong> the VeriFresh<br />
Product Simulator both have plastic mounting<br />
clips that may be fastened anywhere on a shelf<br />
or the side of a refrigerated case. After mounting<br />
the clip, the sensor may be snapped on to the<br />
mounting clip.<br />
Because of the varying different types of<br />
case shelves or surfaces in supermarkets, CPC<br />
supplies several alternative mounting kits.<br />
Figure 4-3 - Right-Angle Mounting of <strong>Sensor</strong> Mounting Clip.<br />
Mounting VeriTemp/VeriFresh <strong>Sensor</strong>s Installing the VeriTemp <strong>Sensor</strong> • 17
4.2.2. Wire Shelf Mounting Kit (P/N<br />
603-0101)<br />
The Wire Shelf Mounting Kit is designed for<br />
mounting a VeriTemp sensor to a wire shelf,<br />
such as the kind that may be found in a cheese or<br />
frozen food case. This kit contains two plates<br />
that can be bolted together to clamp onto the<br />
wire shelf, which provides a surface that the sensor’s<br />
mounting clip may be attached.<br />
Press the fasteners supplied in the kit into the<br />
holes on the mounting plate. With the mounting<br />
plate on the one side of the wire shelf, screw the<br />
mounting clip <strong>and</strong> st<strong>and</strong>off block through the<br />
shelf into the mounting plate, as shown in Figure<br />
4-4. Then, snap the sensor onto the mounting<br />
clip.<br />
4.2.3. Thin Shelf Mounting Kit (P/N<br />
603-0102)<br />
The Thin Shelf Mounting Kit is designed for<br />
mounting the VeriTemp sensor to a thin metal<br />
case shelf. This kit requires you to drill two 9/<br />
32" holes into the shelf, push the supplied fasteners<br />
into the holes, <strong>and</strong> screw both the st<strong>and</strong>off<br />
block <strong>and</strong> the mounting clip into the fasteners<br />
through the shelf, as shown in Figure 4-5.<br />
Use the holes in the st<strong>and</strong>off block to mark<br />
the spots where the holes must be drilled.<br />
Figure 4-5 - Thin Shelf Mounting of <strong>Sensor</strong> Mounting Clip<br />
Figure 4-4 - Wire Shelf Mounting of <strong>Sensor</strong> Mounting Clip<br />
4.3. Activation<br />
All VeriTemp <strong>Sensor</strong>s will be shipped with<br />
the power OFF (Sleep mode) to save battery life.<br />
The sensors must be activated before they will<br />
start transmitting. To activate the sensor, locate<br />
the Service button <strong>and</strong> press for one second (see<br />
Figure 4-6 for the service button locations).<br />
18 • VeriFresh <strong>RF</strong> <strong>Sensor</strong> <strong>System</strong> I&O <strong>Manual</strong> 026-1702 Rev 5 9-17-04
When activated, the sensor LED will stay<br />
ON for one second to indicate the sensor is exiting<br />
Sleep mode <strong>and</strong> beginning operation.<br />
Figure 4-6 - VeriTemp <strong>Sensor</strong> Activation<br />
4.3.1. Verifying Active State<br />
When a VeriTemp <strong>Sensor</strong> is active, you can<br />
verify its active state by momentarily pressing<br />
the Service button <strong>and</strong> then releasing. If active,<br />
the status LED will flash once. If the light does<br />
not come on, it is either in Sleep mode or has a<br />
dead or missing battery.<br />
4.4. Digital Input Wiring<br />
<strong>Sensor</strong> models with digital inputs are<br />
equipped with a two-wire pigtail. These may be<br />
connected to a clean switch, defrost termination<br />
sensor, door switch, or any other dry contact digital<br />
input. Definition of this input as a clean<br />
switch, termination sensor, etc. is performed in<br />
the site controller’s circuit setup screens (refer to<br />
the site controller’s user manual).<br />
All VeriTemp sensors with digital inputs<br />
come equipped with 20’ leads. If a longer wire<br />
length is required, do not exceed a total cable<br />
length of 50’. Belden #8761 or equivalent is recommended.<br />
WARNING! Digital inputs on VeriTemp sensors<br />
are to be connected to dry contacts only.<br />
Do not connect the leads to any voltage or current<br />
source. Doing so will damage the sensor <strong>and</strong> void<br />
the warranty.<br />
Digital Input Wiring Installing the VeriTemp <strong>Sensor</strong> • 19
5 Commissioning the<br />
VeriTemp <strong>Sensor</strong>s<br />
5.1. What is Commissioning?<br />
Commissioning is the act of linking a Veri-<br />
Temp <strong>Sensor</strong>’s input to a virtual “board <strong>and</strong><br />
point” address in a specific VeriFresh Gateway’s<br />
memory so it can be read <strong>and</strong> used by a CPC site<br />
controller.<br />
The act of commissioning involves assigning<br />
each virtual board <strong>and</strong> point in a VeriFresh Gateway’s<br />
software with either the temperature value<br />
or the digital input value from a specific Veri-<br />
Temp <strong>Sensor</strong>. This is achieved by:<br />
• Specifying the unique ID number of the VeriTemp<br />
<strong>Sensor</strong> that will supply the value to<br />
the chosen board <strong>and</strong> point address, <strong>and</strong><br />
• Specifying whether the board <strong>and</strong> point<br />
address will output the sensor’s temperature<br />
value or the digital input value (from either<br />
the clean switch or the defrost termination<br />
sensor).<br />
Figure 5-1 - The Process of Commissioning<br />
20 • VeriFresh <strong>RF</strong> <strong>Sensor</strong> <strong>System</strong> I&O <strong>Manual</strong> 026-1702 Rev 5 9-17-04
A sensor can be commissioned either by<br />
manually entering sensor ID numbers into the<br />
VeriFresh Gateway software or by pressing a<br />
sensor’s service button to broadcast the ID number<br />
to the VeriFresh Gateway via an operational<br />
VeriFresh Receiver.<br />
5.2. <strong>Manual</strong> Entry Method<br />
Each VeriTemp <strong>Sensor</strong> <strong>and</strong> product simulator<br />
has a sticker on the enclosure that displays an<br />
ID number unique to the sensor. This sticker also<br />
has a perforated tag that may be removed from<br />
the enclosure.<br />
When using the <strong>Manual</strong> Entry method of<br />
commissioning sensors, it is recommended you<br />
remove each perforated ID tag after installation<br />
<strong>and</strong> attach it to a data sheet along with information<br />
about its location <strong>and</strong> the name of the E2,<br />
Einstein, or REFLECS controller that will read<br />
the sensor’s value. Appendix A provides a template<br />
that may be photocopied for creating Veri-<br />
Temp <strong>Sensor</strong> data sheets.<br />
When you’ve collected all the ID numbers<br />
from the VeriTemp <strong>Sensor</strong>s <strong>and</strong> product simulators<br />
for your site, the ID numbers may be entered<br />
on the VeriFresh Gateways to commission the<br />
sensors.<br />
5.2.1. Entering the ID Numbers on<br />
the VeriFresh Gateway<br />
The VeriFresh Gateway board is designed to<br />
simulate four 16AI Analog Input boards, each of<br />
which has sixteen inputs, for a total of 64 inputs<br />
per gateway. To commission a sensor, you must<br />
use the H<strong>and</strong>-Held Terminal to associate the<br />
sensor ID number with a “board <strong>and</strong> point” input<br />
address on the gateway.<br />
1. Plug the H<strong>and</strong>-Held Terminal into the HHT<br />
jack on the VeriFresh Gateway. The HHT<br />
should power up <strong>and</strong> display the opening<br />
screen.<br />
CPC - <strong>RF</strong> GATEWAY<br />
810-3500<br />
VER: 1.30F01-01<br />
FAIL: USER CFG<br />
2. Press the DOWN ARROW key TWICE to<br />
display the Options menu.<br />
OPTION: 1<br />
1= SET SENSOR ID<br />
2= STATUS-DEG F<br />
3= STATUS-DEG C<br />
3. Press the RIGHT ARROW, 1, DOWN<br />
ARROW, <strong>and</strong> DOWN ARROW to select<br />
the “Set <strong>Sensor</strong> ID” option <strong>and</strong> navigate to<br />
the ID Entry Method screen.<br />
ID ENTRY METHOD<br />
1 = ENTER ID<br />
2 = SERVICE PIN<br />
METHOD: 1<br />
4. In the ID Entry Method screen, press<br />
RIGHT ARROW, 1, DOWN ARROW,<br />
<strong>and</strong> DOWN ARROW to select the “Enter<br />
ID #” method <strong>and</strong> navigate to the Enter<br />
Starting Board Address menu.<br />
ENTER STARTING<br />
BOARD ADDRESS<br />
( 1 2 3 4 )<br />
BOARD: 1<br />
5. The Enter Starting Board Address menu<br />
allows you to jump to Point 1 of the number<br />
of the “board” you wish to configure. The<br />
four board numbers reserved by this gateway<br />
are shown in parenthesis on line 3 of the<br />
screen. To begin commissioning sensors on a<br />
“board,” press RIGHT ARROW, the number<br />
of the board you wish to configure,<br />
DOWN ARROW, <strong>and</strong> DOWN ARROW.<br />
6. The commissioning screen for Point 1 of the<br />
board number you chose will be visible on<br />
the screen. There are two configurable<br />
parameters on this screen: TYPE, <strong>and</strong> ID.<br />
<strong>Manual</strong> Entry Method Commissioning the VeriTemp <strong>Sensor</strong>s • 21
Press the RIGHT ARROW key to move the<br />
cursor to the TYPE field.<br />
BRD: 1 PT: 1<br />
VER:<br />
TYPE : TEMP1<br />
ID:<br />
7. Choose the type of input you want to set up<br />
on this point using the "." <strong>and</strong> "-" keys to<br />
scroll through the options. When selected,<br />
press the DOWN ARROW key to confirm.<br />
• TEMP1 - If you are setting up a VeriTemp<br />
sensor with a single thermistor, TEMP1 will<br />
be the value of that thermistor. If you are setting<br />
up a dual-thermistor sensor, TEMP1<br />
will be the value of the sensor labeled "<strong>Sensor</strong><br />
1" on the wire leads next to the Molex<br />
connector.<br />
• TEMP2 - For dual-thermistor sensors,<br />
TEMP2 is the value of the sensor labeled<br />
"<strong>Sensor</strong> 2" on the wire leads next to the<br />
Molex connector.<br />
• DIGITAL - The digital input on the Veri-<br />
Temp sensor.<br />
• BATTERY - The sensor’s low battery signal<br />
(available only on version 2.xx or greater<br />
VeriTemp sensors).<br />
8. The cursor should now be on the ID field. In<br />
the ID field, enter the number from the ID<br />
tag or sticker on the VeriTemp <strong>Sensor</strong> enclosure.<br />
When finished, press the DOWN<br />
ARROW key to confirm <strong>and</strong> save.<br />
BRD: 1 PT: 1<br />
VER:<br />
TYPE : TEMP1<br />
ID: 0000024940<br />
9. Press the DOWN ARROW key again to<br />
move on to the next point on the board. Follow<br />
steps 6 through 8 again to commission<br />
the next board point. If you wish to switch to<br />
a different board, pressing F2 will move you<br />
back to the Enter Starting Board screen<br />
described in step 4.<br />
NOTE: For simplicity, it is recommended you<br />
commission a sensor’s digital input value <strong>and</strong><br />
low battery input on the points immediately<br />
after the sensor’s temperature value. For example, if<br />
<strong>Sensor</strong> A’s temperature value is commissioned as<br />
Board 1, Point 1, commission its digital input value as<br />
Board 1, Point 2 <strong>and</strong> the low battery signal as Board<br />
1, Point 3.<br />
5.3. Service Button Method<br />
All VeriTemp <strong>Sensor</strong> models have a service<br />
button that, when pressed, will transmit its ID<br />
number. The service button can be used to commission<br />
the sensor by comm<strong>and</strong>ing the Veri-<br />
Fresh Gateway to receive the transmitted ID<br />
number <strong>and</strong> assign it to a “board <strong>and</strong> point”<br />
input address.<br />
This process will likely require two people:<br />
one to set the VeriFresh Gateway up to receive<br />
the sensor ID transmissions, <strong>and</strong> one on the sales<br />
floor to press the service buttons.<br />
WARNING! Make sure no one else on site is<br />
commissioning or activating sensors while you<br />
are commissioning sensors. Otherwise, the<br />
VeriFresh Gateway may read a service button transmission<br />
from the wrong VeriTemp <strong>Sensor</strong> <strong>and</strong> commission<br />
improperly.<br />
5.3.1. Setting up the VeriFresh<br />
Gateway to Receive ID<br />
Transmissions<br />
The VeriFresh Gateway board is designed to<br />
simulate four 16AI Analog Input boards, each of<br />
which has sixteen inputs, for a total of 64 inputs<br />
per gateway. To commission a sensor, you must<br />
use the H<strong>and</strong>-Held Terminal to associate the sensor<br />
ID number with a “board <strong>and</strong> point” input address<br />
on the gateway.<br />
1. Plug the H<strong>and</strong>-Held Terminal into the HHT<br />
jack on the VeriFresh Gateway. The HHT<br />
22 • VeriFresh <strong>RF</strong> <strong>Sensor</strong> <strong>System</strong> I&O <strong>Manual</strong> 026-1702 Rev 5 9-17-04
should power up <strong>and</strong> display the opening<br />
screen.<br />
CPC - <strong>RF</strong> GATEWAY<br />
810-3500<br />
VER: 1.30F01-01<br />
the RIGHT ARROW key to move the cursor<br />
to the TYPE field.<br />
BRD: 1 PT: 1<br />
VER:<br />
TYPE : TEMP1<br />
2. Press the DOWN ARROW key TWICE to<br />
display the Options menu.<br />
OPTION: 1<br />
1= SET SENSOR ID<br />
2= STATUS-DEG F<br />
3= STATUS-DEG C<br />
3. Press the RIGHT ARROW, 2, DOWN<br />
ARROW, <strong>and</strong> DOWN ARROW to select<br />
the “Set <strong>Sensor</strong> ID” option <strong>and</strong> navigate to<br />
the ID Entry Method screen.<br />
4. In the ID Entry Method screen, press<br />
RIGHT ARROW, 2, DOWN ARROW,<br />
<strong>and</strong> DOWN ARROW to select the “Service<br />
Pin” method <strong>and</strong> navigate to the Enter Starting<br />
Board Address menu.<br />
ENTER STARTING<br />
BOARD ADDRESS<br />
( 1 2 3 4 )<br />
BOARD: 1<br />
5. The Enter Starting Board Address menu<br />
allows you to jump to Point 1 of the number<br />
of the “board” you wish to configure. The<br />
four board numbers reserved by this gateway<br />
are shown in parenthesis on line 3 of the<br />
screen. To begin commissioning sensors on a<br />
“board,” press RIGHT ARROW, the number<br />
of the board you wish to configure,<br />
DOWN ARROW, <strong>and</strong> DOWN ARROW.<br />
6. The commissioning screen for Point 1 of the<br />
board number you chose will be visible on<br />
the screen. If this point has not been commissioned<br />
before, there will only be one configurable<br />
parameter on this screen: TYPE. Press<br />
7. Choose the type of input you want to set up<br />
on this point using the "." <strong>and</strong> "-" keys to<br />
scroll through the options. When selected,<br />
press the DOWN ARROW key to confirm.<br />
• TEMP1 - If you are setting up a VeriTemp<br />
sensor with a single thermistor, TEMP1 will<br />
be the value of that thermistor. If you are setting<br />
up a dual-thermistor sensor, TEMP1<br />
will be the value of the sensor labeled "<strong>Sensor</strong><br />
1" on the wire leads next to the Molex<br />
connector.<br />
• TEMP2 - For dual-thermistor sensors,<br />
TEMP2 is the value of the sensor labeled<br />
"<strong>Sensor</strong> 2" on the wire leads next to the<br />
Molex connector.<br />
• DIGITAL - The digital input on the Veri-<br />
Temp sensor.<br />
• BATTERY - The sensor’s low battery signal<br />
(available only on version 2.xx or greater<br />
VeriTemp sensors).<br />
8. The cursor should now disappear, <strong>and</strong> line 4<br />
of the display will read “(PRESS SRVC<br />
PIN).” Press <strong>and</strong> hold the Service button on<br />
the VeriTemp <strong>Sensor</strong> for one second <strong>and</strong><br />
then release. The VeriFresh Gateway should<br />
receive the Service button message <strong>and</strong> fill<br />
the ID field in with the ID number of the<br />
VeriTemp <strong>Sensor</strong>.<br />
BRD: 1 PT: 1<br />
VER:<br />
TYPE : TEMP1<br />
(PRESS SRVC PIN)<br />
The VeriFresh Gateway will wait one minute<br />
to receive the Service button signal. If it is not<br />
received, the message “SRVC PIN TIMEOUT”<br />
will appear (you may also manually cancel the<br />
wait time by pressing CANCEL.)<br />
Service Button Method Commissioning the VeriTemp <strong>Sensor</strong>s • 23
If commissioning was unsuccessful, press<br />
the UP ARROW key <strong>and</strong> repeat steps 7 <strong>and</strong> 8.<br />
If the sensor will still not commission, refer to<br />
Appendix B for troubleshooting information, or<br />
attempt to commission the sensor using the<br />
<strong>Manual</strong> Entry method (Section 5.2.).<br />
9. Press the DOWN ARROW key again to<br />
move on to the next point on the board. Follow<br />
steps 6 through 8 again to commission<br />
the next board point. If you wish to switch to<br />
a different board, pressing F2 will move you<br />
back to the Enter Starting Board screen<br />
described in step 4.<br />
NOTE: For simplicity, it is recommended you<br />
commission a sensor’s digital input value <strong>and</strong><br />
low battery input on the points immediately<br />
after the sensor’s temperature value. For example, if<br />
<strong>Sensor</strong> A’s temperature value is commissioned as<br />
Board 1, Point 1, commission its digital input value as<br />
Board 1, Point 2 <strong>and</strong> the low battery signal as Board<br />
1, Point 3.<br />
5.3.2. H<strong>and</strong>-Held Terminal Screen<br />
Navigation Tips<br />
• At any time, pressing F1 on the HHT will move you<br />
back to the opening screen.<br />
• Any time you are entering data in a field where the<br />
arrow cursor is visible, pressing CANCEL will<br />
clear the field. During commissioning, pressing<br />
CANCEL with the cursor in an ID field will delete<br />
a sensor from the VeriFresh Gateway’s memory (see<br />
Section 5.5., Decommissioning a <strong>Sensor</strong> from the<br />
VeriFresh Gateway).<br />
5.4. Verifying Successful<br />
Commissioning<br />
Immediately after being commissioned, the<br />
VeriFresh Gateway will begin recording sensor<br />
transmissions from its associated VeriTemp<br />
<strong>Sensor</strong>s. You may verify that all VeriTemp <strong>Sensor</strong>s<br />
you have commissioned for this gateway<br />
are communicating properly by viewing their<br />
status using the H<strong>and</strong>-Held Terminal. Refer to<br />
Section 7.3. for instructions on how to do this.<br />
5.5. Decommissioning a <strong>Sensor</strong><br />
from the VeriFresh<br />
Gateway<br />
VeriTemp <strong>Sensor</strong> records may be deleted or<br />
“decommissioned” from the VeriFresh Gateway’s<br />
memory. The process of decommissioning<br />
a sensor is similar to commissioning, except<br />
instead of entering ID numbers, you must delete<br />
them.<br />
5.5.1. Decommissioning <strong>Manual</strong>ly<br />
Entered ID Numbers<br />
If you commissioned the sensors using the<br />
<strong>Manual</strong> Entry method, follow the instructions in<br />
Section 5.2. to navigate to the commissioning<br />
screen of the sensor input you wish to delete.<br />
BRD: 1 PT: 1<br />
VER:<br />
TYPE : TEMP1<br />
ID: 0000024940<br />
Press the RIGHT ARROW key twice until<br />
the arrow cursor points to the ID number entered<br />
for the sensor. Press CANCEL to erase this<br />
number. The sensor input is now decommissioned.<br />
If this sensor also has a digital input or<br />
low battery signal commissioned, repeat this<br />
process for the second <strong>and</strong> third inputs.<br />
5.5.2. Decommissioning ID Numbers<br />
Entered By Service Button<br />
If you commissioned the sensors using the<br />
Service Button method, follow the instructions<br />
in Section 5.3. to navigate to the commissioning<br />
screen of the sensor input you wish to delete.<br />
BRD: 1 PT: 1<br />
VER:<br />
TYPE : TEMP1<br />
ID: 0000024940<br />
24 • VeriFresh <strong>RF</strong> <strong>Sensor</strong> <strong>System</strong> I&O <strong>Manual</strong> 026-1702 Rev 5 9-17-04
Press the RIGHT ARROW key twice until<br />
the arrow cursor points to the ID number entered<br />
for the sensor. Press CANCEL. This will both<br />
erase this number <strong>and</strong> cause the VeriFresh Gateway<br />
to prompt you to press the service button. If<br />
you wish to commission a different input to this<br />
board <strong>and</strong> point, you may press the service button<br />
of the new sensor now to commission it.<br />
Otherwise, if you wish to leave this board <strong>and</strong><br />
point empty, press CANCEL again to end the<br />
wait time.<br />
If this sensor also has a digital input or low<br />
battery signal commissioned, repeat this process<br />
for the second <strong>and</strong> third inputs.<br />
5.6. Setting the <strong>Sensor</strong> Failure<br />
Timeout<br />
By default, the Gateway will report a Veri-<br />
Temp sensor as failed if it has not received a<br />
transmission from the VeriTemp sensor for at<br />
least 60 minutes. This sensor failure timeout<br />
(called TIMEOUT-MIN) may be changed to any<br />
value you wish between 20 <strong>and</strong> 999 minutes.<br />
1. From the opening screen in the HHT, press<br />
DOWN ARROW key.<br />
2. Press the RIGHT ARROW key to move the<br />
cursor to the TIMEOUT-MIN field. Enter<br />
the desired sensor failure delay in this field.<br />
3. Press the DOWN ARROW to save your<br />
changes.<br />
Setting the <strong>Sensor</strong> Failure Timeout Commissioning the VeriTemp <strong>Sensor</strong>s • 25
6 Connecting <strong>Sensor</strong>s<br />
to E2/Einstein/RE-<br />
FLECS<br />
The commissioning process described in<br />
Section 5 assigns each sensor a virtual “board<br />
<strong>and</strong> point” address in a VeriFresh Gateway’s<br />
memory. Once a sensor is commissioned, the<br />
controller on the VeriFresh Gateway’s RS485 I/<br />
O Network treats the VeriFresh Gateway in all<br />
respects as a series of four 16AI Analog Input<br />
Boards numbered in succession.<br />
Programming E2, Einstein, <strong>and</strong> REFLECS<br />
applications to use VeriTemp <strong>Sensor</strong> values is<br />
exactly the same process as programming E2,<br />
Einstein, <strong>and</strong> REFLECS applications to use conventional<br />
temperature sensors connected to 16AI<br />
input points; just enter the virtual board <strong>and</strong><br />
point address of the VeriTemp <strong>Sensor</strong> in the<br />
input definition fields.<br />
Refer to your site controller’s user manual<br />
for information about setting up board <strong>and</strong> point<br />
addresses for inputs in E2, Einstein, <strong>and</strong><br />
REFLECS applications.<br />
6.1. The Low Battery Signal<br />
The low battery notification signal is available<br />
in all VeriTemp sensors version 2.0 <strong>and</strong><br />
above. It may be configured in the Gateway as a<br />
digital point <strong>and</strong> provided to the site controller<br />
from the Gateway as a digital state, indicating if<br />
the battery is OK (state=OFF) or about to fail<br />
(state=ON).<br />
The low battery notification may be used by<br />
the site controller to generate an alarm using the<br />
controller’s <strong>Sensor</strong> Control <strong>and</strong> generic alarm<br />
capabilities. Refer to the site controller’s user<br />
manual for more about how to do this.<br />
26 • VeriFresh <strong>RF</strong> <strong>Sensor</strong> <strong>System</strong> I&O <strong>Manual</strong> 026-1702 Rev 5 9-17-04
7 <strong>Operation</strong> <strong>and</strong> Maintenance<br />
of the VeriTemp<br />
<strong>Sensor</strong> <strong>System</strong><br />
7.1. Status LEDs<br />
7.1.1. VeriTemp <strong>Sensor</strong>s<br />
All VeriTemp <strong>Sensor</strong> models have a single<br />
LED on top of the enclosure. There are only three<br />
events that will cause the LED to be ON.<br />
1. The LED will be ON for one second when<br />
you activate the sensor (see Section 4.3., Activation).<br />
2. The LED will flash twice when you switch<br />
the sensor into Sleep mode (see Section 7.4.,<br />
VeriTemp <strong>Sensor</strong> Sleep Mode).<br />
3. The LED will flash once each time you press<br />
the Service Button while the sensor is in Active<br />
mode. This indicates the sensor is not in<br />
Sleep mode.<br />
7.1.2. VeriFresh Receivers<br />
7.1.2.1. The Status LED<br />
The STATUS LED flashes GREEN once per<br />
second to indicate the receiver is ON. If this light<br />
does not flash, the receiver is not powered.<br />
7.1.2.2. The <strong>RF</strong> LED<br />
The <strong>RF</strong> LED flashes RED every time it<br />
receives a transmission from a VeriTemp <strong>Sensor</strong>.<br />
In a properly working system, this light<br />
should flash occasionally several times over the<br />
course of 3-5 minutes. If after five minutes the<br />
LED does not flash at all, there may be a problem<br />
with the receiver.<br />
7.1.2.3. The Receiver Bus LED<br />
The RECEIVER BUS LED flashes<br />
ORANGE when it sends transmission data to the<br />
VeriFresh Gateways. The rate at which this light<br />
turns ON depends on the number of receivers on<br />
site, because VeriFresh Receivers take turns<br />
sending collected data to the gateways. In a<br />
properly working system, if this light does not<br />
come on at all for one minute, there may be a<br />
problem with either the VeriFresh Receiver or<br />
the Receiver Bus Network.<br />
Figure 7-1 - VeriFresh Receiver LED Locations<br />
The VeriFresh Receiver has three LED indicators:<br />
the STATUS LED, the <strong>RF</strong> LED, <strong>and</strong> the<br />
RECEIVER BUS LED.<br />
Status LEDs <strong>Operation</strong> <strong>and</strong> Maintenance of the VeriTemp <strong>Sensor</strong> <strong>System</strong> • 27
7.1.3. VeriFresh Gateway<br />
Figure 7-2 - VeriFresh Gateway LED Locations<br />
The VeriFresh Gateway has four LEDs: a<br />
General Status LED, an ALARM LED, an<br />
RS485 I/O NET STATUS LED, <strong>and</strong> a<br />
RECEIVER BUS STATUS LED (Figure 7-2).<br />
7.1.3.1. The General Status LED<br />
The General Status LED light flashes<br />
GREEN once every second to indicate it is powered<br />
up.<br />
7.1.3.2. The Alarm LED<br />
The Alarm LED (red) indicates when an<br />
alarm condition exists for the VeriFresh Gateway.<br />
There are five possible LED states, each of<br />
which indicates a different condition.<br />
• OFF - No alarm conditions are active, <strong>and</strong> the VeriFresh<br />
Gateway is functioning normally.<br />
• Flashes 4 times/second - There is a problem with<br />
the physical hardware (ROM) of the VeriFresh<br />
Gateway board. The board may need to be replaced.<br />
• Flashes 2 times/second - There is no user configuration<br />
on this VeriFresh Gateway - no sensors are<br />
commissioned in its memory, <strong>and</strong> it is essentially in<br />
an empty state. This LED state will occur when the<br />
board is first powered up on-site.<br />
• Flashes 1 time/second - The VeriFresh Gateway is<br />
not communicating with the site controller due to a<br />
possible RS485 I/O Network or controller failure.<br />
• ON with no flashing - The VeriFresh Gateway is<br />
not detecting any traffic on the Receiver Bus Network.<br />
Check Receiver Bus Network connections.<br />
7.1.3.3. RS485 I/O Network Status LED<br />
The RS485 I/O Network Status LED flashes<br />
ORANGE to indicate traffic on the I/O Network.<br />
If this light does not come on at all <strong>and</strong> the<br />
ALARM LED is flashing once per second, there<br />
is a problem with the RS485 I/O Network or the<br />
site controller.<br />
7.1.3.4. Receiver Bus Network Status<br />
LED<br />
The Receiver Bus Network Status LED will<br />
flash ORANGE briefly every time a message is<br />
passed across the Receiver Bus Network. However,<br />
when the VeriFresh Gateway receives a<br />
message that it detects as a message from one of<br />
its commissioned sensors, the LED will flash<br />
brightly for 1/2 second.<br />
If the VeriFresh Gateway has commissioned<br />
sensors <strong>and</strong> is communicating properly, you<br />
should see this LED flash brightly several times<br />
within the course of a few minutes.<br />
7.2. Battery Life <strong>and</strong> Replacement<br />
The battery life of a VeriTemp <strong>Sensor</strong><br />
depends on the frequency of transmission. <strong>Sensor</strong>s<br />
configured to transmit once every three<br />
minutes (the factory default) will have a battery<br />
life of seven years, while sensors configured to<br />
transmit once every 60 seconds will have a battery<br />
life of three years.<br />
Batteries may be replaced by opening the<br />
sensor enclosure, removing the battery from the<br />
circuit board, <strong>and</strong> replacing it with a new battery.<br />
The battery is a special low-temperature<br />
battery available from CPC (P/N 119-5101) —<br />
DO NOT USE ANY OTHER REPLACEMENT<br />
BATTERY.<br />
28 • VeriFresh <strong>RF</strong> <strong>Sensor</strong> <strong>System</strong> I&O <strong>Manual</strong> 026-1702 Rev 5 9-17-04
7.2.1. Reactivating the VeriTemp<br />
<strong>Sensor</strong><br />
After removing <strong>and</strong> replacing the battery, the<br />
sensor will revert back to Sleep mode <strong>and</strong> will<br />
need to be reactivated. Refer to Section 4.3.,<br />
Activation, for information about how to activate<br />
a VeriTemp <strong>Sensor</strong>.<br />
7.3. Viewing Status Using the<br />
H<strong>and</strong>-Held Terminal<br />
For troubleshooting purposes, the VeriFresh<br />
Gateway allows you to view the temperature <strong>and</strong><br />
digital input values of all commissioned Veri-<br />
Temp <strong>Sensor</strong>s with the H<strong>and</strong>-Held Terminal.<br />
1. Plug the H<strong>and</strong>-Held Terminal into the HHT<br />
jack on the VeriFresh Gateway. The HHT<br />
should power up <strong>and</strong> display the opening<br />
screen.<br />
CPC - <strong>RF</strong> GATEWAY<br />
810-3500<br />
VER: 1.30F01-01<br />
2. Press the DOWN ARROW key. The next<br />
screen shows the board numbers assigned to<br />
this Gateway (as determined by the setting of<br />
the network address switches), the baud rates<br />
of the RS485 I/O <strong>and</strong> Receiver Bus networks,<br />
<strong>and</strong> the sensor failure timeout (see<br />
Section 5.6., Setting the <strong>Sensor</strong> Failure Timeout).<br />
3. Press the DOWN ARROW key. The next<br />
screen shows the Options menu.<br />
OPTION: 1<br />
1= SET SENSOR ID<br />
2= STATUS-DEG F<br />
3= STATUS-DEG C<br />
4. Press the RIGHT ARROW, <strong>and</strong> press 2 to<br />
view temperatures in degrees Fahrenheit or 3<br />
to view temperature in degrees Celsius. Press<br />
DOWN ARROW twice to navigate to the<br />
Enter Starting Board Address screen.<br />
5. The Enter Starting Board Address menu<br />
allows you to jump to Point 1 of the number<br />
of the “board” you wish to look at. The four<br />
board numbers reserved by this gateway are<br />
shown in parenthesis on line 3 of the screen.<br />
To view status of sensors on a “board,” press<br />
RIGHT ARROW, the number of the board<br />
you wish to configure, DOWN ARROW,<br />
<strong>and</strong> DOWN ARROW.<br />
6. Point 1 of the board you selected in step 4<br />
should be visible. This screen will display<br />
the board/point address of the point, the version<br />
number (if the sensor is 2.0 or above;<br />
otherwise the version number will not be<br />
shown - see Section 1.2.2., New <strong>Sensor</strong> Features),<br />
the type of input this point is configured<br />
as, <strong>and</strong> the last recorded value of the<br />
sensor.<br />
BRD: 1 PT: 1<br />
VER: 2.02F01<br />
TYPE : TEMP1<br />
VALUE: -5.1<br />
BRD: 1 PT: 2<br />
VER: 2.02F01<br />
TYPE : DIGITAL<br />
VALUE: OFF<br />
BRD: 1 PT: 3<br />
VER: 2.02F01<br />
TYPE : BATTERY<br />
VALUE: BATT OK<br />
Use the UP ARROW <strong>and</strong> DOWN<br />
ARROW keys to scroll through all 64 “board<br />
<strong>and</strong> point” addresses on the VeriFresh Gateway.<br />
If a point’s value shows the message “NO<br />
UPDATE,” this means the VeriFresh Gateway<br />
has not received a transmission from the Veri-<br />
Temp <strong>Sensor</strong> for at least several minutes. Refer<br />
to Appendix B for troubleshooting information.<br />
Viewing Status Using the H<strong>and</strong>-Held Terminal <strong>Operation</strong> <strong>and</strong> Maintenance of the VeriTemp <strong>Sensor</strong> <strong>System</strong> • 29
If a point’s value shows the message “NOT<br />
CFG,” this means the point you are viewing was<br />
never configured or commissioned <strong>and</strong> is essentially<br />
“empty.” If this point is supposed to be<br />
commissioned, follow the instructions in Section<br />
6 to commission the point.<br />
TIP: While viewing the status of points, if you<br />
wish to switch to viewing points on a different<br />
board, press F2 to navigate directly to the<br />
Enter Starting Board screen.<br />
7.3.1. Viewing Update Counts<br />
In addition to viewing the current values of<br />
all VeriTemp <strong>Sensor</strong>s <strong>and</strong> inputs with the HHT,<br />
you may also view how many sensor value<br />
updates the VeriFresh Gateway has received for<br />
a sensor. This will allow you to troubleshoot a<br />
VeriTemp <strong>Sensor</strong> by analyzing its performance<br />
over a period of time.<br />
digital input values on the status screens. Follow<br />
the instructions given in Section 7.3., Viewing<br />
Status Using the H<strong>and</strong>-Held Terminal, to view<br />
update counts for each sensor.<br />
BRD: 1 PT: 1<br />
VER: 2.02F01<br />
TYPE : TEMP1<br />
VALUE: 862<br />
The number in the VALUE field is the number<br />
of updates the VeriFresh Gateway has<br />
received from the commissioned sensor since<br />
the last time the sensor’s count was reset to zero.<br />
NOTE: The Show Updates switch does not affect<br />
the values being sent from the VeriFresh<br />
Gateway to the site controller. The VeriFresh<br />
Gateway will only send temperature values <strong>and</strong> digital<br />
input values to the site controller, not update count<br />
values.<br />
7.3.1.1. Resetting the <strong>Sensor</strong> Update<br />
Count<br />
The update count for a sensor can be reset in<br />
two ways. To clear an individual input’s count,<br />
navigate to the input’s HHT status screen <strong>and</strong><br />
press CANCEL. The VALUE field should reset<br />
to zero. A power loss to the VeriFresh Gateway<br />
will reset all update counts back to zero.<br />
Figure 7-3 - Show Updates Dip Switch on VeriFresh Gateway<br />
To make the HHT show sensor value<br />
updates, locate switch #5 on the VeriFresh Gateway<br />
dip switch, <strong>and</strong> set this switch to the ON<br />
position (Figure 7-3). The HHT will now show<br />
sensor update counts instead of temperature or
7.4. VeriTemp <strong>Sensor</strong> Sleep<br />
Mode<br />
Each VeriTemp <strong>Sensor</strong> is shipped from the<br />
factory in a deactivated state called Sleep mode.<br />
During Sleep mode, the sensor will not broadcast<br />
or do anything that will drain the battery.<br />
Section 4.3. explains how to activate a sensor<br />
that is in Sleep mode. To return an active<br />
sensor to Sleep mode, press <strong>and</strong> hold the Service<br />
button on the sensor enclosure for five seconds.<br />
The sensor’s LED will flash twice to indicate the<br />
sensor has entered Sleep mode.<br />
Figure 7-4 - Putting a <strong>Sensor</strong> in Sleep Mode<br />
VeriTemp <strong>Sensor</strong> Sleep Mode <strong>Operation</strong> <strong>and</strong> Maintenance of the VeriTemp <strong>Sensor</strong> <strong>System</strong> • 31
Appendix A: VeriTemp <strong>Sensor</strong> Commissioning Data Sheets<br />
Site Controller<br />
Name<br />
St<strong>and</strong>ard Circuit<br />
Name<br />
<strong>Sensor</strong> ID<br />
Sticker Number<br />
Physical Location<br />
(Description)<br />
Board # Point #<br />
Temp<br />
or<br />
Digital?<br />
EXAMPLE EIN-<br />
STEIN<br />
EXAMPLE CASE<br />
#1<br />
21943<br />
1st cheese case against west<br />
wall<br />
3 1 TEMP<br />
EXAMPLE EIN-<br />
STEIN<br />
EXAMPLE CASE<br />
#1<br />
21943<br />
1st cheese case against west<br />
wall<br />
3 2 CLN<br />
SWTCH
Site Controller<br />
Name<br />
St<strong>and</strong>ard Circuit<br />
Name<br />
<strong>Sensor</strong> ID<br />
Sticker Number<br />
Physical Location<br />
(Description)<br />
Board # Point #<br />
Temp<br />
or<br />
Digital?
Appendix B: <strong>Sensor</strong> Placement Guidelines<br />
The following guidelines are given as a means to help technicians to correctly install the Veri-<br />
Fresh <strong>RF</strong> <strong>Sensor</strong> <strong>System</strong> <strong>and</strong> troubleshoot problems that might occur.<br />
General Mounting <strong>and</strong> Placement Guidelines<br />
• When possible, use the Service Button method of commissioning, as outlined in Section 5.3.,<br />
Service Button Method. This method is less error-prone <strong>and</strong> easier to troubleshoot.<br />
• There should always be a clear line of sight between a sensor transmitter <strong>and</strong> its receiver, <strong>and</strong><br />
in “open air” if possible. If this is not possible, then at least avoid mounting a sensor so that a<br />
large piece of metal obstructs the line of sight to the receiver.<br />
• Mount all sensors, receivers, <strong>and</strong> gateways as far away from interference-producing devices<br />
such as motors, ballasts, transformers, <strong>and</strong> other electrical devices.<br />
• Keep the distance between sensor <strong>and</strong> transmitter as short as possible, <strong>and</strong> never mount a sensor<br />
outside of its designated broadcast range from a VeriFresh Receiver. If you must mount a<br />
sensor in an area that is too far away from a receiver, you must add another receiver.<br />
• If your VeriFresh Receivers are mounted on the ceiling, remember that a VeriTemp sensor’s<br />
maximum range refers to the line-of-sight distance between the sensor <strong>and</strong> the receiver, NOT<br />
the horizontal distance between the sensor <strong>and</strong> the point on the floor above the receiver. The<br />
line-of-sight distance could be significantly greater, depending on the height of the site’s ceiling.<br />
• Never attach anything to any VeriFresh <strong>RF</strong> equipment unless approved by CPC. Doing so can<br />
cause the equipment to become inoperative.<br />
• Never bend an antenna more than 5 degrees from vertical on a VeriFresh Receiver.<br />
<strong>Sensor</strong> <strong>and</strong> Transmitter Mounting Guidelines<br />
• Test your mounting location before securing the sensor to the case. Certain locations in the<br />
case will likely provide better reception than others; be sure you’ve chosen a location that will<br />
work before mounting the transmitter permanently.<br />
• Mount the transmitters as high up in the case as possible.<br />
• If the sensor must be mounted on a metal surface, make sure the rear end of the sensor faces<br />
the metal surface so that the front end points away.<br />
• If possible, commission the sensor from its mounted location using the Service Button method<br />
(see Section 5.3., Service Button Method). If you can successfully do this, then you have verified<br />
that the sensor is active <strong>and</strong> is mounted in a good location where communication with a<br />
receiver is not obstructed.<br />
General Mounting <strong>and</strong> Placement Guidelines Appendix B: <strong>Sensor</strong> Placement Guidelines • 35
Receiver Mounting <strong>and</strong> Placement Guidelines<br />
• Install receivers after sensors have been placed, so that the receiver’s location can easily be<br />
moved if necessary.<br />
• Choose a central location for the receiver(s) as high up as possible, so that there is a clear,<br />
unobstructed line of sight between the receiver <strong>and</strong> sensors.<br />
• Avoid powering VeriFresh Receivers from outlets that are on the same circuit as other noisy<br />
electrical devices, such as ballasts, motors, computers, <strong>and</strong> transformers.<br />
• Always mount VeriFresh Receivers so that their antennas are pointing straight up or straight<br />
down.<br />
36 • VeriFresh <strong>RF</strong> <strong>Sensor</strong> <strong>System</strong> I&O <strong>Manual</strong> 026-1702 Rev 5 9-17-04
Appendix C: Troubleshooting Guidelines<br />
PROBLEM: The entire system does not appear to be operating.<br />
SOLUTION: Check the Receiver Bus wiring <strong>and</strong> the RS485 network wiring between the E2/Einstein<br />
<strong>and</strong> the VeriFresh Gateway. Also check to verify sensors were activated prior to start-up <strong>and</strong><br />
properly commissioned in the VeriFresh Gateway.<br />
1. Locate <strong>and</strong> observe the RS485 Network LED on the VeriFresh Gateway (see Section<br />
7.1.3.3., RS485 I/O Network Status LED).<br />
1a. If this LED is not flashing, <strong>and</strong> the red ALARM LED on the Gateway is flashing<br />
once per second, there is a problem with the site controller or with the wiring<br />
between the VeriFresh Gateway <strong>and</strong> the site controller.<br />
1b. If this LED is flashing unevenly (indicating network traffic), RS485 communication<br />
is functioning normally.<br />
2. Locate <strong>and</strong> observe the Receiver Bus LED on the VeriFresh Gateway (see Section<br />
7.1.3.4., Receiver Bus Network Status LED).<br />
2a. If this LED is OFF <strong>and</strong> not flashing, there is a problem with the Receiver Bus<br />
wiring. Check all wire connections (Section 2.5., Networking Gateways <strong>and</strong><br />
Receivers (Receiver Bus Network)).<br />
2b. If this LED is flashing rapidly at a regular pace but not occasionally glowing<br />
for 1/2 second intervals, this indicates the network is OK, but no messages are<br />
being received by the Gateway from sensors commissioned in the Gateway’s<br />
memory. If you have not yet commissioned any sensors, this is normal. If you<br />
have commissioned sensors, verify the status of the commissioning with a<br />
H<strong>and</strong>-Held Terminal (see Section 7.3., Viewing Status Using the H<strong>and</strong>-Held<br />
Terminal). Recommission your sensors if necessary.<br />
2c. If this LED is flashing rapidly <strong>and</strong> glowing for 1/2 second at uneven intervals,<br />
the network is OK <strong>and</strong> the VeriFresh Gateway is receiving messages from<br />
some (if not all) of its commissioned sensors.<br />
3. If wiring seems OK <strong>and</strong> sensors will not commission or will not communicate, verify<br />
the sensors are both ON <strong>and</strong> active (powered up). Press the Service Button once.<br />
You should notice a brief flash on the STATUS LED to indicate the sensor is ON<br />
<strong>and</strong> active.<br />
3a. If the LED does not flash, the sensor may be in Sleep Mode. Press <strong>and</strong> hold the<br />
Service Button for one second to switch it back in Active Mode. The STATUS<br />
LED should turn on for one second to indicate Active Mode has begun. If the<br />
LED does not come on, replace the battery <strong>and</strong> repeat step 2. If the LED still<br />
will not come on, replace the sensor.<br />
3b. If the LED does flash, the sensor is OK <strong>and</strong> active.<br />
Appendix C: Troubleshooting Guidelines • 37
4. If steps 1-3 do not uncover any network or commissioning problems, log in to your<br />
site controller <strong>and</strong> verify the proper software connections have been made between<br />
the “points” on the VeriFresh Gateway <strong>and</strong> the application inputs that will be using<br />
the temperature sensor data.<br />
PROBLEM: A sensor will not commission or is commissioning incorrectly.<br />
SOLUTION: Verify the sensor is powered up <strong>and</strong> not defective. Attempt Service Button commissioning<br />
if manual commissioning was used before. Verify the sensor is mounted within its maximum<br />
range of transmission <strong>and</strong> no environmental factors are causing interference.<br />
1. Verify the sensor is both ON <strong>and</strong> active (powered up). Press the Service Button<br />
once. You should notice a brief flash on the STATUS LED to indicate the sensor is<br />
ON <strong>and</strong> active.<br />
1a. If the LED does not flash, the sensor may be in Sleep Mode. Press <strong>and</strong> hold the<br />
Service Button for one second to switch it back in Active Mode. The STATUS<br />
LED should turn on for one second to indicate Active Mode has begun. If the<br />
LED does not come on, replace the battery <strong>and</strong> repeat step 2. If the LED still<br />
will not come on, replace the sensor.<br />
1b. If the LED does flash, the sensor is OK <strong>and</strong> active.<br />
2. If you used the <strong>Manual</strong> Commissioning method to commission the sensor before, try<br />
to commission it using the Service Button method. Follow the procedure in Section<br />
5.3., Service Button Method.<br />
2a. If the sensor commissions, <strong>and</strong> the <strong>Sensor</strong> ID number entered in the VeriFresh<br />
Gateway matches the ID number of the sensor, commissioning has succeeded.<br />
2b. If the sensor commissions, but the <strong>Sensor</strong> ID number entered in the VeriFresh<br />
Gateway is not the same ID number as the sensor whose Service Button you<br />
pushed, either 1) someone in the store is pressing Service Buttons on other sensors,<br />
2) a sensor in the store has a stuck Service Button, or 3) the sensor is<br />
defective.<br />
2c. If the sensor does not commission, continue with the next step.<br />
3. Verify the sensor is sending the service message <strong>and</strong> the receiver is capable of<br />
receiving it. Unmount the sensor from the case. Move as close to a VeriFresh<br />
Receiver as possible <strong>and</strong> press the Service Button. You should see the red <strong>RF</strong> LED<br />
on the receiver flash every time you press the Service Button.<br />
3a. If this flash occurs, the sensor is properly sending its service message. Proceed<br />
to the next step.<br />
3b. If this flash does not occur, the sensor or receiver may be defective. Try pressing<br />
the Service Button on another sensor <strong>and</strong> observe the <strong>RF</strong> LED. If it flashes,<br />
the receiver is OK <strong>and</strong> the sensor is defective. If it does not flash, the receiver<br />
may be defective.<br />
38 • VeriFresh <strong>RF</strong> <strong>Sensor</strong> <strong>System</strong> I&O <strong>Manual</strong> 026-1702 Rev 5 9-17-04
4. A sensor that does not commission using the Service Pin method may not be<br />
mounted in a position within range or line-of-sight of a VeriFresh receiver.<br />
4a. Verify the chosen mounting location meets the guidelines mentioned in<br />
Appendix B: <strong>Sensor</strong> Placement Guidelines. Make especially sure there are no<br />
large metal obstructions between sensor <strong>and</strong> receiver, <strong>and</strong> no interference from<br />
other <strong>RF</strong>-generating sources.<br />
4b. Move the sensor to another location in the case <strong>and</strong> re-try the Service Button<br />
commissioning process. If successful, re-mount the sensor in the new location.<br />
4c. Verify the sensor is within the maximum line-of-sight range from the receiver<br />
(150 feet for VeriTemp <strong>and</strong> VeriFresh Product <strong>Sensor</strong>). If out of range, move<br />
the receiver closer to the case, or add another receiver to the Receiver Bus Network.<br />
PROBLEM: A sensor is not updating its value in E2/Einstein at the proper intervals.<br />
SOLUTION: Occasionally, a single update to a sensor’s value will be skipped, typically because<br />
of a “collision” with another sensor who sent its update at the same time. This is normal, but it should<br />
only happen once in a while, <strong>and</strong> never should two or more skipped updates occur back-to-back. If the<br />
sensor is missing multiple updates, especially several updates in a row, there may be a problem with<br />
the sensor or receiver.<br />
1. Using a H<strong>and</strong>-Held Terminal, connect to a VeriFresh Gateway <strong>and</strong> view the sensor’s<br />
update count (Section 7.3.1., Viewing Update Counts). Compare the number of<br />
updates for this sensor to that of other sensors that are working correctly.<br />
1a. If the number of updates is significantly lower than other sensors’ update numbers,<br />
proceed to step 2.<br />
1b. If the number of updates is the same or nearly the same as the other sensors,<br />
AND all the other sensors appear to be working correctly, the problem is probably<br />
not related to the sensor. Check RS485 Network Wiring between the VeriFresh<br />
Gateway <strong>and</strong> the site controller, <strong>and</strong> also verify the VeriFresh Receivers<br />
are all functioning correctly (refer to Section 7.1.2., VeriFresh Receivers, for<br />
troubleshooting information).<br />
1c. If the number of updates is the same or nearly the same as the other sensors,<br />
BUT other sensors are also skipping updates, the problem is likely related to<br />
the VeriFresh Receiver. Check the position of the VeriFresh Receiver <strong>and</strong> verify<br />
it is not blocked or interfered with in any way (see Appendix B: <strong>Sensor</strong><br />
Placement Guidelines). If positioning or interference does not appear to be an<br />
issue, replace the VeriFresh Receiver.<br />
2. Often, changes in the sensor’s environment will cause transmission problems, specifically<br />
if a noisy <strong>RF</strong> interference source such as a ballast or motor was recently<br />
installed near the sensor or receiver. Verify the chosen mounting location meets the<br />
guidelines mentioned in Appendix B: <strong>Sensor</strong> Placement Guidelines. Make especially<br />
sure there are no large metal obstructions between sensor <strong>and</strong> receiver, <strong>and</strong> no<br />
interference from other <strong>RF</strong>-generating sources.<br />
Appendix C: Troubleshooting Guidelines • 39
3. Unmount the sensor <strong>and</strong> move it to another place in the case, preferably farther away<br />
from interference sources or metal objects but closer to the VeriFresh Receiver.<br />
Observe the sensor’s performance over several hours by using the H<strong>and</strong>-Held Terminal<br />
on the VeriFresh Gateway to examine the update count. If the sensor is still<br />
missing updates, proceed to step 4.<br />
4. Replace the sensor with a new sensor. Remove the old sensor from the case, put it in<br />
Sleep Mode (see Section 7.4.), <strong>and</strong> decommission it from the VeriFresh Gateway<br />
(see Section 5.5.). Snap the new sensor on the old sensor’s mounting bracket, activate<br />
it (see Section 4.3.), <strong>and</strong> commission it in the same place as the old sensor using<br />
the Service Button method (Section 5.3.).<br />
4a. If you have problems commissioning the new sensor, it is highly likely the<br />
transmission problems are caused by the sensor’s location in relation to the<br />
VeriFresh Receiver, either due to interference, physical blockage, or being out<br />
of range.<br />
4b. If you can commission the sensor successfully, observe the sensor’s performance<br />
over several hours by using the H<strong>and</strong>-Held Terminal on the VeriFresh<br />
Gateway to examine the update count. If the new sensor appears to be functioning<br />
correctly, the old sensor is defective.<br />
PROBLEM: <strong>Sensor</strong> 2 on a dual-thermistor VeriTemp sensor is not reporting its value.<br />
SOLUTION: Verify <strong>Sensor</strong> 1 is functioning properly on the same sensor. If <strong>Sensor</strong> 1 is reporting<br />
its value but <strong>Sensor</strong> 2 is not, the most likely cause is an old-version VeriFresh Receiver. Go to each<br />
VeriFresh receiver <strong>and</strong> look at the label on the top of the enclosure. If the label is a flat label with the<br />
logo in green, that receiver is an old version <strong>and</strong> is not compatible with dual-thermistor sensors. Replace<br />
the old VeriFresh Receiver with a new VeriFresh Receiver (with the domed blue label).<br />
If all VeriFresh Receiver have domed blue labels <strong>and</strong> <strong>Sensor</strong> 2 still is not reporting its value, verify<br />
with a HHT that the VeriFresh Gateway is version 1.30 or greater. If not, replace this Gateway with a<br />
new one.<br />
If <strong>Sensor</strong> 2 is still not reporting its value, check the sensor wiring for any breaks or bad contacts.<br />
Also, verify the Gateway point reading this sensor is commissioned correctly <strong>and</strong> the "TYPE" field is<br />
set to "TEMP2."<br />
PROBLEM: The version number of the VeriTemp sensor is not displayed correctly in the<br />
VeriTemp Gateway.<br />
SOLUTION: VeriTemp sensors before 2.00 do not broadcast their revision number. If the Version<br />
# is blank in the Gateway, the sensor is likely a pre-2.00 sensor.<br />
If the version number reads "2.xx," this means the VeriFresh Gateway recognizes the commissioning<br />
number as belonging to a version 2.0 or above VeriTemp sensor, but it has not received the specific<br />
version number from the sensor. In order for the VeriFresh Gateway to read the version number, all<br />
VeriFresh Receivers must be the newer version (with a domed blue label instead of the flat green label<br />
on the top of the enclosure). Check the version of each VeriFresh Receiver <strong>and</strong> replace old ones as<br />
needed.<br />
40 • VeriFresh <strong>RF</strong> <strong>Sensor</strong> <strong>System</strong> I&O <strong>Manual</strong> 026-1702 Rev 5 9-17-04