collecting client information via questionnaire - Cerenade
collecting client information via questionnaire - Cerenade
collecting client information via questionnaire - Cerenade

Create successful ePaper yourself
Turn your PDF publications into a flip-book with our unique Google optimized e-Paper software.
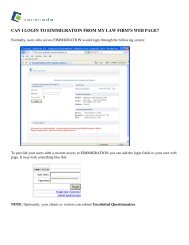
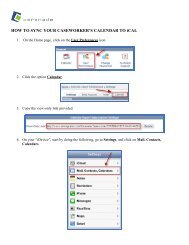
COLLECTING CLIENT INFORMATION VIA QUESTIONNAIRE<br />
There are two methods for <strong>collecting</strong> <strong>client</strong> <strong>information</strong> <strong>via</strong> <strong>questionnaire</strong>. They are: Email Questionnaire to a<br />
NEW CONTACT, and to Email Questionnaire to an EXISTING CONTACT.<br />
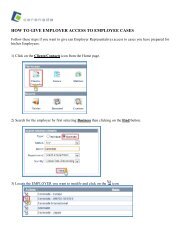
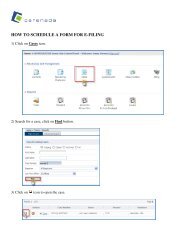
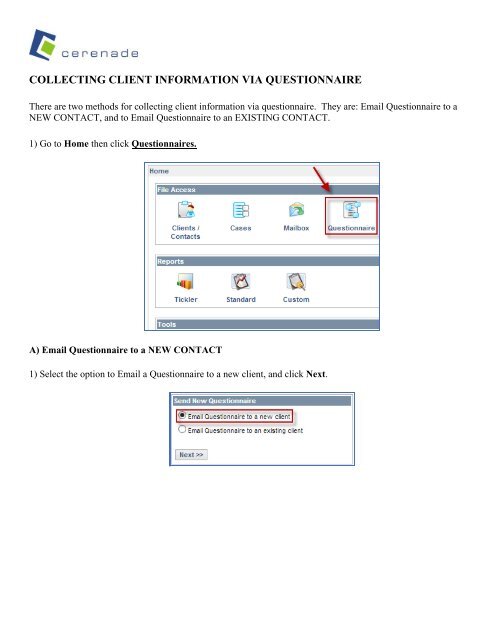
1) Go to Home then click Questionnaires.<br />
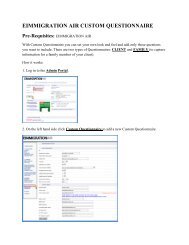
A) Email Questionnaire to a NEW CONTACT<br />
1) Select the option to Email a Questionnaire to a new <strong>client</strong>, and click Next.
2) Here you are getting ready to email the <strong>questionnaire</strong> to New Contact. Type in your <strong>client</strong>’s <strong>information</strong> into<br />
the necessary fields, and click Next.<br />
3) From the next screen you will be emailing your <strong>client</strong>’s account details to them. From here, you can modify<br />
or add to the recipient list, and add notes to the email. When completed, click Next.
4) On the next page, you can select the type of <strong>questionnaire</strong> from one of the case processes from your system.<br />
You can also select or deselect specific portions of the <strong>questionnaire</strong> depending on what <strong>information</strong> you would<br />
like to capture from the <strong>client</strong>. In this example, we have chosen to exclude the abroad trip history and arrest<br />
history portions of the <strong>questionnaire</strong>.<br />
5) On the final page, you will be able to review the email that will be sent to your <strong>client</strong>. Once the email is<br />
ready to be sent out, click Send.
6) A confirmation message appears on the screen.<br />
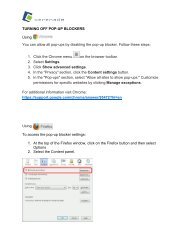
Note: If the <strong>client</strong> calls saying they have not received the email. Ask them to check their spam folder, junk folder or wait<br />
about a few minutes for the email to go through. If you receive the email but your <strong>client</strong> has not then forward<br />
them your copy of the email.<br />
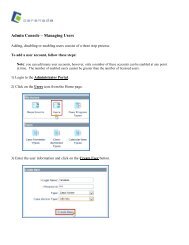
B) Email Questionnaire to an EXISTING CONTACT<br />
1) Click on the button for Emailing a <strong>questionnaire</strong> to an existing <strong>client</strong>, and click Next.<br />
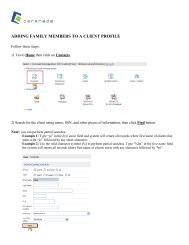
2) Now, it is time to select the <strong>client</strong> who is to receive the <strong>questionnaire</strong>. Type in the <strong>client</strong>’s <strong>information</strong> and<br />
click the Find button.<br />
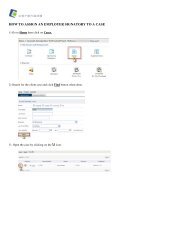
3) Select the contact by clicking the Select link on the results page.
4) On the next page, you can select the type of <strong>questionnaire</strong> from one of the case processes from your system.<br />
You can also select or deselect specific portions of the <strong>questionnaire</strong> depending on what <strong>information</strong> you would<br />
like to capture from the <strong>client</strong>. In this example, we have chosen to exclude the abroad trip history and arrest<br />
history portions of the <strong>questionnaire</strong>.<br />
5) On the final page, you will be able to review the email that will be sent to your <strong>client</strong>. Once the email is<br />
ready to be sent out, click Send.
6) A confirmation message appears on the screen.<br />
Note: If the <strong>client</strong> calls saying they have not received the email. Ask them to check their spam folder, junk folder or wait<br />
about a few minutes for the email to go through. If you receive the email but your <strong>client</strong> has not then forward<br />
them your copy of the email.