Chapter 7 Using AKA 65 Software on Your PC ... - icemeister.net
Chapter 7 Using AKA 65 Software on Your PC ... - icemeister.net
Chapter 7 Using AKA 65 Software on Your PC ... - icemeister.net
Create successful ePaper yourself
Turn your PDF publications into a flip-book with our unique Google optimized e-Paper software.
<str<strong>on</strong>g>Chapter</str<strong>on</strong>g> 7<br />
<str<strong>on</strong>g>Using</str<strong>on</strong>g> <str<strong>on</strong>g>AKA</str<strong>on</strong>g> <str<strong>on</strong>g>65</str<strong>on</strong>g> <str<strong>on</strong>g>Software</str<strong>on</strong>g> <strong>on</strong> <strong>Your</strong> <strong>PC</strong><br />
<str<strong>on</strong>g>AKA</str<strong>on</strong>g> <str<strong>on</strong>g>65</str<strong>on</strong>g> software can be used for communicati<strong>on</strong> with a local AKCESS <strong>net</strong>work (that’s <strong>on</strong>e that the <strong>PC</strong><br />
is directly c<strong>on</strong>nected to), and also (over teleph<strong>on</strong>e lines) with remote AKCESS systems that are<br />
equipped with modems. With <str<strong>on</strong>g>AKA</str<strong>on</strong>g> <str<strong>on</strong>g>65</str<strong>on</strong>g>, you can create and maintain a teleph<strong>on</strong>e directory for your<br />
AKCESS systems. You can also download history from the systems for storage and processing <strong>on</strong> your<br />
<strong>PC</strong>.<br />
When communicating with an AKC 55, <str<strong>on</strong>g>AKA</str<strong>on</strong>g> <str<strong>on</strong>g>65</str<strong>on</strong>g> Network Interface software exactly duplicates each<br />
screen seen <strong>on</strong> the AKC 55 Rack C<strong>on</strong>troller. Navigati<strong>on</strong> from screen to screen is precisely the same, too;<br />
all the procedures for c<strong>on</strong>figurati<strong>on</strong> and using the system are the same, except that you will be using the<br />
<strong>PC</strong> keyboard and m<strong>on</strong>itor instead of the Rack C<strong>on</strong>troller’s keypad and display. There is also an opti<strong>on</strong><br />
in <str<strong>on</strong>g>AKA</str<strong>on</strong>g> <str<strong>on</strong>g>65</str<strong>on</strong>g> to use color ic<strong>on</strong>s in the rack c<strong>on</strong>troller screens you are viewing.<br />
Install <str<strong>on</strong>g>AKA</str<strong>on</strong>g> <str<strong>on</strong>g>65</str<strong>on</strong>g> software by following the instructi<strong>on</strong>s in the package.<br />
Starting <str<strong>on</strong>g>AKA</str<strong>on</strong>g> <str<strong>on</strong>g>65</str<strong>on</strong>g><br />
To start <str<strong>on</strong>g>AKA</str<strong>on</strong>g> <str<strong>on</strong>g>65</str<strong>on</strong>g>, click <strong>on</strong> the <str<strong>on</strong>g>AKA</str<strong>on</strong>g> <str<strong>on</strong>g>65</str<strong>on</strong>g> ic<strong>on</strong>. A title window with program informati<strong>on</strong> (versi<strong>on</strong><br />
number, copyright informati<strong>on</strong>, and registered name and serial number) will appear briefly, then the main<br />
window headed <str<strong>on</strong>g>AKA</str<strong>on</strong>g> <str<strong>on</strong>g>65</str<strong>on</strong>g> Network Interface will open. (If you need the versi<strong>on</strong> number or serial number<br />
later, you can bring up the title window by selecting About... from the Help menu.)<br />
<str<strong>on</strong>g>Chapter</str<strong>on</strong>g> 7 - 1:<br />
First Things First<br />
This brief secti<strong>on</strong> orients you to the <str<strong>on</strong>g>AKA</str<strong>on</strong>g> <str<strong>on</strong>g>65</str<strong>on</strong>g> menu opti<strong>on</strong>s. It will <strong>on</strong>ly take a few minutes to read, but<br />
if you’re in a real hurry, skip ahead to the paragraphs <strong>on</strong> Port C<strong>on</strong>figurati<strong>on</strong> and get that d<strong>on</strong>e before<br />
trying to communicate with a system, either local or remote.<br />
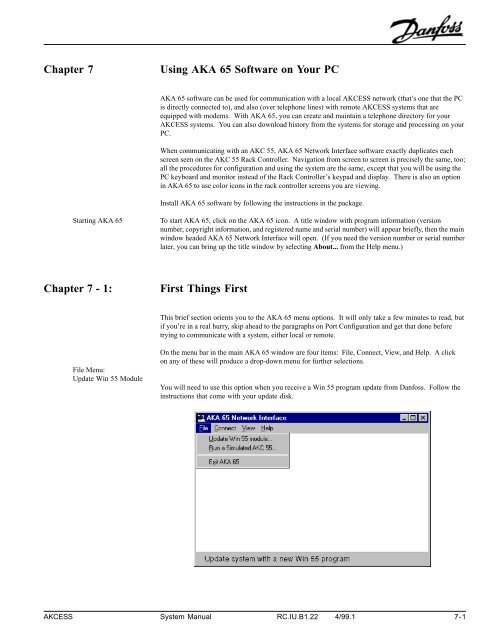
File Menu:<br />
Update Win 55 Module<br />
On the menu bar in the main <str<strong>on</strong>g>AKA</str<strong>on</strong>g> <str<strong>on</strong>g>65</str<strong>on</strong>g> window are four items: File, C<strong>on</strong>nect, View, and Help. A click<br />
<strong>on</strong> any of these will produce a drop-down menu for further selecti<strong>on</strong>s.<br />
You will need to use this opti<strong>on</strong> when you receive a Win 55 program update from Danfoss. Follow the<br />
instructi<strong>on</strong>s that come with your update disk.<br />
AKCESS System Manual RC.IU.B1.22 4/99.1 7-1
File Menu:<br />
Run a Simulated AKC 55<br />
This opti<strong>on</strong> is useful for examining and editing database (c<strong>on</strong>figurati<strong>on</strong>) files you have saved to disk. It<br />
can also be used for training. A click produces this window:<br />
In the box <strong>on</strong> the left side of the window, the first item will always be [n<strong>on</strong>e]. Beginning <strong>on</strong> the next line<br />
will be a list of the database files you have stored to disk using <str<strong>on</strong>g>AKA</str<strong>on</strong>g> <str<strong>on</strong>g>65</str<strong>on</strong>g>. The most recently saved<br />
database will be highlighted.<br />
Clicking <strong>on</strong> the Execute butt<strong>on</strong> will always cause the Sim 55, the AKC 55 simulator, to run. Sim 55<br />
presents a screen which beneath its Windows menu bar c<strong>on</strong>tains exactly the same informati<strong>on</strong> as an<br />
actual AKC 55. Sim 55 was used to create most of the screens used in <str<strong>on</strong>g>Chapter</str<strong>on</strong>g>s 4 and 5 of this manual.<br />
Selecting [n<strong>on</strong>e] in the Database files window, then clicking <strong>on</strong> the Execute butt<strong>on</strong>, will cause Sim 55 to<br />
run a completely unc<strong>on</strong>figured “unit.”<br />
File Menu:<br />
Exit <str<strong>on</strong>g>AKA</str<strong>on</strong>g> <str<strong>on</strong>g>65</str<strong>on</strong>g><br />
C<strong>on</strong>nect Menu<br />
When a stored database is selected from the list, pressing Execute will run the AKC 55 simulator with<br />
the c<strong>on</strong>figurati<strong>on</strong> that database c<strong>on</strong>tains.<br />
A click here ends your <str<strong>on</strong>g>AKA</str<strong>on</strong>g> <str<strong>on</strong>g>65</str<strong>on</strong>g> sessi<strong>on</strong>. The sessi<strong>on</strong> will also end, and (disc<strong>on</strong>nect communicati<strong>on</strong>s) if<br />
you close the <str<strong>on</strong>g>AKA</str<strong>on</strong>g> <str<strong>on</strong>g>65</str<strong>on</strong>g> window or if your computer is shut off during the sessi<strong>on</strong>. No harm will be d<strong>on</strong>e<br />
in either case.<br />
The c<strong>on</strong>nect menu has five opti<strong>on</strong>s, all of which have to do with communicati<strong>on</strong>s.<br />
7 - 2 System Manual RC.IU.B1.22 4/99.1 AKCESS
C<strong>on</strong>nect Menu:<br />
Login<br />
Click <strong>on</strong> Login to start communicati<strong>on</strong>s with an AKCESS system to which your <strong>PC</strong> is directly<br />
c<strong>on</strong>nected.<br />
C<strong>on</strong>nect Menu:<br />
Dial Dial is for modem communicati<strong>on</strong>s over a teleph<strong>on</strong>e line. See <str<strong>on</strong>g>Chapter</str<strong>on</strong>g> 7-3.<br />
C<strong>on</strong>nect Menu:<br />
Ether<strong>net</strong> Ether<strong>net</strong> is for communicati<strong>on</strong>s over an ether<strong>net</strong> <strong>net</strong>work. See <str<strong>on</strong>g>Chapter</str<strong>on</strong>g> 7-4.<br />
C<strong>on</strong>nect Menu:<br />
Port C<strong>on</strong>figurati<strong>on</strong><br />
Start here to c<strong>on</strong>figure your <str<strong>on</strong>g>AKA</str<strong>on</strong>g> <str<strong>on</strong>g>65</str<strong>on</strong>g> software for your pers<strong>on</strong>al hardware. You will need to know what<br />
COM ports (and the IRQ for each, possibly) <strong>on</strong> your computer are being used for direct c<strong>on</strong>necti<strong>on</strong> to a<br />
local AKCESS system and for your modem.<br />
Click <strong>on</strong> Port C<strong>on</strong>figurati<strong>on</strong> and you are asked for the informati<strong>on</strong>:<br />
For local communicati<strong>on</strong>, the <str<strong>on</strong>g>AKA</str<strong>on</strong>g> <str<strong>on</strong>g>65</str<strong>on</strong>g> needs <strong>on</strong>ly to know the COM port and IRQ. In many cases,<br />
selecting the default IRQ (interrupt request) for a COM port will be correct. If there is special or<br />
unusual hardware c<strong>on</strong>nected to your <strong>PC</strong> (extra drives or peripherals, most likely) then your ports may<br />
have been assigned n<strong>on</strong>-default IRQ’s, and you will have to supply specific informati<strong>on</strong>.<br />
Modem Settings<br />
For your modem, you will have to supply the maximum speed (“Baud rate”). You may need to supply<br />
an initializati<strong>on</strong> string; if you do not supply <strong>on</strong>e, <str<strong>on</strong>g>AKA</str<strong>on</strong>g> <str<strong>on</strong>g>65</str<strong>on</strong>g> will attempt to initialize the modem using a<br />
generic string. If you need to enter an initializati<strong>on</strong> string, c<strong>on</strong>sult your modem manual.<br />
Check either T<strong>on</strong>e or Pulse as appropriate for the teleph<strong>on</strong>e line.<br />
Dialing Prefix<br />
If your teleph<strong>on</strong>e c<strong>on</strong>necti<strong>on</strong> is through a switchboard, or if a dialing prefix is needed for another reas<strong>on</strong>,<br />
click <strong>on</strong> the Dial checkbox and then enter the prefix in the space provided. If necessary, use <strong>on</strong>e or more<br />
commas to cause a pause during dialing.<br />
AKCESS System Manual RC.IU.B1.22 4/99.1 7-3
Calling Card<br />
Informati<strong>on</strong><br />
To use a calling card for <str<strong>on</strong>g>AKA</str<strong>on</strong>g> <str<strong>on</strong>g>65</str<strong>on</strong>g> calls, click <strong>on</strong> the Calling card checkbox, then supply informati<strong>on</strong> as<br />
follows:<br />
Number:<br />
Account no.:<br />
Authorizati<strong>on</strong>:<br />
Enter the teleph<strong>on</strong>e number you dial to reach your calling card service<br />
provider.<br />
Enter your calling card account number.<br />
Enter your PIN number or accounting code if required.<br />
When you dial a unit, <str<strong>on</strong>g>AKA</str<strong>on</strong>g> <str<strong>on</strong>g>65</str<strong>on</strong>g> does the following:<br />
1. dials your service provider, then pauses<br />
2. dials the AKCESS system you have chosen, then pauses<br />
3. dials your credit card number, then pauses<br />
4. dials your PIN or accounting code<br />
When you first try credit card dialing, listen carefully to your modem speaker and try to follow the fourstep<br />
program above. If you hear dialing at an inappropriate time, you probably need to extend <strong>on</strong>e of<br />
the pauses. You can do this by adding <strong>on</strong>e or more commas at the end of the appropriate number in Port<br />
C<strong>on</strong>figurati<strong>on</strong>.<br />
When you have entered all the settings, click <strong>on</strong> OK to return to the main <str<strong>on</strong>g>AKA</str<strong>on</strong>g> <str<strong>on</strong>g>65</str<strong>on</strong>g> window.<br />
7 - 4 System Manual RC.IU.B1.22 4/99.1 AKCESS
<str<strong>on</strong>g>Chapter</str<strong>on</strong>g> 7 - 2<br />
C<strong>on</strong>necting to an AKCESS System<br />
Once you have supplied the correct Port C<strong>on</strong>figurati<strong>on</strong> informati<strong>on</strong>, you can easily start communicating<br />
with any of your AKCESS systems by using the C<strong>on</strong>nect menu.<br />
For c<strong>on</strong>necti<strong>on</strong> to a local system, click <strong>on</strong> Login in the C<strong>on</strong>nect menu. Immediately, a dialog box<br />
appears:<br />
During the initial handshake between your <str<strong>on</strong>g>AKA</str<strong>on</strong>g> <str<strong>on</strong>g>65</str<strong>on</strong>g> <strong>PC</strong> and the AKC 55, the lines in the status panel<br />
will change from gray text to black as they are accomplished. Then, the Launch Menu will appear:<br />
The Launch Menu appears immediately after c<strong>on</strong>necti<strong>on</strong> is established to the lead AKC 55 in a host<br />
<strong>net</strong>work. The areas and butt<strong>on</strong>s <strong>on</strong> the menu are as follows:<br />
Store name panel Shows the name of the installati<strong>on</strong> as entered in Store Info in the AKC 55<br />
you’re c<strong>on</strong>nected to. If there is no name, the panel will be blank. In the<br />
example shown, the store is unnamed.<br />
AKCESS System Manual RC.IU.B1.22 4/99.1 7-5
AKC 55’s <strong>on</strong> <strong>net</strong>work:<br />
View:<br />
Select new Unit:<br />
Download History:<br />
C<strong>on</strong>necti<strong>on</strong> panel:<br />
Shows each of the AKC 55’s in the <strong>net</strong>work, and allows you to select <strong>on</strong>e<br />
to view. In our example, there is <strong>on</strong>ly <strong>on</strong>e unit; if there were several AKC<br />
55’s in the host <strong>net</strong>work, each would be listed. A unit in the list box is<br />
selected by clicking <strong>on</strong> it with your mouse.<br />
Opens a Win 55 window for the selected unit.<br />
While the list box is active for unit selecti<strong>on</strong>, this butt<strong>on</strong> is “grayed out.”<br />
Once a unit has been selected and is being viewed, clicking <strong>on</strong> this butt<strong>on</strong><br />
reactivates the list box and closes the Win 55 window that was opened<br />
earlier.<br />
Downloads history informati<strong>on</strong> from the AKCESS system.<br />
Gives the unit number of the AKC 55 that you’re c<strong>on</strong>nected to and of the<br />
<strong>on</strong>e you are currently viewing, if any.<br />
C<strong>on</strong>necti<strong>on</strong> status panel:<br />
Gives the status of communicati<strong>on</strong>s. Notice that in the illustrati<strong>on</strong> above,<br />
the panel is blank. That is because although we have an active c<strong>on</strong>necti<strong>on</strong>,<br />
we are not viewing a unit.<br />
Before discussing the remaining panels and butt<strong>on</strong>s <strong>on</strong> the launch menu, let’s see how the menu changes<br />
when we have selected a unit to view and clicked <strong>on</strong> the View butt<strong>on</strong>:<br />
Now, “Online” appears in the c<strong>on</strong>necti<strong>on</strong> status panel, and in the lower left corner you can see the<br />
versi<strong>on</strong> of software in the AKC 55 which you have selected.<br />
Win 55<br />
Win 55 is the viewer that <str<strong>on</strong>g>AKA</str<strong>on</strong>g> <str<strong>on</strong>g>65</str<strong>on</strong>g> opens when you have selected a unit and clicked <strong>on</strong> View. The<br />
c<strong>on</strong>tents of a Win 55 window are identical to the display <strong>on</strong> the AKC 55. Here’s exactly what the Win<br />
55 view looks like:<br />
7 - 6 System Manual RC.IU.B1.22 4/99.1 AKCESS
The Win 55 module<br />
versi<strong>on</strong> has to be<br />
the same<br />
“generati<strong>on</strong>” as the<br />
AKC 55 software<br />
versi<strong>on</strong>! Danfoss<br />
sends updates to<br />
licensed uses !!<br />
Once this window appears, and you click <strong>on</strong> it, you are interacting with the AKC 55 you have selected<br />
as if you were right in fr<strong>on</strong>t of it, except that now you can use the <strong>PC</strong> keyboard to enter text after you<br />
switch to edit mode with the + or - key. You can also use your mouse to select menu items and fields to<br />
edit.<br />
There are a few keys <strong>on</strong> the AKC 55 that d<strong>on</strong>’t exist <strong>on</strong> the <strong>PC</strong>. The equivalent keys to use <strong>on</strong> the <strong>PC</strong><br />
are these:<br />
A<br />
KC 55<br />
Keypad<br />
<strong>PC</strong> Keyboar<br />
d<br />
+ /-<br />
+ or -<br />
EXIT<br />
MENU<br />
End<br />
Home<br />
Help<br />
F1<br />
For all the other AKC 55 keys (ENTER, arrow keys, and numerals) use the same keys <strong>on</strong> the <strong>PC</strong><br />
keyboard.<br />
AKCESS System Manual RC.IU.B1.22 4/99.1 7-7
<str<strong>on</strong>g>Using</str<strong>on</strong>g> <strong>Your</strong> Mouse<br />
in Win 55<br />
<strong>Your</strong> mouse can be used to select ic<strong>on</strong>s and fields in the AKC 55 screens displayed <strong>on</strong> you <strong>PC</strong>. The first<br />
click <strong>on</strong> your left mouse butt<strong>on</strong> positi<strong>on</strong>s the cursor; a sec<strong>on</strong>d click has the same effect as pressing<br />
ENTER. A click in the title secti<strong>on</strong> of an AKC 55 screen will “back up” <strong>on</strong>e level; with multiple clicks<br />
you can back out all the way to the main menu.<br />
The right mouse butt<strong>on</strong> will scroll the c<strong>on</strong>tents of a field (<strong>on</strong>ce the field has been selected with the left<br />
butt<strong>on</strong>) in the same way that the down arrow key will act. After you have used the right butt<strong>on</strong> to<br />
select the field c<strong>on</strong>tents you want, you can use the left butt<strong>on</strong> to perform the ENTER functi<strong>on</strong> which is<br />
necessary to c<strong>on</strong>firm and store the selecti<strong>on</strong>.<br />
For navigati<strong>on</strong>, c<strong>on</strong>figurati<strong>on</strong>, and operati<strong>on</strong>s, use the same procedures described in <str<strong>on</strong>g>Chapter</str<strong>on</strong>g>s 4 and 5 of<br />
this manual, except that with <str<strong>on</strong>g>AKA</str<strong>on</strong>g> <str<strong>on</strong>g>65</str<strong>on</strong>g>, text fields can be filled in by typing letters and numerals from the<br />
<strong>PC</strong> keyboard (<strong>on</strong>ce you have entered edit mode by typing a + or -).<br />
Stats<br />
At any time, you can check the time <strong>on</strong> line and other c<strong>on</strong>necti<strong>on</strong> statistics by clicking <strong>on</strong> the Stats<br />
butt<strong>on</strong> <strong>on</strong> the Launch Menu.<br />
7 - 8 System Manual RC.IU.B1.22 4/99.1 AKCESS
<str<strong>on</strong>g>Chapter</str<strong>on</strong>g> 7 - 3<br />
Dial-Up Communicati<strong>on</strong>s<br />
Dial-up communicati<strong>on</strong>s using your modem begin when you select Dial from the C<strong>on</strong>nect menu after<br />
starting <str<strong>on</strong>g>AKA</str<strong>on</strong>g> <str<strong>on</strong>g>65</str<strong>on</strong>g>. After <str<strong>on</strong>g>AKA</str<strong>on</strong>g> <str<strong>on</strong>g>65</str<strong>on</strong>g> initializes your mode, the Dialing Directory appears.<br />
Initially, your dialing directory will be empty. To add stores to the directory, click <strong>on</strong> the Add butt<strong>on</strong>,<br />
and an empty Modify Directory dialog box is presented. As you can see, more informati<strong>on</strong> is maintained<br />
for each store than is apparent from the Dialing Directory screen. After a store is in the directory,<br />
you can update the informati<strong>on</strong> at any time by highlighting the store in the Dialing Directory and clicking<br />
<strong>on</strong> the Modify butt<strong>on</strong>.<br />
Just enter the informati<strong>on</strong> for the store in the blanks. Notice that there is reference informati<strong>on</strong> kept here<br />
which does not appear in the dialing directory. You move from <strong>on</strong>e field to another with tab key (and<br />
you can move back by using Shift-tab). When the entry is complete, click <strong>on</strong> the Save butt<strong>on</strong>.<br />
AKCESS System Manual RC.IU.B1.22 4/99.1 7-9
Before you close the dialing directory, if you want to save your changes, you must click <strong>on</strong> its Save<br />
butt<strong>on</strong>, too. If you do not, you’ll be reminded when you click <strong>on</strong> Exit.<br />
Dialing a Remote Unit<br />
To dial a remote unit which is in the directory, its entry must be highlighted. You can either use your<br />
mouse to highlight the entry or begin typing the store name in the Speed Search box. Once the store you<br />
want is highlighted, click <strong>on</strong> Dial. A dialing status box appears:<br />
After the teleph<strong>on</strong>e c<strong>on</strong>necti<strong>on</strong> is made, the Launch Menu will appear, and communicati<strong>on</strong> begins as<br />
described earlier in <str<strong>on</strong>g>Chapter</str<strong>on</strong>g> 7-2, C<strong>on</strong>necting to an AKCESS System.<br />
Manual Dialing<br />
If you are going to dial a unit <strong>on</strong>ly <strong>on</strong>ce, or if for some other reas<strong>on</strong> you d<strong>on</strong>’t want to enter it in the<br />
Dialing Directory, you can use the Manual dialing feature. Just click <strong>on</strong> the Manual butt<strong>on</strong>. A<br />
teleph<strong>on</strong>e keypad appears which you can dial by clicking <strong>on</strong> the keys with your mouse.<br />
As you click <strong>on</strong> the keys, the character is appended to the window above the keypad. When the number<br />
is entered correctly, click <strong>on</strong> Dial. The Clear butt<strong>on</strong> can be used to erase all the numerals in the<br />
window.<br />
Once you’re c<strong>on</strong>nected to the remote unit, the Launch Menu will appear as discussed in <str<strong>on</strong>g>Chapter</str<strong>on</strong>g> 6-2<br />
(above).<br />
7-10 System Manual RC.IU.B1.22 4/99.1 AKCESS
<str<strong>on</strong>g>Chapter</str<strong>on</strong>g> 7 - 4<br />
Ether<strong>net</strong> Communicati<strong>on</strong>s<br />
<str<strong>on</strong>g>AKA</str<strong>on</strong>g> <str<strong>on</strong>g>65</str<strong>on</strong>g> can be used for communicati<strong>on</strong> with AKCESS systems by means of either local or satellite<br />
ether<strong>net</strong>s. Danfoss supplies ether<strong>net</strong> adapters which are used at the <strong>PC</strong> running <str<strong>on</strong>g>AKA</str<strong>on</strong>g> <str<strong>on</strong>g>65</str<strong>on</strong>g> and at each<br />
remote AKCESS system.<br />
To initiate ether<strong>net</strong> communicati<strong>on</strong>s, select Ether<strong>net</strong>… from the C<strong>on</strong>nect menu. A directory screen<br />
appears similar to that for dial-up communicati<strong>on</strong>s:<br />
Notice that instead of a teleph<strong>on</strong>e number, each store has an IP address. The IP address is the store’s<br />
locati<strong>on</strong> <strong>on</strong> the ether<strong>net</strong>. The address can be obtained from the <strong>net</strong>work administrator.<br />
A click <strong>on</strong> Modify brings up a Modify Directory screen which is somewhat different than that for<br />
teleph<strong>on</strong>e communicati<strong>on</strong>s, as you can see:<br />
AKCESS System Manual RC.IU.B1.22 4/99.1 7-11
<str<strong>on</strong>g>Chapter</str<strong>on</strong>g> 7 - 5 Retrieving, Viewing, and Graphing History with <str<strong>on</strong>g>AKA</str<strong>on</strong>g> <str<strong>on</strong>g>65</str<strong>on</strong>g><br />
<str<strong>on</strong>g>AKA</str<strong>on</strong>g> <str<strong>on</strong>g>65</str<strong>on</strong>g> software comes with a Special Editi<strong>on</strong> of the Danfoss V.I.P. (Visual Interface Program) for<br />
viewing history. It is also possible to process history files using a spreadsheet program, either Excel,<br />
Quattro Pro, or Lotus 1-2-3. First, we will see how V.I.P. handles history, then discuss spreadsheet<br />
applicati<strong>on</strong>s with AKCESS history files.<br />
Install V.I.P. Special Editi<strong>on</strong> by following the instructi<strong>on</strong>s in the package. In order to use V.I.P. as your<br />
history viewer, you must start <str<strong>on</strong>g>AKA</str<strong>on</strong>g> <str<strong>on</strong>g>65</str<strong>on</strong>g> and from the menu bar select View, History, Settings. Then<br />
choose V.I.P. as the program in the Data Viewer box.<br />
History files downloaded while using <str<strong>on</strong>g>AKA</str<strong>on</strong>g> <str<strong>on</strong>g>65</str<strong>on</strong>g> in communicati<strong>on</strong> with remote AKC 55 <strong>net</strong>works are<br />
automatically stored in the AKCESS directory <strong>on</strong> your hard drive. Make sure that any history files you<br />
copy from diskette are also copied to the AKCESS directory.<br />
There are two ways to start V.I.P.<br />
Starting V.I.P.<br />
from Windows 95<br />
Use the Start butt<strong>on</strong> in Windows 95, then Programs, Danfoss Automatic C<strong>on</strong>trols, and finally V.I.P.<br />
When the title screen appears, use the menu bar and click <strong>on</strong> File, Open History, and a screen will<br />
appear like the <strong>on</strong>e shown here, listing all the history files you have in your AKCESS directory (<strong>on</strong>ly<br />
part of the screen is shown):<br />
To select a file, double click <strong>on</strong> its name. When you do this, a selecti<strong>on</strong> screen appears.<br />
7-12 System Manual RC.IU.B1.22 4/99.1 AKCESS
The selecti<strong>on</strong> screen c<strong>on</strong>tains a list of available datapoints <strong>on</strong> the left. You select the datapoints you want to<br />
graph by clicking <strong>on</strong> them to highlight them, then using the Add arrow in the middle of the screen to build<br />
a list in the right box. Datapoints can be deselected by using the Remove arrow.<br />
A history<br />
graph is no<br />
more accurate<br />
than the<br />
history it’s<br />
based <strong>on</strong> !!<br />
Some of the datapoint rates in the history file may be so short as to result in a graph with more detail than<br />
you want to see in your graph. If so, use the range butt<strong>on</strong> to adjust the display rate. When you click <strong>on</strong><br />
the range butt<strong>on</strong>, a dialog box appears:<br />
The date/time range given is the range covered by the entire history file. You can select all or any part of<br />
the file for viewing by adjusting the entries.<br />
The Rate interval is the amount of time between displayed samples. It can be set to any value from 5<br />
sec<strong>on</strong>ds to 1 day. Bear in mind that if the rate you choose is smaller than the actual sample interval, the<br />
measured value will be repeated to fill the displayed interval. For example, if the actual sample interval for<br />
the datapoint were <strong>on</strong>e minute, and you choose in the range dialog box to display a graph of the data every<br />
thirty sec<strong>on</strong>ds, then each measurement would appear two times. This can result in a false sense of<br />
accuracy.<br />
AKCESS System Manual RC.IU.B1.22 4/99.1 7-13
When all your datapoints are selected, and the range is adjusted, click <strong>on</strong> the View butt<strong>on</strong> to make the<br />
graph appear. Here’s a typical graph screen:<br />
This graph shows four analog sensors with the range adjusted to 2 minutes. The graph traces are in<br />
color. The sensors are listed to the right of the graph, and the reading for each is color-coded the same as<br />
its trace. If the graph c<strong>on</strong>tained any <strong>on</strong>/off inputs, they would be shown at the bottom of the graph area<br />
and listed at the bottom of the panel to the right of the graph. On/off inputs are also color-coded.<br />
To move to different periods of time in the history file, use the scroll bar beneath the graph.<br />
<str<strong>on</strong>g>Using</str<strong>on</strong>g> V.I.P. from<br />
<str<strong>on</strong>g>AKA</str<strong>on</strong>g> <str<strong>on</strong>g>65</str<strong>on</strong>g><br />
You can select V.I.P. as your history viewer in <str<strong>on</strong>g>AKA</str<strong>on</strong>g> <str<strong>on</strong>g>65</str<strong>on</strong>g> rather than<br />
using a spreadsheet. From the <str<strong>on</strong>g>AKA</str<strong>on</strong>g> <str<strong>on</strong>g>65</str<strong>on</strong>g> menu bar select View,<br />
History, Settings, then select V.I.P. from the Program list box. Now<br />
whenever you view history data and choose a file, V.I.P. will automatically<br />
start.<br />
You can start the<br />
V.I.P. history<br />
viewer either from<br />
Windows 95 or<br />
from <str<strong>on</strong>g>AKA</str<strong>on</strong>g> <str<strong>on</strong>g>65</str<strong>on</strong>g> !<br />
7-14 System Manual RC.IU.B1.22 4/99.1 AKCESS
History Settings<br />
Before viewing history with <str<strong>on</strong>g>AKA</str<strong>on</strong>g> <str<strong>on</strong>g>65</str<strong>on</strong>g>, click <strong>on</strong> View, then History, then Settings. The Settings dialog box<br />
appears:<br />
Spreadsheet<br />
Purge<br />
First, the Spreadsheet secti<strong>on</strong>: Select the spreadsheet program <strong>on</strong> your <strong>PC</strong>, either V.I.P., Excel, Quattro<br />
Pro, or Lotus 1-2-3. Then, type the command line Windows uses to start the spreadsheet, or use the<br />
Browse butt<strong>on</strong> to find the spreadsheet’s .EXE file <strong>on</strong> your <strong>PC</strong>.<br />
The Purge functi<strong>on</strong> automatically deletes history and history text files from your disk after they reach a<br />
certain age. The default purge setting is “Never purge.” Purge can be set to delete files after <strong>on</strong>e or two<br />
weeks; <strong>on</strong>e, two, four, or six m<strong>on</strong>ths; or 1 year. History files (.HST) are the files pulled back from<br />
AKCESS systems to your <strong>PC</strong>, and c<strong>on</strong>tain all the history in a given AKCESS system. Text history files<br />
(.TXT) are the files created by <str<strong>on</strong>g>AKA</str<strong>on</strong>g> <str<strong>on</strong>g>65</str<strong>on</strong>g> after you have selected data points for viewing. TXT files have<br />
been prepared by <str<strong>on</strong>g>AKA</str<strong>on</strong>g> <str<strong>on</strong>g>65</str<strong>on</strong>g> for import into a spreadsheet program.<br />
If you leave purge set to Never purge, you will have to manually delete history files (both .HST and<br />
.TXT) which you no l<strong>on</strong>ger need.<br />
AKCESS System Manual RC.IU.B1.22 4/99.1 7-15
Downloading History<br />
History retrieval starts from the launch menu. To download history, first use the <str<strong>on</strong>g>AKA</str<strong>on</strong>g> <str<strong>on</strong>g>65</str<strong>on</strong>g> C<strong>on</strong>nect<br />
functi<strong>on</strong> to establish communicati<strong>on</strong>s with the system. When the Win 55 Launch Menu appears, click<br />
<strong>on</strong> the Download History butt<strong>on</strong>. You will first select the units whose points you want to download;<br />
you can choose all units at <strong>on</strong>ce or individual units.<br />
Next, a History Data Points dialog box appears:<br />
Each point available is listed, followed in parentheses by the address of the point’s AKC 55. Select<br />
points for download by using the butt<strong>on</strong>s in the center of the dialog box. Describe the group, or your<br />
purpose in downloading it, in the space labeled Descripti<strong>on</strong>. When you have finished your list of<br />
datapoints to download and your descripti<strong>on</strong>, your dialog box will look something like this:<br />
If you’re satisfied with the selecti<strong>on</strong>s you have made, click <strong>on</strong> the OK butt<strong>on</strong>.<br />
7-16 System Manual RC.IU.B1.22 4/99.1 AKCESS
Next, you are asked for the period of time you want the history downloaded:<br />
This box gives you the opti<strong>on</strong> to download all the history for the points selected, or to select a shorter<br />
period in the range available. When the time range is correctly specified, click the OK butt<strong>on</strong>, and the<br />
download to your <strong>PC</strong> will begin.<br />
If you are retrieving all of the history from a system, downloading can take a half hour or more. The<br />
most recent informati<strong>on</strong> is transferred first. You can interrupt the transfer at any time by clicking <strong>on</strong> the<br />
Cancel butt<strong>on</strong>.<br />
History files are saved to your AKCESS directory and are named by the date of retrieval. If the retrieval<br />
date, for example, is April 2, 1997, the first file retrieved will be named 04029700.hst, the sec<strong>on</strong>d<br />
04029701.hst, and so <strong>on</strong>.<br />
AKCESS System Manual RC.IU.B1.22 4/99.1 7-17
Viewing History<br />
(Immediately)<br />
Viewing History<br />
(From Disk Archive)<br />
When a download is finished, a dialog box appears listing the datapoints available for viewing, in case<br />
you want to examine the downloaded history immediately. The selecti<strong>on</strong> process for datapoints and time<br />
range is the same as that described below. If you do not want to view the history now, click <strong>on</strong> the<br />
Cancel butt<strong>on</strong>.<br />
To view a history file stored <strong>on</strong> your <strong>PC</strong>, choose View, History, Data from the <str<strong>on</strong>g>AKA</str<strong>on</strong>g> <str<strong>on</strong>g>65</str<strong>on</strong>g> menu bar, and<br />
this dialog box appears:<br />
The box lists all the history files you have stored. Notice that the file descripti<strong>on</strong> you entered for the<br />
download appears when you highlight a file. When you have selected the file to view, click <strong>on</strong> Open.<br />
Now a History Data Points dialog box appears:<br />
From the list of points available, select the points you want to view by highlighting them in the list box<br />
<strong>on</strong> the left and clicking <strong>on</strong> Add. As you do so, the point name will appear in the list box <strong>on</strong> the right.<br />
Points can be removed by highlighting them in the right-hand box and clicking <strong>on</strong> Remove. When you<br />
have finished selecting points, click <strong>on</strong> OK.<br />
7-18 System Manual RC.IU.B1.22 4/99.1 AKCESS
Next, select the time range for which you want to view:<br />
When you click <strong>on</strong> OK after selecti<strong>on</strong> of the time range, your spreadsheet will open and the history data<br />
will be automatically imported. After the data has been loaded into your spreadsheet program, you will<br />
be able to use the spreadsheet’s functi<strong>on</strong>s to process the history data, and you can create graphs using<br />
the spreadsheet’s graphing functi<strong>on</strong>s.<br />
AKCESS System Manual RC.IU.B1.22 4/99.1 7-19
7-20 System Manual RC.IU.B1.22 4/99.1 AKCESS


