The Drive on Metz: - Victory Point Games
The Drive on Metz: - Victory Point Games
The Drive on Metz: - Victory Point Games

Create successful ePaper yourself
Turn your PDF publications into a flip-book with our unique Google optimized e-Paper software.
TC Tennis<br />
Table of C<strong>on</strong>tents<br />
[1.0] INTRODUCTION ............................ 1<br />
[2.0] GAME EQUIPMENT ...................... 1<br />
[3.0] SETTING UP THE GAME ............... 2<br />
[4.0] CONVENTIONS ............................. 2<br />
[5.0] TAKING TURNS ............................ 2<br />
[6.0] TAKING AN ACTION ..................... 3<br />
[7.0] RESOLVE A RALLY ...................... 3<br />
[8.0] STRATEGY MOVES ...................... 5<br />
[9.0] ENDING YOUR TURN ................... 5<br />
[10.0] CHALLENGES ............................. 5<br />
[11.0] WINNING THE TRAINING GAME 5<br />
[12.0] RETURN & DEFENSE .................. 5<br />
[13.0] RANDOM EVENTS ...................... 6<br />
[14.0] END SET CARDS ......................... 6<br />
[15.0] TIEBREAK .................................. 7<br />
[16.0] A COMPLETE MATCH ................ 7<br />
[17.0] STAMINA .................................... 7<br />
[18.0] INJURIES .................................... 8<br />
[19.0] NEW TACTICS ............................ 8<br />
[20.0] HOUSEKEEPING ......................... 8<br />
[21.0] ALL-SURFACE MATCH .............. 8<br />
[22.0] SCORING THE SET................. IFC<br />
[23.0] TOURNAMENTS ..................... IFC<br />
[24.0] TENNIS HISTORY .................. IFC<br />
[25.0] DESIGNER’S NOTES .............. IFC<br />
[0.0] USING THESE RULES<br />
New gaming terms, when they are initially<br />
defined, appear in dark red lettering for<br />
quick referencing.<br />
<str<strong>on</strong>g>The</str<strong>on</strong>g> instructi<strong>on</strong>s for this game are organized<br />
into major Rules secti<strong>on</strong>s as shown in large<br />
green CAPS f<strong>on</strong>t, and represented by the<br />
number to the left of the decimal point<br />
(e.g., rule 4.0 is the fourth rule). <str<strong>on</strong>g>The</str<strong>on</strong>g>se rules<br />
generally explain the game’s subject matter,<br />
its comp<strong>on</strong>ents, the procedures for play, the<br />
game’s core systems and mechanics, how<br />
to set it up, and how to win.<br />
With each Rule, there can be “Cases” that<br />
further explain a rule’s general c<strong>on</strong>cept or<br />
Training procedure. Cases might also<br />
restrict the applicati<strong>on</strong> of a rule by denoting<br />
excepti<strong>on</strong>s to it. Cases (and Subcases) are<br />
an extensi<strong>on</strong> of a Rule shown in the way<br />
that they are numbered. For example, Rule<br />
4.1 is the first Case of the fourth Rule; and<br />
Rule 4.1.2 is the sec<strong>on</strong>d Subcase of the first<br />
Case of the fourth Rule.<br />
Important informati<strong>on</strong> is in red text.<br />
References to examples of a Rule or Case are<br />
in blue text and this f<strong>on</strong>t.<br />
TC Tennis Rules v1.0 1<br />
Text in shaded boxes, like this, provides<br />
the voice of the game’s designer, who is<br />
addressing you to explain an idea or<br />
c<strong>on</strong>cept that is not, itself, a Rule or a Case.<br />
[1.0] INTRODUCTION<br />
TC Tennis is a sports strategy game for<br />
<strong>on</strong>e or two players, allowing them to pit<br />
some of the greatest tennis champi<strong>on</strong>s in<br />
history against each other in a fun, fastpaced<br />
game format that dem<strong>on</strong>strates how<br />
the great baseline players c<strong>on</strong>trolled the<br />
pace <strong>on</strong> slow red clay, or how serve-andvolley<br />
players attacked relentlessly <strong>on</strong><br />
lightning-fast grass courts. <str<strong>on</strong>g>The</str<strong>on</strong>g> tennis<br />
players are presented <strong>on</strong> cards and rated for<br />
their historical performance at powerful<br />
volleys, exquisite touch shots, sweeping<br />
ground strokes, and cann<strong>on</strong>ball serves.<br />
Stage your own tournaments and lead your<br />
favorite players to victory in TC Tennis!<br />
[2.0] GAME EQUIPMENT<br />
Parts Inventory<br />
● 24 Player Cards<br />
● 80 Strategy Cards<br />
● One 11” x 17” Player Mat<br />
● 56 single-sided markers<br />
● Two 11” x 4.25” Tournament Tables<br />
● 1 Rules booklet<br />
● 1 Momentum Mat (inside back cover)<br />
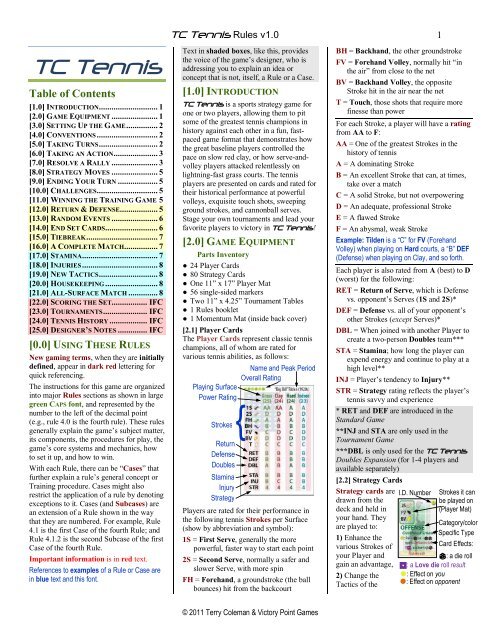
[2.1] Player Cards<br />
<str<strong>on</strong>g>The</str<strong>on</strong>g> Player Cards represent classic tennis<br />
champi<strong>on</strong>s, all of whom are rated for<br />
various tennis abilities, as follows:<br />
Playing Surface<br />
Power Rating<br />
Strokes<br />
{<br />
Return<br />
Defense<br />
Doubles<br />
Stamina<br />
Injury<br />
Strategy<br />
Name and Peak Period<br />
Overall Rating<br />
Players are rated for their performance in<br />
the following tennis Strokes per Surface<br />
(show by abbreviati<strong>on</strong> and symbol):<br />
1S = First Serve, generally the more<br />
powerful, faster way to start each point<br />
2S = Sec<strong>on</strong>d Serve, normally a safer and<br />
slower Serve, with more spin<br />
FH = Forehand, a groundstroke (the ball<br />
bounces) hit from the backcourt<br />
BH = Backhand, the other groundstroke<br />
FV = Forehand Volley, normally hit “in<br />
the air” from close to the net<br />
BV = Backhand Volley, the opposite<br />
Stroke hit in the air near the net<br />
T = Touch, those shots that require more<br />
finesse than power<br />
For each Stroke, a player will have a rating<br />
from AA to F:<br />
AA = One of the greatest Strokes in the<br />
history of tennis<br />
A = A dominating Stroke<br />
B = An excellent Stroke that can, at times,<br />
take over a match<br />
C = A solid Stroke, but not overpowering<br />
D = An adequate, professi<strong>on</strong>al Stroke<br />
E = A flawed Stroke<br />
F = An abysmal, weak Stroke<br />
Example: Tilden is a “C” for FV (Forehand<br />
Volley) when playing <strong>on</strong> Hard courts, a “B” DEF<br />
(Defense) when playing <strong>on</strong> Clay, and so forth.<br />
Each player is also rated from A (best) to D<br />
(worst) for the following:<br />
RET = Return of Serve, which is Defense<br />
vs. opp<strong>on</strong>ent’s Serves (1S and 2S)*<br />
DEF = Defense vs. all of your opp<strong>on</strong>ent’s<br />
other Strokes (except Serves)*<br />
DBL = When joined with another Player to<br />
create a two-pers<strong>on</strong> Doubles team***<br />
STA = Stamina; how l<strong>on</strong>g the player can<br />
expend energy and c<strong>on</strong>tinue to play at a<br />
high level**<br />
INJ = Player’s tendency to Injury**<br />
STR = Strategy rating reflects the player’s<br />
tennis savvy and experience<br />
* RET and DEF are introduced in the<br />
Standard Game<br />
**INJ and STA are <strong>on</strong>ly used in the<br />
Tournament Game<br />
***DBL is <strong>on</strong>ly used for the TC Tennis<br />
Doubles Expansi<strong>on</strong> (for 1-4 players and<br />
available separately)<br />
[2.2] Strategy Cards<br />
Strategy cards are<br />
drawn from the<br />
deck and held in<br />
your hand. <str<strong>on</strong>g>The</str<strong>on</strong>g>y<br />
are played to:<br />
1) Enhance the<br />
various Strokes of<br />
your Player and<br />
gain an advantage,<br />
2) Change the<br />
Tactics of the<br />
I.D. Number<br />
Strokes it can<br />
be played <strong>on</strong><br />
(Player Mat)<br />
Category/color<br />
Specific Type<br />
Card Effects:<br />
z: a die roll<br />
1: a Love die roll result<br />
•: Effect <strong>on</strong> you<br />
•: Effect <strong>on</strong> opp<strong>on</strong>ent<br />
© 2011 Terry Coleman & <strong>Victory</strong> <strong>Point</strong> <strong>Games</strong>
TC Tennis Rules v1.0 2<br />
match, or<br />
3) Determine the end of a tennis Set.<br />
[2.3] <str<strong>on</strong>g>The</str<strong>on</strong>g> Player Mat<br />
<str<strong>on</strong>g>The</str<strong>on</strong>g> Player Mat holds the cards and<br />
informati<strong>on</strong> markers currently in play for<br />
both players. On <strong>on</strong>e side sits the Favorite<br />
and opposite the Underdog in the match<br />
(shown below the “Player Card” holding<br />
box) as determined by the Overall Rating<br />
of each player (see 2.1).<br />
[2.4] Markers<br />
Each player uses three markers <strong>on</strong><br />
their side of the Player Mat to<br />
indicate if they have a Challenge<br />
remaining for the current Set being<br />
played, the current value of that<br />
player’s Strategy Rating, and to<br />
indicate which Strokes have been<br />
resolved during the current Set.<br />
<str<strong>on</strong>g>The</str<strong>on</strong>g> green (Standard Game) and<br />
purple (Tournament Game)<br />
markers are drawn when Random<br />
Events occur. <str<strong>on</strong>g>The</str<strong>on</strong>g> colored<br />
markers (Tournament Game) are<br />
used to record Events from the<br />
Stamina and Injury tables. Some<br />
markers affect both you and your<br />
opp<strong>on</strong>ent when drawn and are<br />
marked “BOTH” at the top.<br />
<str<strong>on</strong>g>The</str<strong>on</strong>g> Momentum marker is<br />
used <strong>on</strong> the Momentum<br />
Track to show who is ahead<br />
in the current Set and by how<br />
much.<br />
[3.0] SETTING UP THE GAME<br />
1. Select Player Cards: You and your<br />
opp<strong>on</strong>ent both select a Player card.<br />
<str<strong>on</strong>g>The</str<strong>on</strong>g> Player card with the highest Overall<br />
Rating is placed in the “Favorite” Player<br />
Card Holding Box <strong>on</strong> the Player mat and<br />
the other card is placed in the “Underdog”<br />
Player Card Holding Box. (If the<br />
Overall Ratings are tied, roll a die to<br />
determine.)<str<strong>on</strong>g>The</str<strong>on</strong>g> players sit <strong>on</strong> those sides<br />
of the Player mat with their Player card.<br />
2. Strategy: Both players place a<br />
Strategy marker <strong>on</strong> their<br />
respective Strategy Tracks <strong>on</strong><br />
the box number corresp<strong>on</strong>ding to their<br />
Player card’s STR(ategy) rating for the<br />
surface <strong>on</strong> which the Match is being<br />
played (by mutual agreement).<br />
Fred Perry is playing Henri Cochet <strong>on</strong> an<br />
Indoor Surface. Thus, Perry places his<br />
Strategy marker <strong>on</strong> the “3” box of his Strategy<br />
track and Cochet places his <strong>on</strong> the “4” of his<br />
track. If they were playing <strong>on</strong> Clay or Grass,<br />
Perry would also have a STR(ategy) of 4.<br />
3. Challenge: Both players place a<br />
Challenge marker <strong>on</strong> their side<br />
of the Player mat.<br />
4. Momentum: Place the<br />
Momentum marker <strong>on</strong> the “0”<br />
box of the Momentum Track.<br />
5. To play the Training Game: Set aside<br />
all green and purple Random Event<br />
markers, all End Set cards (Strategy<br />
Cards 1-10), and the five Tactic cards<br />
marked “Tournament Game” al<strong>on</strong>g their<br />
bottom from the deck. <str<strong>on</strong>g>The</str<strong>on</strong>g>se comp<strong>on</strong>ents<br />
are not used in the Training Game.<br />
6. Shuffle and deal out the Strategy<br />
Cards: Each player receives a number of<br />
Strategy cards equal to his opp<strong>on</strong>ent’s<br />
Overall Rating. (Thus the Favorite will<br />
never start with more cards than the<br />
Underdog.) Keep the draw and discard<br />
piles separate, near both players.<br />
7. Plan: Beginning with the First player<br />
(see 5.1), each player may place up to<br />
two Stroke (i.e., Offense or Defense)<br />
cards as per Case 4.2.<br />
You are now ready to begin play (see 5.0).<br />
[4.0] CONVENTIONS<br />
Certain terms and procedures are used<br />
throughout these rules and the game:<br />
[4.1] Dice: TC Tennis uses standard sixsided<br />
dice to resolve various functi<strong>on</strong>s.<br />
Sometimes, these dice are added together to<br />
produce a sum. Other times, they are rolled<br />
in groups of two or three dice of different<br />
colors. Finally, you may be asked to<br />
“combine” the dice result as a number from<br />
11-66 for a STA(mina) or INJ(ury) result<br />
(in the Standard/Tournament Rules).<br />
Although the dice are called “black” for the<br />
summed pair of dice and “blue” for the<br />
single die, you may use other colors if you<br />
like, as l<strong>on</strong>g it’s two different colors.<br />
[4.2] Strategy Cards: Strategy cards are<br />
held in your hand and are generally kept<br />
secret from your opp<strong>on</strong>ent.<br />
When played:<br />
Offense and Defense cards are placed,<br />
face-down, in their corresp<strong>on</strong>ding Stroke’s<br />
Holding Box (cards that say “ANY” may<br />
be placed <strong>on</strong> any Stroke) <strong>on</strong> your side of<br />
the Player Mat, but <strong>on</strong>ly if that Stroke’s<br />
Holding Box does not have a Resolved<br />
marker in it. I.e., you cannot play these<br />
cards <strong>on</strong> Strokes that<br />
have already been<br />
Resolved this Set.<br />
Example: This Offense:<br />
Overhead Smash card<br />
can <strong>on</strong>ly be placed in<br />
your 2S, FV or BV Stroke<br />
Holding Boxes, and <strong>on</strong>ly<br />
when that Stroke is still<br />
unresolved.<br />
● A maximum of two cards may be placed<br />
in each unresolved Stroke Holding Box.<br />
If you should be caught with more than<br />
two, your opp<strong>on</strong>ent may examine them<br />
and choose which to discard to bring it<br />
back down to two (so pay attenti<strong>on</strong>).<br />
● If you must reveal a Stroke card in its<br />
Holding Box <strong>on</strong> your side of the Player<br />
Mat, that card remains face-up for the<br />
durati<strong>on</strong> of the Set or until that Stroke is<br />
resolved.<br />
Tactic cards are not played <strong>on</strong> Strokes, but<br />
are instead always played face-up in that<br />
player’s Tactic Holding Box.<br />
End Set cards are played off to the side of<br />
the Player Mat where you and your<br />
opp<strong>on</strong>ent can easily see them.<br />
[5.0] TAKING TURNS<br />
A Match in TC Tennis is played in Sets.<br />
Each Set c<strong>on</strong>sists of a variable number of<br />
Turns. On your Turn, you must roll<br />
together the two black and <strong>on</strong>e blue die.<br />
Depending <strong>on</strong> the result, you will play a<br />
Strategy card, resolve a Stroke, or take<br />
another type of Acti<strong>on</strong>, all of which end<br />
your Turn.<br />
After that, your opp<strong>on</strong>ent performs this<br />
procedure (i.e., rolling the three dice and<br />
attending to the result). Player Turns are<br />
repeated thus until the Set ends.<br />
A Set ends after all of the Strokes are<br />
resolved. <str<strong>on</strong>g>The</str<strong>on</strong>g> winner of that Set is<br />
determined.<br />
A Match ends after a predetermined,<br />
agreed up<strong>on</strong> number of Sets have been w<strong>on</strong><br />
by <strong>on</strong>e player (usually 2 or 3 Sets).<br />
[5.1] Who Goes First?: <str<strong>on</strong>g>The</str<strong>on</strong>g> Underdog<br />
goes first in the first Set. If you c<strong>on</strong>tinue the<br />
Match bey<strong>on</strong>d <strong>on</strong>e Set, whoever lost the<br />
previous Set goes first <strong>on</strong> the next Set.<br />
© 2011 Terry Coleman & <strong>Victory</strong> <strong>Point</strong> <strong>Games</strong>
[5.2] Taking Your Turn: When it is your<br />
Turn, begin by rolling the three dice (two<br />
black and <strong>on</strong>e blue) together.<br />
Note the result of the blue die as follows:<br />
If the result of the blue die is a 1, 2, 3 or<br />
4, you must take <strong>on</strong>e Acti<strong>on</strong> (see 6.0).<br />
If the result of the blue die is a 5, you may<br />
either take <strong>on</strong>e Acti<strong>on</strong> (6.0) OR resolve a<br />
Rally (see 7.0).<br />
If the result of the blue die is a 6, you<br />
must resolve a Rally (see 7.0).<br />
After your Acti<strong>on</strong> is performed or each<br />
player’s Stroke is resolved, it is your<br />
opp<strong>on</strong>ent’s Turn unless the Set has ended.<br />
[6.0] TAKING AN ACTION<br />
When you take an Acti<strong>on</strong> you must do <strong>on</strong>e<br />
of the following:<br />
Change Tactic: Play a Tactic card (see<br />
4.2). If your Tactic Holding Box is<br />
already occupied by another Tactic card,<br />
you must discard that other card to play<br />
the new <strong>on</strong>e. Alternately, you may use<br />
this Acti<strong>on</strong> to simply take your current<br />
Tactic card from its Holding Box and<br />
return it to your hand (thus leaving you<br />
without a Tactic card in play).<br />
C<strong>on</strong>centrate: Draw <strong>on</strong>e Strategy card<br />
from the top of the Draw Pile.<br />
Hand Size: If you ever have more than 7<br />
cards in your hand, you must immediately<br />
discard down to 7 cards.<br />
Draw: If the deck becomes depleted at any<br />
time, reshuffle it to form a new Draw Pile.<br />
Get a Read: Examine (i.e., flip face-up)<br />
<strong>on</strong>e face-down card in the opp<strong>on</strong>ent’s<br />
Stroke Holding Box of your choice.<br />
Outwit: If your opp<strong>on</strong>ent Strategized<br />
last Turn, <strong>on</strong>ly then can you take the top<br />
card (<strong>on</strong>ly) from the Discard Pile, place it<br />
into your hand, and then discard a<br />
different card from your hand.<br />
Restricti<strong>on</strong>s: You cannot choose to<br />
Outwit if you do not have a card in your<br />
hand to place in the Discard Pile. Also,<br />
certain cards (e.g., End Set and some<br />
Tactic) can never be drawn from<br />
the Discard Pile as indicated by the<br />
negated draw symbol shown here.<br />
Prepare: Place a Stroke card from your<br />
hand (see 4.2). If there are already two<br />
Stroke cards in that box, you must take<br />
<strong>on</strong>e of them back into your hand.<br />
Strategize: Discard up to two cards from<br />
your hand, face-up, into the Discard Pile<br />
and draw that many cards from the top<br />
of the Draw Pile.<br />
TC Tennis Rules v1.0 3<br />
[7.0] RESOLVE A RALLY<br />
Strokes are resolved in pairs (<strong>on</strong>e Stroke for<br />
each player) called a Rally. Each player<br />
determines which of their Strokes to<br />
resolve.<br />
[7.1] To determine which Strokes to<br />
resolve, examine the two black dice rolled<br />
and note each of their values and their<br />
sum (when it is 7 or less). One unresolved<br />
Stroke corresp<strong>on</strong>ding to <strong>on</strong>e of those<br />
numbers is resolved by the player whose<br />
turn it is first, and then the opp<strong>on</strong>ent<br />
similarly resolves <strong>on</strong>e unresolved Stroke<br />
corresp<strong>on</strong>ding to those numbers (it does not<br />
have to be the same number stroke that the<br />
other player just resolved). Thus, a Rally of<br />
two Strokes are resolved, in order, every<br />
time that a player Resolves Strokes.<br />
Example, Reading the Black Dice: Stan Smith<br />
rolls a 5 and 2 <strong>on</strong> the black dice, and a 6 <strong>on</strong><br />
the blue die. Because the blue die is a 6, Stan<br />
must Resolve Strokes. Examining the black<br />
dice, he can Resolve the 5 (FV), the 2 (2S) or<br />
their sum, 7 (T). Since his FV is <strong>on</strong>e of his best<br />
Strokes and it is still unresolved, Smith chooses<br />
to Resolve it, placing a Resolved marker in his<br />
FV box afterward.<br />
After that Stroke is Resolved, Tilden must also<br />
Resolve <strong>on</strong>e. He has the same choice to<br />
Resolve the 5 (FV), the 2 (2S) or their sum, 7 (T)<br />
and chooses to resolve his T Stroke, placing a<br />
Resolved marker in his T box afterward.<br />
Reading the Black Dice C<strong>on</strong>tinued: On his<br />
next turn, Stan Smith rolls a 5 and 4 <strong>on</strong> the<br />
black dice and again rolls a 6 <strong>on</strong> the blue die.<br />
This means that Stan must Resolve Strokes<br />
<strong>on</strong>ce more. Examining the black dice, he<br />
cannot Resolve the 5 (FV) as it is already<br />
Resolved (too bad!), leaving <strong>on</strong>ly <strong>on</strong>e opti<strong>on</strong>, his<br />
4 (BH), which is not his best Stroke. He has no<br />
other choice since 5 + 4 = 9, and 9 doesn’t<br />
match any of the Stroke box numbers.<br />
His opp<strong>on</strong>ent, Bill Tilden, still has both his 5<br />
(FV) and 4 (BH) Strokes unresolved, so he can<br />
choose either <strong>on</strong>e.<br />
EXCEPTION: When Resolving a Stroke,<br />
if n<strong>on</strong>e of the numbers available to you are<br />
unresolved, then you must resolve any<br />
unresolved Stroke of your choice.<br />
Reading the Black Dice C<strong>on</strong>tinued: A few<br />
turns later, Stan Smith rolls a 1 and 4 <strong>on</strong> the<br />
black dice and rolls a 5 <strong>on</strong> the blue die. Stan<br />
would like to Resolve Strokes and hurry the Set<br />
while he’s ahead, but his 5 (FV) and 4 (BH) are<br />
both Resolved already, leaving <strong>on</strong>ly his<br />
unresolved 1 (S) Stroke, which isn’t so great.<br />
Perhaps he will choose to take an Acti<strong>on</strong> this<br />
Turn instead; since he rolled a blue 5, he has<br />
his choice.<br />
Procedure for Resolving a Stroke<br />
After deciding which Strokes to resolve<br />
(above), playing Strategy cards – including<br />
any voiding (see 7.3.3) and Love Die rolls<br />
that must be made (see 7.3.4) – each player<br />
resolving his Stroke rolls up to four dice.<br />
<str<strong>on</strong>g>The</str<strong>on</strong>g> sum of those dice is that player’s Base<br />
Score for that Stroke. <str<strong>on</strong>g>The</str<strong>on</strong>g> Momentum<br />
marker is moved a number of spaces in that<br />
player’s directi<strong>on</strong> equal to the amount of<br />
that Stroke’s final, adjusted (see 7.3.1,<br />
7.3.2) score. With both players Resolving<br />
<strong>on</strong>e Stroke each Rally, the Momentum<br />
marker will be c<strong>on</strong>stantly moving back and<br />
forth.<br />
[7.2] Stroke Rating and Scoring Dice:<br />
<str<strong>on</strong>g>The</str<strong>on</strong>g> Rating of your Stroke determines the<br />
number of dice you roll to determine your<br />
Base Score when Resolving a Stroke:<br />
Ratings<br />
AA = z z z z<br />
A = z z z 1/2z<br />
B = z z z<br />
C = z z 1/2z<br />
D = z z<br />
E = z 1/2z<br />
F = z<br />
NOTE: For a “1/2z,” also roll a different<br />
colored scoring die and add in <strong>on</strong>ly half of<br />
that roll, rounded up. E.g., half of 5 is 3.<br />
Example: Rod Laver is resolving his 2 (2S)<br />
Stroke, which is rated “C.” He rolls two black<br />
dice and <strong>on</strong>e blue “1/2” die. <str<strong>on</strong>g>The</str<strong>on</strong>g> results are a 6<br />
and 3 <strong>on</strong> the black dice, and a 5 <strong>on</strong> the blue<br />
“1/2” die, which is halved to 3, so his Base<br />
Score would be 6 + 3 + 3 = 12.<br />
[7.3] Strategy Cards: When a Rally is<br />
resolved, both players reveal their Strategy<br />
Cards in their respective Holding Boxes for<br />
the Strokes they’ve selected.<br />
Procedure<br />
After both players have declared their<br />
Strokes to resolve for that Rally, they reveal<br />
all of their Strategy (green Offense and red<br />
Defense) cards in their respective Holding<br />
Boxes for those Strokes. All of these<br />
Strategy cards apply their modifiers to the<br />
two Strokes being resolved (see below) and<br />
are then discarded after use.<br />
[7.3.1] Add / Subtract Dice: Offense<br />
cards can show next to a yellow tennis<br />
ball symbol (•; meaning it affects you<br />
when rolling for your own Stroke) at the<br />
bottom a number of black dice symbols<br />
(e.g., z z). Increase the number of<br />
dice rolled to determine the Base Score<br />
© 2011 Terry Coleman & <strong>Victory</strong> <strong>Point</strong> <strong>Games</strong>
y the number of black dice symbols<br />
shown. <str<strong>on</strong>g>The</str<strong>on</strong>g>re is no limit to the number of<br />
dice that can be added.<br />
C<strong>on</strong>versely, Defense cards, next to an<br />
orange tennis ball symbol (•; meaning it<br />
affects your opp<strong>on</strong>ent when rolling for<br />
his Stroke) at the bottom, a number of<br />
red dice symbols (e.g., z z) might<br />
appear. In this case, decrease the number<br />
of dice rolled to determine the Base<br />
Score by the number of red dice symbols<br />
shown. Even after subtracti<strong>on</strong>s, a<br />
minimum of <strong>on</strong>e die is always rolled to<br />
determine the Base Score.<br />
[7.3.2] Add / Subtract Score: Offense<br />
cards might have a yellow tennis ball<br />
symbol (•) followed by a “+X” value.<br />
That value is added to the Base Score<br />
roll after it is made.<br />
C<strong>on</strong>versely, Defense cards might have an<br />
orange tennis ball symbol (•) followed<br />
by a “-X” value. That value is<br />
subtracted from the Base Score roll<br />
after it is made. After all subtracti<strong>on</strong>s,<br />
any Base Score total that is less than zero<br />
is treated as zero.<br />
All modifiers are cumulative. So, if you<br />
had an Offense card in your 3 (FH) box<br />
that gave you +2, and your opp<strong>on</strong>ent had<br />
a Defense card in his 3 (FH) that<br />
inflicted a -1 against your Stroke, you<br />
would apply the net modifier which<br />
would be +1.<br />
Example: You are<br />
c<strong>on</strong>ducting your 3 (FH)<br />
Stroke and reveal your<br />
Offense (green) cards<br />
in that box, showing<br />
two cards: Overhead<br />
Smash and Inspired<br />
Play. Your opp<strong>on</strong>ent<br />
reveals <strong>on</strong>e Defense<br />
(red) card: Chop Shot.<br />
<str<strong>on</strong>g>The</str<strong>on</strong>g> modifiers for this<br />
Stroke are shaping up to be: +1/2z (<strong>on</strong>e<br />
from the Overhead Smash and 1/2 from the<br />
Inspired Play), and -1 to their sum (from the<br />
Chop Shot).<br />
TC Tennis Rules v1.0 4<br />
[7.3.3] Voiding the Opp<strong>on</strong>ent’s Card:<br />
Text might appear <strong>on</strong> <strong>on</strong>e Strategy card<br />
that voids another; such text always lists<br />
the card that can be voided by its exact<br />
card title.<br />
If Strategy cards currently in play to<br />
Resolve a Stroke are voided, they are all<br />
immediately and simultaneously discarded<br />
without effect <strong>on</strong> that Stroke. <str<strong>on</strong>g>The</str<strong>on</strong>g> card<br />
which voided it, if not used to Resolve<br />
that Stroke, remains, face-up, in its<br />
Holding Box and is still available for<br />
play when its Stroke is Resolved.<br />
Timing: Voiding cards can <strong>on</strong>ly be d<strong>on</strong>e<br />
after Strategy cards are revealed /<br />
committed to Resolving a Stroke, but<br />
before any die or dice are rolled to<br />
determine its Score.<br />
Surprise!: A card played to void another<br />
does not have to be played from a box<br />
corresp<strong>on</strong>ding to the Stroke being<br />
resolved. <str<strong>on</strong>g>The</str<strong>on</strong>g> owning player can reveal a<br />
card that voids another from any Holding<br />
Box <strong>on</strong> his side of the Player Mat.<br />
Example C<strong>on</strong>tinued:<br />
Interestingly, you have<br />
in your 4 (BH) box, facedown,<br />
the Offense Hard<br />
& Flat card. After seeing<br />
your opp<strong>on</strong>ent’s Chop<br />
Shot card, you reveal<br />
your Hard & Flat card<br />
and leave it, face-up, in<br />
your 4 (BH) box (where<br />
it awaits that Stroke still<br />
to be Resolved later that Set.)<br />
[7.4] <str<strong>on</strong>g>The</str<strong>on</strong>g> “Love Die:” Some Strategy<br />
cards add an additi<strong>on</strong>al element of<br />
1<br />
risk and reward. Cards with a<br />
purple die roll outcome symbol<br />
each require a separate “Love Die” roll to<br />
determine if that effect is applied or not.<br />
<str<strong>on</strong>g>The</str<strong>on</strong>g>se Love Die rolls require an additi<strong>on</strong>al<br />
die cast for each such card showing any<br />
purple die faces; these rolls are separate<br />
from the Base Score roll made to resolve<br />
the Stroke.<br />
Applicati<strong>on</strong>: If its Love Die roll result is<br />
shown <strong>on</strong> that card, the indicated effect is<br />
applied. If not, there is no effect.<br />
Unless a Love Die result specifically states<br />
otherwise, the other effects of its card<br />
(modifiers, etc.) still apply.<br />
Note: When the Love Die result calls for<br />
the loss of 1/2z, if a 1/2z was rolled for<br />
that Stroke resoluti<strong>on</strong> its result is lost (i.e.,<br />
it adds zero to the Base Score). If no 1/2z<br />
was rolled, take the highest z rolled for<br />
that Stroke resoluti<strong>on</strong> and cut it in half<br />
(rounding up as usual).<br />
[7.5] Tactic Cards: Finally, before the dice<br />
are rolled, examine both players’ Tactic<br />
Card Holding Boxes to see if there are any<br />
Tactic cards in play that modify the scoring<br />
result of the Stroke being Resolved. After<br />
affecting a Stroke, these cards remain in<br />
their respective Tactic Card Holding Boxes<br />
and c<strong>on</strong>tinue to affect play while there.<br />
Example C<strong>on</strong>tinued: Your player’s rating for<br />
this Stroke is B, which starts you at z z z.<br />
With the modifiers from the preceding Example,<br />
you will be rolling z z z z 1/2z (four-anda-half<br />
dice), which is very good.<br />
But wait! Your Overhead Smash requires a<br />
Love Die roll and, with the Fates against you,<br />
you roll a 1. This means your highest z is lost<br />
and will not be added to that Stroke’s Score.<br />
Next, you look at each other’s Tactic cards.<br />
Yours is No Pace and your opp<strong>on</strong>ent’s is<br />
Wicked Topspin. Your card does not affect<br />
your opp<strong>on</strong>ent at the moment (•) since you are<br />
resolving your Stroke right now, but you must<br />
still roll the Love Die to see if you suffer a<br />
penalty for using this Tactic! <str<strong>on</strong>g>The</str<strong>on</strong>g> result is a 4,<br />
which is no effect (this Stroke).<br />
Up<strong>on</strong> inspecting your opp<strong>on</strong>ent’s Tactic card,<br />
because you’re resolving your FH (Forehand),<br />
there is no effect to your Stroke, and the Love<br />
Die checks <strong>on</strong> that card <strong>on</strong>ly affects your<br />
opp<strong>on</strong>ent during his Strokes (not yours).<br />
So, the end result is that you’ll be rolling 4 1/2<br />
dice and losing the highest die roll.<br />
You throw a 5, 1, 5, 2 and the half-die is a<br />
3. After losing your highest z (which is a 5),<br />
you add 5 + 1 + 2 + half of 3 (which rounds up to<br />
2) for a total of 10. Note that you would not then<br />
subtract 1 from your opp<strong>on</strong>ent’s Chop Shot<br />
card because your Hard & Flat card completely<br />
voided that card and sent it to the Discard Pile.<br />
[7.6] Momentum and Scoring: Once the<br />
Final Score for a Stroke is<br />
resolved (see the example, above),<br />
note the current space occupied by<br />
the Momentum marker (in case there is a<br />
Challenge, see 10.0) and then the player<br />
whose Stroke that was adjusts the<br />
© 2011 Terry Coleman & <strong>Victory</strong> <strong>Point</strong> <strong>Games</strong>
TC Tennis Rules v1.0 5<br />
Momentum marker al<strong>on</strong>g the Momentum<br />
Track a number of spaces in his favor equal<br />
to that Final Score.<br />
Since Strokes are resolved in Rallies (pairs<br />
off the same dice roll), the opp<strong>on</strong>ent’s<br />
Stroke is then resolved and he adjusts the<br />
Momentum marker al<strong>on</strong>g the Momentum<br />
Track in his favor that many spaces in his<br />
favor.<br />
Thus, you’ll see momentum go back-andforth<br />
with every Rally of Strokes resolved.<br />
<str<strong>on</strong>g>The</str<strong>on</strong>g> Momentum Track is at 2 in Stan Smith’s<br />
favor from an earlier Stroke resoluti<strong>on</strong>. Smith<br />
just resolved his BH with a Final Score of 8, so,<br />
he moves the Momentum marker al<strong>on</strong>g the<br />
track 8 spaces in his favor. It is now in the 10<br />
space to Smith’s advantage.<br />
Now, Rod Laver resolves his 2S Stroke and<br />
gets a Final Score 12, so he moves the<br />
Momentum marker 12 spaces in the other<br />
directi<strong>on</strong> towards his side. It is now in the 2<br />
space <strong>on</strong> Laver’s side. Thus, Rod has g<strong>on</strong>e<br />
from being slightly behind (at the beginning of<br />
this pair of Strokes) to now being slightly ahead<br />
after their resoluti<strong>on</strong>.<br />
If <strong>on</strong>e player leads <strong>on</strong> the<br />
Momentum Track by 20 or more,<br />
replace the Momentum marker<br />
with the “Big Mo” Momentum marker and<br />
c<strong>on</strong>tinue counting again at the 0 space (this<br />
marker being worth +20).<br />
Whenever this Big Mo + 20 marker is in<br />
play, that player who is ahead receives an<br />
extra 1/2 z <strong>on</strong> all his scoring resoluti<strong>on</strong>s.<br />
[7.7] Resolved Strokes: After<br />
adding your score to the<br />
Momentum Track:<br />
1. Discard all of the Offense and Defense<br />
cards that were played in Resolving that<br />
Stroke (excepti<strong>on</strong>, see 7.3.3) and,<br />
2. Place a Resolved marker <strong>on</strong> that Stroke’s<br />
Holding Box <strong>on</strong> your side of the Player<br />
Mat to show that you cannot resolve that<br />
Stroke again this Set.<br />
[8.0] STRATEGY MOVES<br />
After the First Player has<br />
completed his turn by either<br />
taking an Acti<strong>on</strong> or resolving<br />
Strokes, before he declares his turn ended<br />
and passes play to his opp<strong>on</strong>ent, he may<br />
take a B<strong>on</strong>us Acti<strong>on</strong> (which is an Acti<strong>on</strong>,<br />
<strong>on</strong>ly, not another opportunity to Resolve<br />
Strokes) by spending <strong>on</strong>e of his Strategy<br />
Moves. He does this by reducing his<br />
Strategy marker by <strong>on</strong>e space. If it is <strong>on</strong><br />
the 0 space, that player can take no further<br />
B<strong>on</strong>us Acti<strong>on</strong>s that Set.<br />
How many Strategy Moves you begin with<br />
depends <strong>on</strong> the player you choose and the<br />
surface being played <strong>on</strong>. Strategy Moves<br />
allow you to take an Acti<strong>on</strong> during critical<br />
turns of the Set when a well-timed play<br />
could make the difference.<br />
[9.0] ENDING YOUR TURN<br />
After the First Player has completed his<br />
turn, including any B<strong>on</strong>us Acti<strong>on</strong>s (see<br />
8.0), then the Sec<strong>on</strong>d Player does the same,<br />
including any B<strong>on</strong>us Acti<strong>on</strong>s. Turns<br />
c<strong>on</strong>tinue in this fashi<strong>on</strong> in the Training<br />
Game until all seven Strokes in the Set are<br />
Resolved.<br />
[10.0] CHALLENGES<br />
Each Set, both players may make<br />
a single Challenge to the<br />
resoluti<strong>on</strong> of a Rally, thus forcing<br />
both Strokes to be re-rolled. <str<strong>on</strong>g>The</str<strong>on</strong>g><br />
ability to Challenge is shown by possessi<strong>on</strong><br />
of your Challenge marker.<br />
Procedure<br />
To make a Challenge, you must possess<br />
your Challenge marker. First, the player<br />
whose turn it is (i.e., who is causing the two<br />
Strokes to be resolved) has the opti<strong>on</strong> to<br />
Challenge; if that opti<strong>on</strong> is not exercised,<br />
then the opposing player has the opti<strong>on</strong> to<br />
Challenge that Rally. To Challenge:<br />
1. State to your opp<strong>on</strong>ent that you are<br />
Challenging that Rally.<br />
2. Remove your Challenge marker from<br />
your side of the Player Mat.<br />
3. Reset the Momentum marker to the<br />
space it occupied at the beginning of the<br />
Rally (7.6).<br />
4. Re-roll both Stroke Resoluti<strong>on</strong>s just as<br />
before and apply those results.<br />
Challenges can <strong>on</strong>ly be made immediately<br />
after a Rally is completed (before the next<br />
Turn is c<strong>on</strong>ducted).<br />
You can Challenge a Rally that was just rerolled<br />
by your opp<strong>on</strong>ent’s Challenge.<br />
[11.0] WINNING THE<br />
TRAINING GAME<br />
At the end of a Set, the player with the<br />
Momentum marker <strong>on</strong> his side wins. If it is<br />
in its 0 space, the player with the lower<br />
Overall Rating wins. If those Ratings are<br />
equal, the player still possessing their<br />
Challenge marker wins. If neither (or both)<br />
have their Challenge marker, roll a die to<br />
determine the winner.<br />
You now know all you need to play the<br />
Training Game of TC Tennis.<br />
Good luck and have fun!<br />
THE STANDARD GAME<br />
After a Training Game or two, move <strong>on</strong> to<br />
the more challenging Standard Game where<br />
a players’ Defense and Return ratings affect<br />
scoring and random events can occur, End<br />
Set cards can vary the length of play, and<br />
Matches of more than <strong>on</strong>e Set are played.<br />
Additi<strong>on</strong>al Set Up<br />
Add the End Set cards to the Deck.<br />
Have the beige RET(urn) and<br />
DEF(ense) markers handy.<br />
Place the green Random Events<br />
markers into a clean, opaque c<strong>on</strong>tainer<br />
(e.g., a trophy cup) and mix them.<br />
[12.0] RETURN & DEFENSE<br />
After resolving a Stroke in the Standard<br />
Game, before applying the result to the<br />
Momentum Track, <strong>on</strong>e additi<strong>on</strong>al step takes<br />
place. <str<strong>on</strong>g>The</str<strong>on</strong>g> Final Score is adjusted by the<br />
opp<strong>on</strong>ent rolling a Defense Die for his<br />
player’s RET(urn) and DEF(ense) ratings<br />
(if applicable) depending up<strong>on</strong> what Stroke<br />
the scoring player just used.<br />
RET = Return of Serve, which is applied<br />
vs. the opp<strong>on</strong>ent’s Serves (1S and 2S)<br />
DEF = Defense which is applied vs. all of<br />
the opp<strong>on</strong>ent’s other Strokes<br />
Ratings<br />
A = -1/2z<br />
B = No modifier<br />
C = +1/2z<br />
D = +z<br />
Place RET and DEF markers <strong>on</strong> your<br />
Player card as a reminder of their effects <strong>on</strong><br />
your opp<strong>on</strong>ent’s ratings, thus:<br />
Jimmy C<strong>on</strong>nors is playing Pete Sampras <strong>on</strong><br />
Clay (their respective RET and DEF Ratings<br />
circled, above). During Set Up, C<strong>on</strong>nors takes<br />
a RET A and a DEF C maker while Sampras<br />
requires n<strong>on</strong>e for his B ratings in both of these<br />
categories. For the durati<strong>on</strong> of this Match,<br />
C<strong>on</strong>nors must roll a Defense Die versus all of<br />
Sampras’ Strokes (Serves and n<strong>on</strong>-Serves).<br />
Example: Sampras has just rolled a 1 6 <strong>on</strong><br />
the black dice and a 5 <strong>on</strong> the blue. He happily<br />
© 2011 Terry Coleman & <strong>Victory</strong> <strong>Point</strong> <strong>Games</strong>
TC Tennis Rules v1.0 6<br />
chooses to resolve his 1S (at AA, it is Pete’s<br />
best Stroke). He rolls z z z z for a total of<br />
14. Because C<strong>on</strong>nors is an A for RET <strong>on</strong> Clay,<br />
Jimmy rolls his –z1/2 Defense Die to see how<br />
his RET affects Pete’s 1S Score. Jimmy rolls a<br />
4, reducing Pete’s total by two (i.e., -2), leaving<br />
Pete with a Final Score of 12 for that Stroke.<br />
[13.0] RANDOM EVENTS<br />
In the Standard Game, set up the green<br />
Random Event markers in an opaque<br />
c<strong>on</strong>tainer (called the Events Cup) from<br />
which they are drawn at random.<br />
Procedure<br />
When you roll doubles <strong>on</strong> the two black<br />
dice (i.e., they are both the same number)<br />
while taking your Turn (5.2), if you do not<br />
resolve a Rally, then you may forgo your<br />
Acti<strong>on</strong> that turn and draw two Event<br />
markers from the Events Cup instead,<br />
selecting <strong>on</strong>e to keep and returning the<br />
other to the Events Cup (to possibly be<br />
redrawn later).<br />
If you roll a 6 <strong>on</strong> the blue die, you must<br />
resolve a Rally and cannot draw Random<br />
Events even if you had rolled doubles <strong>on</strong> the<br />
black dice. If you roll doubles <strong>on</strong> the black dice<br />
and a blue 5, then you have all of your opti<strong>on</strong>s<br />
available that turn and must choose to either:<br />
A) draw Random Events, B) take an Acti<strong>on</strong>, or<br />
C) resolve a Rally. On any other black doubles<br />
plus blue die roll result, you can either A) draw<br />
Random Events or B) take an Acti<strong>on</strong>.<br />
[13.1] Timing: Some Events (as specified<br />
below with the word “Play”) must be<br />
played immediately and, <strong>on</strong>ce played, those<br />
markers are set aside (discarded) and<br />
remain out of play for the rest of the Set.<br />
Other Events are c<strong>on</strong>tinuous or played at a<br />
later time (as specified below with the word<br />
“Retain”). Those markers are placed, faceup<br />
<strong>on</strong> your Player card. Each player can<br />
have no more than two such Event markers<br />
working for them at a time. If another such<br />
c<strong>on</strong>tinuous/delayed Event is added, <strong>on</strong>e of<br />
those three Event markers must be immediately<br />
discarded without (further) effect.<br />
Once played, Event markers are discarded.<br />
[13.2] Effects: <str<strong>on</strong>g>The</str<strong>on</strong>g> specific Event markers<br />
are explained below:<br />
+1 to Tiebreak die roll (Retain): Play if you<br />
are behind at the end of a Set and<br />
rolling to obtain a Tiebreak (see<br />
15.0) for a +1 die roll modifier.<br />
+2 to your next Stroke this Set (Retain):<br />
Play when resolving your next Stroke<br />
this Set. Add two (+2) to your Final<br />
Score for that Stroke.<br />
[BOTH] +1/2 z to FH & BH this Set (Retain):<br />
<str<strong>on</strong>g>The</str<strong>on</strong>g> c<strong>on</strong>tinuous effect is that both you<br />
and your opp<strong>on</strong>ent gain 1/2 z to your 3<br />
(FH) and 4 (BH) Strokes this Set. Big<br />
shots from the backcourt are rewarded.<br />
[BOTH] +1/2 z to FV & BV this Set<br />
(Retain): <str<strong>on</strong>g>The</str<strong>on</strong>g> c<strong>on</strong>tinuous effect is that<br />
both you and your opp<strong>on</strong>ent gain 1/2 z<br />
to your 5 (FV) and 6 (BV) Strokes this<br />
Set. Shots played close to the net are<br />
really working.<br />
[BOTH] Discard all End Set & Tactics cards<br />
(Play): All End Set and Tactic<br />
cards in play for both you and<br />
your opp<strong>on</strong>ent are immediately<br />
discarded.<br />
Draw 2 cards <strong>on</strong> next C<strong>on</strong>centrate Acti<strong>on</strong><br />
(Retain): <str<strong>on</strong>g>The</str<strong>on</strong>g> next time you take a<br />
C<strong>on</strong>centrate Acti<strong>on</strong>, play this marker to<br />
receive two cards instead of the usual<br />
<strong>on</strong>e.<br />
Examine all discards and place <strong>on</strong>e in your<br />
hand (Retain): Play at the beginning of<br />
your turn (before the dice are rolled) to<br />
search the Discard Pile. You may take<br />
any <strong>on</strong>e card without the negated draw<br />
symbol from there and add it to your<br />
hand.<br />
Force Opp<strong>on</strong>ent to play End Set card<br />
(Retain): Play at the beginning of your<br />
turn (before the dice are rolled) to force<br />
your opp<strong>on</strong>ent to play an End Set card<br />
from his hand if he has <strong>on</strong>e. If he has<br />
n<strong>on</strong>e, this marker is discarded without<br />
effect; if he has more than <strong>on</strong>e he may<br />
play his choice.<br />
Gain 1 Strategy <strong>Point</strong> (Retain): Play at any<br />
time to gain <strong>on</strong>e <strong>on</strong> your Strategy<br />
track (e.g., to go from 3 to 4).<br />
Your Strategy Rating can never<br />
exceed 5.<br />
Ignore 1 Love Die Result (Retain): Play this<br />
marker when a Love Die roll is resolved<br />
to change its result to “No Effect.”<br />
Must Rally, your choice, same Stroke both<br />
players (Play): Immediately Resolve a<br />
Rally using your choice of available<br />
Strokes. Your opp<strong>on</strong>ent must resolve that<br />
same Stroke if available (if not, then his<br />
choice am<strong>on</strong>g his available Strokes).<br />
Opp<strong>on</strong>ent 1 random discard; you take Acti<strong>on</strong><br />
(Retain): Play at the beginning of your<br />
turn (before the dice are rolled) to discard<br />
a random card from your opp<strong>on</strong>ent’s<br />
hand, then take an Acti<strong>on</strong>. You may take<br />
an Outwit Acti<strong>on</strong> to pick up this<br />
discarded card if it does not have<br />
the negated draw symbol.<br />
[14.0] END SET CARDS<br />
In the Standard Game, a<br />
Set can end before all<br />
seven Strokes are resolved<br />
by playing End Set cards.<br />
Playing an End Set card is<br />
a new type of Acti<strong>on</strong> (see<br />
6.0) and is added to that<br />
list in the Standard Game:<br />
Change Tempo: Place an End Set card<br />
from your hand, face-up, adjacent to the<br />
Player Mat where both players can easily<br />
see it. If there is already an End Set card<br />
there, discard it and replace it with the<br />
newly-played <strong>on</strong>e.<br />
Unlike other cards, <strong>on</strong>ly <strong>on</strong>e End Set card<br />
is ever in play (not <strong>on</strong>e per player) and it<br />
has no specific Holding Box; End Set cards<br />
are never played in a Stroke or Tactic box.<br />
[14.1] End Set Effect: When no End Set<br />
card is in play, all seven Rallies must be<br />
resolved to end a Set.<br />
While an End Set card is in play, it states<br />
after how many Rallies are resolved that the<br />
Set ends – that is, after 4, 5, 6, or even back<br />
to 7 Strokes are resolved.<br />
<str<strong>on</strong>g>The</str<strong>on</strong>g> reas<strong>on</strong> the End Set After 7 Strokes<br />
card is included is to replace another End<br />
Set card already in play when you want the<br />
Set to go for the full length (to allow your<br />
superior Strokes and strategic decisi<strong>on</strong>making<br />
to make a difference).<br />
Example: An End Set After 4 card is in play<br />
and three Rallies have already been resolved.<br />
This End Set card would end the Set after the<br />
next Rally (i.e., the fourth). However, Tilden<br />
isn’t ready for the Set to end (some of his best<br />
Strokes are still unresolved), so he takes an<br />
Acti<strong>on</strong> this turn and plays an End Set After 6<br />
card to keep the Set going.<br />
[14.2] End Set Timing: A played End Set<br />
card does not take effect until after the next<br />
Rally is resolved!<br />
Example: You play an End Set After 4 card,<br />
but there have already been five Rallies. D<strong>on</strong>’t<br />
Panic! <str<strong>on</strong>g>The</str<strong>on</strong>g> set cannot end until after the next<br />
Rally is resolved at the earliest.<br />
Tennis has no clock determining when play<br />
ends (unlike most sports). Each Set has its<br />
own cadence and drama, and the End Set<br />
cards recreate this. Choosing which Stroke<br />
to resolve, and when, is a very important<br />
strategic decisi<strong>on</strong>, creating a more fun and<br />
interesting Match.<br />
© 2011 Terry Coleman & <strong>Victory</strong> <strong>Point</strong> <strong>Games</strong>
TC Tennis Rules v1.0 7<br />
[15.0] TIEBREAK<br />
Unlike the Training Game, a close score (at<br />
or near 0) <strong>on</strong> the Momentum Track when a<br />
Set ends might require a Tiebreak (playing<br />
a “mini-Set” of a few additi<strong>on</strong>al Rallies) to<br />
resolve that Set and determine its winner.<br />
Procedure<br />
When a Set ends, check the Momentum<br />
Track. If <strong>on</strong>e player is ahead by 6 or more<br />
points, the Set is over and that player wins<br />
the Set. If the Momentum Track is at 0, a<br />
Tiebreak must take place.<br />
If <strong>on</strong>e player is ahead by 1 to 5 points, the<br />
player who is behind rolls a die. If the die<br />
roll result is greater than (>) the score<br />
shown by the Momentum marker, a<br />
Tiebreak must take place; if the result is<br />
less than or equal to (≤) that score, the<br />
player who is ahead wins the Set.<br />
Example: At the end of a Set, the Momentum<br />
marker favors Tilden by 4 points. Since Budge<br />
is behind, he rolls a single die and the result is a<br />
3, which isn’t greater than Tilden’s 4 points, so<br />
Tilden wins the Set. If Budge had rolled a 5 or<br />
6, the Set would be decided by a Tiebreak.<br />
In tennis, the player with the most points<br />
doesn’t always win the Set. This is similar<br />
to a team piling up a bunch of yardage in a<br />
football game, but not quite putting the<br />
opposing team away.<br />
[15.1] Setting Up a Tiebreak:<br />
1. Clear for Acti<strong>on</strong>: All Strategy cards not<br />
in a player’s hand are discarded<br />
(i.e., End Game, Tactic and<br />
unresolved cards in Stroke<br />
Holding Boxes). In additi<strong>on</strong>, remove all<br />
Resolved markers from Stroke Holding<br />
Boxes.<br />
2. Strategy: Both players gain <strong>on</strong>e <strong>on</strong> their<br />
respective Strategy tracks (e.g., to<br />
go from 1 to 2). Your Strategy<br />
Rating can never exceed 5.<br />
3. Challenge Reset: Both players replace<br />
their Challenge marker <strong>on</strong> their<br />
side of the Player Mat if it is not<br />
currently there. You cannot have<br />
2 of these, so if you didn’t use it<br />
previously, you d<strong>on</strong>’t gain <strong>on</strong>e now.<br />
4. Momentum: Place the<br />
Momentum marker <strong>on</strong> the “0”<br />
box of the Momentum Track.<br />
5. C<strong>on</strong>centrate: Beginning with the First<br />
player (see 5.1), both players draw <strong>on</strong>e<br />
card.<br />
6. Plan: Beginning with the First player<br />
(see 5.1), each player may place up to<br />
two Stroke (i.e., Offense or Defense)<br />
cards as per Case 4.2.<br />
You are now ready to recommence play<br />
with the Tiebreak (see 5.0).<br />
[15.2] Ending / Winning a Tiebreak:<br />
<str<strong>on</strong>g>The</str<strong>on</strong>g> Tiebreak ends and the score <strong>on</strong> the<br />
Momentum Track is checked after three<br />
Rallies. If an End Set card is in play, the<br />
Tiebreak ends after <strong>on</strong>ly two Rallies.<br />
If <strong>on</strong>e player is ahead by 6 or more points,<br />
the Tiebreak is over and that player wins<br />
the Set. If the Momentum Track is at 0, the<br />
Tiebreak must c<strong>on</strong>tinue.*<br />
If <strong>on</strong>e player is ahead by 1 to 5 points, the<br />
player who is behind rolls a die. If the die<br />
roll result is greater than (>) the score<br />
shown by the Momentum marker, the<br />
Tiebreak c<strong>on</strong>tinues*; if the result is less<br />
than or equal to (≤) that score, the player<br />
who is ahead wins the Set.<br />
C<strong>on</strong>tinuing Tiebreaks<br />
*Important: Each time the Tiebreak is<br />
c<strong>on</strong>tinued, reset the Momentum marker to<br />
zero.<br />
If all seven Strokes are resolved during a<br />
Tiebreak and neither player has w<strong>on</strong> the<br />
Set, then reset for a new Tiebreaker.<br />
This <strong>on</strong>ly happened twice in more than 100<br />
test games...<br />
[16.0] A COMPLETE MATCH<br />
In the Standard Game, winning a Set is not<br />
enough. To win the game, you must win a<br />
Match c<strong>on</strong>sisting of winning either best 2-<br />
out-of-3 Sets (for most men’s events and<br />
nearly all women’s events) or best 3-out-of-<br />
5 Sets (generally reserved for major men’s<br />
tournaments <strong>on</strong>ly).<br />
We str<strong>on</strong>gly recommend that you play best<br />
2-out-of-3 Sets for your first few Matches.<br />
Starting a New Set during a Match<br />
After a Set is completed (including any<br />
Tiebreak) and its winner determined, if the<br />
Match c<strong>on</strong>tinues, set up the next Set as<br />
follows:<br />
1. Clear for Acti<strong>on</strong>: All Strategy cards not<br />
in a player’s hand are<br />
discarded (i.e., End Game,<br />
Tactic and unresolved cards<br />
in Stroke Holding Boxes)<br />
including. any “DISCARD<br />
after Set, if played” cards<br />
that were played that Set<br />
(even if returned to that player’s<br />
hand). In additi<strong>on</strong>, remove all<br />
Resolved markers from Stroke<br />
Holding Boxes.<br />
2. Strategy: Both players reset their<br />
Strategy markers to the box<br />
number corresp<strong>on</strong>ding to their<br />
Player card’s STR(ategy) rating<br />
for the surface they’re playing <strong>on</strong>.<br />
3. Challenge Reset: Both players replace<br />
their Challenge marker <strong>on</strong> their<br />
side of the Player Mat if it is not<br />
currently there. You cannot have<br />
2 of these, so if you didn’t use it<br />
previously, you d<strong>on</strong>’t gain <strong>on</strong>e now.<br />
4. Momentum: Place the<br />
Momentum marker <strong>on</strong> the “0”<br />
box of the Momentum Track.<br />
5. Events: Return all of the discarded<br />
Random Events markers to the Events<br />
Cup and mix them up.<br />
6. Refocus: <str<strong>on</strong>g>The</str<strong>on</strong>g> player who lost the<br />
previous Set is the First Player (5.1) for<br />
the next Set and draws three cards.<br />
<str<strong>on</strong>g>The</str<strong>on</strong>g>n the player who w<strong>on</strong> the previous<br />
set draws two cards.<br />
7. Plan: Beginning with the First player<br />
(see above), each player may place up to<br />
two Stroke (i.e., Offense or Defense)<br />
cards as per Case 4.2.<br />
You are now ready to begin play of the next<br />
Set (see 5.0).<br />
THE TOURNAMENT GAME<br />
After you are familiar with the Standard<br />
Game, try the Tournament Game where<br />
players’ Stamina comes into play over l<strong>on</strong>g<br />
Matches and injuries can occur.<br />
Additi<strong>on</strong>al Set Up<br />
Add the “Tournament Game <strong>on</strong>ly”<br />
Tactic cards to the Deck.<br />
Add the purple Random Events<br />
markers to the Events Cup.<br />
Have the gray Stamina Effects markers<br />
handy.<br />
[17.0] STAMINA<br />
In the Tournament Game, players are<br />
required to make a Stamina Check<br />
immediately prior to the start of (i.e., just<br />
before the First Player takes his<br />
first Turn) every Set after the<br />
sec<strong>on</strong>d Set and when called for by<br />
a Random Event selecti<strong>on</strong>.<br />
Procedure<br />
To make a Stamina Check, c<strong>on</strong>sult the<br />
Stamina table and roll <strong>on</strong>e black (the 10s)<br />
and <strong>on</strong>e blue (the 1s) which are read<br />
together to generate a value from 11 to 66<br />
to determine the column to use. <str<strong>on</strong>g>The</str<strong>on</strong>g> row to<br />
cross-index it with is your Player’s<br />
STA(mina) Rating.<br />
© 2011 Terry Coleman & <strong>Victory</strong> <strong>Point</strong> <strong>Games</strong>
TC Tennis Rules v1.0 8<br />
Example: Tilden must make a Stamina check.<br />
On every court, his STA(mina) Rating is “B.” He<br />
rolls a 4 and 5 (i.e., “45”), which means that<br />
Big Bill is Tiring.<br />
After the result is found by this crossindexing,<br />
it is shifted as indicated by the<br />
Shift Modifiers below the table. Some<br />
circumstances shift the results by columns<br />
(i.e., or ) while others lower which<br />
row is used (). All modifiers must be<br />
applied!<br />
Example C<strong>on</strong>tinued: Since it is currently a Set<br />
being played after <strong>on</strong>e resolved by a Tiebreak,<br />
the result is shifted <strong>on</strong>e column to the right ().<br />
This means that Tilden is now Fatigued.<br />
Effects<br />
When an effect occurs (e.g., “Tiring”), it is<br />
explained below the table. A result of or<br />
2 lowers both of that player’s DEF(ense)<br />
and RET(urn) Ratings (i.e., from “A” down<br />
to “B,” but never below “D”).<br />
Split Ratings: Some players have a Split<br />
STA(mina) Rating (e.g., “C/B”). This<br />
shows how some stars are pr<strong>on</strong>e to tough<br />
matches and even upsets early in a given<br />
tournament, such as when they play <strong>on</strong> an<br />
unfamiliar surface.<br />
When playing a Tournament (see 23.0 <strong>on</strong><br />
the inside fr<strong>on</strong>t cover), a Split-Rated player<br />
uses the lesser STA(mina) Rating until that<br />
player reaches the semifinal, at which point<br />
the higher STA(mina) Rating is used.<br />
This allows for a star to play himself or<br />
herself “into shape” during the course of<br />
the Tournament. Tennis can be a grueling<br />
sport, and unlike a team sport, you can’t<br />
substitute off the bench. So, the l<strong>on</strong>ger the<br />
match goes, and the more hard-fought it is,<br />
the more important physical and mental<br />
c<strong>on</strong>diti<strong>on</strong>ing becomes. Note that some court<br />
surfaces are more grueling than others.<br />
Random Event<br />
Sec<strong>on</strong>d Wind (Retain): Play this marker<br />
when you obtain an adverse result<br />
from a Stamina Check to negate<br />
that result.<br />
[18.0] INJURIES<br />
In the Tournament Game, players are<br />
required to make an Injury Check<br />
immediately prior to the start of (i.e., just<br />
before the First Player takes his first Turn)<br />
every Set after the third Set and<br />
when called for by a Random Event<br />
selecti<strong>on</strong>.<br />
Procedure<br />
To make an Injury Check, c<strong>on</strong>sult the<br />
Injury table and roll <strong>on</strong>e black (the 10s)<br />
and <strong>on</strong>e blue (the 1s) which are read<br />
together to generate a value from 11 to 66<br />
to determine the column to use. <str<strong>on</strong>g>The</str<strong>on</strong>g> row to<br />
cross-index it with is your Player’s<br />
INJ(ury) Rating.<br />
Example: Boris Becker is playing indoors and<br />
must make an Injury check. His INJ(ury) Rating<br />
is “B.” He rolls a 5 and 1 (i.e., “51”), which<br />
means an attack of Cramps.<br />
After the result is found by this crossindexing,<br />
it is shifted as indicated by the<br />
Shift Modifiers below the table. Some<br />
circumstances shift the results by columns<br />
(i.e., or ) while others lower which<br />
row is used (). All modifiers must be<br />
applied!<br />
Example C<strong>on</strong>tinued: Having already suffered<br />
two bad results from previous Stamina checks<br />
this Match, the result is shifted two columns to<br />
the right (), increasing the injury to Slight.<br />
Effects<br />
When an injury occurs (e.g., “Minor”), it is<br />
explained below the table. A result of or<br />
2 lowers both of that player’s DEF(ense)<br />
and RET(urn) Ratings that many levels<br />
(i.e., would go from, say, “A” down to<br />
“B”) but never below “D.”<br />
Injury Aftereffects<br />
If an injured player wins the Match, an<br />
Injury Aftereffects Check must be made<br />
for that player at the start of every Match<br />
played thereafter.<br />
Unlike Stamina (which is checked every<br />
Set after the sec<strong>on</strong>d), Injury Checks <strong>on</strong>ly<br />
occur when chosen by a player as a<br />
Random Event or in a best-of-five-set<br />
Match (after the third and fourth Sets).<br />
[19.0] NEW TACTICS<br />
In the Tournament Game, certain Tactic<br />
cards can mitigate the effects of adverse<br />
Stamina and Injury Check results.<br />
If played into your Tactic<br />
Holding Box, the Sec<strong>on</strong>d<br />
Wind card mitigates the ill<br />
effects of the last Stamina<br />
result you suffered. It is then<br />
discarded.<br />
Similarly, if played into your<br />
Tactic Holding Box, the Call<br />
for Trainer card can<br />
potentially improve (heal) an<br />
injury by <strong>on</strong>e or two (e.g.,<br />
from Serious to Medium would<br />
be <strong>on</strong>e level of improvement;<br />
from Serious to Slight would be two).<br />
[20.0] HOUSEKEEPING<br />
In the Tournament Game, starting a new<br />
Set requires a couple more Housekeeping<br />
Checks be performed just before the First<br />
Player takes his first Turn of that new Set:<br />
After Set Up and Before First Turn<br />
After the sec<strong>on</strong>d Set (i.e., for the 3 rd<br />
through 5 th Sets), both players make a<br />
Stamina Check (see 15.0).<br />
After the third Set (i.e., for the 4 th and 5 th<br />
Sets), both players make an Injury<br />
Check (see 16.0).<br />
Before the first Set of a new Match,<br />
Injured players must make an Injury<br />
Aftereffects Check (see 16.0).<br />
Note that Tactic cards which would help<br />
you through Stamina and Injury Checks<br />
will not be in play at this time and therefore<br />
cannot help you with these Housekeeping<br />
Checks.<br />
[21.0] ALL-SURFACE MATCH<br />
Players may agree to try a 5-Set All-<br />
Surface Match. To do so, prior to Setting<br />
Up the first Set, the Underdog chooses the<br />
surface to be played <strong>on</strong>.<br />
Afterwards, the loser of the just-completed<br />
Set, before Set Up, chooses the surface for<br />
the next Set. This process repeats until the<br />
Match is over. However, no surface can be<br />
chosen a sec<strong>on</strong>d time until all four have<br />
been chosen at least <strong>on</strong>ce.<br />
Which means the fourth Set will always be<br />
the last surface not yet chosen and the<br />
winner of the fourth Set can choose any<br />
surface for the final Set.<br />
© 2011 Terry Coleman & <strong>Victory</strong> <strong>Point</strong> <strong>Games</strong>