Create successful ePaper yourself
Turn your PDF publications into a flip-book with our unique Google optimized e-Paper software.
<strong>Service</strong><br />
<strong>Training</strong><br />
7/03 Kwikee Products Co., Inc.<br />
Safety Precautions<br />
Extending Slide Out Room<br />
See Operation Safety<br />
Precautions<br />
before proceeding.<br />
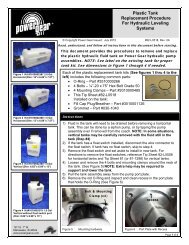
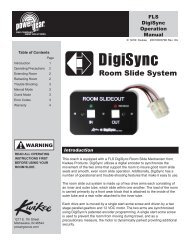
Room Slide System<br />
by Kwikee Products<br />
To extend the room slide simply press<br />
and hold the “OUT” button. To stop the<br />
room during operation, release the<br />
button. Once the room has has reached<br />
its full extension it will stop<br />
automatically. The extend button will<br />
not function again until the retract<br />
button has been pressed.<br />
Retracting Slide Out Room<br />
See Operation Safety<br />
Precautions<br />
before proceeding.<br />
To retract the room simply press and<br />
hold the “IN” button. To stop the room<br />
during operation, release the button.<br />
Once the room has completely<br />
retracted it will stop automatically. The<br />
“Retract” button will not function again<br />
until the extend button has been<br />
pressed.<br />
In the event of a total system failure, two crank handles may be used to retract<br />
or extend the room.<br />
Crank Mode:<br />
To use the crank handles open the luggage compartment doors exposing the front of<br />
each room slide mechanism. Insert the crank handle into the tube and align the drive<br />
pin at the rear of the tube with the notches in the crank handle. It may be necessary<br />
to move the handle slightly from side to side. The crank handle will only move the<br />
tube that it is inserted into. Consequently you will need to alternate between each<br />
crank handle on each side to move the room in or out. If help is available a second<br />
person cranking on the other handle simultaneously will greatly speed up the<br />
process.<br />
Prior to extending the room, take a<br />
moment to insure the following:<br />
1. See coach manufacturer instructions<br />
regarding the leveling of the coach<br />
and room slide out operation.<br />
2. If your coach is equipped with a<br />
luggage compartment beneath the<br />
room that extends, make sure that<br />
the luggage compartment doors are<br />
closed so that they will not interfere<br />
with slide out operation.<br />
3. Make sure that there are no<br />
obstacles that could interfere with<br />
extention on the outside of the<br />
coach.<br />
4. Check to ensure that all safety travel<br />
straps / bars have been removed<br />
and that no obstructions exist<br />
between the inside wall flange and<br />
the inside wall of the coach.<br />
5. Park Brake must be set.<br />
If the slide out room is equipped with a<br />
couch or other furniture, make sure that<br />
the room is clear of people and pets<br />
during extension. Once the room has<br />
reached its maximum extension the<br />
room may be occupied once again.<br />
Prior to retracting the room take a<br />
moment to insure the following:<br />
1. See coach manufacturer instructions<br />
regarding the leveling of the coach<br />
and room slide out operation.<br />
2. Make sure that there are no<br />
obstacles that could interfere with<br />
retraction on the inside of the coach.<br />
3. Check the outside of the coach to<br />
make sure that no obstacles exist<br />
between the outer wall flange and<br />
the outside side wall of the coach.<br />
4. If the slide out room is equipped with<br />
a couch or other furniture, make sure<br />
that the room is clear of people and<br />
pets during retraction. Once the<br />
room has reached its maximum<br />
extension / retraction the room may<br />
be occupied once again.<br />
5. Park Brake must be set.
Page 2<br />
DigiSync <strong>Service</strong> <strong>Training</strong><br />
Trouble Shooting:<br />
Retracting the Room<br />
In the event there is an error detected on<br />
your DigiSync Room Slide System, the<br />
left LED on the control panel will blink an<br />
error code (See Error Codes for details).<br />
To retract the room after an error is<br />
detected you can override the<br />
synchronization programming and<br />
operate the room in the Manual Mode.<br />
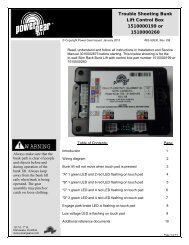
Manual Mode<br />
Manual Mode permits the operator to<br />
individually move the two room arms by<br />
pressing the IN and OUT buttons on the<br />
control pad. This mode can be used<br />
only if there is not a motor failure. To<br />
override the encoder and enter the<br />
Manual Mode, press and hold the<br />
SERVICE button until the two LEDs begin<br />
to flash. See Figure 1 for location of the<br />
SERVICE button.<br />
While in the Manual Mode each of the<br />
two, room slide arms are activated by<br />
pressing and holding the IN and OUT<br />
buttons. One button will retract the front<br />
arm. The other will retract the back arm.<br />
Both IN and OUT buttons may be held<br />
down at the same time to simultaneously<br />
activate both arms to retract the room.<br />
If one side of the room gets ahead of the<br />
other, release that button until the other<br />
arm catches up. The current limiting<br />
feature of the control still functions in the<br />
Manual Mode so each side can be fully<br />
retracted until it stops.<br />
Once the room has been retracted the<br />
control will return to the automatic mode<br />
after 60 seconds. You can manually return<br />
to automatic mode by pressing the<br />
SERVICE button.<br />
Trouble Shooting:<br />
Extending the Room<br />
If the red Park Brake LED is flashing while<br />
attempting to extend the room, set the<br />
vehicle’s parking brake.<br />
In the event there is a system failure while<br />
extending the room you must use the<br />
Crank Mode described on first page.<br />
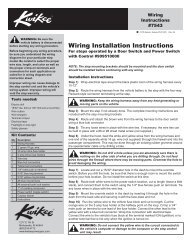
Figure 1<br />
ROOM SLIDEOUT<br />
IN<br />
out<br />
PARK BRAKE<br />
<strong>Service</strong> Button: Access using ballpoint pen,<br />
toothpick, etc.<br />
Note: On earlier versions of the control panel<br />
the 'STOP' button functions as the <strong>Service</strong><br />
Button.<br />
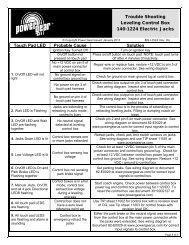
Error Codes<br />
DigiSync is equipped with onboard<br />
diagnostics capabilities. In the event of a<br />
system failure the left LED on the<br />
control panel will blink to display several<br />
possible error codes. An error code will<br />
not be displayed unless one of the<br />
control panel buttons has been pressed.<br />
For example, control panel will not<br />
display error code for low battery<br />
voltage unless you are trying to extend<br />
or retract the room when low voltage is<br />
present.<br />
When an error is detected the left led will<br />
begin to flash. The error code can be<br />
determined by counting the number of<br />
flashes in between each pause. See the<br />
Onboard Diagnostics Key below for<br />
details. The error code may be cleared<br />
at any time by pressing the SERVICE<br />
button or by allowing the system to time<br />
out after 60 seconds. Once cleared, the<br />
operation can be tried again. If the error<br />
code apears again, see Manual Mode<br />
and/or Crank Mode sections.<br />
# of Descriptions of<br />
Flashes Problem<br />
1 Unit Timed out (ran for 90 sec<br />
without reaching end of stroke)<br />
3 Battery Voltage
Page 3<br />
DigiSync <strong>Service</strong> <strong>Training</strong><br />
Slide Arm<br />
Synchronization<br />
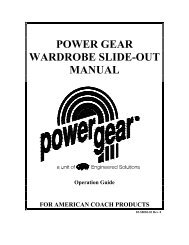
DigiSync uses an electronic timing<br />
system to synchronize two slide arms. As<br />
arms extend, encoders send pulses from<br />
both arms to the control. The control<br />
counts the pulses and continually looks<br />
for differences between the front and rear<br />
arm. If the difference reaches a preset<br />
limit, the power to the faster arm is<br />
momentarily shut down until the slower<br />
arm catches up. Then the power is<br />
reapplied.<br />
DigiSync Motor,<br />
Linear Actuator,<br />
KWIKEE P/N 1820106<br />
FRONT<br />
ARM<br />
REAR<br />
ARM<br />
Front arm stops. Front arm<br />
Rear arm continues starts again.<br />
to run. Both arms now running.<br />
BOM FOR REFERENCE ONLY<br />
BILL OF MATERIAL<br />
Part # Description QTY UofM Weight<br />
1820106 MOTOR, LINEAR ACTUATOR 1 EA 14.65<br />
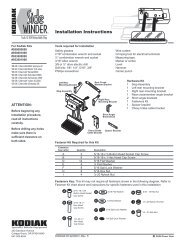
Current Limit Sensors<br />
DigiSync uses current limit sensors on<br />
each arm to detect the end of travel at<br />
the 'in/out' stops built into the tube. The<br />
sensors can also detect a jam in the<br />
system through an over current situation.<br />
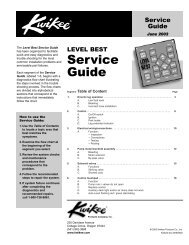
DigiSync Encoder Assembly,<br />
available in kit form only,<br />
KWIKEE P/N 7200055<br />
1<br />
4<br />
Usually one arm will make contact<br />
slightly ahead of the other due to rooms<br />
being slightly out of square, stops not<br />
perfectly set, or one arm lagging the<br />
other within the preset limit. When the<br />
first arm makes contact and the current<br />
limit is reached the second arm is<br />
allowed to travel 1/2" beyond its current<br />
position. It should make contact with the<br />
stop before the excess travel limit is<br />
reached and current limit. If this happens<br />
the control shuts down and the green<br />
LED on the operating panel goes out.<br />
If the arm does not stop before the<br />
preset limit, the green LED on the<br />
operating panel will flash an error code.<br />
Count the flashes to determine the error<br />
code (see previous page.) During the<br />
initial setup this is generally caused by<br />
the stops being set improperly or the<br />
encoders not being zeroed at the full<br />
retract position.<br />
3<br />
BILL OF MATERIAL<br />
Index Part # Description QTY UofM Weight<br />
1 1612526 PLASTIC, ENCODER HOUSING 1 EA 0.04<br />
2 1612527 PLASTIC ENCODER HOUSING BASE 1 EA 0.05<br />
3 1801125 ASSY ENCODER SWITCH 1 EA 0.02<br />
4 ASSY_ENCODER_B ASSY, ENCODER VANE 1 EA 0.12<br />
Total Weight 54.6<br />
BOM FOR REFERENCE ONLY<br />
2<br />
First arm<br />
current limits<br />
Second arm<br />
current limits<br />
Maximum overtravel<br />
Kwikee Products Company, Inc.<br />
230 Davidson Avenue<br />
Cottage Grove, Oregon 97424-9545<br />
(541) 942-3888<br />
www.kwikee.com