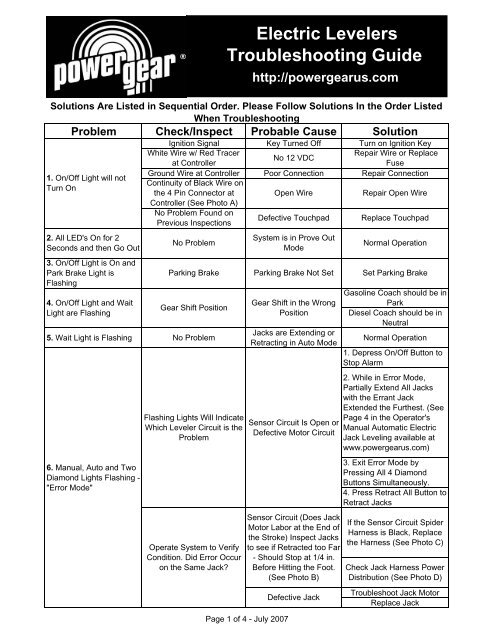
Electric Levelers Troubleshooting Guide - Power Gear
Electric Levelers Troubleshooting Guide - Power Gear
Electric Levelers Troubleshooting Guide - Power Gear

You also want an ePaper? Increase the reach of your titles
YUMPU automatically turns print PDFs into web optimized ePapers that Google loves.
Solutions Are Listed in Sequential Order. Please Follow Solutions In the Order Listed<br />
When <strong>Troubleshooting</strong><br />
Problem Check/Inspect Probable Cause Solution<br />
1. On/Off Light will not<br />
Turn On<br />
2. All LED's On for 2<br />
Seconds and then Go Out<br />
3. On/Off Light is On and<br />
Park Brake Light is<br />
Flashing<br />
4. On/Off Light and Wait<br />
Light are Flashing<br />
Ignition Signal Key Turned Off Turn on Ignition Key<br />
White Wire w/ Red Tracer<br />
Repair Wire or Replace<br />
No 12 VDC<br />
at Controller<br />
Fuse<br />
Ground Wire at Controller Poor Connection Repair Connection<br />
Continuity of Black Wire on<br />
the 4 Pin Connector at Open Wire<br />
Repair Open Wire<br />
Controller (See Photo A)<br />
No Problem Found on<br />
Previous Inspections<br />
Defective Touchpad Replace Touchpad<br />
No Problem<br />
Parking Brake<br />
<strong>Gear</strong> Shift Position<br />
5. Wait Light is Flashing No Problem<br />
6. Manual, Auto and Two<br />
Diamond Lights Flashing -<br />
"Error Mode"<br />
Flashing Lights Will Indicate<br />
Which Leveler Circuit is the<br />
Problem<br />
Operate System to Verify<br />
Condition. Did Error Occur<br />
on the Same Jack?<br />
<strong>Electric</strong> <strong>Levelers</strong><br />
<strong>Troubleshooting</strong> <strong>Guide</strong><br />
Page 1 of 4 - July 2007<br />
http://powergearus.com<br />
System is in Prove Out<br />
Mode<br />
Parking Brake Not Set<br />
<strong>Gear</strong> Shift in the Wrong<br />
Position<br />
Jacks are Extending or<br />
Retracting in Auto Mode<br />
Sensor Circuit Is Open or<br />
Defective Motor Circuit<br />
Sensor Circuit (Does Jack<br />
Motor Labor at the End of<br />
the Stroke) Inspect Jacks<br />
to see if Retracted too Far<br />
- Should Stop at 1/4 in.<br />
Before Hitting the Foot.<br />
(See Photo B)<br />
Defective Jack<br />
Normal Operation<br />
Set Parking Brake<br />
Gasoline Coach should be in<br />
Park<br />
Diesel Coach should be in<br />
Neutral<br />
Normal Operation<br />
1. Depress On/Off Button to<br />
Stop Alarm<br />
2. While in Error Mode,<br />
Partially Extend All Jacks<br />
with the Errant Jack<br />
Extended the Furthest. (See<br />
Page 4 in the Operator's<br />
Manual Automatic <strong>Electric</strong><br />
Jack Leveling available at<br />
www.powergearus.com)<br />
3. Exit Error Mode by<br />
Pressing All 4 Diamond<br />
Buttons Simultaneously.<br />
4. Press Retract All Button to<br />
Retract Jacks<br />
If the Sensor Circuit Spider<br />
Harness is Black, Replace<br />
the Harness (See Photo C)<br />
Check Jack Harness <strong>Power</strong><br />
Distribution (See Photo D)<br />
Troubleshoot Jack Motor<br />
Replace Jack
Problem Check/Inspect Probable Cause Solution<br />
6A. <strong>Troubleshooting</strong> Jack<br />
Motor<br />
6B. Manual, Auto and<br />
Two Diamond Lights<br />
Flashing - "Error Mode"<br />
6C. Manual, Auto and<br />
Two Diamond Lights<br />
Flashing - "Error Mode"<br />
7. Low Voltage LED is ON<br />
8. On/Off LED is On, No<br />
other Response<br />
9. All Touchpad LED's are<br />
Flashing and an Audible<br />
Beeper.<br />
10. <strong>Levelers</strong> will not<br />
Extend, Stall in Cold<br />
Weather or Will Not<br />
Retract<br />
11. System will Operate in<br />
Manual or Auto Mode, but<br />
will not Achieve Level<br />
Is the Motor Getting 12<br />
VDC<br />
Unplug Harness From Jack<br />
Motor and Supply 12 VDC<br />
and Ground to the Two<br />
Wires (See Photo F)<br />
Did Error Occur on a<br />
Different Jack?<br />
Did No Error Occur?<br />
Battery Condition<br />
Check for 12 VDC at the<br />
Controller Positive Terminal<br />
Park Brake<br />
Transmission has been<br />
Shifted out of Park or<br />
Neutral<br />
Controller Revision<br />
Front, Left, Right, Rear and<br />
Center <strong>Power</strong> <strong>Gear</strong> Logo<br />
LED's are Flashing<br />
<strong>Electric</strong> <strong>Levelers</strong><br />
<strong>Troubleshooting</strong> <strong>Guide</strong><br />
Page 2 of 4 - July 2007<br />
http://powergearus.com<br />
Harness not Supplying 12<br />
VDC or Jack Motor Not<br />
Responding<br />
Defective Controller,<br />
Defective Motor <strong>Power</strong><br />
Distribution Harness,<br />
Defective Motor, or<br />
Defective Jack<br />
Sensor Circuit Spider<br />
Harness (See Photo C)<br />
Sensor Circuit Spider<br />
Harness (See Photo G)<br />
Unknown<br />
Low Batteries<br />
No 12 VDC<br />
System is in the<br />
Emergency Auto Retract<br />
Mode<br />
Early Controllers Would<br />
Not Show Error Mode -<br />
Controller Revision is<br />
Earlier than OG<br />
Excessive Slope Mode<br />
If 12 VDC is Being Supplied<br />
and Motor Not Running,<br />
Replace the Motor<br />
If No, Check Continuity on<br />
the Communication Harness<br />
(See Photo E)<br />
If Motor Turns, Replace<br />
Controller<br />
If Motor Does not Turn,<br />
Replace the Motor<br />
If Motor Turns, but Jack<br />
does not Extend, Replace<br />
the Jack.<br />
If the Sensor Circuit Spider<br />
Harness is Black, Replace<br />
the Harness<br />
Verify that the Sensor Circuit<br />
Spider Harness is<br />
Connected Correctly to the<br />
Controller. (RR, RF, LR, LF)<br />
(See Photo H)<br />
Check All Connections<br />
Cycle Jacks Several Times<br />
to Verify the Jacks Work<br />
Properly<br />
Recharge Batteries and Start<br />
Engine<br />
Reset 100 amp. In-Line<br />
Breaker<br />
Re-engage Park Brake<br />
Shift Back into Park or<br />
Neutral<br />
Replace Controller with an<br />
OG or Newer Revision - See<br />
Fleetwood Service Bulletin<br />
SBA 0271. After Replacing<br />
Controller, System May Go<br />
Into Error Mode (Refer to 6<br />
through 6C)<br />
Move Coach to a Different<br />
Location
4 Pin Harness<br />
Black Wire<br />
Photo A<br />
Retracted Correctly -<br />
1/8" to 1/4" Above Weld<br />
Photo B<br />
Retracted too Far - Tight<br />
Against Bottom Weld<br />
Black Sensor Circuit<br />
Spider Wire<br />
Photo C Photo D Red & Black<br />
Wires Between<br />
Motor and<br />
Controller<br />
Page 3 of 4 - July 2007
Photo E<br />
Photo F<br />
Supply<br />
12 VDC and<br />
Ground<br />
Make Sure Connected to<br />
Controller Correctly<br />
Photo G<br />
Photo H<br />
Page 4 of 4 - July 2007