Standard DigiSync Error Codes - Power Gear
Standard DigiSync Error Codes - Power Gear
Standard DigiSync Error Codes - Power Gear

You also want an ePaper? Increase the reach of your titles
YUMPU automatically turns print PDFs into web optimized ePapers that Google loves.
ONE COMPANY<br />
MANY SOLUTIONS<br />
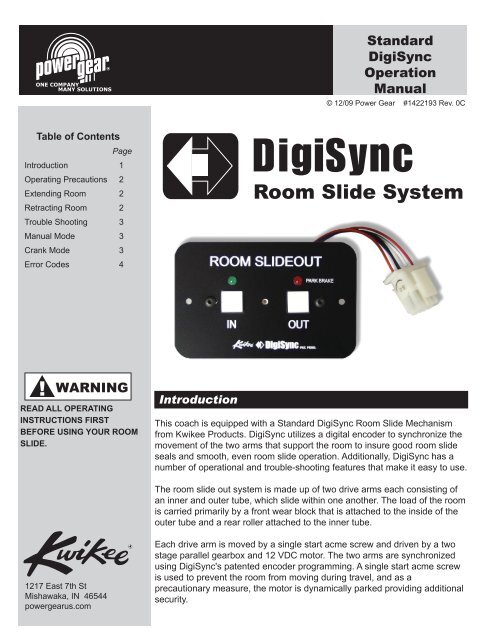
<strong>Standard</strong><br />
<strong>DigiSync</strong><br />
Operation<br />
Manual<br />
© 12/09 <strong>Power</strong> <strong>Gear</strong> #1422193 Rev. 0C<br />
Table of Contents<br />
Page<br />
Introduction 1<br />
Operating Precautions 2<br />
Extending Room 2<br />
Retracting Room 2<br />
Trouble Shooting 3<br />
Manual Mode 3<br />
Crank Mode 3<br />
<strong>Error</strong> <strong>Codes</strong> 4<br />
<strong>DigiSync</strong><br />
Room Slide System<br />
!<br />
WARNING<br />
READ ALL OPERATING<br />
INSTRUCTIONS FIRST<br />
BEFORE USING YOUR ROOM<br />
SLIDE.<br />
Introduction<br />
This coach is equipped with a <strong>Standard</strong> <strong>DigiSync</strong> Room Slide Mechanism<br />
from Kwikee Products. <strong>DigiSync</strong> utilizes a digital encoder to synchronize the<br />
movement of the two arms that support the room to insure good room slide<br />
seals and smooth, even room slide operation. Additionally, <strong>DigiSync</strong> has a<br />
number of operational and trouble-shooting features that make it easy to use.<br />
The room slide out system is made up of two drive arms each consisting of<br />
an inner and outer tube, which slide within one another. The load of the room<br />
is carried primarily by a front wear block that is attached to the inside of the<br />
outer tube and a rear roller attached to the inner tube.<br />
1217 East 7th St<br />
Mishawaka, IN 46544<br />
powergearus.com<br />
Each drive arm is moved by a single start acme screw and driven by a two<br />
stage parallel gearbox and 12 VDC motor. The two arms are synchronized<br />
using <strong>DigiSync</strong>'s patented encoder programming. A single start acme screw<br />
is used to prevent the room from moving during travel, and as a<br />
precautionary measure, the motor is dynamically parked providing additional<br />
security.
Operating Your Room Slide<br />
<strong>DigiSync</strong><br />
!<br />
WARNING<br />
Prior to extending the room, take a moment to insure the following:<br />
1. Follow the coach manufacturer instructions regarding the leveling of the coach<br />
and room slide out operation.<br />
2. If your coach is equipped with a luggage compartment beneath the room that<br />
extends, make sure that the luggage compartment doors are closed so that they<br />
will not interfere with slide out operation.<br />
3. Check both inside and outside of the vehicle to make sure that there are no<br />
people who could be harmed or obstacles that could cause damage due to room<br />
extension or retraction.<br />
4. Check to ensure that all safety travel straps / bars have been removed and that<br />
no obstructions exist between the inside wall flange and the inside wall of the<br />
coach.<br />
5. Park brake must be set.<br />
If the slide out room is equipped with a couch or other furniture, make sure that the<br />
room is clear of people and pets during extension. Once the room has reached its<br />
maximum extension the room may be occupied again.<br />
Prior to retracting the room, take a moment to insure the following:<br />
1. Follow the coach manufacturer instructions regarding the leveling of the coach<br />
and room slide out operation.<br />
2. Check both inside and outside of the vehicle to make sure that there are no<br />
people who could be harmed or obstacles that could cause damage due to room<br />
extension or retraction.<br />
3. If the slide out room is equipped with a couch or other furniture, make sure that<br />
the room is clear of people and pets during retraction. Once the room has<br />
completely retracted, it may be occupied again.<br />
4. Park Brake must be set.<br />
Extending Your Slide Out Room<br />
See Operating Safety Precautions Above Before Proceeding.<br />
To extend the room slide, simply press and hold the "OUT" button. To stop the room<br />
during operation, release the button. Once the room has reached its full extension it<br />
will stop automatically. The extend button will not function again until the retract<br />
button has been pressed.<br />
Retracting Your Slide Out Room<br />
See Operating Safety Precautions Above Before Proceeding.<br />
To retract the room simply press and hold the "IN" button. To stop the room during<br />
operation, release the button. Once the room has completely retracted it will stop<br />
automatically. The retract button will not function again until the extend button has<br />
been pressed.
<strong>DigiSync</strong><br />
Note:<br />
Manual Mode and<br />
corresponding Actuator 1<br />
& 2 locations:<br />
Rear Actuator:<br />
Retract / In Button<br />
Front Actuator:<br />
Extend / Out<br />
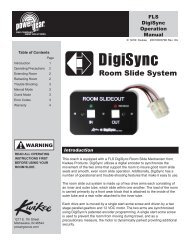
Figure 1<br />
ROOM SLIDEOUT<br />
IN<br />
<br />
Troubleshooting<br />
PARK BRAKE<br />
OUT<br />
<strong>DigiSync</strong><br />
Service Button<br />
Access using ballpoint pen, toothpick, etc.<br />
Extending Your Slide Out Room<br />
If the red Park Brake LED is flashing while attempting to extend the room, set the<br />
vehicles's parking brake.<br />
In the event there is a system failure while extending the room, you must use the<br />
Crank Mode described below.<br />
Retracting Your Slide Out Room<br />
In the event there is an error detected on you <strong>DigiSync</strong> Room slide System, the left<br />
LED light on the control panel will blink an error code (See On Board diagnostics for<br />
Details). To retract the room after an error is detected you can override the<br />
synchronization programming and operate the room in the Manual Mode.<br />
Manual Mode<br />
Manual mode permits the operator to individually move the two room arms by<br />
pressing the IN and OUT buttons on the control pad. This mode can be used only if<br />
there is not a motor failure.<br />
To override the encoder and enter the Manual Mode,<br />
press and hold the Service Button (see figure 1) until<br />
the two LEDs begin to flash.<br />
While in Manual Mode each of the two room slide<br />
arms are activated by pressing and holding the IN<br />
and OUT buttons. One button will retract the front<br />
arm. The other will retract the back arm. Both IN and<br />
OUT buttons may be held down at the same time to<br />
simultaneously activate both arms to retract the<br />
room. If one side of the room gets ahead of the other,<br />
release that button until the other arm catches up.<br />
The current limiting feature of the control still<br />
functions in the Manual Mode so each side can be<br />
fully retracted until it stops.<br />
Once the room has been retracted the control will<br />
return to the automatic mode after 60 seconds. You<br />
can manually return to automatic mode by pressing<br />
the service button.<br />
!<br />
NOTICE<br />
Improper use of the crank<br />
handle can result in<br />
damage to your slideout<br />
system. Crank mode<br />
should only be used to<br />
retract your slideout in the<br />
event of a system failure.<br />
Crank Mode<br />
In the event of a total system failure, two crank handles may be used to retract<br />
the room.<br />
To use the crank handles, either open the luggage compartment doors, or remove<br />
the cover on units without StoreMore, exposing the front of each room slide<br />
mechanism. Insert the crank handle into the tube and align the drive pin at the rear<br />
of the tube with the notches in the crank handle. It may be necessary to move the<br />
handle slightly from side to side. The crank handle will only move the tube that it is<br />
inserted into. Consequently you will need to alternate between each crank handle<br />
on each side to move the room in. If help is available, a second person cranking on<br />
the other handle simultaneously will greatly speed up the process.
<strong>Error</strong> <strong>Codes</strong><br />
<strong>DigiSync</strong><br />
<strong>DigiSync</strong> is equipped with onboard diagnostic capabilities. In the event of a<br />
system failure, the left LED light on the control panel will blink to display<br />
several possible error codes. An error code will not be displayed unless one<br />
of the control panel buttons has been pressed. For example, the control<br />
panel will not display an error code for low voltage unless you try to extend or<br />
retract the room when low voltage is present.<br />
When an error code is detected the left LED will begin to flash. The error<br />
code can be determined by counting the number of flashes in between each<br />
pause. See the Diagnostic Keys in the charts below. The error code may be<br />
cleared at any time by pressing the SERVICE button (see figure 1), or by<br />
allowing the system to time out after 60 seconds. Once cleared, the<br />
operation can be tried again, see Manual Mode and/or Crank Mode.<br />
<strong>Standard</strong> <strong>DigiSync</strong> <strong>Error</strong> <strong>Codes</strong><br />
1 Unit timed out (ran for 90 seconds<br />
without reaching end of stroke.<br />
3. Battery Voltage less then 10 volts<br />
(detected when move requested)<br />
4. Battery Voltage less than 8 volts<br />
(detected during move.<br />
5. Battery Voltage greater than 18<br />
volts (detected when move requested)<br />
6. Stall on Rear Actuator only<br />
7. Stall on Front Actuator only<br />
8. Short Detect on Rear Motor<br />
9. Short Detect on Front Motor<br />
10. No Current Detect on Rear Motor<br />
11. No Current Detect on Front Motor<br />
12. No Encoder Signal detected on Rear<br />
Actuator<br />
13. No Encoder Signal detected on Front<br />
Actuator<br />
14. Rear Actuator did not resync with<br />
Front Actuator within 5 seconds<br />
15. Front Actuator did not resync with<br />
Rear Actuator within 5 seconds
<strong>Power</strong> <strong>Gear</strong> Limited Warranty<br />
<strong>Power</strong> <strong>Gear</strong> Limited Warranty Policy<br />
(original equipment)<br />
<strong>DigiSync</strong><br />
<strong>Power</strong> <strong>Gear</strong> warrants its manufacturer installed <strong>Power</strong> <strong>Gear</strong> and Kwikee brand products to be free of<br />
material and workmanship defects for two (2) years from the date of the original sale of the motor vehicle<br />
in which they are installed, provided that these products are installed and operated according to the<br />
purpose for which they were intended, designed and specified. This warranty does not cover product that<br />
is incorrectly installed, or upon examination has been misused or abused by the vehicle owner.<br />
Warranty coverage includes:<br />
· Repair or replacement of the defective component(s) of the malfunctioning system. Entire<br />
systems are not replaced unless either the faulty component is not replaceable or all<br />
components comprising the system are defective.<br />
· Labor costs for the diagnosis and repair work associated with the repair or replacement of the<br />
defective component(s) by a licensed servicing center.<br />
This warranty does not include payment or reimbursement of:<br />
· Normal system maintenance and preventive maintenance.<br />
· Mobile service or towing expenses related to field repairs and/or the transportation of the vehicle<br />
to a repair facility.<br />
· Living or travel related expenses incurred in the repair of the vehicle.<br />
By filing a warranty claim in accordance with <strong>Power</strong> <strong>Gear</strong>’s Warranty Administration Procedure, service<br />
providers agree that the replacement part(s) will be provided to the vehicle owner at no cost and that the<br />
total labor charges for the completion of warranty repairs will be billed to <strong>Power</strong> <strong>Gear</strong>. Accordingly, under<br />
no circumstances will <strong>Power</strong> <strong>Gear</strong> reimburse the vehicle owner directly for costs covered under this<br />
warranty policy.<br />
Warranty coverage runs concurrently with any vehicle warranty period provided by the manufacturer, and<br />
is transferable to subsequent owners. Proof of original date of purchase of vehicle, and if applicable<br />
subsequent owner’s proof of purchase, is required to confirm coverage.<br />
<strong>Power</strong> <strong>Gear</strong> reserves the right to change the terms of our warranty policy at any time. For the most<br />
current information on product warranty and our warranty claim procedure, visit our website at<br />
www.powergearus.com.<br />
1217 East 7th St<br />
Mishawaka, IN 46544