
Create successful ePaper yourself
Turn your PDF publications into a flip-book with our unique Google optimized e-Paper software.
Step 5:<br />
Connect and pin the eight (8) 10’6” Braces to the 40x Hip<br />
Intermediate Fitting.<br />
Step 6:<br />
Start at one corner of the tent and begin to connect and<br />
pin the perimeter pipes. <strong>Install</strong> the corner fitting on the end<br />
of the 14’4” hip rafter and slide on the perimeter pipe.<br />
Once both pipes are on the fitting, line up hole and install<br />
the pins. Continue around the tent connecting and pinning<br />
the perimeter pipes, corner fittings, side tee fittings and<br />
special side tee fittings. <strong>Install</strong> the 40’ cable across from<br />
the special side tee to the opposite special side tee across<br />
the tent. The cable should be looped over the perimeter<br />
arm of the fitting and will keep the tent from bowing outward<br />
past the 40’ width.<br />
Step 7:<br />
Lay down a drop cloth to unfold the tent top on one end of<br />
the tent. Make sure to inspect the tent top for cleanliness at<br />
this time as it becomes next to impossible to clean the<br />
exterior of the tent once the top is installed. Unfold the tent<br />
top and pull it over the frame shiny side up. The buckles<br />
should be on the underside of the tent top.<br />
**Dragging the top fabric on the ground, or pulling hard<br />
over frame parts can damage, tear, and scratch the fabric.<br />
Be careful with your fabric.<br />
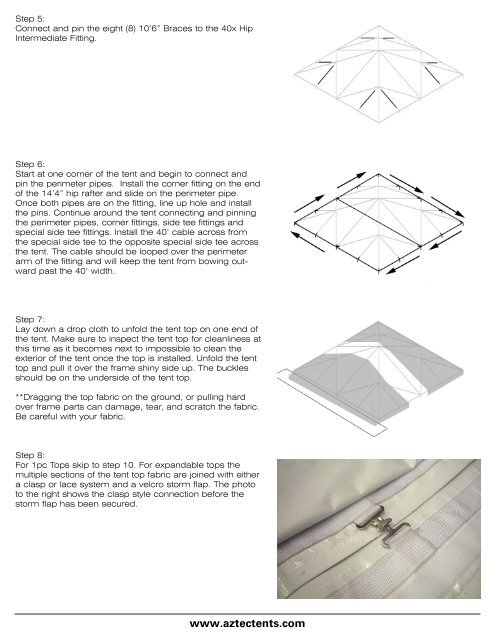
Step 8:<br />
For 1pc Tops skip to step 10. For expandable tops the<br />
multiple sections of the tent top fabric are joined with either<br />
a clasp or lace system and a velcro storm flap. The photo<br />
to the right shows the clasp style connection before the<br />
storm flap has been secured.<br />
www.aztectents.com