Download the specification - qdis
Download the specification - qdis
Download the specification - qdis

You also want an ePaper? Increase the reach of your titles
YUMPU automatically turns print PDFs into web optimized ePapers that Google loves.
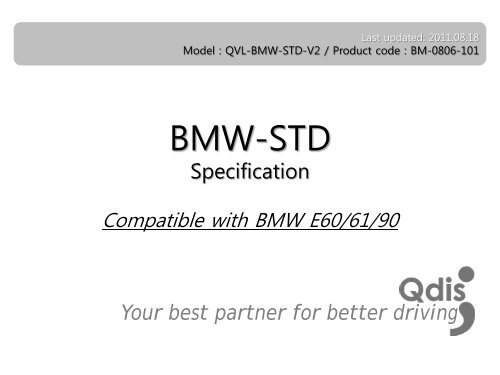
Last updated: 2011.08.18<br />
Model : QVL-BMW-STD-V2 / Product code : BM-0806-101<br />
BMW-STD<br />
Specification<br />
Compatible with BMW E60/61/90<br />
Your best partner for better driving
Contents<br />
1. Before installation<br />
1.1 Main <strong>specification</strong><br />
1.2 Features<br />
1.3 System diagram<br />
1.4 Components<br />
1.5 Exterior<br />
1.6 POWER cable<br />
2. Setup<br />
2.1 DIP switch<br />
2.2 Factory mode<br />
2.3 Keypad usage<br />
2.4 Parking guide line<br />
2.5 OSD (on screen display)<br />
2.6 BMW Handle button NAVI setting<br />
2.7 FMTX Frequency Setting<br />
3. Troubleshooting 18<br />
www.<strong>qdis</strong>.co.kr 2<br />
3<br />
4<br />
5<br />
6<br />
7<br />
8<br />
9<br />
11<br />
13<br />
14<br />
15<br />
16<br />
17
1.1 Main <strong>specification</strong><br />
1. Input Spec. (MULTI VIDEO INTERFACE)<br />
-. 1 x Analog R,G,B (Sync on Green)<br />
-. 1 x CVBS(REAR CAMERA) Input. (Rear camera source)<br />
- 3 x A/V (NTST & PAL) Input.<br />
-. 1 x LCD Input (Car system Input)<br />
2. Output Spec.<br />
-. 2 X CVBS OUTPUT (Video Out for installing Headrest monitor)<br />
-. 1 x Audio OUTPUT<br />
-. 1 X LCD OUTPUT(LCD Operation)<br />
3. Electric Power Consumption<br />
- Input Power : 8VDC ~ 24VDC<br />
- Consumption Power : 12WATT, Max<br />
4. Switching Mode (AV source)<br />
- Possible to skip AV source while switching Mode (AV source) by DIP S/W<br />
(Refer to <strong>the</strong> DIP S/W page)<br />
- By ‘SET’ button of <strong>the</strong> OSD Keypad<br />
- By Toggle Switch (Option)<br />
- By ‘Menu’ button of <strong>the</strong> car through CAN<br />
www.<strong>qdis</strong>.co.kr 3
1.2 Features<br />
- FMTX Module is added in <strong>the</strong> product. (No need additional FMTX<br />
Module for Audio)<br />
- Offering OSD Key Pad<br />
(The remote control is not offered anymore)<br />
- Possible to move <strong>the</strong> displayed position of Navi (Only on RGB mode)<br />
- Changed OSD MENU<br />
www.<strong>qdis</strong>.co.kr 4
1.3 System diagram<br />
NAVIGATION Input<br />
(Analog RGB)<br />
A/V 1<br />
A/V 2<br />
A/V 3<br />
CVBS IN<br />
(Rear camera)<br />
Car Screen Input<br />
(CAR MAIN BOARD)<br />
OSD Keypad Switch for source toggle<br />
VIDEO<br />
CIRCUIT<br />
POWER<br />
CIRCUIT<br />
Power Input<br />
(+8VDC ~ +24VDC)<br />
MCU<br />
VIDEO MUX<br />
Dip S/W<br />
DISPLAY<br />
A/V OUT<br />
OEM Navi Button (Can Intrface)<br />
Car Installation<br />
OEM LCD<br />
HEADREST<br />
MONITOR<br />
www.<strong>qdis</strong>.co.kr 5<br />
FMTX<br />
(Video out 2<br />
Audio L, R1)
1.4 Components<br />
IR cable (8P) * 1ea<br />
Remote control * 1ea<br />
OR<br />
Ground cable * 1ea<br />
Keypad * 1ea<br />
MODE cable * 1ea LVDS cable(F-TYPE) * 1ea<br />
RGB cable * 1ea<br />
AV cable * 1ea<br />
CAN cable * 1ea<br />
POWER cable (6P) * 1ea<br />
www.<strong>qdis</strong>.co.kr 6
1.5 Exterior<br />
⑩<br />
⑨<br />
⑧<br />
① ② ③ ④ ⑤<br />
⑦<br />
⑥<br />
Dimension<br />
Horizontal length 147mm<br />
Vertical length 92mm<br />
Height 20mm<br />
① DIP switch<br />
② KEYPAD<br />
③ RGB(IN)<br />
④ A/V(IN/OUT)<br />
⑤ POWER<br />
⑥ CAN<br />
⑦ LCD-OUT<br />
⑧ LCD-IN<br />
⑨ MODE<br />
⑩ LED<br />
www.<strong>qdis</strong>.co.kr 7
1.6 POWER cable<br />
FILTER<br />
& FUSE BOX<br />
Gray<br />
Red<br />
Black<br />
Blue<br />
Orange<br />
파란색<br />
990mm<br />
990mm<br />
주황색<br />
검정색<br />
빨강색<br />
FMTX<br />
I - DRV<br />
GND<br />
ACC<br />
LAMP - RV<br />
www.<strong>qdis</strong>.co.kr 8<br />
회색
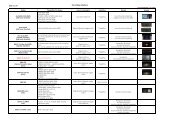
2.1.1 DIP switch<br />
※ ON : DOWN / OFF : UP<br />
PIN Function Dip S/W Selection<br />
1 RGB INPUT MUTE<br />
2 A/V 1 MUTE<br />
3 A/V 2 MUTE<br />
4 A/V 3 MUTE<br />
5 To select monitor size<br />
6<br />
Type of monitor<br />
(후면참조)<br />
7 Rear Mode<br />
ON : Skipping RGB Mode<br />
OFF : RGB Display<br />
ON : Skipping A/V 1<br />
OFF : A/V1 Display<br />
ON : Skipping A/V 2<br />
OFF : A/V2 Display<br />
ON : Skipping A/V 3<br />
OFF : A/V3 Display<br />
ON : 6.5” LCD Setting (Possible to use BMW 1 series)<br />
OFF : 8.8” LCD Setting<br />
ON : Siemens setting (only when to turn on <strong>the</strong> 5 th pin)<br />
OFF : Alpine setting (only when to turn on <strong>the</strong> 5 th pin)<br />
ON : Operation rear monitor for New 7 (only when to turn off <strong>the</strong> 5 th pin)<br />
OFF : 8.8” Setting<br />
ON : External Rear Camera<br />
OFF : OEM Rear Camera<br />
8 N.C<br />
www.<strong>qdis</strong>.co.kr 9
2.1.2 DIP switch<br />
Type of monitor<br />
#PIN<br />
5 6<br />
E60 8.8” OFF OFF<br />
E60 Alpine 6.5” ON OFF<br />
E60 Siemens 6.5” ON ON<br />
E60 Armrest 6.5” OFF ON<br />
※DIP S/W Use Example<br />
[BMW E60-6.5” Alpine]<br />
-. Use Input Mode : A/V3(DVD), Navigation (RGB)<br />
-. Rear Camera : When to be installed on CVBS 4<br />
▷ DIP S/W : 1 � OFF<br />
▷ DIP S/W : 2,3 � ON<br />
(INPUT MODE SKIP)<br />
▷ DIP S/W : 4 � OFF (enable A/V3)<br />
▷ DIP S/W : 5 � ON (6.5” Alpine)<br />
▷ DIP S/W : 6 � OFF<br />
▷ DIP S/W : 7 � ON (enable CVBS4)<br />
▷ DIP S/W : 8 � OFF<br />
[E60 8.8”]<br />
[E60 Alpine 6.5”]<br />
[E60 Siemens 6.5”]<br />
[E65 Armrest 6.5”]<br />
www.<strong>qdis</strong>.co.kr 10
2.2.1 FACTORY mode<br />
FACTORY mode : Operated with pressing UP->DOWN->UP->MENU keys of <strong>the</strong> keypad in sequent.<br />
POSITION<br />
– H-POSITION : moving in horizontal<br />
direction<br />
- V-POSITION : moving in vertical<br />
direction<br />
BUTTON<br />
– FRONT – E60 : Set up for mode<br />
change via menu buttons of front<br />
when to install on E60 front monitor.<br />
- ARMREST – E65 : Set up for mode<br />
change via menu buttons of armrest<br />
monitor when to install on E65<br />
armrest monitor.<br />
www.<strong>qdis</strong>.co.kr 11<br />
I-DRV<br />
–To control DVD, Navi by I-DRV<br />
(Optional)<br />
Refer to <strong>the</strong> “BMW Handle button<br />
NAVI setting” page.
2.2.2 FACTORY mode<br />
FACTORY mode : Operated with pressing UP->DOWN->UP->MENU keys of <strong>the</strong> keypad in sequent.<br />
FM-TX<br />
- FM-TX USE : Set up for FMTX<br />
- FREQUENCY : FMTX Frequency<br />
Setting. (Refer to <strong>the</strong> next ‘FMTX<br />
frequency setting’ page)<br />
MODEL<br />
- For E60 : When to install on E60<br />
(This is initially set)<br />
- For E70 : When to install on E70<br />
(Not available at present)<br />
REAR-CAM<br />
-By Rear Wire : When to install Back-up<br />
Cam by rear wire of power cable (Same<br />
with previous version)<br />
- By CAN-BUS : When to install Back-up<br />
Cam by CAN wiring. In this case, when<br />
<strong>the</strong> car is in reverse, <strong>the</strong> CAM is<br />
detected automatically.<br />
www.<strong>qdis</strong>.co.kr 12
2.3 Keypad usage<br />
Select one between <strong>the</strong> remote controller and <strong>the</strong> keypad<br />
FACTORY MODE (Interface setting) :<br />
Press <strong>the</strong>se buttons on OSD keypad in <strong>the</strong> following sequence; UP→DOWN→UP →MENU<br />
Key Function<br />
MENU/EXIT Activating OSD menu and Getting back to <strong>the</strong> previous state after setting mode<br />
SEL/INPUT Making a selection and hanging modes<br />
UP<br />
DOWN<br />
Moving leftward or upward (If you press this button 2 seconds long, you can get access<br />
to HOT KEY function.)<br />
Moving rightward or downward (IF you press this button 2 seconds long, you can reset<br />
all data.)<br />
www.<strong>qdis</strong>.co.kr 13
2.4 Parking guide line<br />
Factory Default : DISPLAY - DISABLE<br />
① When <strong>the</strong> car is in reverse, if<br />
press ‘UP’ key for 2 sec, <strong>the</strong><br />
guide line appears on <strong>the</strong> screen.<br />
② If you need to move <strong>the</strong> line<br />
position, press ‘SEL’ key on<br />
<strong>the</strong> above step.<br />
(Use ‘Up’, ‘Down’ Key of Keypad)<br />
③ On step no.2, once press “SEL”<br />
key again, you can move <strong>the</strong><br />
line vertically by “UP”, “Down”<br />
keys.<br />
www.<strong>qdis</strong>.co.kr 14
2.5 OSD (on screen display)<br />
Analog RGB Mode<br />
Analog RGB Mode<br />
Video mode<br />
Video mode<br />
COLOR<br />
-BRIGHTNESS<br />
-CONTRAST<br />
-RED<br />
-GREEN<br />
-BLUE<br />
-COLOR BOX : Selecting one<br />
among 3 color options<br />
-SATURATION<br />
-SHARPNESS<br />
OPTION<br />
-OSD H_POS<br />
: Move of OSD window to Left, Right<br />
-OSD V_POS<br />
: Move of OSD window to Up, Down<br />
- OSD TRANS<br />
: OSD window transparency setting<br />
- SCREEN MODE<br />
: Screen Rate setting (4:3, 16:9)<br />
- INITIAL : Initializing OSD setting<br />
value<br />
www.<strong>qdis</strong>.co.kr 15
2.6 BMW Handle Button NAVI setting<br />
Oversea<br />
Domestic<br />
After implementing FACTORY MODE<br />
(Interface setting), select I-DRV and press <strong>the</strong><br />
Sel button of Keypad, and <strong>the</strong>n Navi Setting<br />
window is displayed as shown right.<br />
After selecting <strong>the</strong> one among RGB, AV1~3,<br />
press <strong>the</strong> Sel button of keypad.<br />
(It is fine to select any channel, because <strong>the</strong><br />
selecting of RGB, AV1~3 is useless. But, <strong>the</strong><br />
channel selected on this step will be<br />
exempted on next channel selecting step.)<br />
※This function is not supported at domestic NAVI, but this setting is necessary for implementation of Domestic DMB.<br />
When <strong>the</strong> above steps is finished, <strong>the</strong><br />
window is displayed as shown left. ARION,<br />
NET-770, ML-100S, ML-740T are Domestic<br />
DMB model. Select <strong>the</strong> model you want to<br />
use, after that select <strong>the</strong> channel of RGB,<br />
AV1~3.<br />
(The channel selected on <strong>the</strong> above steps<br />
is exempted.)<br />
NET-770 (DMB model) is designated AV1<br />
as shown right.<br />
※When DVD-IR (Black) wire of RGB-IN cable is connected to IR input wire of DMB, able to operate via handle buttons.<br />
www.<strong>qdis</strong>.co.kr 16
2.7 FMTX Frequency Setting<br />
Factory Default : FMTX USE – ON, FREQENCY – 87.5MHz<br />
※If you do not want this function, should set “FM-TX USE” to “OFF”<br />
Get <strong>the</strong> Factory Mode Operated with pressing UP->DOWN-<br />
>UP->MENU keys of <strong>the</strong> keypad in sequent.<br />
Set “FM-TX USE” to “ON” as shown left. (‘ON’ is Default).<br />
Control <strong>the</strong> frequency by “UP”, “Down” keys.<br />
At <strong>the</strong> bottom, you can see present frequency and control it<br />
from 87.5MHZ to 108MHZ. (1MHZ per each time to press)<br />
www.<strong>qdis</strong>.co.kr 17
3. Troubleshooting<br />
Q. I can not switch A/V sources<br />
A. Check IR or Ground cable connection. Check LED lamps in <strong>the</strong> interface, if it is not on, check power cable.<br />
Q. All I got on <strong>the</strong> screen is black.<br />
A. Check second LED lamp of <strong>the</strong> interface is on, if not, check A/V sources connected are working well. (Second lamp indicates AV sources<br />
connected works well.) Check interface connection has been done well.<br />
Q. Displayed image color is not proper (too dim or not suitable color)<br />
A. Try to select “INITIAL” in OSD menu, if it does not work, inform to manufacturer.)<br />
Q. I can watch <strong>the</strong> rear camera on <strong>the</strong> screen<br />
A. Set <strong>the</strong> DIP switch #7 as state “ON”.<br />
Q. Unwanted A/V mode is displayed. (A/V source switching order : OEM->RGB->AV1->AV2->AV3)<br />
A. Check DIP Switch Setting.<br />
Q. OEM image is not displayed.<br />
A. Check interface’s LCD In/Out cable connection. If <strong>the</strong> status keeps on, inform to manufacturer.<br />
Q. Screen only displays white color.<br />
A. Check LCD out cable is connected well, if this status keeps, inform to manufacturer.<br />
Q. After setting PIP function, I got only half OEM image at <strong>the</strong> right in <strong>the</strong> screen.<br />
A. This is not an error, just caused by user’s setting mistake, user should set to<br />
“Split Screen” in <strong>the</strong> OEM menu.<br />
Q. Rear CAM does not appear, when car is in reverse after CAN wiring.<br />
A. Operate “FACTORY MODE” like left picture, <strong>the</strong>n select “UTIL � Rear Select” If it is set as “LAMP”, change it to “CAN” by remote or keypad.<br />
※ LAMP : In case of connecting “Rear-C” wire of Power Cable to Rear Lamp in vehicle.<br />
CAN : In case of detecting Rear Cam thru CAN signal. (CAN must be wired)<br />
Q. After moving gear to “P” or “D” from “Reverse”, I can’t get navigation, but half PDC Image in <strong>the</strong> screen.<br />
A. Once, you starts driving, <strong>the</strong> screen displays navigation right away, this is not an system error.<br />
www.<strong>qdis</strong>.co.kr 18