Download the specification - English Version - qdis
Download the specification - English Version - qdis
Download the specification - English Version - qdis

You also want an ePaper? Increase the reach of your titles
YUMPU automatically turns print PDFs into web optimized ePapers that Google loves.
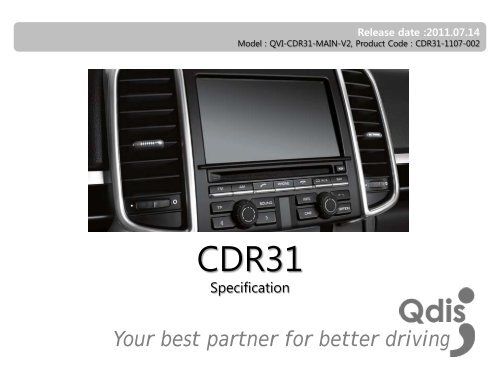
Release date :2011.07.14<br />
Model : QVI-CDR31-MAIN-V2, Product Code : CDR31-1107-002<br />
CDR31<br />
Specification<br />
Your best partner for better driving
Contents<br />
1. Before <strong>the</strong> installation<br />
1.1 Main <strong>specification</strong><br />
1.2 Features<br />
1.3 Components<br />
1.4 Exterior<br />
2. Setup<br />
2.1 DIP switch<br />
2.2 Remote controller<br />
2.3 Original buttons in car<br />
2.4 Factory mode<br />
2.5 Rear parking guide line<br />
2.6 OSD (on screen display)<br />
3<br />
4<br />
5<br />
6<br />
7<br />
8<br />
9<br />
10<br />
11<br />
12<br />
3. Troubleshooting 14<br />
www.<strong>qdis</strong>.co.kr 2
1.1 Main <strong>specification</strong><br />
1. Input Spec. (VIDEO INTERFACE)<br />
-. 1 x Analog R,G,B, C sync<br />
-. 1 x CVBS(REAR CAMERA) Input. (Rear camera source)<br />
- 3 x A/V (NTSC & PAL) Input.<br />
-. 1 x LCD Input (Car system Input)<br />
2. Output Spec.<br />
-. 3 x Audio Select (12V power comes out from 3 wires of cable by A/V1, Navigation, Rear mode)<br />
-. 1 x Audio OUTPUT<br />
-. 1 X LCD OUTPUT(LCD Operation)<br />
3. Power Spec.<br />
- Input Power : 10VDC ~ 16VDC<br />
- Consumption Power : 2WATT in maximum level<br />
4. Switching mode<br />
- Skip function of input video : Able to skip each input source via adjusting DIP switch.<br />
- Control by using <strong>the</strong> remote controller.<br />
- Able to change a mode to ano<strong>the</strong>r by using <strong>the</strong> mode switch.<br />
- Able to change modes and get back to <strong>the</strong> OEM screen through <strong>the</strong> genuine buttons.<br />
www.<strong>qdis</strong>.co.kr 3
1.2 Features<br />
• Plug & Play (LVDS cable enclosed)<br />
• Able to position DVD, Navigation screen by itself<br />
• Improvement in screen display (Interface intended for user convenience)<br />
• Remote controller enclosed<br />
• Able to change a mode to ano<strong>the</strong>r via <strong>the</strong> mode switch<br />
• Control of DVD, DTV via Touch OSD<br />
www.<strong>qdis</strong>.co.kr 4
1.3 Components<br />
Mode cable * 1EA<br />
(HARETC0001)<br />
LVDS cable * 1EA<br />
(HLVDSC0007)<br />
Audio select * 1EA<br />
(HSELCA0001)<br />
FPC * 1EA<br />
(FPCABL0013)<br />
Main board * 1EA<br />
POWER cable (24P) * 1EA<br />
(HPOWER0011)<br />
TOUCH IN cable * 1EA<br />
(HTOUCH0004)<br />
TOUCH Out cable * 1EA<br />
(HTOUCH0012)<br />
FFC * 1EA<br />
(FFCABL0005)<br />
Extension connector board * 1EA<br />
(SMTASY0103)<br />
AV cable * 1EA<br />
(HAVCAB0002)<br />
RGB cable * 1EA<br />
(HRGBCA0004)<br />
RGB cable * 1EA<br />
RGB NAVI cable * 1ea<br />
(HNAVIC0002)<br />
IR cable * 1EA<br />
(HIRCAB0002)<br />
Remote Control* 1EA<br />
(REMOTE0001)<br />
Sub board * 1EA<br />
(QCPASS0076)<br />
www.<strong>qdis</strong>.co.kr 5
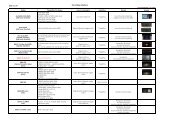
1.4 Exterior<br />
5 6 7<br />
8<br />
9<br />
Dimension<br />
Horizontal length 127mm<br />
Vertical length 90mm<br />
Height 24mm<br />
1 POWER<br />
2 AUDIO SEL<br />
3 AV (IN/OUT)<br />
4 RGB-OUT<br />
5 LED<br />
6 DIP S/W<br />
7 TOUCH OUT TO NAVI<br />
8 TOUCH IN<br />
9 LVDS-OUT<br />
1 2 3 4<br />
www.<strong>qdis</strong>.co.kr 6
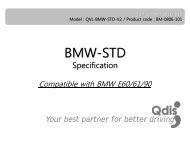
2.1 DIP switch<br />
#PIN FUNCTION DIP S/W Selection<br />
1 RGB INPUT SKIP<br />
2 A/V 1 SKIP<br />
3 A/V 2 SKIP<br />
4 A/V 3 SKIP<br />
5 N.C<br />
ON : Skipping RGB Mode<br />
OFF : RGB Display<br />
ON : Skipping A/V 1<br />
OFF : A/V1 Display<br />
ON : Skipping A/V 2<br />
OFF : A/V2 Display<br />
ON : Skipping A/V 3<br />
OFF : A/V3 Display<br />
※ ON : DOWN, OFF : UP<br />
※ DIP S/W Use Example<br />
[CDR31]<br />
- Use Input Mode : A/V3(DVD), Navigation (RGB)<br />
- Rear Camera : When to be installed on CVBS<br />
- When an original Navigation is not installed.<br />
▷ DIP S/W : 1 OFF<br />
▷ DIP S/W : 2,3 ON (INPUT MODE SKIP)<br />
▷ DIP S/W : 4 OFF (enable A/V3)<br />
▷ DIP S/W : 5 OFF<br />
▷ DIP S/W : 6 OFF<br />
▷ DIP S/W : 7 ON (enable CVBS4)<br />
▷ DIP S/W : 8 OFF<br />
6 N.C<br />
7 Rear Mode<br />
8 OEM Navi Mute<br />
ON : External Rear Camera<br />
OFF : OEM Rear Camera<br />
ON : In case of OEM Navi installed<br />
OFF : In case of OEM Navi not<br />
installed<br />
www.<strong>qdis</strong>.co.kr 7
2.2 Remote controller<br />
▲ Key Function<br />
Key<br />
Function<br />
POWER & PIP<br />
MENU<br />
OK<br />
▲<br />
▼<br />
◀<br />
▶<br />
N.C<br />
OSD MENU<br />
selection<br />
Up<br />
Down<br />
Left ,<br />
if you press about 2 seconds long, you are able to approach <strong>the</strong><br />
factory mode.<br />
Right<br />
www.<strong>qdis</strong>.co.kr 8
2.3 Original buttons in car<br />
Mode Change<br />
Button Press Function<br />
Mode change<br />
Press long<br />
Press short<br />
Changing modes like this sequence; NAVI-AV1-AV2-AV3-NAVI-… without <strong>the</strong><br />
genuine screen.<br />
Getting back to <strong>the</strong> genuine screen.<br />
Rest of <strong>the</strong> buttons<br />
Press short<br />
Directly changing from NAVI/AV modes to <strong>the</strong> genuine screen.<br />
(except for blue ones)<br />
www.<strong>qdis</strong>.co.kr 9
2.4 Factory mode<br />
※ Factory Mode – Press long ◀ button on <strong>the</strong> remote controller.<br />
IMAGE<br />
- H POSITION : control over <strong>the</strong><br />
horizontal position of <strong>the</strong> screen<br />
- V POSITION : control over <strong>the</strong><br />
vertical position of <strong>the</strong> screen<br />
PARK<br />
- PARK ENABLE : able to choose<br />
whe<strong>the</strong>r <strong>the</strong> rear guide line is<br />
displayed or not with rear gear.<br />
(default-ON)<br />
- PARK SETUP : able to adjust <strong>the</strong><br />
position of <strong>the</strong> rear guide line with<br />
<strong>the</strong> remote controller. ( Refer to <strong>the</strong><br />
page#11 )<br />
UTIL<br />
- CALIBRATION<br />
-FACTORY RESET<br />
: able to reset <strong>the</strong> data.<br />
www.<strong>qdis</strong>.co.kr 10
2.5 Rear parking guide line<br />
※ Factory Mode – Press long ◀ button on <strong>the</strong> remote controller.<br />
※ FACTORY default : PARK ENABLE-on<br />
1 Set PARK ENABLE with “ON” under FACTORY mode/<br />
PARK menu like <strong>the</strong> left picture.<br />
2 Once you change up into rear gear after setting,<br />
<strong>the</strong>re will be <strong>the</strong> rear guide line on <strong>the</strong> screen like <strong>the</strong><br />
left picture.<br />
And move to <strong>the</strong> “PARK SETUP”.<br />
Then you can change <strong>the</strong> position of that by using <strong>the</strong><br />
remote controller.<br />
www.<strong>qdis</strong>.co.kr 11
2.6 OSD (on screen display)<br />
※ OSD menu : Press “MENU” button on <strong>the</strong> remote controller.<br />
Analog RGB Mode<br />
Analog RGB Mode<br />
Video Mode<br />
IMAGE<br />
- BRIGHTNESS : able to adjust brightness of <strong>the</strong> screen<br />
- CONTRAST : able to adjust contrast of <strong>the</strong> screen<br />
- SATURATION : able to adjust saturation of <strong>the</strong> image<br />
- HUE : able to adjust hue of <strong>the</strong> screen<br />
- SHARPNESS : able to adjust sharpness of <strong>the</strong> screen<br />
- USER IMAGE : able to make a choice among 4 set-colors<br />
of <strong>the</strong> screen<br />
Video Mode<br />
OSD<br />
- TRANSPARENT : control over <strong>the</strong> transparency of OSD<br />
- H_POSITION : control over <strong>the</strong> horizontal position of<br />
OSD<br />
- V_POSITION : control over <strong>the</strong> vertical position of OSD<br />
www.<strong>qdis</strong>.co.kr 12
2.6 OSD (on screen display)<br />
Analog RGB Mode<br />
Video Mode<br />
UTIL<br />
- USER RESET : able to reset <strong>the</strong> whole value of <strong>the</strong> NAVI or DVD screen to <strong>the</strong> default. (not for <strong>the</strong> screen image, but<br />
for <strong>the</strong> values in OSD)<br />
Analog RGB Mode<br />
COLOR<br />
- RED<br />
- GREEN<br />
- BLUE<br />
- USER COLOR : user choice among <strong>the</strong> setting colors<br />
Digital TV<br />
- POWER<br />
- SCAN<br />
- CH UP : CHANEL UP<br />
- CH DN : CHANEL DOWN<br />
- INPUT<br />
DVD<br />
- PWR : POWER<br />
- PLAY<br />
- PREV : PREVIOUS<br />
- NEXT<br />
- CD UP<br />
- CD DN : CD DOWN<br />
- STOP<br />
- PAUSE<br />
- REW : REWIND<br />
- FWD : FORWARD<br />
- VOICE<br />
- INPUT<br />
Digital TV OSD Mode<br />
DVD OSD Mode<br />
www.<strong>qdis</strong>.co.kr 13
3. Troubleshooting<br />
Q. I can not switch A/V sources.<br />
A. Check IR or Ground cable connection. Check LED lamps in <strong>the</strong> interface, if it is not on, check power cable.<br />
Q. All I got on <strong>the</strong> screen is black.<br />
A. Check second LED lamp of <strong>the</strong> interface is on, if not, check A/V sources connected are working well.<br />
(Second lamp indicates AV sources connected works well.) Check interface connection has been done well.<br />
Q. Displayed image color is not proper. (too dim or not suitable color)<br />
A. Try to select “INITIAL” in OSD menu, if it does not work, inform <strong>the</strong> manufacturer.)<br />
Q. Rear camera image does NOT appear.<br />
A. Set DIP switch #7 in “ON”<br />
Q. Unwanted A/V mode is displayed. (A/V source switching order : OEM->RGB->AV1->AV2->AV3)<br />
A. Check DIP Switch Setting.<br />
Q. OEM image is not displayed.<br />
A. Check interface’s LCD In/Out cable connection. If <strong>the</strong> status keeps on, inform <strong>the</strong> manufacturer.<br />
Q. Screen only displays white like left picture.<br />
A. Check LCD out cable is connected well, if this status keeps, inform <strong>the</strong> manufacturer.<br />
www.<strong>qdis</strong>.co.kr 14