Chemical Anchor Technical Handbook
Chemical Anchor Technical Handbook
Chemical Anchor Technical Handbook

You also want an ePaper? Increase the reach of your titles
YUMPU automatically turns print PDFs into web optimized ePapers that Google loves.
Product Details<br />
CF850 <strong>Technical</strong> Information<br />
<strong>Chemical</strong> <strong>Anchor</strong>ing<br />
Product Overview<br />
<strong>Chemical</strong> <strong>Anchor</strong>ing<br />
Theory<br />
Contents<br />
Applications<br />
1. Areas of<br />
Application<br />
2. Benefits<br />
3. Properties<br />
Usage Instructions<br />
CF850<br />
Reaction resin mortar, polyester-based<br />
styrene-free<br />
Hollow brick<br />
Usage<br />
• Used for medium-load applications<br />
• The perforated sleeve can be used in<br />
hollow bricks, Hlz 4 to DIN 105,<br />
sand-lime hollow bricks, KSL 4 to DIN 106,<br />
hollow light concrete bricks, Hbl 2 to DIN 18 151 and<br />
hollow concrete bricks, Hbn 4 to DIN 18 153<br />
• Suitable for attachment of façades, projecting roofs, wooden<br />
constructions, metal constructions, metal profiles, consoles,<br />
railings, grills, sanitary fittings, pipe connections, cable runs etc.<br />
• Secure anchoring in hollow brick; high load bearing capacity<br />
• No expansion effect, allowing attachment points to be placed<br />
close to edges etc.<br />
• Cartridge can be used until the expiration date by replacing either the<br />
static mixer or resealing cartridge with the sealing cap<br />
• <strong>Anchor</strong>ing by composite form-fitting between injection mortar, sleeve<br />
collar, anchor rod and anchoring surface<br />
• Galvanized steel, stainless steel, highly corrosion-resistant steel<br />
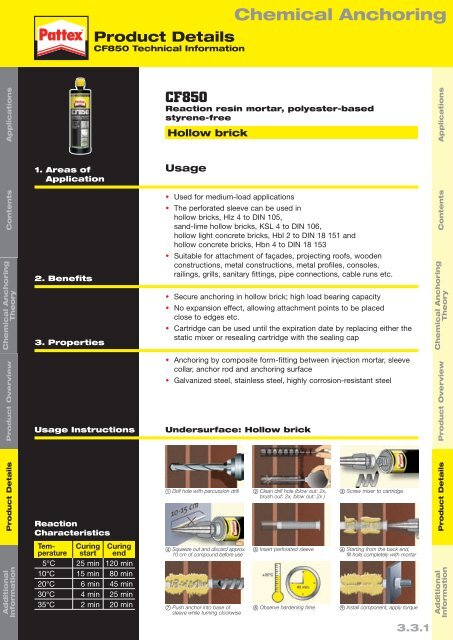
Undersurface: Hollow brick<br />
Product Overview<br />
<strong>Chemical</strong> <strong>Anchor</strong>ing<br />
Contents Applications<br />
Theory<br />
Product Details<br />
Reaction<br />
Characteristics<br />
Drill hole with percussion drill Clean drill hole (blow out: 2x,<br />
brush out: 2x, blow out: 2x )<br />
Screw mixer to cartridge<br />
Product Details<br />
Additional<br />
Information<br />
Temperature<br />
Curing<br />
start<br />
Curing<br />
end<br />
5°C 25 min 120 min<br />
10°C 15 min 80 min<br />
20°C 6 min 45 min<br />
30°C 4 min 25 min<br />
35°C 2 min 20 min<br />
Squeeze out and discard approx.<br />
10 cm of compound before use<br />
Push anchor into base of<br />
sleeve while turning clockwise<br />
Insert perforated sleeve<br />
Observe hardening time<br />
Starting from the back end,<br />
fill hole completely with mortar<br />
Install component, apply torque<br />
Additional<br />
Information<br />
3.3.1