Chemical Anchor Technical Handbook
Chemical Anchor Technical Handbook
Chemical Anchor Technical Handbook

Create successful ePaper yourself
Turn your PDF publications into a flip-book with our unique Google optimized e-Paper software.
Product Details<br />
CF900 TROPIC <strong>Technical</strong> Information<br />
<strong>Chemical</strong> <strong>Anchor</strong>ing<br />
Product Overview<br />
<strong>Chemical</strong> <strong>Anchor</strong>ing<br />
Theory<br />
Contents<br />
Applications<br />
1. Areas of<br />
Application<br />
2. Benefits<br />
3. Properties<br />
Usage Instructions<br />
CF900 TROPIC<br />
Reaction resin mortar, vinylester-based<br />
styrene-free<br />
Hollow brick<br />
Usage<br />
• Used for medium-load applications<br />
• The perforated sleeve can be used in<br />
hollow bricks, Hlz 4 to DIN 105,<br />
sand-lime hollow bricks, KSL 4 to DIN 106,<br />
hollow light concrete bricks, Hbl 2 to DIN 18 151 and<br />
hollow concrete bricks, Hbn 4 to DIN 18 153<br />
• Suitable for attachment of façades, projecting roofs, wooden<br />
constructions, metal constructions, metal profiles, consoles,<br />
railings, grills, sanitary fittings, pipe connections, cable runs etc.<br />
• Secure anchoring in hollow brick; high load bearing capacity<br />
• No expansion effect, allowing attachment points to be placed close<br />
to edges etc.<br />
• Cartridge can be used until the expiration date by replacing either the<br />
static mixer or resealing cartridge with the sealing cap<br />
• <strong>Anchor</strong>ing by composite form-fitting between injection mortar, sleeve<br />
collar, anchor rod and anchoring surface<br />
• Galvanized steel, stainless steel, highly corrosion-resitant steel<br />
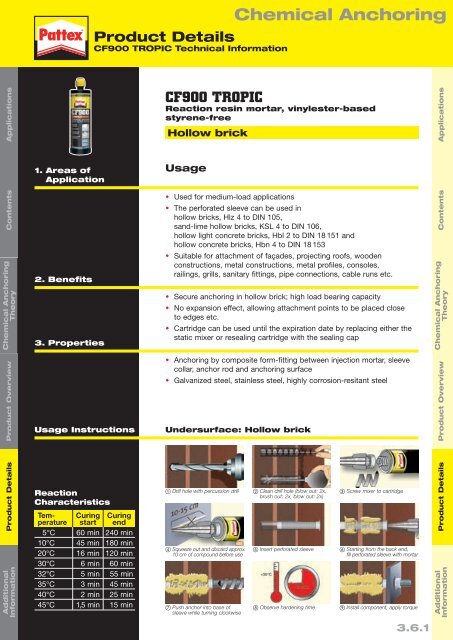
Undersurface: Hollow brick<br />
Product Overview<br />
<strong>Chemical</strong> <strong>Anchor</strong>ing<br />
Contents Applications<br />
Theory<br />
Product Details<br />
Additional<br />
Information<br />
Reaction<br />
Characteristics<br />
Temperature<br />
Curing<br />
start<br />
Curing<br />
end<br />
5°C 60 min 240 min<br />
10°C 45 min 180 min<br />
20°C 16 min 120 min<br />
30°C 6 min 60 min<br />
32°C 5 min 55 min<br />
35°C 3 min 45 min<br />
40°C 2 min 25 min<br />
45°C 1,5 min 15 min<br />
Drill hole with percussion drill Clean drill hole (blow out: 2x,<br />
brush out: 2x, blow out: 2x)<br />
Squeeze out and discard approx.<br />
10 cm of compound before use<br />
Push anchor into base of<br />
sleeve while turning clockwise<br />
Insert perforated sleeve<br />
Observe hardening time<br />
Screw mixer to cartridge<br />
Starting from the back end,<br />
fill perforated sleeve with mortar<br />
Install component, apply torque<br />
Product Details<br />
Additional<br />
Information<br />
3.6.1