Tethys instruction booklet.cdr - Public Missiles Ltd.
Tethys instruction booklet.cdr - Public Missiles Ltd.
Tethys instruction booklet.cdr - Public Missiles Ltd.

You also want an ePaper? Increase the reach of your titles
YUMPU automatically turns print PDFs into web optimized ePapers that Google loves.
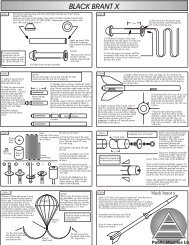
Basic Construction FAQ<br />
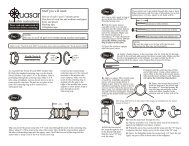
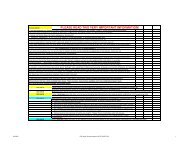
The major parts involved in each step are shown shaded at the beginning of that<br />
step. Areas where epoxy should be applied are shown as well.<br />
PREP & ASSEMBLY<br />
( Read and understand the <strong>instruction</strong> steps fully before you begin the step.<br />
( ALWAYS sand the parts to be bonded with 100-120 grit sandpaper.<br />
( We strongly recommend you dry-fit (assemble without gluing) all parts in each step<br />
BEFORE epoxying them together. Sand or adjust fit as needed before gluing.<br />
( Most epoxies work fine. Use 5 or 15 minute depending on how quickly you feel you can<br />
complete the step. Use longer set-time epoxy if you're unsure.<br />
( To make internal fillets to the fins deep up into the airframe, "load up" the end of a dowel<br />
with a blob of epoxy, then stick the dowel into the airframe and onto the fin joint you're<br />
working on. After depositing enough epoxy in this fashion, you can pull the dowel toward<br />
you, making a fillet with the rounded edge of the dowel.<br />
( Be sure to follow the "Do's & Don'ts" sheet provided with QT tubing.<br />
( Fins do not need to be "shaped". Lightly sand the edges to remove any manufacturing burrs.<br />
PAINTING/FINISHING<br />
( Before you paint the fins, scuff the entire surface with 220 grit sandpaper. This is easiest to<br />
do before mounting the fins.<br />
( Plastic nosecone imperfections can be filled with plastic model kit putty.<br />
( Stay with the same brand of paint throughout the process; primer, base color, accent colors,<br />
and clear coat. DO NOT skimp on the "shake the can for at least two minutes after the ball<br />
rattles" step! For the best finish, let each coat dry overnight and sand lightly with 320 or<br />
400 grit sandpaper.<br />
( Apply the last color coat as heavy as possible without running or sagging. Let the paint cure<br />
for at least 48 hours before handling!<br />
( We recommend a clear coat of some sort to help protect the decals as well as "seal" their<br />
edges to help prevent them peeling off. When using any clear coat, put on only VERY thin,<br />
light coats, and wait at least 5 minutes between coats. The clear coat can damage your<br />
decals or paint if you put it on too heavily or don't wait long enough between coats!<br />
FINAL FITTING/PREPARATIONS FOR FLIGHT<br />
( The piston should be a smooth slip-fit in the airframe; this is critical. Sand the piston as<br />
needed so it can be easily inserted, and pulled out with just a gentle tug on the shock cord.<br />
Keep sandpaper in your range box in case you need to adjust the fit the first few times at<br />
the field to deal with differing temperature and humidity.<br />
( Couplers should also be sanded to allow easy separation of the rocket.<br />
( If the coupler or nosecone is too loose, use masking tape to build it up to a good fit. If the<br />
nosecone is too tight, sand the ribs on the shoulder until it fits well. The parts fit properly if<br />
the rocket can be held upside down and gently shaken with nothing moving or coming<br />
apart.<br />
( Ejections will leave a black, gritty residue inside the airframe. Occasionally wipe the tube<br />
interior with a damp cloth wrapped around a dowel or broomstick; allow to dry.<br />
( See our website FAQ for information about thrust rings and motor retention. Motor<br />
recommendation information is available on our website on the Specs Page.<br />
For our complete FAQ, see the FAQ Page on our website at www.publicmissiles.com.<br />
www.publicmissiles.com<br />
The PML Web Store and Knowledge Base