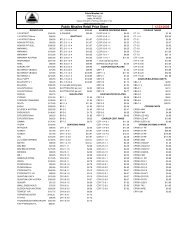
Tethys instruction booklet.cdr - Public Missiles Ltd.
Tethys instruction booklet.cdr - Public Missiles Ltd.
Tethys instruction booklet.cdr - Public Missiles Ltd.

Create successful ePaper yourself
Turn your PDF publications into a flip-book with our unique Google optimized e-Paper software.
Step 3<br />
Step 4<br />
Step 3<br />
Step 4<br />
Step 3<br />
Step 4<br />
Step 3<br />
Step 4<br />
Step 3<br />
Step 4<br />
Step 3<br />
Step 4<br />
Step 3<br />
Step 4<br />
Step 3<br />
Step 4<br />
Step 3<br />
Step 4<br />
Step 3<br />
Step 4<br />
Step 3<br />
Step 4<br />
Step 3<br />
Step 4<br />
Step 3<br />
Step 4<br />
Step 3<br />
Step 4<br />
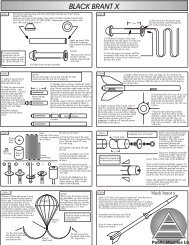
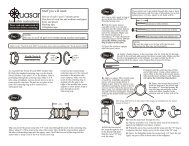
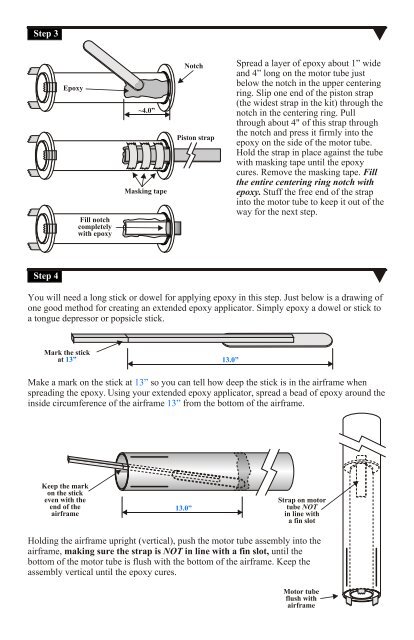
Spread a layer of epoxy about 1” wide<br />
and 4” long on the motor tube just<br />
below the notch in the upper centering<br />
ring. Slip one end of the piston strap<br />
(the widest strap in the kit) through the<br />
notch in the centering ring. Pull<br />
through about 4" of this strap through<br />
the notch and press it firmly into the<br />
epoxy on the side of the motor tube.<br />
Hold the strap in place against the tube<br />
with masking tape until the epoxy<br />
cures. Remove the masking tape. Fill<br />
the entire centering ring notch with<br />
epoxy. Stuff the free end of the strap<br />
into the motor tube to keep it out of the<br />
way for the next step.<br />
~4.0”<br />
Notch<br />
Piston strap<br />
Masking tape<br />
Fill notch<br />
completely<br />
with epoxy<br />
Epoxy<br />
Step 3<br />
Step 4<br />
Spread a layer of epoxy about 1” wide<br />
and 4” long on the motor tube just<br />
below the notch in the upper centering<br />
ring. Slip one end of the piston strap<br />
(the widest strap in the kit) through the<br />
notch in the centering ring. Pull<br />
through about 4" of this strap through<br />
the notch and press it firmly into the<br />
epoxy on the side of the motor tube.<br />
Hold the strap in place against the tube<br />
with masking tape until the epoxy<br />
cures. Remove the masking tape. Fill<br />
the entire centering ring notch with<br />
epoxy. Stuff the free end of the strap<br />
into the motor tube to keep it out of the<br />
way for the next step.<br />
~4.0”<br />
Notch<br />
Piston strap<br />
Masking tape<br />
Fill notch<br />
completely<br />
with epoxy<br />
Epoxy<br />
You will need a long stick or dowel for applying epoxy in this step. Just below is a drawing of<br />
one good method for creating an extended epoxy applicator. Simply epoxy a dowel or stick to<br />
a tongue depressor or popsicle stick.<br />
Make a mark on the stick at<br />
so you can tell how deep the stick is in the airframe when<br />
spreading the epoxy.<br />
13”<br />
13”<br />
Using your extended epoxy applicator, spread a bead of epoxy around the<br />
inside circumference of the airframe<br />
from the bottom of the airframe.<br />
Holding the airframe upright (vertical), push the motor tube assembly into the<br />
airframe, making sure the strap is NOT in line with a fin slot, until the<br />
bottom of the motor tube is flush with the bottom of the airframe. Keep the<br />
assembly vertical until the epoxy cures.<br />
13.0”<br />
13.0”<br />
Mark the stick<br />
at 13”<br />
Keep the mark<br />
on the stick<br />
even with the<br />
end of the<br />
airframe<br />
Motor tube<br />
flush with<br />
airframe<br />
Strap on motor<br />
tube NOT<br />
in line with<br />
a fin slot<br />
Step 3<br />
Step 4<br />
Spread a layer of epoxy about 1” wide<br />
and 4” long on the motor tube just<br />
below the notch in the upper centering<br />
ring. Slip one end of the piston strap<br />
(the widest strap in the kit) through the<br />
notch in the centering ring. Pull<br />
through about 4" of this strap through<br />
the notch and press it firmly into the<br />
epoxy on the side of the motor tube.<br />
Hold the strap in place against the tube<br />
with masking tape until the epoxy<br />
cures. Remove the masking tape. Fill<br />
the entire centering ring notch with<br />
epoxy. Stuff the free end of the strap<br />
into the motor tube to keep it out of the<br />
way for the next step.<br />
~4.0”<br />
Notch<br />
Piston strap<br />
Masking tape<br />
Fill notch<br />
completely<br />
with epoxy<br />
Epoxy<br />
You will need a long stick or dowel for applying epoxy in this step. Just below is a drawing of<br />
one good method for creating an extended epoxy applicator. Simply epoxy a dowel or stick to<br />
a tongue depressor or popsicle stick.<br />
Make a mark on the stick at<br />
so you can tell how deep the stick is in the airframe when<br />
spreading the epoxy.<br />
13”<br />
13”<br />
Using your extended epoxy applicator, spread a bead of epoxy around the<br />
inside circumference of the airframe<br />
from the bottom of the airframe.<br />
Holding the airframe upright (vertical), push the motor tube assembly into the<br />
airframe, making sure the strap is NOT in line with a fin slot, until the<br />
bottom of the motor tube is flush with the bottom of the airframe. Keep the<br />
assembly vertical until the epoxy cures.<br />
13.0”<br />
13.0”<br />
Mark the stick<br />
at 13”<br />
Keep the mark<br />
on the stick<br />
even with the<br />
end of the<br />
airframe<br />
Motor tube<br />
flush with<br />
airframe<br />
Strap on motor<br />
tube NOT<br />
in line with<br />
a fin slot