Tethys instruction booklet.cdr - Public Missiles Ltd.
Tethys instruction booklet.cdr - Public Missiles Ltd.
Tethys instruction booklet.cdr - Public Missiles Ltd.

Create successful ePaper yourself
Turn your PDF publications into a flip-book with our unique Google optimized e-Paper software.
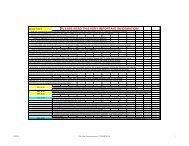
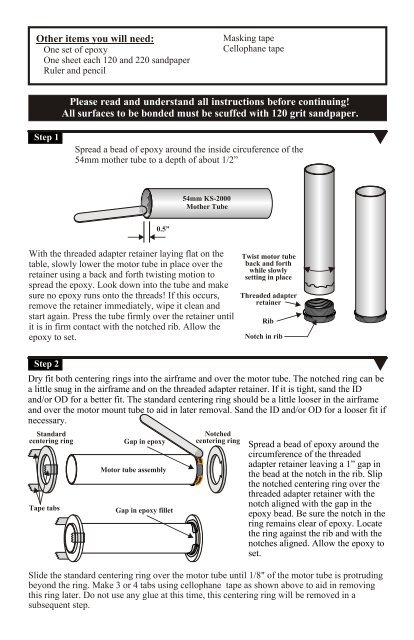
Other items you will need:<br />
> Masking tape<br />
> One set of epoxy<br />
><br />
Cellophane tape<br />
> One sheet each 120 and 220 sandpaper<br />
> Ruler and pencil<br />
Please read and understand all <strong>instruction</strong>s before continuing!<br />
All surfaces to be bonded must be scuffed with 120 grit sandpaper.<br />
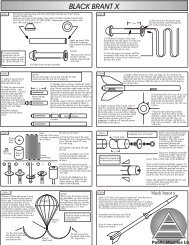
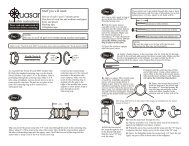
Step 1<br />
Spread a bead of epoxy around the inside circuference of the<br />
54mm mother tube to a depth of about 1/2”<br />
54mm KS-2000<br />
Mother Tube<br />
0.5”<br />
With the threaded adapter retainer laying flat on the<br />
table, slowly lower the motor tube in place over the<br />
retainer using a back and forth twisting motion to<br />
spread the epoxy. Look down into the tube and make<br />
sure no epoxy runs onto the threads! If this occurs,<br />
remove the retainer immediately, wipe it clean and<br />
start again. Press the tube firmly over the retainer until<br />
it is in firm contact with the notched rib. Allow the<br />
epoxy to set.<br />
Twist motor tube<br />
back and forth<br />
while slowly<br />
setting in place<br />
Threaded adapter<br />
retainer<br />
Rib<br />
Notch in rib<br />
Step 2<br />
Dry fit both centering rings into the airframe and over the motor tube. The notched ring can be<br />
a little snug in the airframe and on the threaded adapter retainer. If it is tight, sand the ID<br />
and/or OD for a better fit. The standard centering ring should be a little looser in the airframe<br />
and over the motor mount tube to aid in later removal. Sand the ID and/or OD for a looser fit if<br />
necessary.<br />
Standard<br />
Notched<br />
centering ring<br />
Gap in epoxy<br />
centering ring<br />
Spread a bead of epoxy around the<br />
circumference of the threaded<br />
Motor tube assembly<br />
adapter retainer leaving a 1” gap in<br />
the bead at the notch in the rib. Slip<br />
the notched centering ring over the<br />
threaded adapter retainer with the<br />
Tape tabs<br />
Gap in epoxy fillet<br />
notch aligned with the gap in the<br />
epoxy bead. Be sure the notch in the<br />
ring remains clear of epoxy. Locate<br />
the ring against the rib and with the<br />
notches aligned. Allow the epoxy to<br />
set.<br />
Slide the standard centering ring over the motor tube until 1/8" of the motor tube is protruding<br />
beyond the ring. Make 3 or 4 tabs using cellophane tape as shown above to aid in removing<br />
this ring later. Do not use any glue at this time, this centering ring will be removed in a<br />
subsequent step.