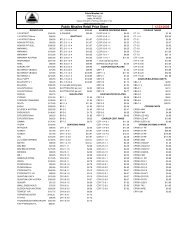
Tethys instruction booklet.cdr - Public Missiles Ltd.
Tethys instruction booklet.cdr - Public Missiles Ltd.
Tethys instruction booklet.cdr - Public Missiles Ltd.

You also want an ePaper? Increase the reach of your titles
YUMPU automatically turns print PDFs into web optimized ePapers that Google loves.
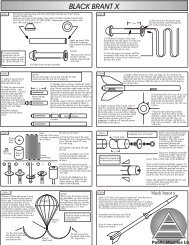
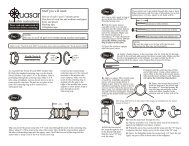
Step 5<br />
A) Apply a bead of epoxy to the root edge of a fin. Push the fin through the slot in the airframe<br />
and against the motor mount tube. Make sure that the fin is perpendicular to the airframe. Use<br />
tape to hold the fin in position while the epoxy cures. Repeat this process for all fins.<br />
B) Apply an epoxy fillet to both sides of each fin. Carefully smooth the epoxy with your finger<br />
before it begins to gel. Allow the epoxy to set up before rotating the rocket to do the next set<br />
of fins. Once the epoxy has fully cured, you should sand the fillet smooth with fine sandpaper.<br />
Sanding will help the primer hold better to the epoxy.<br />
C) Gently pull the centering ring off the end of the rocket by<br />
tugging on the tape tabs. Using a stick, apply an epoxy fillet to the<br />
fins at the motor mount tube and the inner airframe wall.<br />
D) Remove the tape tabs from the centering ring and permanently<br />
epoxy it in the base of the rocket 1/8” in from the bottom of the<br />
airframe.<br />
Epoxy fillet<br />
points<br />
Step 6<br />
NOTE: In this step you will be using the free end of the<br />
strap that you mounted to the motor tube assembly.<br />
A B C D<br />
E<br />
F<br />
A) Pull the free end of the strap through the slot in the piston bulk plate.<br />
B) Slip the metal "D" ring over the strap.<br />
C) Feed the strap back through the slot.<br />
D) Pull on the strap until the “D” ring is wedged at the slot.<br />
E) Flip the assembly over. Spread a layer of epoxy on the underside of the piston plate as<br />
shown. Fold the short end of the strap flat<br />
against the piston plate and press it into the<br />
H<br />
epoxy. You can use a clamp to hold the strap<br />
in the epoxy while it sets.<br />
G<br />
F) When the epoxy has cured, pull the strap<br />
until the "D" ring is wedged tight at the slot.<br />
Apply epoxy to the strap at the "D" ring.<br />
G) Epoxy the piston plate inside the piston<br />
body 1/8" from the top.<br />
H) Apply an epoxy fillet to both sides of the<br />
piston plate.