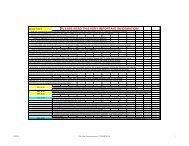
Tethys instruction booklet.cdr - Public Missiles Ltd.
Tethys instruction booklet.cdr - Public Missiles Ltd.
Tethys instruction booklet.cdr - Public Missiles Ltd.

You also want an ePaper? Increase the reach of your titles
YUMPU automatically turns print PDFs into web optimized ePapers that Google loves.
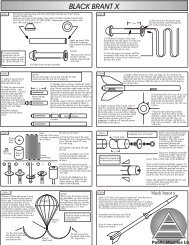
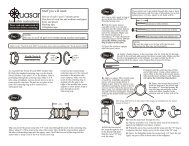
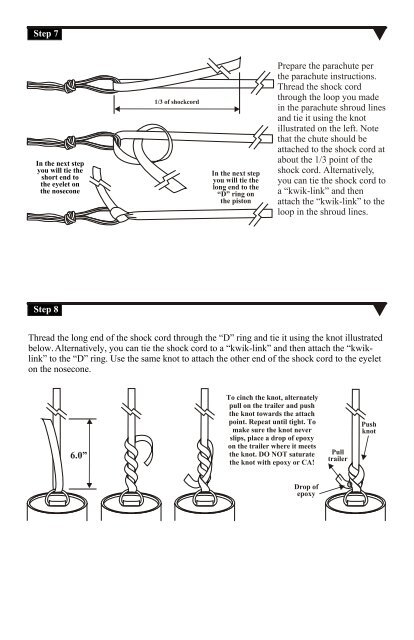
Step 7<br />
In the next step<br />
you will tie the<br />
short end to<br />
the eyelet on<br />
the nosecone<br />
1/3 of shockcord<br />
In the next step<br />
you will tie the<br />
long end to the<br />
“D” ring on<br />
the piston<br />
Prepare the parachute per<br />
the parachute <strong>instruction</strong>s.<br />
Thread the shock cord<br />
through the loop you made<br />
in the parachute shroud lines<br />
and tie it using the knot<br />
illustrated on the left. Note<br />
that the chute should be<br />
attached to the shock cord at<br />
about the 1/3 point of the<br />
shock cord. Alternatively,<br />
you can tie the shock cord to<br />
a “kwik-link” and then<br />
attach the “kwik-link” to the<br />
loop in the shroud lines.<br />
Step 8<br />
Thread the long end of the shock cord through the “D” ring and tie it using the knot illustrated<br />
below. Alternatively, you can tie the shock cord to a “kwik-link” and then attach the “kwiklink”<br />
to the “D” ring. Use the same knot to attach the other end of the shock cord to the eyelet<br />
on the nosecone.<br />
6.0”<br />
To cinch the knot, alternately<br />
pull on the trailer and push<br />
the knot towards the attach<br />
point. Repeat until tight. To<br />
make sure the knot never<br />
slips, place a drop of epoxy<br />
on the trailer where it meets<br />
the knot. DO NOT saturate<br />
the knot with epoxy or CA!<br />
Pull<br />
trailer<br />
Push<br />
knot<br />
Drop of<br />
epoxy