I.P.S. Pressure/Irrigation (P.I.P) Installation Guide - JM Eagle
I.P.S. Pressure/Irrigation (P.I.P) Installation Guide - JM Eagle
I.P.S. Pressure/Irrigation (P.I.P) Installation Guide - JM Eagle

Create successful ePaper yourself
Turn your PDF publications into a flip-book with our unique Google optimized e-Paper software.
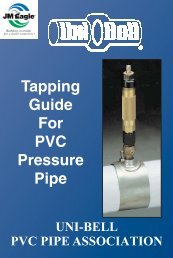
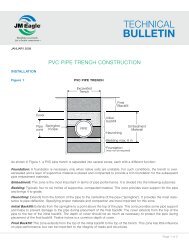
Caution: After spigot end is lubricated, do not allow it to contact the bedding<br />
material. Small pieces of stone or soil may adhere to the lubricant and<br />
may become lodged between the spigot and the gasket upon assembly,<br />
resulting in a possible leak. (See Figure 8.)<br />
Figure 8<br />
NOTICE: The <strong>JM</strong> <strong>Eagle</strong> lubricant supplied with each shipment has been<br />
tested and approved for potable water service. Do not use non-approved lubricant,<br />
which may harbor bacteria or damage the gaskets or drinking water.<br />
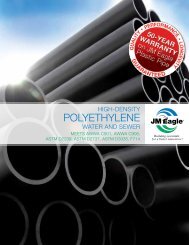
5. Insert the beveled spigot end into the bell so that it is in contact with the<br />
Rieber ® gasket. Hold the pipe lengths being joined close to the ground<br />
(see Figure 9) and keep the lengths in proper alignment. Brace the bell,<br />
as shown, while the spigot end is inserted under the gasket, so that<br />
previously completed joints in the line will not be closed up or over-assembled.<br />
Push the spigot end in until the reference mark on the spigot<br />
end is flush with the end of the bell. Stabbing is not recommended and<br />
should be avoided to prevent damage to the gasket and joint.<br />
Figure 9<br />
IRRIGATION & I.P.S. PRESSURE INSTALLATION GUIDE<br />
21