I.P.S. Pressure/Irrigation (P.I.P) Installation Guide - JM Eagle
I.P.S. Pressure/Irrigation (P.I.P) Installation Guide - JM Eagle
I.P.S. Pressure/Irrigation (P.I.P) Installation Guide - JM Eagle

You also want an ePaper? Increase the reach of your titles
YUMPU automatically turns print PDFs into web optimized ePapers that Google loves.
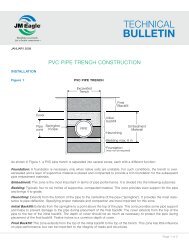
Table A1.2 continued<br />
Soil Class as Defined in Table A1.1<br />
Class IA Class IB Class II Class III Class IV-A<br />
Bedding<br />
Suitable as restricted<br />
above. Install in 6-inch<br />
maximum layers.<br />
Level final grade by<br />
hand. Minimum depth<br />
4 inches (6 inches in<br />
rock cuts).<br />
Install and compact<br />
in 6-inch maxImum<br />
layers. Level final<br />
grade by hand.<br />
Minimum depth 4<br />
inches (6 inches in<br />
rock cuts).<br />
Suitable as restricted<br />
above. Install and compact<br />
in 6 inch maximum layers.<br />
Level final grade by hand.<br />
Minimum depth 4 inches<br />
(6 inches in rock cuts).<br />
Suitable only in dry trench<br />
conditions. Install and<br />
compact in 6 inch maximum<br />
layers. Level final<br />
grade by hand. Minimum<br />
depth 4 inches (6 inches<br />
in rock cuts).<br />
Suitable only in dry trench<br />
conditions and when optimum<br />
placement and compaction control<br />
is maintained. Install and compact<br />
in 6 inch maximum layers. Level final<br />
grade by hand. Minimum depth<br />
4 inches (6 inches in rock cuts).<br />
Haunching<br />
Suitable as restricted<br />
above. Install in 6-inch<br />
maximum layers.<br />
Work in around pipe<br />
by hand to provide<br />
uniform support.<br />
Install and compact<br />
in 6-inch maximum<br />
layers. Work in<br />
around pipe by hand<br />
to provide uniform<br />
support.<br />
Suitable as restricted<br />
above. Install and<br />
compact in 6 inch<br />
maximum layers. Work in<br />
around pipe by hand to<br />
provide uniform support.<br />
Suitable as restricted<br />
above. Install and<br />
compact in 6 inch<br />
maximum layers. Work in<br />
around pipe by hand to<br />
provide uniform support.<br />
Suitable only in dry trench<br />
conditions and when optimum<br />
placement and compaction control<br />
is maintained. Install and compact<br />
in 6 inch maximum layers. Work<br />
in around pipe by hand to provide<br />
uniform support.<br />
Initial<br />
Backfill<br />
Suitable as restricted<br />
above. Install to a<br />
minimum of 6 inches<br />
above pipe crown.<br />
Install and compact<br />
to a minimum of 6<br />
inches above pipe<br />
crown.<br />
Suitable as restricted<br />
above. Install and compact<br />
to a minumum of 6 inches<br />
above pipe crown.<br />
Suitable as restricted<br />
above. Install and compact<br />
to a minumum of 6<br />
inches above pipe crown.<br />
Suitable as restricted above. Install<br />
and compact to a minumum of 6<br />
inches above pipe crown.<br />
Final<br />
Backfill<br />
Compact as required<br />
by the engineer.<br />
Compact as required<br />
by the engineer.<br />
Compact as required by<br />
the engineer.<br />
Compact as required by<br />
the engineer.<br />
Suitable as restricted above.<br />
Compact as required by the<br />
engineer.<br />
Based on tables found in the Uni-Bell ® PVC Pipe Association, “Handbook of PVC Pipe Design and Construction”.<br />
IRRIGATION & I.P.S. PRESSURE INSTALLATION GUIDE<br />
49