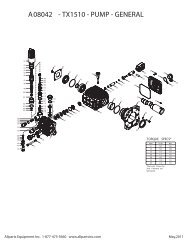
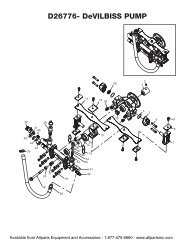
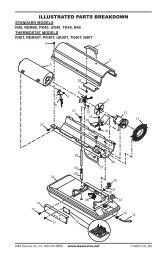
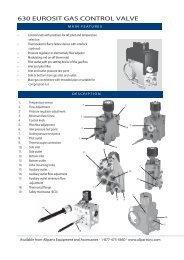
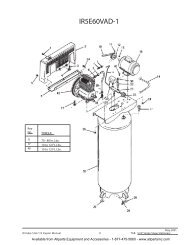
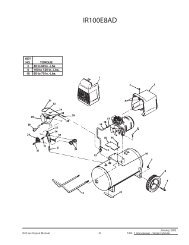
Illustrated Parts Diagram
Illustrated Parts Diagram
Illustrated Parts Diagram

Create successful ePaper yourself
Turn your PDF publications into a flip-book with our unique Google optimized e-Paper software.
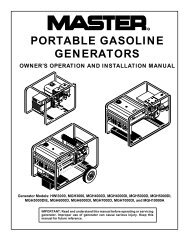
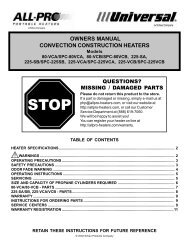
OWNER’S MANUAL<br />
STORAGE<br />
CAUTION: Disconnect heater<br />
from propane supply tank(s).<br />
1. Store propane tank(s) in safe manner.<br />
2. Place packing items on the heater and<br />
hose/regulator assembly. Place heater<br />
and hose/regulator assembly into heater<br />
carton.<br />
3. Store in dry, clean, and safe place. Do<br />
not store hose/regulator assembly inside<br />
heater combustion chamber.<br />
4. When taking heater out of storage, always<br />
check inside of heater. Insects and<br />
small animals may place foreign objects<br />
in heater. Keep inside of heater free from<br />
combustible and foreign objects.<br />
MAINTENANCE<br />
WARNING: Never service<br />
heater while it is plugged in, connected<br />
to propane supply, operating,<br />
or hot. Severe burns and<br />
electrical shock can occur.<br />
1. Keep heater clean. Clean heater annually<br />
or as needed to remove dust and<br />
debris. If heater is dirty or dusty, clean<br />
heater with a damp cloth.<br />
2. Inspect heater before each use. Check<br />
connections for leaks. Apply mixture<br />
of liquid soap and water to connections.<br />
Bubbles forming show a leak. Correct<br />
all leaks at once.<br />
3. Inspect hose/regulator assembly before<br />
each use. If hose is highly worn<br />
or cut, replace.<br />
4. Have heater inspected yearly by service<br />
person.<br />
5. Keep inside of heater free from combustible<br />
and foreign objects.<br />
6. Clean fan every 500 hours of operation<br />
or as needed.<br />
SERVICE<br />
PROCEDURE<br />
WARNING: Never service<br />
heater while it is plugged in, connected<br />
to propane supply, operating,<br />
or hot. Severe burns and<br />
electrical shock can occur.<br />
Cleaning Fan<br />
150 Model<br />
1. Remove upper shell of heater. Remove<br />
screws along each side of heater using<br />
5/16" nut-driver (see Figure 8). These<br />
screws attach upper and lower shells<br />
together.<br />
2. Lift or slide upper shell off.<br />
3. Remove fan guard.<br />
4. Use 1/8" Allen wrench to loosen setscrew<br />
which holds fan to motor shaft<br />
(see Figure 9).<br />
5. Slip fan off motor shaft.<br />
6. Clean fan using soft cloth moistened<br />
with kerosene or solvent.<br />
7. Dry fan thoroughly.<br />
8. Replace fan on motor shaft. Make sure<br />
set screw is touching back of flat surface<br />
on motor shaft (see Figure 10).<br />
9. Place setscrew on flat of shaft. Tighten<br />
setscrew firmly (4.5-5.6 n-m).<br />
10. Replace fan guard and upper shell.<br />
Figure 8 - Upper Shell Removal, 150 Model<br />
0<br />
l<br />
Motor shaft<br />
Figure 9 - Fan, Motor Shaft, and Setscrew<br />
Location<br />
Hub<br />
Fan<br />
Fan<br />
Setscrew<br />
Setscrew<br />
Motor Shaft<br />
Figure 10 - Fan Cross Section<br />
Continued<br />
100166<br />
7