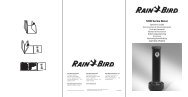
Orbit WaterMaster 57926 ST2-RF Controller With ... - Irrigation Direct
Orbit WaterMaster 57926 ST2-RF Controller With ... - Irrigation Direct
Orbit WaterMaster 57926 ST2-RF Controller With ... - Irrigation Direct

Create successful ePaper yourself
Turn your PDF publications into a flip-book with our unique Google optimized e-Paper software.
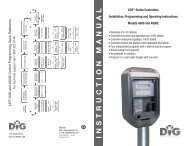
<strong>ST2</strong>-<strong>RF</strong> SPRINKLER TIMER MANUAL<br />
<strong>RF</strong> SYNC<br />
ACTIVE<br />
BYPASS<br />
NO WATERING<br />
DAY / PERIOD<br />
MODELS:<br />
<strong>57926</strong>, 57922,<br />
57916, 57912,<br />
91916, 91912, 91926, 91922,<br />
94916, 94912, 94926, 94922<br />
PN <strong>57926</strong>-24 Rev C
Table of Contents<br />
ENGLISH<br />
• Introduction . . . . . . . . . . . . . . . . . . . . . . . . . . . . . . . . . . . . .2<br />
• Getting Started . . . . . . . . . . . . . . . . . . . . . . . . . . . . . . . . . . .4<br />
• Programing Your Timer . . . . . . . . . . . . . . . . . . . . . . . . . . . . .6<br />
• Using the Remote Control Device . . . . . . . . . . . . . . . . . . . .11<br />
• Using the Optional Rain-Freeze Sensor . . . . . . . . . . . . . . . .12<br />
• Installing Indoor Mount Sprinkler Timer<br />
and Remote Control Device Sleeve . . . . . . . . . . . . . . . . . . . 12<br />
• Diagnostics Circuit Breaker . . . . . . . . . . . . . . . . . . . . . . . . .15<br />
• Glossary of Terms. . . . . . . . . . . . . . . . . . . . . . . . . . . . . . . . 16<br />
• Trouble Shooting . . . . . . . . . . . . . . . . . . . . . . . . . . . . . . . . 18<br />
Section 1: Introduction<br />
Thank you for selecting an <strong>Orbit</strong> ® Signature Control timer,<br />
the most advanced and versatile controller available. <strong>Orbit</strong> ®<br />
designers have combined the latest technological features with<br />
an intuitive display to create a controller that fits every watering<br />
need.<br />
Please read this manual completely before you begin<br />
programming and using the controller.<br />
Important Features and Capabilities<br />
Dual Programs<br />
The timer offers two programs – Program A and Program B – for<br />
watering flexibility. Any of the watering stations can be assigned<br />
to either program. For example, stations that water your garden<br />
and flower beds could be assigned to Program A and watered<br />
daily starting at 8 a.m., while stations that water your lawn could<br />
be assigned to Program B and watered every third day starting at<br />
5 a.m.<br />
Six Cycle Start Times Per Program<br />
The timer accommodates six different start times for each of the<br />
two programs (A and B). Most timers only allow four different<br />
cycle start times.<br />
No-Watering Days and Times<br />
It’s easy to prevent watering on one or more days of the week<br />
or during specific periods of the day. This comes in handy if<br />
watering restrictions are imposed in your area.<br />
2
Docking Port<br />
This timer has been designed for convenience and “armchair”<br />
programming. The timer’s docking port is mounted on a wall<br />
and all wires are connected to it. The main timer unit can be<br />
easily and quickly slid on and off the docking port, allowing<br />
you to take the timer virtually anywhere to create or change<br />
watering programs.<br />
Remote Control Capabilities (Not included on all models)<br />
This timer can be controlled by the included remote control<br />
device via a radio frequency (<strong>RF</strong>) receiver and antennae, both<br />
of which are built into the timer. The remote control device<br />
allows you to turn stations on and off on the spot and to<br />
perform programming tasks from anywhere within range. The<br />
433 megahertz remote frequency is approved for use in the<br />
United States, Canada, Europe and Australia, and permits an<br />
effective line-of-sight range of 300 feet (reduced to 200 feet<br />
with obstructions).<br />
Choice of Five Languages<br />
You can easily set the LCD display to read in any of five<br />
languages: English, Spanish, French, German or Italian.<br />
Water Budgeting<br />
This convenient feature provides a quick, easy way to increase<br />
or decrease the watering durations of all stations in both<br />
programs to match seasonal watering needs. You won’t have to<br />
adjust each station’s watering time individually.<br />
Rain Sensor (Optional)<br />
An optional rain sensor can be purchased separately to prevent<br />
programmed watering for a period of time after rain falls<br />
(determined by the amount of rain and how quickly the<br />
sensors dry out). If your unit is <strong>RF</strong> capable then you can use a<br />
wireless sensor. Otherwise a hard-wired sensor can be used.<br />
Commonly Used Controls<br />
ENGLISH<br />
Programming Information Stored Safely<br />
in Non-Volatile Memory<br />
All programming information for Program A and Program<br />
B is stored indefinitely in the timer’s non-volatile memory<br />
(EEPROM) and internal memory. This high-end feature means<br />
your programming won’t be lost or erased if the power and<br />
batteries go out.<br />
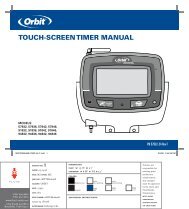
Easy-to-Read Back-Lit LCD Display<br />
The timer’s back-lit blue LCD display screen is easy to read<br />
under any lighting conditions.<br />
Digital Display with Text Messaging<br />
A large LCD (Liquid Crystal Display) shows the time of day and<br />
indicates many of the programming settings. Interactive text<br />
messaging simplifies programming and current sprinkler timer<br />
status. (See Figure 1)<br />
3
ACTIVE<br />
BYPASS<br />
DAY / PERIOD<br />
NO WATERING<br />
<strong>RF</strong> SYNC<br />
Programming Buttons<br />
These nine buttons are used for programming and other<br />
operations:<br />
Selection Dial<br />
This dial is used for programming, reviewing and operating the<br />
sprinkler timer.<br />
Rain Sensor Bypass Switch<br />
In Active position the controller will monitor the rain sensor, in<br />
Bypass position the controller will ignore the rain sensor. (This<br />
switch is for hard wired sensors only and does not effect wireless<br />
rain sensors - sensors sold separately).<br />
About This Manual<br />
A <strong>RF</strong> Sync (only on remote control model)<br />
Allows the timer to synchronize with a new remote or wire<br />
less sensor.<br />
b Rain Delay<br />
Push this button once while in AUTO to access the rain<br />
delay option. NOTE: Pressing this button will access the<br />
Language and No Watering Period options while in those<br />
respective dial positions.<br />
c Reset (pin hole)<br />
Resets the timer to its factory settings.<br />
d Increase<br />
e Decrease<br />
f Enter<br />
g Next<br />
h Clear<br />
i Manual<br />
Figure 1: Front view of timer<br />
h<br />
i<br />
g<br />
d<br />
f<br />
e<br />
We have added the following features to this manual to assist<br />
you:<br />
• BLUE TEXT relates to the buttons used for programming.<br />
• BLUE UNDERLINED TEXT relates to stop positions for the<br />
selection dial.<br />
• A glossary of the most common terms is included.<br />
(see page 16)<br />
Section 2: Getting Started<br />
You can program this sprinkler timer in just a few basic steps.<br />
Before you begin programming, it is important to:<br />
• Activate the batteries<br />
• Reset the sprinkler timer<br />
• Select the preferred language<br />
• Set the time of day and date<br />
• Determine a watering plan<br />
4
Activating the Batteries<br />
• Slide the docking port off the timer unit to gain access to the<br />
battery compartment door.<br />
• Slide the door off the battery compartment in the direction<br />
of the arrow.<br />
• Remove the black strip from the battery compartment.<br />
• Replace the battery compartment door.<br />
• Slide the docking port back onto the main controller unit.<br />
If no programming occurs after the RESET button has been<br />
pressed and the dial is left in the AUTO position the timer will<br />
assume a default program mode. In default mode, the timer will<br />
automatically water each station for 10 minutes, beginning at 5<br />
a.m. each day.<br />
Select the Preferred Language<br />
• Turn the selection dial to BUDGETING/LANGUAGE.<br />
ENGLISH<br />
• Press the RAIN DELAY button.<br />
• Press the NEXT<br />
shown in the display.<br />
button until the desired language is<br />
The display will show “LOW BATTERY” when it is time to<br />
replace the batteries.<br />
NOTE: Batteries alone will not operate the valves in your sprinkling<br />
system. The transformer must be plugged in and have power to operate<br />
your system normally.<br />
Reset the Timer<br />
If this is the first time the sprinkler timer has been programmed,<br />
you should press the small recessed button labeled<br />
RESET (located under the RAIN DELAY button). You will probably<br />
need a pen, pencil or similarly small object to push it.<br />
Do not press the RESET button again unless you want to completely<br />
remove all your programming, including time and date.<br />
• Exit the language selection mode by turning the selection dial<br />
or pressing the RAIN DELAY button.<br />
Set the Time of Day and Date<br />
If this is the first time the timer has been programmed, press<br />
the small recessed RESET button.<br />
• Turn the selection dial to TIME/DATE.<br />
• The top line of the display reads “SET TIME.” Set the current<br />
time by pressing either the or button.<br />
NOTE: To move faster through the time or other selections, hold the<br />
or buttons down, rather than merely pressing and releasing.<br />
• Press the ENTER button. The display now reads “SET<br />
YEAR.” Set the current year by pressing either the<br />
or button.<br />
5
DAY / PERIOD<br />
NO WATERING<br />
• Press the ENTER button. The display now reads “SET<br />
MONTH.” Set the current month by pressing either the<br />
or button.<br />
• Press the ENTER button. The display now reads “SET<br />
DATE.” Set the current day of the month by pressing either<br />
the or button.<br />
• Exit the set time and date mode at any time by turning the<br />
selection dial.<br />
Determine a Watering Plan<br />
See page 20 for instructions.<br />
Section 3: Programming Your Timer<br />
• Turn the selection dial to START TIMES for the program you<br />
wish to set (A or B).<br />
• Set Start Time 1 using the and buttons.<br />
• If you wish to set additional start times (up to six) for the same<br />
program, press the NEXT button or ENTER button.<br />
• To remove a start time press CLEAR C .<br />
• Exit the set start time mode by turning the selection dial.<br />
Set Station Watering Durations<br />
• Turn the selection dial to DURATION for the program you<br />
wish to set (A or B).<br />
• Set the desired duration (0 - 120 minutes) for the station<br />
displayed. Press NEXT or ENTER to advance to<br />
the next station. Press CLEAR C to remove a duration.<br />
IMPORTANT: Each station can have two durations. For example:<br />
Station 1 can have a duration of 5 minutes in Program A and a<br />
duration of 25 minutes in Program B. Typically a station has only<br />
one duration in either Program A of B. A station with a setting of 0<br />
minutes will not water with that Program.<br />
Figure 2: Program A and Program B Dial Settings<br />
Set Start Times<br />
IMPORTANT: Multiple start times in Program A will repeat the watering<br />
program. Generally, only one cycle start time is required for each<br />
program (A and B) Start times do not correspond to individual stations.<br />
• If two programs are needed repeat these steps for the other<br />
program.<br />
• Exit the set watering durations mode by turning the<br />
selection dial.<br />
6
Set Watering Days<br />
• Turn the selection dial to WATERING DAYS for the program<br />
you wish to set (A or B).<br />
Set to Water - Days of the Week:<br />
• Press the NEXT button to move through the days of<br />
the week. The selected day will flash.Press ENTER and<br />
a water drop appears above that day of the week. The program<br />
is now set to water on that day. The program can be set<br />
to water any combination of days (ex. Mo, We, Fr).<br />
• To deactivate watering for a particular day, press the<br />
CLEAR C button. The water drop will disappear.<br />
Set to Water - Odd Days:<br />
• Press the NEXT<br />
• Press the ENTER<br />
above “ODD.”<br />
button until “ODD” flashes.<br />
button. A water drop will appear<br />
CLEAR C button or by selecting another watering day<br />
mode. The water drop will disappear.<br />
Set to Water - Interval<br />
• Press the NEXT<br />
button until “INT” (interval) flashes.<br />
• Press the or buttons to select the desired interval<br />
(select between every 1 day and every 32 days). An interval<br />
of “2” means it will water every other day.<br />
• You can deactivate the “INTERVAL” mode by pressing the<br />
CLEAR<br />
C<br />
button or by selecting another watering day<br />
mode. The water drop will disappear.<br />
Set the Timer to Automatically<br />
Run Your Programs:<br />
• Turn the selection dial to AUTO. The timer will be controlled<br />
automatically by the programming parameters that have been<br />
set.<br />
ENGLISH<br />
• You can deactivate the “ODD” mode by pressing the<br />
CLEAR C button or by selecting another watering day<br />
mode. The water drop will disappear.<br />
Set to Water - Even Days:<br />
• Press the NEXT button until “EVEN” flashes.<br />
• Press the ENTER button. A water drop will appear<br />
above “EVEN.”<br />
• You can deactivate the “EVEN” mode by pressing the<br />
To Turn All Watering Off:<br />
• Turn the selection dial to OFF. This prevents the timer from<br />
turning any watering station on at any time, regardless of<br />
programming.<br />
To Prevent Watering on a Particular Day:<br />
There may be one or more days of the week when you never<br />
want to have the water turn on, regardless of what the program<br />
7
says. (For example, in some water districts, watering is<br />
prohibited on certain days.) To cancel programmed watering on<br />
specific days of the week, follow these steps:<br />
• Turn the selection dial to NO WATERING DAY/PERIOD. On<br />
the display, you will see the seven days of the week with a<br />
water drop above each day. The water drop means watering<br />
is allowed on that particular day.<br />
• Press the NEXT button to select the day of the week<br />
you don’t want to water. (The day will flash.)<br />
• Press the CLEAR C button. The water drop above that day<br />
will disappear and the “ON” on the bottom right of the<br />
display will change to “OFF.” This means the timer will prevent<br />
watering on that day.<br />
• To unblock a day that has been selected as a no watering day,<br />
select the day (following the same steps), then press the<br />
ENTER button. The water drop will reappear and the<br />
“OFF” will change to “ON.”<br />
• Exit the “NO WATERING DAY” selection mode by turning<br />
the selection dial.<br />
To Prevent Watering During a<br />
Particular Period of the Day:<br />
There may be a time of the day when you never want the water<br />
to come on, regardless of what the program calls for. (Perhaps<br />
your community has banned watering during certain periods<br />
of the day, or you don’t want your children to get wet going to<br />
school.) Here’s what to do:<br />
• Turn the selection dial to NO WATERING DAY/PERIOD.<br />
• Press the RAIN DELAY button. The display reads “SET NO<br />
WATER START PERIOD.”<br />
• Press either the or button to set the start time of the<br />
period you don’t want the water to come on.<br />
• Press the ENTER button. The display reads “SET NO<br />
WATER END PERIOD.”<br />
• Press either the or button to set the end time of the<br />
period you don’t want the water to come on.<br />
• Exit the “NO WATERING PERIOD” selection mode by turning<br />
the selection dial.<br />
NOTE: If programmed watering is interrupted by a no-watering<br />
period, the timer will resume the watering schedule where it left off<br />
as soon as the no-watering period is over. If the no-watering period<br />
prevents scheduled watering from starting, the timer will start the<br />
watering as soon as the no-watering period is over. This feature is<br />
called “stacking.”<br />
Set Water Budgeting:<br />
Water Budgeting is a quick way to adjust your set durations (10<br />
to 200%) based on seasonal requirements.<br />
• Turn the selection dial to BUDGETING/LANGUAGE.<br />
• Either press the button to increase the watering times, or<br />
press the button to decrease the times in increments<br />
of 10 percent. A setting of 100% will not change the set<br />
durations, a setting of 200% will increase a 10 minute<br />
8
duration to 20 minutes, and a setting of 10% will decrease a<br />
10 minute duration to 1 minute.<br />
• Exit the set water budgeting mode by turning the selection<br />
dial.<br />
Test All Stations:<br />
<strong>With</strong> the “TEST ALL” function, you can easily test all the watering<br />
stations by turning them on in sequence for one minute<br />
each.<br />
• <strong>With</strong> the dial in the AUTO position press the MANUAL<br />
button.<br />
• The display reads “TEST ALL” to the right of the letters “A”<br />
and “B.”<br />
• Press the ENTER<br />
button.<br />
Each watering station will turn on for one minute, in sequence.<br />
To abort this process before the test is finished, press the<br />
CLEAR C button. To advance quickly from one station to<br />
the next press NEXT . Otherwise, the timer will automatically<br />
exit the “TEST ALL” mode after all stations have run for<br />
one minute.<br />
• Press the NEXT<br />
button.<br />
• The display reads “MANUAL ALL” to the right of the letters<br />
“A” and “B.”<br />
• Press the ENTER<br />
button.<br />
Each station with a set duration will water in sequence. To<br />
quickly advance from one station to the next press NEXT .<br />
To abort this process before the manual watering is finished,<br />
press CLEAR C . Otherwise, the timer will automatically exit<br />
the “MANUAL ALL” mode after all stations have run.<br />
Manual Watering - Program A:<br />
This will allow you to water only those stations with set durations<br />
in Program A.<br />
• <strong>With</strong> the dial in the AUTO position press the MANUAL<br />
button.<br />
• Press the NEXT<br />
“A MANUAL ALL”.<br />
• Press the ENTER<br />
button until the display reads<br />
button.<br />
ENGLISH<br />
Manual Watering - All Stations:<br />
<strong>With</strong> the “MANUAL ALL” function, you can manually turn on<br />
the watering stations at any time.<br />
• <strong>With</strong> the dial in the AUTO position press the MANUAL<br />
button.<br />
Each station will water, in sequence, one after another, for the<br />
same duration specified in Program A. To quickly advance from<br />
one station to the next press NEXT .<br />
To abort this process before the manual watering is finished,<br />
press CLEAR<br />
C<br />
. Otherwise, the timer will automatically<br />
exit the “A – MANUAL ALL” mode after all Program A stations<br />
have run.<br />
9
Manual Watering - Program B:<br />
This will allow you to water only those stations with set durations<br />
in Program B.<br />
• <strong>With</strong> the dial in the AUTO position press the MANUAL<br />
button.<br />
• Press the NEXT button until the display reads “B<br />
MANUAL ALL”.<br />
• Press the ENTER<br />
button.<br />
Each station will water, in sequence, one after another, for the<br />
same duration specified in Program B. To quickly advance from<br />
one station to the next press NEXT .<br />
To abort this process before the manual watering is finished,<br />
tpress CLEAR<br />
C<br />
. Otherwise, the timer will automatically<br />
exit the “B – MANUAL ALL” mode after all Program B stations<br />
have run.<br />
Manual Watering - Single Stations:<br />
This will allow you to water a single station at a time.<br />
• <strong>With</strong> the dial in the AUTO position press the MANUAL<br />
button.<br />
• Press the NEXT button until the display reads<br />
“MANUAL STATION 1”.<br />
• Press the NEXT<br />
you want to water.<br />
button to select the station number<br />
• Press the or buttons to select the number of minutes<br />
to water that station (from 1 to 120 minutes).<br />
• Press the ENTER<br />
button.<br />
To abort this process before the manual watering is finished,<br />
C<br />
press CLEAR . Otherwise, the timer will automatically exit<br />
the “MANUAL – STATION” mode after the selected station has<br />
run.<br />
Rain Delay Function:<br />
You can press the RAIN DELAY button to stop all programmed<br />
watering from taking place for a certain number of hours or<br />
days (for instance, after a rain storm).<br />
• <strong>With</strong> the dial in the AUTO position press the RAIN DELAY<br />
button.<br />
• Press the or buttons to change the rain delay<br />
period. The options are: 24 hours, 48 hours, 72 hours, 4<br />
days, 5 days … and up to 99 days in one-day increments.<br />
• Press the ENTER button to enter the rain delay mode.<br />
The Rain Delay hours remaining will show on the display.<br />
The timer will revert to the programmed schedule at the expiration<br />
of the rain delay period. To return to the programmed<br />
schedule before the expiration of the rain delay period, press<br />
the CLEAR<br />
C<br />
button.<br />
Manual Advance During Watering:<br />
• Pressing the NEXT<br />
button will advance watering from<br />
10
the current station to the next station in the cycle. This can<br />
be done during scheduled, manual, or remote actuated<br />
watering.<br />
Section 4: Using the Remote<br />
Control Device<br />
• Press the OFF button on the remote or depress the stem of<br />
the <strong>RF</strong> sensor (the red light should start blinking).<br />
• If the red light blinks you have successfully synchronized the<br />
devices. If the light does not blink check that the remote has a<br />
fresh 9V battery or that the <strong>RF</strong> sensor switch is not OFF and<br />
try the steps again.<br />
ENGLISH<br />
NOTE: The timer will accept commands from the remote control<br />
device only when the selection dial is turned to AUTO or OFF. (If<br />
the selection dial is turned to any other setting, commands from the<br />
Remote Control Device will be stored in memory and executed when<br />
the selection dial is turned to AUTO).<br />
Install a Battery in the Remote Control Device:<br />
• Open the battery compartment door.<br />
• Install a 9-volt battery in the battery compartment.<br />
• Replace the battery compartment door.<br />
To Synchronize the Remote Control Device<br />
with the Timer:<br />
The remote device provided with your timer is already synchronized<br />
to your timer. If the remote is not functioning properly or<br />
if you are adding a new remote or <strong>RF</strong> sensor to your system do<br />
the following:<br />
• <strong>With</strong> the remote device in your hand press the “<strong>RF</strong> Sync”<br />
button on the timer (this will activate a red light on<br />
the timer).<br />
To Water All Stations:<br />
• Press and release the ALL button on the remote control<br />
device to select all stations for watering.<br />
• Press and release the ON “X” MIN button to command the<br />
timer to water all the stations sequentially for the desired<br />
(“X”) number of minutes.<br />
• If you wish to advance to the next station before a station's<br />
watering duration is complete, press NEXT.<br />
To Water One Station:<br />
• Press the number of the station you wish to water.<br />
• Press ON "X" MIN to water the station for the desired ("X")<br />
number of minutes.<br />
To Water More Than One Specific Station:<br />
• Press the numbers of the stations you wish to water. (Example:<br />
3, 7, 10, and 6. The timer will water in sequence from lowest<br />
to the highest. 3, 6, 7, 10.) (No matter which order you press<br />
the keys, the timer will water them sequentially from the<br />
lowest to the highest number.)<br />
11
ACTIVE<br />
BYPASS<br />
<strong>RF</strong> SYNC<br />
SENSOR COM PUMP 1 2 3 4 5 6 7 8 9 10 11 12 24 VAC<br />
• Press ON “X” MIN to water those stations for the desired<br />
(“X”) number of minutes.<br />
To Cancel Remote Control Device Operation<br />
and Return Control to Timer:<br />
• Press the OFF/CLEAR button on the Remote Control Device.<br />
This cancels any current commands from the device<br />
and returns control back to the timer.<br />
Section 5: Using the Optional<br />
Rain-Freeze Sensor<br />
An optional rain-freeze sensor can be purchased separately to<br />
prevent programmed watering for a specified period of time<br />
after rain falls or during periods when temperatures fall below<br />
a specified temperature. The sensor has settings for RAIN, OFF<br />
and RAIN/FREEZE. Please refer to the manual that accompanies<br />
the rain-freeze sensor for installation and programming instructions.<br />
Installing the Sprinkler Timer<br />
in Five Easy Steps<br />
1. Select a Location<br />
Select a location with the following criteria:<br />
• Near an electrical outlet. (Avoid using an outlet controlled<br />
by a switch.)<br />
• In a dry, indoor location, where operating temperatures<br />
are not below 32° or above 122° Fahrenheit (below 0<br />
degrees or above 50 degrees Celsius).<br />
• Not in direct sunlight.<br />
• Accessible to sprinkler wires from valves.<br />
NOTE: The rain-freeze sensor will function only when the selection<br />
dial on the timer is turned to AUTO.<br />
DAY / PERIOD<br />
NO WATERING<br />
Section 6: Installing Indoor Mount<br />
Sprinkler Timer and Remote<br />
Control Device Sleeve<br />
NOTE: Before installation, please have the following tools on hand:<br />
• Phillips screwdriver<br />
• Wire strippers<br />
Slide the Timer off the Docking Port<br />
Figure 3: Mounting the Docking Port<br />
12
2. Mount the Docking Port<br />
• Slide the timer off the docking port. (See Figure 3)<br />
• Using the mounting template (included), mark the two<br />
screw locations on the wall, then drill holes at the marks<br />
for No. 8 screws. Use the expanding anchors in plaster or<br />
masonry if necessary.<br />
• Place the docking port against the wall, aligning the two<br />
holes in the docking port with the two drilled holes.<br />
• Secure the docking port to the wall by screwing a No. 8<br />
screw (included) through each of the two holes.<br />
• Do not slide the timer back onto the docking port yet.<br />
3. Connect the Transformer<br />
• Find the two sockets at the bottom of the docking port<br />
labeled “24VAC.” (See Figure 4)<br />
• Insuring the transformer is not plugged in; insert one of<br />
the two power leads from the transformer into each<br />
terminal socket using the phillips screwdriver to depress<br />
the terminal button (this allows for wire insertion or<br />
removal).<br />
• Plug in the transformer.<br />
WARNING: Do not link two or more sprinkler timers together with<br />
one transformer.<br />
4. Connect Valve Wires to Timer, Pump Start and Master<br />
Valve Sockets<br />
A. Wire the Electric Valves<br />
NOTE: If the distance between the sprinkler timer and valves<br />
is under 700’ (210 m), use <strong>Orbit</strong> ® sprinkler wire or 20 gauge<br />
(AWG) plastic jacketed thermostat wire to connect the sprinkler<br />
timer to the valves. If the distance is over 700’ (210 m), use 16<br />
gauge (AWG) wire.<br />
• Taking the sprinkler wire, strip 1/2" (12 mm) of the<br />
plastic insulation off the end of each individual wire.<br />
ENGLISH<br />
SENSOR COM PUMP 1 2 3 4 5 6 7 8 9 10 11 12 24 VAC<br />
Terminal Button<br />
Transformer<br />
Figure 4: Connecting the Transformer<br />
• Connect one wire from each valve (it doesn’t matter<br />
which wire) to a single “common” sprinkler wire. This<br />
is usually white. (See Figure 5)<br />
IMPORTANT: All wires should be joined together using wire<br />
nuts, solder and/or vinyl tape. For additional protection to<br />
waterproof connections, an <strong>Orbit</strong> ® grease cap can be used.<br />
• Next, connect the remaining wire from each valve to a<br />
separate colored sprinkler wire.<br />
13
• To avoid electrical hazards, only one valve should be<br />
connected to each station.<br />
IMPORTANT: The wire can be buried in the ground. However,<br />
for greater protection, wires can be pulled through PVC pipe<br />
and buried underground. Be careful to avoid burying the wires<br />
in locations where they could be damaged by future digging or<br />
trenching.<br />
B. Connect Valve Wires to the Sprinkler Timer<br />
• Strip 1/4" (6 mm) of the plastic insulation off the end<br />
of each wire.<br />
• Determine which valve you want to connect to which<br />
station. Insert each sprinkler wire, excluding the<br />
“common” wire, into a separate station socket (numbered<br />
above each socket) by inserting the bare wire<br />
fully into the socket under each number. (See Figure 5)<br />
• Connect the common wire to one of the two sockets<br />
(white in color) labeled “COM.”<br />
NOTE: Insert only one wire into each “COM” socket. If more<br />
than two common wires are required, splice several together so<br />
only one wire runs into each of the two “COM” terminals. Protect<br />
the splice connection with a wire nut.<br />
C. Connect Pump Start and Master Valve<br />
This timer allows a master valve or pump start relay to operate<br />
whenever a station is on.<br />
NOTE: If you are activating a pump from this timer, you must<br />
purchase a Pump Start Relay.<br />
From the pump start relay (or master valve); connect one<br />
wire to the “PUMP” socket and the other wire to the “COM”<br />
socket.<br />
Once all connections to the docking port are made, you may<br />
slide the timer back onto the docking port.<br />
SENSOR COM PUMP 1 2 3 4 5 6 7 8 9 10 11 12 24 VAC<br />
5. Mount the Sleeve for the Remote Control Device<br />
Terminal Button<br />
Common Wire<br />
• Using the mounting template (included) mark the two<br />
screw locations on the wall, then drill holes at the marks<br />
for No. 8 screws. Use the expanding anchors in plaster or<br />
masonry if necessary. (The sleeve can be mounted any<br />
where and does not need to be next to the timer.)<br />
Station Valves<br />
Figure 5: Connecting Sprinkler Wire<br />
• Place the remote control device sleeve against the wall,<br />
aligning the two holes in the sleeve with the two<br />
drilled holes.<br />
14
• Secure the sleeve to the wall by screwing a No. 8 screw<br />
(included) through each of the two holes.<br />
• Slide the remote control device into the sleeve.<br />
Section 7: Diagnostics Circuit Breaker<br />
4. If the message continues, a short in the wiring still exists.<br />
Internal Auto-Resetting Electronic Circuit Breaker<br />
The sprinkler timer is equipped with an internal electronic<br />
self-resetting circuit breaker.<br />
ENGLISH<br />
Smart-Scan ® Diagnostic Fault Sensing<br />
A diagnostic fault sensor will automatically scan for the<br />
presence of a faulty solenoid or wiring short in a valve during<br />
each watering sequence. If a faulty station is detected, the<br />
sprinkler timer will move to the next working station. Smart-<br />
Scan ® also detects faulty wiring for the Pump or Master Control.<br />
Upon detection watering cycle is discontinued.<br />
Fault Notification<br />
• Faulty Station: “FAULT STN” and station number is<br />
displayed. When multiple faulty stations are detected, only<br />
the last faulty station will be displayed.<br />
• Faulty wiring for pump/master control: “PUMP FAULT” is<br />
displayed.<br />
Correcting the Fault<br />
1. First, repair the short in the wiring or replace the faulty<br />
solenoid.<br />
2. Test the station by operating a manual watering<br />
sequence.<br />
3. If the short is not detected after a few seconds, the fault<br />
notification message will be terminated.<br />
Possible causes of a circuit breaker tripping:<br />
1. If lightning strikes nearby.<br />
2. When the power supply has an electric spike.<br />
3. If a station has a wiring short.<br />
Whenever one of these conditions occurs, the electronic circuit<br />
breaker may trip, causing the station output from the sprinkler<br />
timer to be halted momentarily. The batteries will continue<br />
to activate the LCD. After a few moments, the sprinkler timer<br />
will automatically retest the circuit to see if the condition has<br />
stopped. If so, the circuit breaker will reset itself.<br />
15
Section 8: Glossary of Terms<br />
TERM<br />
Cycle Start Time<br />
Master Valve<br />
Multiple Start Times<br />
Program (A or B)<br />
Rain Delay<br />
Solenoid<br />
Sprinkler Timer<br />
Stacking<br />
Station (Watering Station)<br />
Terminal<br />
Watering Program<br />
Watering Restrictions<br />
Watering Valve<br />
(<strong>Irrigation</strong> Valve)<br />
Zones<br />
DEFINITION<br />
The time the program begins watering the cycle<br />
A valve that prohibits water from reaching station valves<br />
A feature that allows a program to be operated multiple times on the same day<br />
A schedule for a group of stations that determines the date and time for watering<br />
A feature that prevents the sprinkler timer from running it's scheduled watering program for a specific duration<br />
The electrical part on a sprinkler (irrigation) valve that opens and closes the valve<br />
A device that is responsible for turning an automatic irrigation system on and off<br />
When a start time is scheduled to begin before the previous cycle has completed<br />
An area where the watering (irrigation) is all controlled by a single control valve<br />
The connection point on the docking port where a wire is inserted<br />
See “Program (A or B)”<br />
Specific days and/or times that local municipalities prohibit watering<br />
Used in conjunction with sprinkler timers – a convenient way to deliver water to lawns, plants and gardens<br />
See “Station (Watering Station)”<br />
Determine a Watering Plan<br />
Your timer has two programs: Program A and Program B. The<br />
dual program capability allows you to assign certain watering<br />
stations to Program A and others to Program B. There are<br />
various reasons why you would want to do so. For example,<br />
you might want to assign the stations that water the garden and<br />
flower beds to Program A and those that water the lawn areas<br />
of your yard to Program B. That way, you can set Program A to<br />
water the garden beds every day, and set Program B to water the<br />
lawn every second or third day.<br />
Your timer allows you to set up to six different watering cycle<br />
start times for Program A or Program B. You cannot set a cycle<br />
start time for each station. Stations can be assigned to either<br />
Program A or Program B. Stations assigned to a program will turn<br />
on sequentially according to the cycle start times assigned.<br />
To help you visualize how best to program your timer, it might<br />
be helpful to make a watering plan on paper. This will help you<br />
establish the days, times and durations to water each station.<br />
16
1. For each station (or valve) write down the watering<br />
location, the type of sprinkler head and the types of<br />
plants to be watered.<br />
2. Using this list, determine the recommended watering<br />
duration (for each type of sprinkler head and the<br />
vegetation to be watered) and frequency for each station.<br />
IMPORTANT: Be aware of any watering restrictions through<br />
your local water district.<br />
3. Determine, based on step 2, the ideal watering option for<br />
each station.<br />
Based on the preceding information your water program may<br />
look like this:<br />
ENGLISH<br />
Station<br />
Program<br />
Watering<br />
Option<br />
Days<br />
Start<br />
Time<br />
Duration<br />
Minutes<br />
Location<br />
Sprinkler<br />
Plants<br />
1<br />
A<br />
Days of Week<br />
M, W, Sat<br />
5:00 AM<br />
15 min<br />
Front Strip<br />
Spray Heads<br />
Grass<br />
2<br />
A<br />
Days of Week<br />
M, W, Sat<br />
15 min<br />
Front, North<br />
Spray Heads<br />
Grass<br />
3<br />
B<br />
Odd/Even<br />
Every other day<br />
6:45 AM<br />
30 min<br />
Back, North<br />
Gear Drive<br />
Grass<br />
4<br />
B<br />
Interval<br />
Every 5 days<br />
9:00 PM<br />
30 min<br />
Front<br />
Shrub Head<br />
Shrubs and Flowers<br />
17
Section 9: Trouble Shooting<br />
Symptom<br />
One or more stations do<br />
not turn on<br />
Stations turn on when<br />
they are not supposed to<br />
One station is stuck<br />
on and will not shut off<br />
All stations do not turn on<br />
Timer will not power up<br />
Stations continue to turn on and off<br />
when they are not programmed to<br />
Persistant Fault<br />
Possible Causes of Problems<br />
1. Faulty Solenoid<br />
2. Wire broken or not connected<br />
3. Flow control stem screwed down, shutting valve off<br />
4. Programming is incorrect<br />
1. Water pressure is too high<br />
2. More than one start time is programmed<br />
3. Stations are set to water with both programs<br />
1. Faulty valve<br />
2. Particles of dirt or debris stuck in valve<br />
3. Valve diaphragm faulty<br />
1. Transformer is defective or is not connected correctly<br />
2. Programming is incorrect<br />
3. Timer is in OFF mode<br />
1. Transformer is defective or is not connected correctly<br />
2. Timer is not all the way down on the docking port<br />
1. More than one start time is programmed with overlapping schedules<br />
2. Excessive pressure<br />
1. Short in wiring or solenoids<br />
Correction<br />
Replace solenoid<br />
Repair wire and check connections<br />
Turn flow control stem counter-clockwise<br />
until desired flow is achieved<br />
Check to make sure the station in<br />
question is set to water with a program<br />
Install a pressure reducer<br />
Reduce the number of start times for that<br />
program<br />
Set station duration to 0 for suspect program<br />
Check that valve is not installed backwards<br />
Remove dirt or debris from valve<br />
Replace diaphragm<br />
Check connections and outlet if NO A/C<br />
power persists replace transformer<br />
Check Start Time and Watering Days<br />
Turn dial to AUTO<br />
Check connections and outlet if NO A/C<br />
power persists replace transformer<br />
Push down timer on docking port until back<br />
light turns on.<br />
Reduce the number of start times for that<br />
program<br />
Install pressure reducer<br />
Check wiring or replace solenoid<br />
18
Help<br />
Before returning this sprinkler timer to the store, contact <strong>Orbit</strong> ®<br />
Technical Service at:<br />
1-800-488-6156, 1-801-299-5555.<br />
• Connect the equipment into an outlet on a circuit<br />
different from that to which the receiver is connected.<br />
• Consult the dealer or an experienced radio/TV<br />
technician for help.<br />
ENGLISH<br />
Listings<br />
This device complies with Part 15 of the FCC Rules. Operation<br />
is subject to the following two conditions: (1) This device may<br />
not cause harmful interference, and (2) This device must accept<br />
any interference received, including interference that may cause<br />
undesired operation.<br />
Warning: Changes or modifications to this unit not expressly<br />
approved by the party responsible for compliance could void<br />
the user’s authority to operate the equipment.<br />
NOTE: This equipment has been tested and found to comply<br />
with the limits for a Class B digital device, pursuant to Part 15<br />
of the FCC Rules. These limits are designed to provide reasonable<br />
protection against harmful interference in a residential installation.<br />
This equipment generates uses and can radiate radio<br />
frequency energy and, if not installed and used in accordance<br />
with the instructions, may cause harmful interference to radio<br />
communications. However, there is no guarantee that interference<br />
will not occur in a particular installation. If this equipment<br />
does cause harmful interference to radio or television reception,<br />
which can be determined by turning the equipment off and on,<br />
the user is encouraged to try to correct the interference by one<br />
or more of the following measures:<br />
• Reorient or relocate the receiving antenna.<br />
• Increase the separation between the equipment and<br />
receiver.<br />
<strong>Orbit</strong> ® <strong>Irrigation</strong> Limited Six-Year Warranty<br />
<strong>Orbit</strong> ® <strong>Irrigation</strong> Products, Inc. warrants to its customers that its<br />
products will be free from defects in materials and workmanship<br />
for a period of six years from the date of purchase.<br />
We will replace, free of charge, the defective part or parts found<br />
to be defective under normal use and service for a period of up<br />
to six years after purchase (proof of purchase required).<br />
We reserve the right to inspect the defective part prior to<br />
replacement. <strong>Orbit</strong> ® <strong>Irrigation</strong> Products, Inc. will not be responsible<br />
for consequential or incidental cost or damage caused<br />
by the product failure. <strong>Orbit</strong> ® liability under this warranty is<br />
limited solely to the replacement or repair of defective parts.<br />
To exercise your warranty, return the unit to your dealer with a<br />
copy of the sales receipt.<br />
SAFETY OF CHILDREN: The controller is not intended for use by<br />
young children or infirm person without supervision. Young children<br />
should be supervised to ensure they do not play with controller.<br />
<strong>Orbit</strong> ® <strong>Irrigation</strong> Products, Inc.<br />
North Salt Lake, UT 84054 USA<br />
www.orbitonline.com | 1-800-488-6156<br />
© 2007 <strong>Orbit</strong> ® <strong>Irrigation</strong> Products, Inc.<br />
All rights reserved. All trade names are registered<br />
trademarks of respective manufacturers listed.<br />
19