Decking & Dryspace - Barker Lumber Co.
Decking & Dryspace - Barker Lumber Co.
Decking & Dryspace - Barker Lumber Co.

Create successful ePaper yourself
Turn your PDF publications into a flip-book with our unique Google optimized e-Paper software.
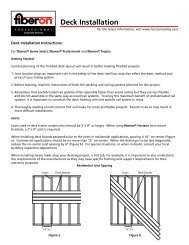
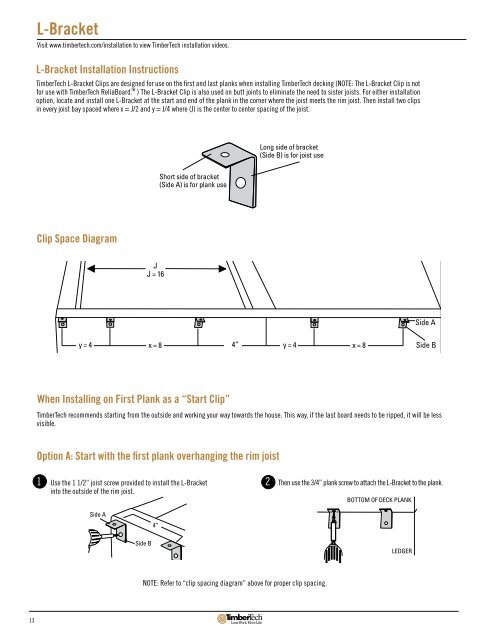
L-Bracket<br />
Visit www.timbertech.com/installation to view TimberTech installation videos.<br />
L-Bracket Installation Instructions<br />
TimberTech L-Bracket Clips are designed for use on the first and last planks when installing TimberTech decking (NOTE: The L-Bracket Clip is not<br />
for use with TimberTech ReliaBoard.<br />
TM ) The L-Bracket Clip is also used on butt joints to eliminate the need to sister joists. For either installation<br />
option, locate and install one L-Bracket at the start and end of the plank in the corner where the joist meets the rim joist. Then install two clips<br />
in every joist bay spaced where x = J/2 and y = J/4 where (J) is the center to center spacing of the joist.<br />
Long side of bracket<br />
(Side B) is for joist use<br />
Short side of bracket<br />
(Side A) is for plank use<br />
Clip Space Diagram<br />
J<br />
J = 16<br />
Side A<br />
y = 4 x = 8<br />
y = 4<br />
x = 8<br />
4”<br />
Side B<br />
When Installing on First Plank as a “Start Clip”<br />
TimberTech recommends starting from the outside and working your way towards the house. This way, if the last board needs to be ripped, it will be less<br />
visible.<br />
Option A: Start with the first plank overhanging the rim joist<br />
1 Use the 1 1/2” joist screw provided to install the L-Bracket<br />
into the outside of the rim joist.<br />
2 Then use the 3/4” plank screw to attach the L-Bracket to the plank.<br />
BOTTOM OF DECK PLANK<br />
Side A<br />
4”<br />
Side B<br />
LEDGER<br />
NOTE: Refer to “clip spacing diagram” above for proper clip spacing.<br />
13