Decking & Dryspace - Barker Lumber Co.
Decking & Dryspace - Barker Lumber Co.
Decking & Dryspace - Barker Lumber Co.

Create successful ePaper yourself
Turn your PDF publications into a flip-book with our unique Google optimized e-Paper software.
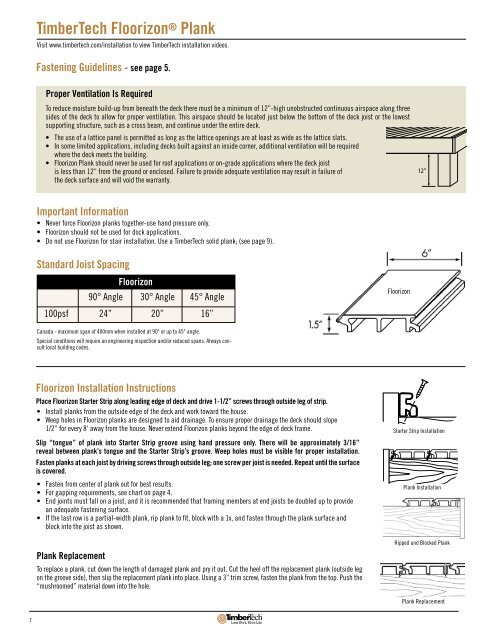
TimberTech Floorizon ® Plank<br />
Visit www.timbertech.com/installation to view TimberTech installation videos.<br />
Fastening Guidelines - see page 5.<br />
Proper Ventilation Is Required<br />
To reduce moisture build-up from beneath the deck there must be a minimum of 12”-high unobstructed continuous airspace along three<br />
sides of the deck to allow for proper ventilation. This airspace should be located just below the bottom of the deck joist or the lowest<br />
supporting structure, such as a cross beam, and continue under the entire deck.<br />
• The use of a lattice panel is permitted as long as the lattice openings are at least as wide as the lattice slats.<br />
• In some limited applications, including decks built against an inside corner, additional ventilation will be required<br />
where the deck meets the building.<br />
• Floorizon Plank should never be used for roof applications or on-grade applications where the deck joist<br />
is less than 12” from the ground or enclosed. Failure to provide adequate ventilation may result in failure of<br />
the deck surface and will void the warranty.<br />
Important Information<br />
• Never force Floorizon planks together-use hand pressure only.<br />
• Floorizon should not be used for dock applications.<br />
• Do not use Floorizon for stair installation. Use a TimberTech solid plank; (see page 9).<br />
Standard Joist Spacing<br />
Floorizon<br />
90° Angle 30° Angle 45° Angle<br />
100psf 24” 20” 16”<br />
Floorizon<br />
Canada - maximum span of 400mm when installed at 90˚ or up to 45˚ angle.<br />
Special conditions will require an engineering inspection and/or reduced spans. Always consult<br />
local building codes.<br />
Floorizon Installation Instructions<br />
Place Floorizon Starter Strip along leading edge of deck and drive 1-1/2” screws through outside leg of strip.<br />
• Install planks from the outside edge of the deck and work toward the house.<br />
• Weep holes in Floorizon planks are designed to aid drainage. To ensure proper drainage the deck should slope<br />
1/2” for every 8’ away from the house. Never extend Floorizon planks beyond the edge of deck frame.<br />
Slip “tongue” of plank into Starter Strip groove using hand pressure only. There will be approximately 3/16”<br />
reveal between plank’s tongue and the Starter Strip’s groove. Weep holes must be visible for proper installation.<br />
Fasten planks at each joist by driving screws through outside leg; one screw per joist is needed. Repeat until the surface<br />
is covered.<br />
• Fasten from center of plank out for best results.<br />
• For gapping requirements, see chart on page 4.<br />
• End joints must fall on a joist, and it is recommended that framing members at end joists be doubled up to provide<br />
an adequate fastening surface.<br />
• If the last row is a partial-width plank, rip plank to fit, block with a 1x, and fasten through the plank surface and<br />
block into the joist as shown.<br />
Plank Replacement<br />
To replace a plank, cut down the length of damaged plank and pry it out. Cut the heel off the replacement plank (outside leg<br />
on the groove side), then slip the replacement plank into place. Using a 3” trim screw, fasten the plank from the top. Push the<br />
“mushroomed” material down into the hole.<br />
Starter Strip Installation<br />
Plank Installation<br />
Ripped and Blocked Plank<br />
Plank Replacement<br />
7