
Create successful ePaper yourself
Turn your PDF publications into a flip-book with our unique Google optimized e-Paper software.
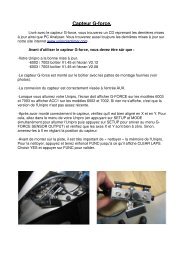
<strong>Unipro</strong> G-<strong>force</strong> <strong>sensor</strong><br />
Included with the <strong>sensor</strong> you will find a CD with the latest software for your Laptimer and computer. You will<br />
always find the latest software available on our homepage www.uniprolaptimer.com<br />
Before you mount the G-<strong>force</strong> <strong>sensor</strong> you have to make sure that:<br />
Laptimer:<br />
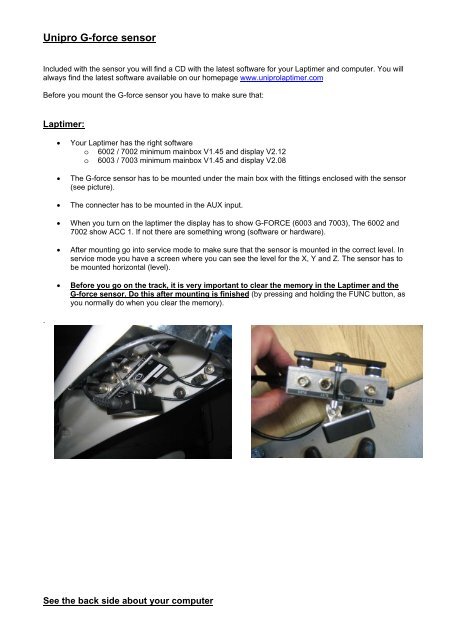
.<br />
• Your Laptimer has the right software<br />
o 6002 / 7002 minimum mainbox V1.45 and display V2.12<br />
o 6003 / 7003 minimum mainbox V1.45 and display V2.08<br />
• The G-<strong>force</strong> <strong>sensor</strong> has to be mounted under the main box with the fittings enclosed with the <strong>sensor</strong><br />
(see picture).<br />
• The connecter has to be mounted in the AUX input.<br />
• When you turn on the laptimer the display has to show G-FORCE (6003 and 7003), The 6002 and<br />
7002 show ACC 1. If not there are something wrong (software or hardware).<br />
• After mounting go into service mode to make sure that the <strong>sensor</strong> is mounted in the correct level. In<br />
service mode you have a screen where you can see the level for the X, Y and Z. The <strong>sensor</strong> has to<br />
be mounted horizontal (level).<br />
• Before you go on the track, it is very important to clear the memory in the Laptimer and the<br />
G-<strong>force</strong> <strong>sensor</strong>. Do this after mounting is finished (by pressing and holding the FUNC button, as<br />
you normally do when you clear the memory).<br />
See the back side about your computer
Computer:<br />
The PC Analyser software on your computer has to be minimum version 0.1.0.176<br />
When you have installed the software on you computer (with the setup.exe file), connect your computer to<br />
the internet, and choose the “Help” tab and then press “Check for Update”. Then you will have the latest<br />
software. Do this at least once per week here in the beginning.<br />
After transferring data from the Laptimer, use the method following to make a new reference track.<br />
1. From the Tools tab, click on the Track Manager button.<br />
2. Open the G-Force file you just transferred with the Open G-Force button.<br />
3. Go through the laps to find the best looking one.<br />
4. Rotate the track from the Setup tab to get the best view.<br />
5. A good idea is to remove the checkmark in the Join Ends checkbox and then adjust the Calibration until<br />
the ends are closest together. Check Join Ends again when you are done.<br />
6. Give the track map the correct Track Name and save it for later with the Save Track button.<br />
Close the track manager by pressing the OK button<br />
Now you made a new reference track that can be used for future as well as old lap data. To use this new<br />
reference track, you need to load it again.<br />
1. Open the lap file you want to analyse.<br />
2. Display the track window by enabling it with the Track button from the View tab.<br />
3. Double click on the track window to show the track select window. Select the track you need.<br />
Now you have attached a track map to the data loaded. The track map will be adjusted to the same length as<br />
the reference lap.<br />
Good luck with your new G-Force <strong>sensor</strong>