JD7136 TA ST manual - Ruberkon
JD7136 TA ST manual - Ruberkon
JD7136 TA ST manual - Ruberkon

You also want an ePaper? Increase the reach of your titles
YUMPU automatically turns print PDFs into web optimized ePapers that Google loves.
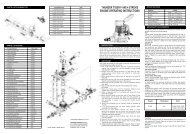
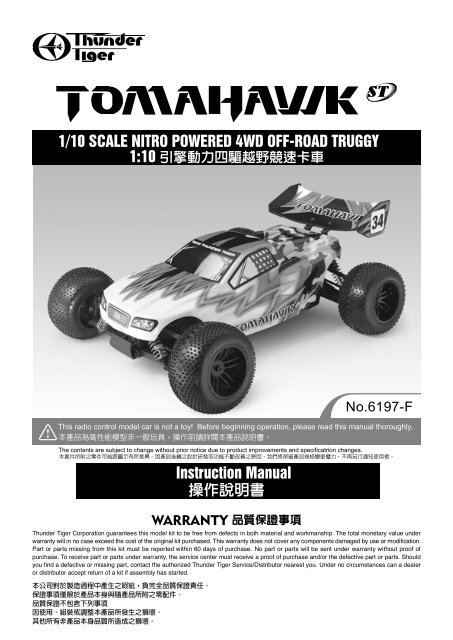
1/10 SCALE NITRO POWERED 4WD OFF-ROAD TRUGGY<br />
1:10 <br />
This radio control model car is not a toy! Before beginning operation, please read this <strong>manual</strong> thoroughly.<br />
<br />
The contents are subject to change without prior notice due to product improvements and specificatrion changes.<br />
<br />
WARRANTY <br />
Thunder Tiger Corporation guarantees this model kit to be free from defects in both material and workmanship. The total monetary value under<br />
warranty will in no case exceed the cost of the original kit purchased. This warranty does not cover any components damaged by use or modification.<br />
Part or parts missing from this kit must be reported within 60 days of purchase. No part or parts will be sent under warranty without proof of<br />
purchase. To receive part or parts under warranty, the service center must receive a proof of purchase and/or the defective part or parts. Should<br />
you find a defective or missing part, contact the authorized Thunder Tiger Service/Distributor nearest you. Under no circumstances can a dealer<br />
or distributor accept return of a kit if assembly has started.<br />
<br />
<br />
<br />
<br />
<br />
Instruction Manual<br />
<br />
No.6197-F
INTRODUCTION <br />
Thank you for your purchase of this Thunder Tiger product. You should enjoy many hours of fun and excitement from this advanced<br />
R/C model. Thunder Tiger strives to bring you the highest level of quality and service we can provide. We race and test our cars around<br />
the world to bring you state-of-the-art products.<br />
We offer on-line help on our www.acehobby.com or www.thundertiger.com forum and our product specialists are ready to take your<br />
call if you have any technical questions. Please read all instructions and familiarize yourself with the systems and controls of this model<br />
before running. Have fun and enjoy the exciting world of R/C!<br />
TOMAHAWK <strong>ST</strong><br />
<br />
<br />
24www.thundertiger.com<br />
www.tiger.com.tw<br />
CAUTION <br />
Thank you for purchasing a Thunder Tiger Product.<br />
Please read all instructions and familiarize yourself with the products and controls before operation.<br />
1. This product is not a toy. It is a high performance model product. It is important to familiarize yourself with the model, its <strong>manual</strong>,<br />
and its construction before assembly or operation. A child operating under the supervision of the adults is necessary.<br />
2. Always keep this instruction <strong>manual</strong> ready at your hand for your assembling and operating reference, even after completing the<br />
assembly.<br />
3. Make sure all the screws are properly tightened and all the parts are checked after running the car for a long period of time.<br />
4. For the best performance, it is important to make sure all the moveable parts work free without binding.<br />
5. Do not operate model products in rain, on public roads, near crowds, near airport, or near areas with restricted radio operation.<br />
6. Always keep fuel away from heat and open flame. Only operate in open, well-ventilated area. Store fuel in cool, dry area. Keep the<br />
fuel bottle cap tightly closed. Clean up any leak or excess fuel before starting the engine.<br />
7. This product, its parts, and its construction tools can be harmful to your health. Always exercise extreme caution when assembling<br />
and/or operating this product. Do not touch any part of the model that rotates.<br />
8. Check your radio frequency with the proper operating frequency of the area or country. Always check to see if there are any modelers<br />
operating on the same frequency as yours. Also, check your radio for proper operation before operating a model.<br />
<br />
1. <br />
2. <br />
3. <br />
4. <br />
5. <br />
6. <br />
<br />
7. <br />
<br />
8. <br />
INDEX <br />
INTRODUCTION 1<br />
IMPOR<strong>TA</strong>NT NOTES & WARNING 2<br />
ITEMS REQUIRED FOR OPERATION 3<br />
UNWRAPPING CONTENTS FROM BOX 4<br />
CHARGING THE GLOW PLUG IGNITER 4<br />
PREPARING THE RADIO 4<br />
RADIO BATTERY INS<strong>TA</strong>LLATION 5<br />
RADIO OPERATION 5<br />
OPERATING RADIO <strong>ST</strong>EERING FUNCTION 5<br />
OPERATING RADIO THROTTLE/BRAKE FUNCTION<br />
6<br />
ADJU<strong>ST</strong>ING THE THROTTLE LINKAGE 6<br />
ADJU<strong>ST</strong>ING CARBURETOR 7<br />
FUELLING 7<br />
PREPARING THE ENGINE FOR S<strong>TA</strong>RTING 8<br />
S<strong>TA</strong>RTING THE ENGINE 8<br />
SHOCK ADJU<strong>ST</strong>MENT 9<br />
BODY CUTTING 9<br />
ENGINE BREAK-IN & ENGINE SETTING 10<br />
<strong>ST</strong>OPPING ENGINE 11<br />
WHEEL AND TIRE PREPARATION 11<br />
<strong>ST</strong>ORING AND MAINTENANCE 11<br />
DRIVING TIPS 12<br />
TROUBLESHOOTING 13
IMPOR<strong>TA</strong>NT NOTES & WARNING <br />
FUEL <br />
1. Choose a fuel from a reputable, brand name company that is approved for car/truck use. Do not use airplane or boat fuels in<br />
your car/truck. Never use gasoline in a glow model engine.<br />
2. Fuel color is for identification purpose only and is not important to performance or durability of your engine.<br />
3. Always store fuel in a well ventilated place, away from heating devices, open flames, direct sunlight, or batteries. Keep glow<br />
fuel away from children. Always keep your fuel bottle closed when not in use.<br />
4. Do not dispose of fuel or empty fuel containers in a fire. It may possibly cause fire or explosion.<br />
1. 10~30<br />
5~1820<br />
2. <br />
3. <br />
<br />
4. <br />
ENGINE <br />
1. For proper engine break-in procedure, please refer to the <strong>manual</strong> of your engine.<br />
2. Never run your vehicle without the air filter .If the vehicle will be operated in an area with fine dust, use filter oil or caster oil on<br />
the air filter element. It is important that the foam is only moist to trap dirt and allow air passage. With the foam too wet, limited<br />
air can pass through; therefore, limiting engine performance.<br />
3. The parts around engine could be dangerously hot after operation. Do not touch it without any protection!<br />
1. <br />
2. <br />
<br />
3. <br />
OPERATION <br />
1. Choose the right place to operate your R/C model. Do not run on public streets or highways. This could cause serious accidents,<br />
personal injuries, and/or property damage. Never run R/C models near people or animals. To avoid injury, do not run in confined<br />
spaces. Do not run where loud noises can disturb others, such as hospitals and residential areas. Never run indoors. There is<br />
a high risk of fire and/or damage.<br />
2. Inspect your model before operation. Make sure all the screws are properly tightened and all the parts are checked after running<br />
the car for a long period of time. Always use fresh batteries for your transmitter and for your receiver to avoid losing control of<br />
the model. Always test the brakes and the throttle before starting your engine to avoid losing control of the model.<br />
3. Check your radio frequency with the proper operating frequency of the area or country. Always check to see if there are any<br />
modelers operating on the same frequency as yours. Also, check your radio for proper operation before operating a model.<br />
4. Do not touch any part of the model that rotates.<br />
1. <br />
2. <br />
<br />
3. <br />
4. <br />
FIR<strong>ST</strong> AID <br />
1. If you drink nitro fuel by accident, immediately drink large quantities of water and try to induce vomiting. Consult with physician<br />
right after then.<br />
2. If the nitro fuel gets into your eyes, rinse them well with water. Consult with physician right after then.<br />
3. If the fuel gets onto your skin, wash it well with soap and water.<br />
1. <br />
2. <br />
3. <br />
WARNING <br />
1. Improper operations may cause personal and/or property damage. Thunder Tiger and its distributor have no control over damage<br />
resulting from shipping, improper construction, or improper usage.<br />
2. Thunder Tiger assumes and accepts no responsibility for personal and/or property damages resulting from the use of improper<br />
building materials, equipment and operations. By the act of assembling or operating this product, the user accepts all resulting<br />
liability. If the buyer is not prepared to accept this liability, then he/she should return this kit in new, unassembled, and unused<br />
condition to the place of purchase.<br />
1. <br />
<br />
2.
ITEMS REQUIRED FOR OPERATION <br />
Screw Drivers, Lexan Body Reamer, Hobby Knife,<br />
Lexan Scissors.<br />
<br />
Glow Starter w/ Charger<br />
<br />
Glow Fuel, Methanol 10% to 30%<br />
Nitro 5% to 18% Caster / Synthetic Oil<br />
10%~30%<br />
5%~18%<br />
TOOLS INCLUDED<br />
Hex Wrench Set, 1.5mm / 2.0mm / 2.5mm / 3.0mm<br />
, 1.5mm / 2.0mm / 2.5mm / 3.0mm<br />
Fuel Bottle<br />
<br />
5-Way Wrench<br />
<br />
*AA Rechargeable Ni-MH<br />
battery 4 pieces for receiver<br />
<br />
AA Alkaline dry batteries 8<br />
pieces for transmitter
1<br />
UNWRAPPING CONTENTS FROM BOX <br />
a<br />
b<br />
Pull out<br />
a. Contents of the box are secured with reusable zip-ties. To unlock zip-tie, press on the small lever.<br />
b. Pull on the zip-tie while keeping the small lever pressed. Pull the zip-tie out completely.<br />
<br />
2<br />
CHARGING THE GLOW PLUG IGNITER <br />
a b c<br />
a. Plug the charger into an AC outlet, and then pull on the igniter lever to accept the charging adapter.<br />
b. At this point, the small red LED indicator on the charger should light up indicating the charging sequence is in progress.<br />
c. When the charging complete, pull on the glow plug igniter lever to unplug the glow igniter. Charge the new glow plug igniter for<br />
16 to 24 hours on the first charge. For subsequent charges, charge it about 12 hours before next use.<br />
NOTE:<br />
If the igniter gets warm or hot during the charge, unplug the igniter from charger immediately. A warm / hot igniter means the igniter<br />
is overcharged. Overcharging can damage the internal battery in the igniter; thus, shortening its life.<br />
a. 110V<br />
b. LED<br />
c. 162012<br />
<br />
40~45°C<br />
<br />
PREPARING THE RADIO <br />
3 a b c<br />
a. Check the frequency printed on the transmitter crystal.<br />
b. Remove the radio receiver from box. Check the frequency printed on the receiver crystal, and make sure it matches with the<br />
transmitter crystal. Make sure no one will operate on the same frequency when you are. When there is a radio glitch, it will most<br />
likely be caused by improper crystal, damaged crystal, or people operating on the same frequency. Ensure all wires are securely<br />
connected to the receiver:<br />
steering servo connector plug - into the channel 1 slot 1 (CH1)<br />
throttle servo connector plug - into the channel 2 slot 2 (CH2)<br />
battery switch connector plug - into battery slot. (BATT)<br />
Then thread the receiver antenna/wire through the antenna mount. Thread the receiver antenna/wire all the way through the antenna<br />
tube and install the antenna tube onto the mount. After checking, place the receiver back in the box and secure the receiver box<br />
top.<br />
c. Install the antenna into transmitter.<br />
a. <br />
b. <br />
<br />
c.
4 a b<br />
c<br />
RADIO BATTERY INS<strong>TA</strong>LLATION <br />
a. Install 8 AA size alkaline batteries into transmitter.<br />
b. Install 4 AA size alkaline batteries in receiver battery box to the receiver switch.<br />
c. Install the battery into the receiver box, secure the box with a body clip.<br />
a. 83<br />
b. 43<br />
c. R<br />
5<br />
RADIO OPERATION <br />
a b c<br />
a. When turning radio on, first turn on the transmitter.<br />
b. Then, turn on the receiver. When turning off, first turn the receiver off, then the transmitter off.<br />
c. To reverse the functions of servos, use the small, white servo reverse switches located on side of the pistol transmitter (or the<br />
inset servo reverse switches located at the bottom of the stick transmitter). To trim the servos on pistol transmitter, use the trim<br />
switches on side of the steering wheel (the <strong>ST</strong>. trims steering, and the TH trims throttle/brake). On a stick transmitter, the trim<br />
levers are located accordingly around the sticks.<br />
d. For more details, please check the transmitter instruction <strong>manual</strong>.<br />
a. <br />
b. <br />
c. <br />
d. <br />
6<br />
OPERATING RADIO <strong>ST</strong>EERING FUNCTION<br />
<br />
a b c<br />
a. Check the radio steering functions. With the radio transmitter and receiver on, turn the steering wheel / stick to the left. The front<br />
tires/wheels should turn left accordingly. If not, flip the steering servo reverse switch.<br />
b. Return the steering wheel / stick to neutral. The front tires/wheels should point straight forward. If not, use the steering trim lever<br />
to correct it.<br />
c. Turn the steering wheel / stick to the right. The front tires/wheels should turn right accordingly.<br />
a. <br />
b. <br />
c.
7<br />
OPERATING RADIO THROTTLE/ BRAKE FUNCTION<br />
<br />
a b c<br />
a. Check the radio throttle/brake functions. With the radio transmitter and receiver on, pull the trigger / push the stick forward. The<br />
carburetor should be fully opened and the brake disengaged. To reverse this function, flip the throttle/brake servo reverse switch.<br />
b. Return the trigger / stick to neutral. The carburetor should be closed to a point where the idle has been set (see step 8 for settings),<br />
and the brake still disengaged. If not, use the throttle/brake trim lever to correct it.<br />
c. Push the trigger / pull the stick backward. The carburetor opening should still be the same at neutral, throttle spring compressed<br />
slightly, and the brake engaged.<br />
a. <br />
<br />
b. <br />
8<br />
c. <br />
8<br />
ADJU<strong>ST</strong>ING THROTTLE / BRAKE LINKAGE<br />
<br />
a<br />
b<br />
c<br />
adjust collars if spur gear is not hard to move<br />
<br />
a. Idle: To set the throttle/brake linkage, first the radio should be on ( but do not start the engine)and the servo is at neutral position.<br />
The factory setup of throttle linkage is about 28mm.(see picture) If it is not, please adjust the linkage to the proper length. The<br />
carburetor opening should be in the idle position. (almost closed, but remain about 0.5~1mm opening inside the carburetor)<br />
b. Full throttle: Now pull the full throttle. The brakes should disengage immediately. The carburetor should be fully open. If the<br />
carburetor is not fully open, adjust the throttle linkage into 28mm (see above) to get the carburetor fully open. You may also adjust<br />
your throttle trim according to your radio's instructions.<br />
c. Brake: Push the trigger / pull the tick backward. The carburetor opening should be in the idle position. (almost closed, but remain<br />
about 0.5~1mm opening inside the carburetor), but the spur gear will be hard to move. If it is not engaged, adjust the collars<br />
(next to the spring) or setup in your radio to get the brake to engage properly. Be ware that the servo spring should not be completely<br />
compressed.<br />
a. <br />
28mm<br />
0.5~1mm<br />
b. <br />
<br />
c. 0.5~1mm
9<br />
ADJU<strong>ST</strong>ING CARBURETOR <br />
a b c<br />
1mm<br />
<br />
<br />
<br />
d<br />
d<br />
<br />
e<br />
<br />
a. To set the high speed needle: (large needle sticking out from the carburetor body), turn the screw as pictured. Initial high speed<br />
needle setting should be 3~3.5 turns (close the needle completely, then back out 3~3.5 turns). Clockwise turn will provide leaner<br />
setting (lower fuel to air mixture), and counterclockwise turn will provide richer setting (higher fuel to air mixture).<br />
b. To set the carburetor idle: (small needle sticking out from the carburetor body), turn the screw as pictured. Initial idle setting<br />
should leave 1mm carburetor gap. Clockwise turn will provide higher idle (larger carburetor opening), and counterclockwise turn<br />
will provide lower idle (smaller carburetor opening). For more details about the engine setting, please refer to ENGINE BREAK-<br />
IN/SETTING procedures to properly set the engine.<br />
c. To set the low speed needle: (The low-speed mixture screw is located in the end of the carburetor). turn the screw as pictured.<br />
This screw controls how much fuel enters the engine at idle and low throttle. This adjustment will smooth the idle and improve<br />
the acceleration to mid speed. Make this adjustment with the throttle closed, after setting the idle. Turn the screw clockwise gently<br />
until it bottoms out. DO NOT over tighten. Now turn the low-speed mixture screw counter-clock 6 1/2 turns.<br />
d. Remove the outer foam from filter and make it moist evenly with a few drops of fuel. Put the filter in a plastic bag and knead it<br />
until the foam is saturated, but not soaked.<br />
e. Finally, make sure the air cleaner boot is securely fastened with a zip-tie.<br />
Never run your vehicle without the air filter .If the vehicle will be operated in an area with fine dust, use filter oil or caster oil instead<br />
of fuel. It is important that the foam is only moist to trap dirt and allow air passage. With the foam too wet, limited air can pass through;<br />
therefore, limiting engine performance.<br />
a. 3~3.5<br />
3~3.5<br />
<br />
b. b1mm<br />
<br />
c. c6.5<br />
6.5<br />
<br />
d. <br />
e. <br />
<br />
<br />
10<br />
FUELLING <br />
a b c<br />
a. Remove the cap from fuel bottle nozzle.<br />
b. Squeeze the fuel bottle, insert into fuel, and draw fuel into the fuel bottle. The fuel used should be methanol based model engine<br />
glow fuel (available at hobby shops) with 10% to 30% nitro content and 5% to 18% caster/synthetic oil content for lubrication.<br />
c. Fill car's fuel tank with glow fuel.<br />
a. <br />
b. <br />
c.
11<br />
PREPARING THE ENGINE FOR S<strong>TA</strong>RTING <br />
a<br />
b<br />
c<br />
d<br />
e<br />
f<br />
a. To start an engine, first remove the glow plug with the included wrench.<br />
b. Check the glow plug by plugging it into the glow plug igniter. The glow plug element should light up brightly. If it lights up dimly,<br />
then the glow plug igniter is low (and it needs recharging). If it doesn't light up, or the plug element looks distorted, then the<br />
glow plug is bad (replace with new one). After checking, reinstall the glow plug.<br />
The glow plug used for this engine can be: Thunder Tiger 9281, McCoy #9 / #59,<br />
Novarossi C4S / C5S / C6S,OS #8 / #A3 / #A5, and Picco P6S / P7S.<br />
c. With the radio off, <strong>manual</strong>ly turn the servo to open the carburetor (open throttle).<br />
d. Plug the tuned pipe exhaust tip.<br />
e. Keeping the exhaust tip plugged, pull on the engine's starter. Keep doing it until fuel reaches engine's carburetor, then pull it 3<br />
more times to prime the engine.<br />
f. Manually return the servo back to neutral.<br />
a. <br />
b. <br />
<br />
No.9281, McCoy #9 / #59,<br />
Novarossi C4S / C5S / C6S,OS #8 / #A3 / #A5, and Picco P6S / P7S.<br />
c. <br />
d. <br />
e. 3~4<br />
f. <br />
12<br />
S<strong>TA</strong>RTING THE ENGINE <br />
a b c<br />
Not pull on<br />
over 35cm<br />
a. Turn on the radio (transmitter first, then receiver).<br />
b. Clip the glow plug igniter onto engine's glow plug.<br />
c. Pull on the engine starter, release, repeat until the engine starts. Throttle maybe required to be opened momentarily, but release<br />
back to neutral immediately after it starts.<br />
Remove the glow plug igniter from engine after engine has started and warmed up. If the engine stops right after the igniter is<br />
removed, the carburetor setting is too rich. Please refer to engine setting section.<br />
If engine starter becomes hard to pull, the engine maybe flooded. To unflood an engine, remove the glow plug from engine, flip the<br />
car upside down, and pull on the starter to release excess fuel. Then, reinstall the glow plug and repeat the engine starting procedure.<br />
a. <br />
b. <br />
c. 20~35<br />
35
13 a<br />
SHOCK ADJU<strong>ST</strong>MENT <br />
a. Use the included shock clips to adjust for spring pre-load. Pressing the entire car down, release, and the car should returm to<br />
ride height (indicated on set-up page). More pre-load clips will produce higher ride height, and less clips will produce lower ride<br />
height. Amount of clips used to front and rear shocks can be different, but clips should be the same for the left and right.<br />
a. <br />
<br />
6mm<br />
4mm<br />
2mm<br />
1mm<br />
Hard Suspension<br />
<br />
Soft Suspension<br />
<br />
14 BODY CUTTING It is recommended to cut<br />
the window opening out<br />
to let cool air in for good<br />
circulation.
15<br />
ENGINE BREAK-IN <br />
For a new engine (break-in setting), the high speed needle needs to be set as rich as possible. Turn the high speed needle 1/4<br />
turn counterclockwise from initial setting (3~3.5 turns from fully closed). Repeat step 15b. Keep doing this until the engine stalls at<br />
full throttle, then turn the high speed needle 1/4 turn clockwise. Run the car in an open parking lot with this rich engine setting for<br />
at least 5 tanks of fuel to complete the break-in process. It is normal for new engines to stall many times during this time due to the<br />
rich setting. When it does, just restart the engine. After break-in, follow the engine setting procedure to set the carburetor for normal<br />
operations.<br />
3~3.51/4<br />
1/4<br />
5<br />
<br />
<br />
ENGINE SETTING <br />
Due to different fuel formula, operating elevation, humidity . . . etc. The engine may / may not operate properly at initial setting.<br />
Please follow the following procedure to achieve proper carburetor setting. Do not perform this procedure until the engine has been<br />
properly broken in.<br />
a. Start the engine.<br />
b. With a running engine, run the car back and foreth in a straight line (full throttle achieved during each passage) in an open parking<br />
lot. Repeat, and note the sound of the exhaust. Do not hold the throttle open with car off the ground or the engine connect rod<br />
may break.<br />
c. If the exhaust does not reach a high pitch note, turn the high speed needle (long needle, extending from carburetor, pointing up)<br />
1/4 turn clockwise, and repeat step 15b.<br />
If the exhaust reaches a high pitch note immediately, turn the high speed needle 1/4 turn counterclockwise, and repeat step 15b.<br />
d. Repeat step 15c until the engine reaches optimum setting (turning in the high speed needle will no longer have an effect at full<br />
throttle and turning out the needle will cause the engine's full throttle rpm to drop a little).<br />
For normal operations, turn the high speed needle 1/4 turn counterclockwise from the optimum high speed needle setting.<br />
e. To set the idle, turn the idle screw in (higher rpm) or out (lower rpm).<br />
Basically, the idle needs to be set at the lowest possible point before the engine stalls.<br />
f. To set the low speed needle (larger needle on the side of carburetor body), the engine needs to be broken-in and high speed<br />
needle needs to be set first.<br />
g. Repeating step 15b every 10 seconds (1 second of full throttle and 10 seconds of idle). If the engine rpm at idle drops after a<br />
few seconds and stalls, then turn in the low speed needle (clockwise) 1/4 turn. If the engine rpm stays the same or goes up at<br />
idle, then turn out the low speed needle (counterclockwise) 1/4 turn.<br />
h. Keep repeating step 15g until the engine rpm drops (goes to idle rpm, then drops a few more rpm after a few seconds) but does<br />
not stall at idle.<br />
<br />
<br />
a. <br />
b. <br />
<br />
c. 1/8~1/415b<br />
1/8~1/415b<br />
d. 15b15c<br />
<br />
e. <br />
<br />
f. <br />
g. 15b101/8<br />
1/8<br />
h. 15g
16<br />
<strong>ST</strong>OPPING ENGINE <br />
a b c<br />
a. Pinch fuel tube to stop fuel flow.<br />
b. After stopping the engine, turn off the receiver switch first, then the transmitter.<br />
c. Be careful! The engine and muffler will be getting extremely hot during operation! Don’t touch them during or just after operation.<br />
a. <br />
b. <br />
c. <br />
17 a<br />
WHEEL AND TIRE PREPARATION <br />
b<br />
c<br />
a. Remove wheel cap crew using equipped 3mm hex wrench and detach wheels.<br />
b. Replace fresh tires and wheels if the original tires worn out seriously.<br />
c. Tighten the wheel cap screw down with the washer.<br />
a.<br />
b. <br />
c. <br />
18 a<br />
<strong>ST</strong>ORING AND MAINTENANCE <br />
b<br />
c<br />
d<br />
e<br />
a. Before storing you car, draw out any fuel from the tank.<br />
b. Next, restart the engine to combust remaining fuel.<br />
c. Unplug the glow plug and put after engine oil inside the engine, re-plug the glow plug.<br />
d. Wipe off the dirt and oil on your car.<br />
e. Make sure you have disconnected the power (batteries).<br />
a. <br />
b. <br />
c. <br />
d. <br />
e.
19a. Hold your elbows in and keep the<br />
transmitter antenna pointing straight<br />
up.<br />
a. <br />
<br />
DRIVING TIPS <br />
b. Squeeze the throttle trigger or pull the<br />
throttle stick gently and steer the car<br />
to left and right.<br />
b. <br />
<br />
<br />
c. Squeeze the throttle trigger and<br />
release. Repeat this action to control<br />
car speed.<br />
c. <br />
<br />
d. If you are of unsure of the steering<br />
direction, practice with the transmitter<br />
facing towards you.<br />
d. <br />
<br />
e. At first, set the steering D/R function<br />
for less steering response.<br />
e. D/R<br />
<br />
f. Be careful not to squeeze the throttle<br />
trigger abruptly while steering.<br />
f. <br />
<br />
Left <br />
Right <br />
g. After you become used to the controls, experiment with high<br />
performance possible at full throttle and full steering.<br />
g. <br />
h. Practice doing figure 8S.<br />
h. 8
TROUBLESHOOTING <br />
If you have trouble starting or keeping your TOMAHAWK <strong>ST</strong> running, here's a quick checklist of what to look for first.<br />
TOMAHAWK <strong>ST</strong> <br />
<br />
Description <br />
Problem <br />
Solution <br />
Engine will not<br />
start<br />
<br />
Out of fuel .................................................... Fill fuel tank <br />
Contaminated fuel ....................................... Replace fuel <br />
Glow plug igniter not charged ...................... Charge glow igniter <br />
Glow plug bad .......................................... Replace glow plug, see "Glow Plug Problems"<br />
section below. <br />
Fuel not getting to carburetor ........ Open and close fuel tank lid twice. <br />
<br />
Engine flooded ............................................ See "Flooding" section below. <br />
<br />
Engine overheating ...................................... Allow engine to cool, richen fuel mixture, see "Fuel<br />
Mixture" section below<br />
<br />
Carburetor incorrectly adjusted ......... Re-adjust carburetor, see "Fuel Mixture" or "Factory<br />
Carburetor Settings" section below.<br />
<br />
Exhaust blocked ...................................... Check exhaust, remove blockage.<br />
<br />
Air cleaner blocked ........................... Check air cleaner, remove blockage.<br />
<br />
Engine starts,<br />
then stalls<br />
<br />
Idle speed set to low ..................................... Adjust idle speed screw, see "Fuel Mixture" section<br />
below. <br />
Air bubbles in fuel line ........................ Check for leaks in fuel line <br />
Glow plug is fouled ............................. Replace glow plug, see "Glow Plug Problems" Section<br />
below. <br />
Starter rope will<br />
not pull<br />
<br />
Engine is flooded .......................................... See "Flooding" section below. <br />
<br />
Engine is seized ............................................ Examine engine for damage
Glow Plug Problems. <br />
The glow plug in your engine must<br />
be replaced periodically to maintain<br />
peak performance and easy<br />
starting. Most starting problems<br />
or erratic performance can be<br />
traced back to the glow plug. The<br />
easiest way to check for a faulty<br />
glow plug is to simply install a new one and see if the problem<br />
is corrected. However, to test the glow plug, remove the glow<br />
plug form the cylinder<br />
head with a 5/16" nut driver (make sure there is no dirt<br />
on top of the head which could fall into the engine. Do not lose<br />
the copper gasket which seals the glow plug.)<br />
Connect the glow plug to the glow igniter. All of the coils should<br />
glow bright white. Sometimes, the first few coils will not glow,<br />
while the rest are bright orange. This indicates a bad glow<br />
plug or low igniter battery. Try recharging the igniter, or replacing<br />
the glow plug.<br />
<br />
<br />
<br />
<br />
<br />
<br />
<br />
<br />
Fuel Mixture <br />
The fuel mixture is controlled by three different adjustments<br />
on the carburetor, and should come preset from the factory<br />
(see photos below). Your engine should<br />
start and run slightly rich with these settings (rich is good<br />
for break-in). Tuning Tip: Always make sure you can see<br />
some exhaust smoke coming out of the exhaust outlet<br />
during operation. This is a good sign that enough fuel is<br />
getting to the engine.<br />
<br />
<br />
<br />
<br />
<br />
Factory Carburetor Settings. <br />
Idle Screw<br />
Low Speed<br />
Screw<br />
Richer<br />
Leaner<br />
Low speed mixture<br />
6 1/2 turns out<br />
Clockwise=Leaner<br />
Counterclockwise-Richer<br />
<br />
6 1/2 <br />
<br />
<br />
Flooding <br />
Symptoms of a flooded engine include difficulty in starting,<br />
muffled sounds coming from the exhaust, pull starter won't<br />
operate, and excess fuel draining from the exhaust outlet.<br />
Remove the glow plug with a 5/16" nut driver and also remove<br />
the air cleaner. Turn the car upside down and pull the starter<br />
a couple of times to drain the excess fuel out of the engine<br />
and carburetor. Re-install the glow plug and try starting again.<br />
<br />
<br />
<br />
<br />
<br />
Leaner<br />
(Less Fuel)<br />
Richer<br />
(More Fuel)<br />
0.5~1mm<br />
Idle speed:<br />
0.5~1mm)<br />
Adjust Idle Screw until<br />
0.5~1mm is obtained.<br />
<br />
0.5~1mm<br />
High speed mixture:<br />
3 1/2 turns out<br />
Clockwise = Leaner<br />
Counterclockwise-Richer<br />
<br />
3 1/2
SETUP SHEET Ver 1.0<br />
NAME TEMP ENGINE MUFFLER<br />
DA<strong>TA</strong> <strong>ST</strong> SERVO TYPE HEAD CLEARANCE FUEL TYPE<br />
TRACK TH SERVO TYPE PLUG NO. RADIO<br />
UP LINK<br />
A<br />
B<br />
D E F<br />
C<br />
FRONT<br />
SHOCK OIL<br />
SHOCK PI<strong>ST</strong>ON<br />
SPRING<br />
SHOCK POSITION<br />
A B C<br />
H I J K<br />
CA<strong>ST</strong>ER ANGLE<br />
CAMBER ANGLE<br />
TOE IN<br />
TIRE TYPE<br />
TIRE HARDNESS<br />
TIRE DIAMETER<br />
RIDE HEIGHT<br />
UPPER ARM POSITION<br />
E<br />
F<br />
SWAY BAR<br />
K<br />
I<br />
J<br />
H<br />
REAR DIFF OIL<br />
ENTER DIFF OIL<br />
(OPTION ONLY)<br />
D E F G<br />
UP LINK<br />
K L<br />
REAR<br />
SHOCK OIL<br />
SHOCK PI<strong>ST</strong>ON<br />
SPRING<br />
A B C<br />
SHOCK POSITION<br />
A B C<br />
H I J N<br />
CA<strong>ST</strong>ER ANGLE<br />
CAMBER ANGLE<br />
TOE IN<br />
TIRE TYPE<br />
TIRE HARDNESS<br />
TIRE DIAMETER<br />
RIDE HEIGHT<br />
UPPER ARM<br />
POSITION<br />
F<br />
K<br />
G<br />
L<br />
SWAY BAR<br />
N<br />
I<br />
J<br />
H<br />
REAR DIFF OIL<br />
CLUTCH TYPE PINION(1) t PINION(2)<br />
CLUTCH SPRING SPUR(1) t SPUR(2)<br />
DIFF RATE(13/44) TO<strong>TA</strong>L RATIO(1) TO<strong>TA</strong>L RATIO(2)<br />
C<br />
2008<br />
<strong>JD7136</strong>