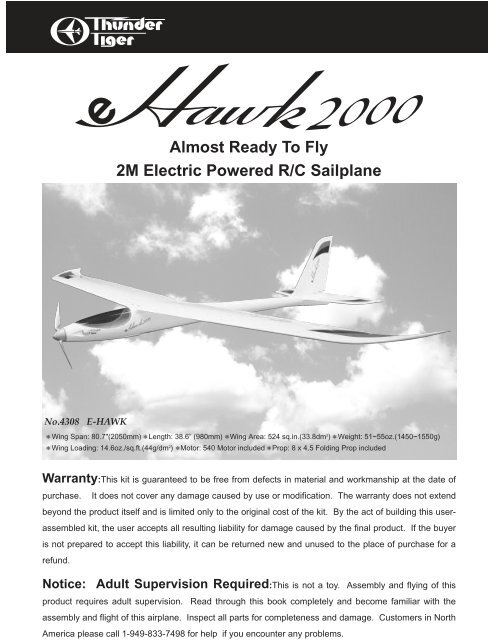
Almost Ready To Fly 2M Electric Powered R/C Sailplane - Carrocar
Almost Ready To Fly 2M Electric Powered R/C Sailplane - Carrocar
Almost Ready To Fly 2M Electric Powered R/C Sailplane - Carrocar
- No tags were found...

You also want an ePaper? Increase the reach of your titles
YUMPU automatically turns print PDFs into web optimized ePapers that Google loves.
www.HarrysInFocus.deHarrys Blitzlicht Vier 2008© by Harry P. 2008 ©Rotfuchs 2008 Canon Eos 50D plus EF 4,0/400 mm DOE-Mail: HarryPX@T-Online.dewww.HarrysInFocus.de
??????????????????????????????????ASSEMBLY INSTRUCTIONPRE-ASSEMBLY NOTES1. If you are not an experienced R/C pilot plan to have a fullycompetent pilot help you to learn to fly your E-Hawk. Thiswill help you to be successful much faster and also avoidpotential damage to your model.2. Please assemble your model exactly according to theseinstructions. Do not attempt to modify or change the E-Hawkin any way as doing so may adversely change its flyingcharacteristics.3. Before you begin please check the entire contents of thiskit against the parts list and part drawings to be sure that noparts are missing or damaged. This will also help you tobecome familiar with each component of your E-Hawk. Ifyou find that any of the parts are either missing or damagedplease contact your dealer immediately for replacement.Note: Your dealer cannot accept kits for return if constructionhas begun.For customers in the US and Canada please call or write toACE Hobby Distributors, Inc for replacement of missing ordamaged parts.ACE Hobby Distributors, Inc.2055 Main Street, Irvine, CA 92614Tel: 949.833.0088Fax: 949.833.0003E-Mail: service@acehobby.comRemember. We have worked very hard to make this modelas easy to assemble as possible while still maintaining ourhigh standards of quality. Your assembly of this model isvery important and will determine the final flight capabilitiesof your E-Hawk, so use extra care and follow the assemblyprocedure exactly.OTHER ITEMS REQUIREDRadio: You will need at least a3 channel radio control systemwith 3 mini servos on anaircraft frequency for use inyour E-Hawk. However, if youare really looking for every bitof extra performance then youshould consider using one ofthe miniature radio systemsavailable which would lowerthe weight and increase theperformance of your E-Hawk.Electronic motor controller: We recommend the ACE8007controlling the power of your E-Hawk as well as eliminatingthe need for a separate radio battery. The BEC (BatteryEliminator Circuitry) in this controller will automatically turnoff the power to the motor when the battery reaches afactory present discharge level leaving about 20-25 minutesof flight time for the radio system. Note: Some radiomanufacturers offer a lightweight radio system with a built-inmotor controller with BEC especially for this type of model.Flight Battery: We recommend the use of a 6~7 cell7.2~8.4V 2000 mAh battery pack for maximum performance.Charger: You will need a quick charger to charge yourpower battery. We recommend our ACE2529 EDC-01 simplecharge or TTR2685 7.2V DC Quick Charger for 6-cellbettery pack or TTR2686 8.4V DC Quick Charger for 7-cellbettery pack. Note: When charging your flight battery besure to very carefully follow the instructions provided withthe charger.Extension Wire: 2 servo extensions plus Y harness arerequired. If you are going to use Flaperon then it will require2 servo extensions which are 15" in length minimum.TOOLS AND SUPPLIES NEEDED1. 5 Minute Epoxy2. Thin CA Glue3. Thick CA Glue4. 1/2 Masking Tape5. Mixing Stick for Epoxy6. Medium Grit Sandpaper7. Rubbing Alcohol8. Paper <strong>To</strong>wels9. Hobby Knife10. 1/16 Drill11. 5/64” Drill12. 1/8 Drill13. 3/16” Drill14. Ruler?????W2@6T2@@? @@@?@@@??7@X;@@X ?@5??@5? ?????@@1?@@1 ?W&(YW&(Y??@@@?@@@ ?&0Y?&0Y ??????????????????????15. Z?Bend Pliers???????16. Pen, Pencil or Marker17. Small Screw Drivers
Open the box and check that you have all the parts as shownbelow. If anything is missing please contact your dealerAS6187 Main Wing SetTwo-Sided Tape (2)Wing Joiner (L/1, S/1)Wing Protector (1)Aileron Servo Tray (2)Hatch Cover (L/1, R/1)Wing Bolt (L/2, S/2)Wood Screw (8)Left Wing (1)Right Wing (1)AS6195 Fuselage SetMotor Mount (1)Fuselage (1)Foam Tape (2) Servo Tray (1)Wing Mount (2)Triangle Wood (4) Blind Nut (4) Vecro (2)Zip Tie (1)AS6188 CanopyWood Screw (3)AS6194 Tails SetAS6193 DecalCanopy (1)AS6189 Motor3x8mm Sink ScrewHorizontal Tail (1)540 Motor (1)Vertical Tail (1)AS6190 Pushrod SetPE0565 Folding Prop SetElev. Pushrod (1)Rudd. Pushrod (1)Spinner (1)Blade (2)Aileron Pushrod (2)Clevis (4)Drive Shaft (1)PE0009 Hardware SetAS6191 Control Horn2x12mm Screw (2)Backplate (1)2mm Nut (2) Allen Wrench (1)2x12mm Screw (8)2x8mm Sink Screw (1)Washer (1)EZ Connector(2)Set Screw (2)Backplate (4)Control Horn(4)5mm Nut (1)Drive Nut (1)
ASSEMBLY / WINGWing Assembly1. Before you install the aileron servo you have todecide if your e-Hawk will have Flaperons(FLPN)or not.3. Use heat iron to tack down the covering at theopening.If Flaperon function is applied, then it will require2 Servo Extensions which are 15" long minimum.(We recommend to set up the e-Hawk withFlaperon if you have a computer radio with mixfunction )If Aileron function only is applied, then it requires 2Servo Extensions plus a Y harness.4. Glue the aileron servo tray ( square plastic piece)on the wing sheeting with instant glue.2. Cut away the covering at servo hatch and the holenear the wing root where extension wire passesthrough.5. Connect the extension wire. You can tape ittogether to prevent from disconnecting duringflight.
ASSEMBLY / WING6. Make a knot on the servo extension wire and theleading string.9. Cut the servo horn as shown. Before you install thecontrol horn and secure the aileron servo in place,you will have to connect the servo to your receiverand set up in your radio to make sure the directionand centering of the servo arm is correct.7. As the holes in the ribs are very small, it will beeasier to pull the string if you tape the extensioncord end to the leading string in a tapered fashionas shown.10.Attach the servo horn in place when servo is atneutral position. Before using two-sided tape tosecure the servo in place, use the hatch cover asa guide to position the servo. Make sure the servohorn does not contact the fairing when attached.8. Pull the string out from the hole slowly, usingneedle-nose pliers or tweezers.11.Install the control horn and secure it with the2x8mm machine screw.M2x8mm
ASSEMBLY / FUSELAGE14.Locate the Hatch Cover. Cut a hole as an exit forpushrod and drill holes at each corner with 1/16"(1.6mm) drill bit, before securing the Hatch Cover,thread the pushrod rod through the exit hole.1/16" 1.6mm12.Locate the clevis and the pushrod. Thread theclevis onto the pushrod at least 1/4" (6mm).Snap the clevis onto the control horn. Make a Zbend at the place where pushrod connect to servohorn.6mmZ1/4"Z15.Secure the Hatch Cover with furnished 2x5mmwood screws. Now do the same for the otherwing.2x5mm13.Remove the clevis from control horn and insert theZ bend end to the servo horn then snap the clevisonto the control horn. Adjust the clevis for neutralaileron as necessary. Cut small piece of siliconetube and slide it onto the clevis.Fuselage3mm16.Locate the 4 triangle wood blocks and two squareplywood pieces. Glue the two triangle woodblocks on the plywood as shown. This will be thewing mount.
ASSEMBLY / TAIL22.Locate the wing protector, place the wing protectorwhere is even with the trailing edge. With itcentered then make drill marks on the wingprotector. Drill 3mm(1/8") holes at the marks.24.Cut away the covering both at the center leadingand trailing edge as shown.Trail secure the wing and protector in place makesure the two wing halves are secured closely andfirmly on the fuselage.3mm 1/8"25.Cut the rear fuselage as shown so the stab can beinserted.23.Locate the plywood servo tray. Insert the tray fromthe wing saddle opening and trial fit into thefuselage as shown. Trim the radio tray ifnecessary to obtain a proper fit in the fuselage.Slightly sand the inside of fuse with 200 gritsandpaper then glue the servo tray in place withepoxy or thick instant glue.26.Spread the rear fuselage and insert the stab in theplace. Make sure the tail fairing is a perfect matchwith the stab.Tail Installation27.Trial fit the vertical tail in place. When satisfied,use pencil or marker to draw lines against theedges of fuselage.
ASSEMBLY / TAIL28.Remove the tail. Cut the covering away about 1/8"inside the line. Clean the line with rubbing alcoholafter you cut away the covering.31.Enlarge the exit hole at the rear of fuselage, makesure that clevis and control horn will pass throughfreely.1/8" ( 2-3mm)29.With main wing installed, make sure the stab andfin are parallel and perpendicular to the wing.When satisfied with the fit and alignment, glue inplace.32.Install the control horn on the elevator, the sameas you did on the aileron. The control horn is rightafter the pushrod exit hole of fuselage.30.Cut control horn as shown.33.Thread the clevis on the pushrod ( Long) then cuta small piece of silicone tube and slide it on theclevis. Insert the pushrod through the fuselage andsnap the clevis on the control horn.
ASSEMBLY / SERVO & MOTOR36.Insert the pushrod through the EZ connector thensecure the horn on the servo when elevator inneutral position. Secure the pushrod with the 3mmset screw.If you have Rudder Control Surface then install therudder servo as the same procedure on theelevator servo.34.The kit comes with the rudder pushrod. You maychoose to have rudder control by cutting thevertical fin. Trim the rudder then tape it at bothside. Install the control horn and connect thefurnished pushrod (short). You will have to drill ahole at rudder pushrod exit fairing for rudderpushrod pass through.3mmMotor / Prop InstallationServo Installation37.Locate the motor mount, drill the 3mm(1/8") holesat the pre-punched mark.3mm(1/8")35.Install the EZ connector on the servo horn asshown. Install the elevator servo on the servotray.38.Trail fit the motor. When satisfied, secure themotor to the fuselage with furnished 3x5mmcountersunk screw.M3x5
ASSEMBLY / RECEIVER39.Locate the prop, spinner and screws as shown.Assemble the folding prop first. Make sure thetwo blades move freely. Insert the drive nut to thebackplate then the drive shaft. The hole of drivenut is tapered to accommodate the drive shaft.Secure the whole set onto motor shaft with thenut. Do not over-tighten the nut as it might breakthe aluminum drive shaft but make sure it will notspin out when it in high rotation.42.Use furnished zip-tie to fix the receiver in place.43.Locate the Velcro, tape one side on the batterypack.40.Make sure there is about 2mm(5/64") gapbetween spinner backplate and fuselage.2mmReceiver & other device Installation41.Locate the foam tapes. Tape at the bottom side ofreceiver to reduce the vibration from motor.
NARROW BANDBATTCH.1CH.2CH.3CH.4CONTINOUS CURRENT :30A(MAX)INPUT VOLTAGE:7.2-8.4VNARROW BANDBATTCH.1CH.2CH.3CH.4ASSEMBLY / CANOPY4.Tape the other side of Velcro in the fuselage so itwill keep the battery in place.ACE R/CTR-402A4CH AM RECEIVER72 MHZNote: We use 6-cell Sanyo Battery Pack and theinitial setting is 4 1/4"(108mm)away from theM+B+STARTM-Auto CutoffSWBECB-OFFONmotor.7.2-8.4V Battery1/4" ( 108mm)447.The attached two pictures are the examples forusing ESC-50 and auto-cutoff.Canopy Installation45.Use switch plate as a template, drill holes theninstall the switch as shown.48.Locate the canopy. Cut 1.5mm(1/16") outside themolded line with curved scissors. Trial fit and trimit until it fits on the fuselage.1.5mm(1/16")46.Refer to the manual of Electronic Speed ControlUnit ( ESC-50 Shown P/N : ACE8014), link tomotor, battery and receiver.ACE R/CTR-402A4CH AM RECEIVER72 MHZ0NOFFBatt Rx SwACEESC-50Motor49.With the canopy in place on the fuselage, drillthree holes with (1.5mm)1/16" bit. One in the frontof canopy, two at both rear sides of the canopy.7.2-8.4V Battery1.5mm(1/16")
FINAL ASSEMBLY / CONTROL THROWS & BALANCINGControl ThrowsThese control throws are merely a starting point foryour radio setup and can be tailored to fit your flyingstyle.1/2"Aileron-Low Rate1/2"2.Check the direction of travel of your controlsurfaces and the operation of the motor controllerper the manufacturers instructions.3.Range check your radio system per themanufacturers instructions.4. Double check that you have installed the screws inthe servo control arms and that the clevis aresnapped tightly on the control horns.BalanceAileron-High RateElevator-Low RateElevator-High Rate3/4"3/4"1/2"1/2"3/4"3/4"We strongly recommend that you get help from anexperienced R/C pilot to learn to fly if you are justbeginning. You should be able to find help at yourlocal dealer or club field.<strong>Fly</strong>ing Your E-HawkFirst of all, if you are flying with other flyers, check tomake sure they are not operating on the samefrequency as you. If they are, do not turn on yourradio until they have safely landed and have turnedtheir radios off.Secondly, even though the E-Hawk is very easy to fly,if you are a novice modeler/pilot, we highlyrecommend that you seek the help of an experiencedmodeler for your first few flights. He can save you alot time and possible disappointment by helping youget your model in the air safely and getting it trimmedout for you.50.Balancing your model is very important and mustnot be overlooked. The center of gravity (CG) is2 3/4" behind the leading edge of the wing nearthe wing root, parallel with the fuselage. You canadjust the battery pack forward or backward toreach the right CG.70mmFIRST FLIGHTS2 3/4" (Checks You Should MakeBefore you attempt to fly your model you shouldperform some final checks:1. Fully charge your radio and flight batteries followingImportant: The radio control system is set up tooperate the control surfaces just like a real airplanesas if the pilot (you) are sitting in cockpit controlling theairplane. When you want the plane to dive, you pushthe elevator stick forward (up), to climb you pull thestick back (down), to turn right, you move the aileronstick to right with elevator up and visa versa. Whenyou want to turn the motor on you push the throttlestick forward and when you want to turn the motor offyou pull the stick back. It is the turning that causesthe most problems with novice pilots because whenthe plane is flying towards you a right turn commandon the transmitter cause the plane to turn to your left(which is the planes right). Get the picture?Fortunately the up and down commands do notchange. The easiest way to conquer this problem isto try and always face your body near the direction theplanes is flying. This means that you will have to lookover your shoulder at times, but many modelers findthis an easy way to learn.
THE FIRST FLIGHTSYou should always use the first few flights to getaccustomed to your new airplane and its flyingcharacteristics. Keep the model upwind and climb toa good comfortable altitude to cut off the motor andtrim your E-Hawk for a glide. At altitude cut the motorand start your glide. Have an experienced modeleradjust the trims of the transmitter for you until theplane will glide straight and level without any othercontrol input. Once the trims are set practice makingsmooth turns in both directions while losing as littlealtitude as possible. When the E-Hawk starts to gettoo low for comfort turn the motor back on and climbback up to altitude. Practice this climbing and glidinguntil you are comfortable with the airplane.Depending on the battery you use the E-Hawk willmake 2 to 3 good climbs up to a nice thermalsearching altitude from single battery charge. Oncethe Auto Cut-off Device or ESC shuts off the power tothe motor you will need to set up for your landing.Continue to make smooth gently turns while lining upthe E-Hawk with your landing strip. Once you are setup to land keep the wings level and let the modelsettle in for an nice gentle landing while adding upelevator to keep the nose up slightly as the planeslows down. Make several flights like this to reallyfamiliarize yourself with the characteristics of yourmodel and to learn the glide and distance coveringabilities of the E-Hawk. Once you have mastered agood “comfort level” you are ready to start searchingfor thermals which will really increase your flight times.THERMALSThermal soaring is one of the most interesting andchallenging types of flying there is. Believe it or not,your E-Hawk is capable of flights thousands of feethigh, lasting for several hours, and covering dozens ofmiles. The following paragraphs will help explain howto take advantage of natures energy sources calledthermals.“Thermal” is the term applied to columns of rising air.This air is rising because it is warmer than thesurrounding air. A dust devil is simply a thermal whichahs picked up some dust. Even a tornado is verysimilar to a thermal, but of course much stronger.Thermals occur when the sun, or other heat source,heat the air in one location faster and/or warmer thanthe surrounding air. Darker surfaces (plowed fields,asphalt parking lots, etc.) absorb the sun’s energyfaster than lighter colored and are generally goodthermal generators. This warmer air is lighter (lessdense) than the cooler air and thus rises. The risingair naturally starts to rotate, much like water goingdown a drain, and forms an inverted funnel shapedcolumn that usually gets larger with altitude. Thiswarmer air often contains water vapor whichcondenses as it reaches the cooler air high above theearth forming big puffy Cumulus clouds thatexperienced sailplane flyers will watch to determinewhere the thermals are forming. Thermals vary instrength, but often contain air that is rising at speedsover 1200 feet per minute. Some thermals are sostrong they can even rip a sailplane apart, especiallyif the plane is flying fast when it passes through thethermal.THERMAL SOARINGIt takes lots of practice and concentration to thermalsoar like the Hawks and Eagles. Since the pilot is notsitting inside an model sailplane, he cannot feel thethermal, he can only see his sailplanes reaction to thethermal. Therefore, the majority of the time, unlessthe pilot is paying careful attention to the plane, hemay not even realize that plane is near a thermal.Since most thermals are relatively small, less than ahundred feet in diameter near the ground, thesailplane will rarely fly directly into the thermal andstart rising. More likely, it will fly near a thermal andthe wing closest to the thermal will rise turning theplane away from the thermal. So as you can see, aninexperienced pilot may bounce around between thethermals with ever knowing that he is encounteringrising air.In order to take advantage of thermals, you need to flysmoothly with as few control inputs as possible.Watch the sailplane carefully and it will tell you whatthe air around it is doing.When a sailplane does fly directly into a thermal it willeither start rising or stop sinking at its normal rate.Either case is reason enough to explore further.Continue flying straight ahead until you haveobviously passed through the area of strongest lift.Now start circling in fairly tight, but smooth circles.Because of the thermals inverted funnel shape, thelower the planes altitude, the tighter the circles needto be. As the plane gains altitude, the diameter of thecircles can be increased. If you see the plane falling
SAFETY PRECAUTIONSthe stronger lift. Thermals are swept along by thewind so allow your circle to drift downwind with thethermal. Be careful when following a thermaldownwind though as you still have to be able to makeit back to the field!If the sailplane is flying along and all of a sudden turnsby itself, it has probably flown near a thermal. Keep inmind that thermal will have tendency to turn the planeaway, so make a 180 degree turn and fly back towardsthe thermal. If you don’t quickly encounter lift startsearching around that area. If you find the thermal,follow the procedure outlined above to take advantageof it.Thermals can be generated at any time of the day, butthe strangest thermals are usually produced when thesun is directly overhead 10:00am to 2:00pm seems tobe the best time to find the strongest thermals.If you find yourself getting too high or you’re havingtrouble getting out of a strong thermal. DO NOT divethe plane to lose altitude. This will very quickly overstressthe airframe and blow the wings off the plane.The easiest and safest way to quickly lose altitude isto apply full rudder (either right or left) and full upelevator. This will put the plane into a tight spin thatwill normally not over-stress the airframe. This isespecially useful if the sailplane gets sucked into acloud or gets too high to see. The spinning action willgive the sun a better chance of reflecting off of thewing and catching your attention.As you might expect, with all this rising air, there mustalso be some sinking air. This sinking air is thesailplane pilots enemy and one of the factors thatreally make soaring challenging. “Sink” as it isreferred to, is usually not as strong as the nearbythermals, but is can quickly put a sailplane on theground. Sink in one of the reasons, you have to bevery careful when chasing a thermal downwind. If youencounter sink, immediately turn and fly 90 degrees tothe direction of the wind. Apply a little down elevatorto pick up some speed and get out of the bad air asquickly as possible.Safety PrecautionsYou as the pilot of this radio controlled model areresponsible for any accidents that may occur during itsuse. We recommend that you fly your model at amodel club field which is specially set up for modelin a safe and careful manner and observe theFollowing Suggestions:1. Do not fly your model close to buildings, powerlines, roads, or other obstacles.2. Do not fly in congested areas such as parks oroccupied playing fields. Select wide, flat and openarea to fly with no obstructions and plenty of roomfor learning to fly.3. Do not fly without help from an experienced modelpilot until you have learned how to fly. Your localmodel club or hobby shop can recommend aninstructor if you do not already know one.4. Always check for other modelers in the area and besure that your frequency is not in use by someoneelse which might cause you model to crash.Always observe frequency control systems atflying fields and wait your turn to fly.5. Never fly your model directly toward spectators,autos, other modelers or their models.6. Always abide by the rules for model flying providedby your club and the governing agency for modelaircraft in your country.CongratulationsNow that you have completed the assembly of your E-Hawk model we feel that have a very capable andgood looking 2-meter electric sailplane. We hope thatyou will enjoy this model and get many hours of flyingpleasure from its use. Thank you for purchasing thisE-Hawk from Thunder Tiger and we look forward toproviding you with other great R/C products in thefuture.