TraumaCad Touch Guide - Voyant Health
TraumaCad Touch Guide - Voyant Health
TraumaCad Touch Guide - Voyant Health

Create successful ePaper yourself
Turn your PDF publications into a flip-book with our unique Google optimized e-Paper software.
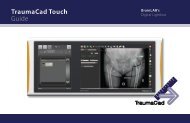
<strong>TraumaCad</strong> <strong>Touch</strong><br />
<strong>Guide</strong><br />
BrainLAB’s<br />
Digital Lightbox
BrainLAB’s Digital Lightbox 2<br />
Contents<br />
Navigation.................................1<br />
Getting Started........................2<br />
Selecting a Procedure...........2<br />
Calibration Tab.........................3<br />
Templates Tab..........................4<br />
Templating Buttons................5<br />
Measurements Tab.................6<br />
Fragments..................................7<br />
OrthoWeb Tab..........................8<br />
<strong>TraumaCad</strong> Buttons...............9<br />
Navigation<br />
There are several finger gestures<br />
to navigate and interact with<br />
<strong>TraumaCad</strong> <strong>Touch</strong> (“TC <strong>Touch</strong>”)<br />
for selecting buttons, tabs or<br />
objects, rotating objects and<br />
zooming & panning images just<br />
as you would using a mouse.<br />
<strong>Touch</strong> / Tap<br />
Similar to left click in mouse<br />
control. When selecting items<br />
on the screen, such as the tabs,<br />
large on-screen buttons, templates<br />
or other objects, simply<br />
touch them with your finger.<br />
Apply some pressure with your<br />
finger pad when touching an<br />
item on the screen. Lift your<br />
finger when completed.<br />
Swipe<br />
To swipe means<br />
to drag your<br />
finger vertically<br />
or horizontally<br />
across<br />
the screen. For<br />
example, to<br />
perform finger<br />
scrolling, such as Implant size<br />
selection, slowly swipe your finger<br />
vertically across the screen<br />
to finger scroll.
Navigation<br />
continued<br />
Multi <strong>Touch</strong><br />
TC <strong>Touch</strong> recognizes a two-finger touch to zoom or to rotate<br />
To zoom in (magnify)<br />
Start with pinched fingers, and<br />
then spread them apart.<br />
To zoom out (make smaller)<br />
Start with separated fingers and<br />
bring them together. You may<br />
also perform these operations<br />
with one finger from each hand,<br />
if that is more convenient.<br />
To rotate an object<br />
<strong>Touch</strong> the object with your<br />
thumb in the location you<br />
would like to define as center<br />
of rotation and apply some<br />
pressure. With your second<br />
finger touch another point of<br />
the object and slide your finger<br />
left or right to rotate the object<br />
around your thumb.<br />
If a larger “turn handle” is desired,<br />
plant one finger at the desired<br />
center of rotation and use<br />
a finger from your other hand,<br />
far away from the first finger, to<br />
simulate a larger turning handle.<br />
This method may often provide<br />
for finer control over rotation.<br />
Slide / Drag<br />
Sliding on the touch-screen also<br />
involves dragging with your<br />
finger, but you need to press<br />
and hold your finger with some<br />
pressure before you start to<br />
drag. While dragging, do not release<br />
your finger until you have<br />
reached the target position. The<br />
following are some instances<br />
when you would use sliding:<br />
• Drag & drop templates into<br />
the image – touch to select<br />
templates from the list on the<br />
left, and slide over into the<br />
image.<br />
• Moving objects (templates<br />
or measurement tools for<br />
instance) from one location to<br />
another.<br />
• Rotating an object – touch the<br />
yellow dot on the top of the<br />
object highlighted box and<br />
slide your finger left or right<br />
to rotate the object around its<br />
center of rotation.<br />
<strong>TraumaCad</strong> <strong>Touch</strong> | <strong>Guide</strong> 1
BrainLAB’s Digital Lightbox 2<br />
Getting Started<br />
To start planning select an image from Digital Lightbox, touch the<br />
<strong>TraumaCad</strong> button to start the application.<br />
Selecting a Procedure<br />
<strong>Touch</strong> the desired surgical or analysis procedure button. The chosen<br />
procedure determines the relevant templates and measurement tools<br />
that will appear in the application.
Calibration Tab<br />
You must set up the image and calibrate it before starting<br />
templating.<br />
Calibrate image<br />
To use an image for quantitative measurements, the image must be<br />
calibrated to the actual bone size. There are 3 ways to calibrate an<br />
image:<br />
Define image orientation<br />
1. View - AP or LAT<br />
2. Laterality – Left or Right<br />
<strong>TraumaCad</strong> automatically<br />
searched for a metal ball as a<br />
marker. If a marker is detected,<br />
the Automatic calibration will<br />
be the default choice: the ball<br />
should be circled and the size<br />
shown is 25.4mm (1 Inch).<br />
To manually indicate the position<br />
of the marker you can use a<br />
ruler tool.<br />
<strong>Touch</strong> the “Manual” button to<br />
select the manual calibration<br />
and then draw the marker by<br />
dragging your finger on the image.<br />
<strong>Touch</strong> the Marker Size field<br />
to open the virtual keyboard.<br />
Enter the marker size and touch<br />
the OK button or Cancel to close<br />
the keyboard.<br />
You can manually resize the image<br />
by entering a percentage in<br />
the Oversize field.<br />
<strong>Touch</strong> the percentages field<br />
to open the virtual keyboard.<br />
Enter the oversized number<br />
(which represents the typical, or<br />
presumed, magnification) and<br />
touch the OK or Cancel button<br />
to close the keyboard.<br />
<strong>Touch</strong> the<br />
button<br />
when all fields are marked to<br />
your satisfaction.<br />
The calibration status of the image<br />
appears in the lower-right<br />
corner of the image.<br />
Once the image is set up you<br />
can start templating.<br />
<strong>TraumaCad</strong> <strong>Touch</strong> | <strong>Guide</strong> 3
BrainLAB’s Digital Lightbox 4<br />
Templates Tab<br />
Start Templating<br />
1. <strong>Touch</strong> the Manufacturer field<br />
to open the implant manufacturer<br />
list. <strong>Touch</strong> the desired<br />
manufacturer to select it.<br />
2. <strong>Touch</strong> the Types of Implants<br />
field to select the implant<br />
type.<br />
3. A list of implants matching<br />
your selection appears in the<br />
Implants tab.<br />
4. You can also do a free search<br />
for your favorite implants.<br />
<strong>Touch</strong> the Look for text box<br />
to open the virtual keyboard<br />
and enter your search, when<br />
finished touch OK or Cancel<br />
to close the keyboard.<br />
<strong>Touch</strong> the button to start<br />
the search.<br />
Mark the checkbox if looking<br />
for an implant regardless of<br />
the selected procedure.<br />
5. Select a template from the<br />
Implants tab and drag it onto<br />
the image.<br />
6. The template appears on the<br />
image.<br />
Once the template appears in<br />
the image you can:<br />
• <strong>Touch</strong> and drag it with your<br />
finger.<br />
• Rotate it using the two-finger<br />
multi-touch method, or by<br />
sliding the yellow dot.<br />
Template will rotate around<br />
the red pivot point (center<br />
of rotation).
Templating<br />
Buttons<br />
Group and Ungroup<br />
Create a Kit<br />
Attach to Cup and Detach Cup<br />
When a template is selected, it<br />
appears with a highlighted box<br />
surrounding it. Each template<br />
has different attached buttons:<br />
Implant Properties<br />
<strong>Touch</strong> the implant properties<br />
button to open a selection of<br />
properties such as implant, offset,<br />
attachment point, external<br />
or internal diameters, etc. In<br />
case the list is long slowly swipe<br />
your finger vertically across the<br />
screen to scroll.<br />
Appears when more than one<br />
object is selected (template,<br />
fragment or measurement tool).<br />
As you touch the Group button,<br />
the selected objects will be<br />
grouped and can be moved and<br />
rotated as a single object.<br />
The button will change to<br />
Ungroup, in case you wish to<br />
ungroup the objects.<br />
Appears when two or more<br />
templates are selected.<br />
Select two templates and touch<br />
the “Create a Kit” button. A virtual<br />
Keyboard will automatically<br />
open and you can type a name<br />
for your kit. Once you save the<br />
kit’s name it will be added to<br />
your “Kits” tab.<br />
Screw Properties<br />
Appears when a screw is<br />
selected, next to the plate’s<br />
highlighted box but will refer<br />
to the selected screw. <strong>Touch</strong><br />
the “Screw Properties” button<br />
to open a selection of properties<br />
such as: Lock Screw, Unlock<br />
Screw, Remove Screw and<br />
Remove All Screws.<br />
Appears in the Auto-Hip procedure<br />
next to the Stem highlighted<br />
box. <strong>Touch</strong> the button<br />
in order to attach the stem to<br />
the cup.<br />
Once the stem is attached to<br />
the cup, the button will change<br />
to “Detach Cup” and you can<br />
touch it to detach the stem from<br />
the cup.<br />
<strong>TraumaCad</strong> <strong>Touch</strong> | <strong>Guide</strong> 5
BrainLAB’s Digital Lightbox 6<br />
Measurements Tab<br />
Accurate measurements can be taken using a variety of orthopedics<br />
tools provided by <strong>TraumaCad</strong> with detailed illustrations and wizards.<br />
Procedure-specific measurement tools are shown on the<br />
Measurements tab. There is a detailed illustration for every<br />
measurement tool describing how to use it.<br />
The most frequently used tools can also be accessed from the right<br />
toolbar as well.
Fragments<br />
Fragments can help you<br />
simulate your operation results,<br />
for instance in osteotomies or<br />
fracture reductions.<br />
1. <strong>Touch</strong> to select the “Define<br />
Fragment” button in the left<br />
toolbar.<br />
2. Make a series of clicks along<br />
the outline of the fragment.<br />
3. Tap twice to close the outline<br />
drawing of the fragment.<br />
4. You have now created a<br />
closed shape that can be<br />
dragged to a new position.<br />
5. You can reshape the fragment<br />
outline by dragging<br />
any of the red points on the<br />
outline.<br />
6. <strong>Touch</strong> the yellow dot and<br />
slide it right or left to rotate<br />
the fragment around its<br />
center of rotation .<br />
You can also drag this pivot<br />
point to a new location and<br />
then rotate the fragment<br />
around it. The rotation angle<br />
appears next to the fragment<br />
highlighted box. Multi-touch<br />
rotation is also possible.<br />
7. Reset fragment – Return a<br />
manipulated fragment to its<br />
original position and location<br />
by touching the button.<br />
<strong>TraumaCad</strong> <strong>Touch</strong> | <strong>Guide</strong> 7
BrainLAB’s Digital Lightbox 8<br />
OrthoWeb Tab<br />
Login to OrthoWeb<br />
Insert your login and password<br />
and touch the “Login” button<br />
to login to your OrthoWeb<br />
account. Once you are loggedin<br />
you can view your OrthoWeb<br />
cases and upload cases to your<br />
account.<br />
Easy Access login<br />
1. Insert Easy Access Key to DLB<br />
2. Enter your PIN number in the<br />
virtual keyboard<br />
3. Easy Access will be blocked<br />
after 3 consecutive mistrials.<br />
4. Pulling Easy Access key will<br />
log you out from your<br />
account.<br />
OrthoWeb is a highlysecure,<br />
web-based environment<br />
allowing you to<br />
bypass the technical issues<br />
often encountered when<br />
moving images around to<br />
different locations—<br />
the clinic, the home, the<br />
hospital, or the operating<br />
room.<br />
If you do not have an<br />
OrthoWeb account, contact<br />
Global Support Center:<br />
support@traumacad.com.<br />
Learn more about<br />
OrthoWeb on the web:<br />
www.orthoweb.com
<strong>TraumaCad</strong><br />
Buttons<br />
Redo<br />
Repeats last cancelled<br />
step<br />
Exit<br />
Exits the application<br />
Line<br />
Draws a line between two<br />
points on the image<br />
Change Procedure<br />
Changes the procedure<br />
selected for surgery or<br />
analysis<br />
Clear Image<br />
Clears image from<br />
planning<br />
Transpose<br />
Transposes implant’s<br />
orientation between<br />
AP and LAT views<br />
Text Annotation<br />
Adds textual annotation<br />
to the image<br />
Save Case<br />
Saves <strong>TraumaCad</strong> Case<br />
Delete<br />
Deletes a selected measurement<br />
tool or implant<br />
Copy Implant<br />
Duplicates a selected<br />
implant<br />
Free Hand Line<br />
Draws a curved line<br />
on the image<br />
Download Templates<br />
Downloads templates<br />
from Orthocrat global<br />
server<br />
Image Mode<br />
Zooms the image in or<br />
out, and pans it<br />
Window/Level<br />
Adjusts the brightness/<br />
contrast of the image<br />
Multi Selection<br />
Selects two or more<br />
objects in the image<br />
Undo<br />
Cancels last step<br />
Invert Image<br />
Reverses the areas of<br />
black/white on the image<br />
Fit to Screen<br />
Fits the image to full<br />
window size<br />
Flip Horizontal<br />
Flips the image<br />
horizontally<br />
Flip Vertical<br />
Flips the image vertically<br />
About Us<br />
Flip Implant<br />
Flips the selected implant<br />
or fragment left/right<br />
Ruler<br />
Measures the distance<br />
between two points<br />
Angle<br />
Measures an angle<br />
Circle<br />
Measures the diameter<br />
of any round object<br />
Interline Angle<br />
Measures the angle<br />
between two lines<br />
Reset Fragment<br />
Returns a manipulated<br />
fragment to its original<br />
position<br />
Duplicate Fragment<br />
Duplicates a fragment<br />
of the image<br />
Define Fragment<br />
Draws a line around a<br />
fragment and cut it<br />
<strong>TraumaCad</strong> <strong>Touch</strong> | <strong>Guide</strong> 9<br />
© 2009. All Rights Reserved | Orthocrat, Ltd. | OC138001 | 111 August 2009
www.orthocrat.com<br />
Baltimore | Tampa | London | Tel Aviv<br />
Orthocrat<br />
Bridge your orthopedic<br />
workflow gap<br />
US: 866-717-0272<br />
UK: 0800-4048204<br />
Europe: 00-800-9290-9290<br />
International: +972-3-929-0929