

OPERATOR'S AND PARTS MANUAL - Walker Mowers
OPERATOR'S AND PARTS MANUAL - Walker Mowers
OPERATOR'S AND PARTS MANUAL - Walker Mowers

Create successful ePaper yourself
Turn your PDF publications into a flip-book with our unique Google optimized e-Paper software.
ASSEMBLY<br />
HITCH INSTALLATION – TRACTOR SIDE<br />
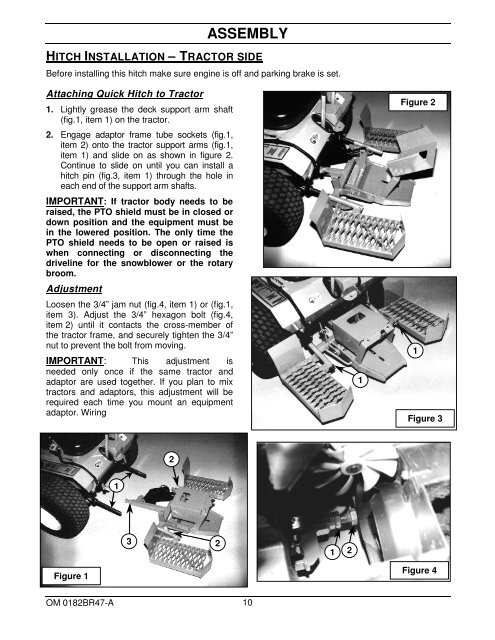
Before installing this hitch make sure engine is off and parking brake is set.<br />
Attaching Quick Hitch to Tractor<br />
1. Lightly grease the deck support arm shaft<br />
(fig.1, item 1) on the tractor.<br />
2. Engage adaptor frame tube sockets (fig.1,<br />
item 2) onto the tractor support arms (fig.1,<br />
item 1) and slide on as shown in figure 2.<br />
Continue to slide on until you can install a<br />
hitch pin (fig.3, item 1) through the hole in<br />
each end of the support arm shafts.<br />
IMPORTANT: If tractor body needs to be<br />
raised, the PTO shield must be in closed or<br />
down position and the equipment must be<br />
in the lowered position. The only time the<br />
PTO shield needs to be open or raised is<br />
when connecting or disconnecting the<br />
driveline for the snowblower or the rotary<br />
broom.<br />
Adjustment<br />
Loosen the 3/4” jam nut (fig.4, item 1) or (fig.1,<br />
item 3). Adjust the 3/4” hexagon bolt (fig.4,<br />
item 2) until it contacts the cross-member of<br />
the tractor frame, and securely tighten the 3/4”<br />
nut to prevent the bolt from moving.<br />
IMPORTANT: This adjustment is<br />
needed only once if the same tractor and<br />
adaptor are used together. If you plan to mix<br />
tractors and adaptors, this adjustment will be<br />
required each time you mount an equipment<br />
adaptor. Wiring<br />
1<br />
Figure 2<br />
1<br />
Figure 3<br />
2<br />
1<br />
3<br />
2<br />
1 2<br />
Figure 1<br />
Figure 4<br />
OM 0182BR47-A 10


