

OPERATOR'S AND PARTS MANUAL - Walker Mowers
OPERATOR'S AND PARTS MANUAL - Walker Mowers
OPERATOR'S AND PARTS MANUAL - Walker Mowers

Create successful ePaper yourself
Turn your PDF publications into a flip-book with our unique Google optimized e-Paper software.
MAINTENANCE<br />
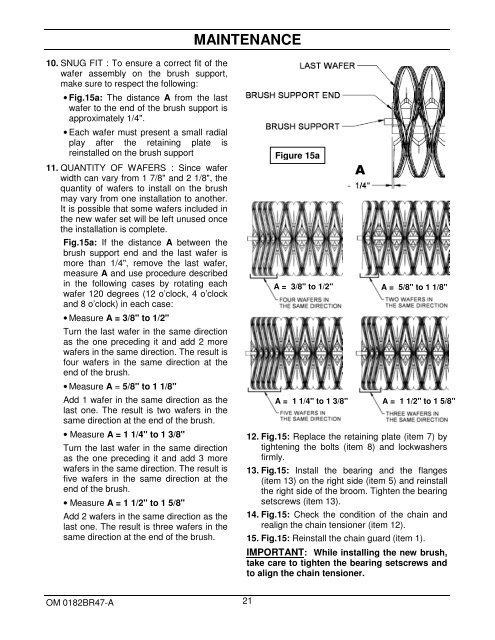
10. SNUG FIT : To ensure a correct fit of the<br />
wafer assembly on the brush support,<br />
make sure to respect the following:<br />
• Fig.15a: The distance A from the last<br />
wafer to the end of the brush support is<br />
approximately 1/4".<br />
• Each wafer must present a small radial<br />
play after the retaining plate is<br />
reinstalled on the brush support<br />
11. QUANTITY OF WAFERS : Since wafer<br />
width can vary from 1 7/8" and 2 1/8", the<br />
quantity of wafers to install on the brush<br />
may vary from one installation to another.<br />
It is possible that some wafers included in<br />
the new wafer set will be left unused once<br />
the installation is complete.<br />
Fig.15a: If the distance A between the<br />
brush support end and the last wafer is<br />
more than 1/4", remove the last wafer,<br />
measure A and use procedure described<br />
in the following cases by rotating each<br />
wafer 120 degrees (12 o’clock, 4 o’clock<br />
and 8 o’clock) in each case:<br />
• Measure A = 3/8" to 1/2"<br />
Turn the last wafer in the same direction<br />
as the one preceding it and add 2 more<br />
wafers in the same direction. The result is<br />
four wafers in the same direction at the<br />
end of the brush.<br />
• Measure A = 5/8" to 1 1/8"<br />
Add 1 wafer in the same direction as the<br />
last one. The result is two wafers in the<br />
same direction at the end of the brush.<br />
• Measure A = 1 1/4" to 1 3/8"<br />
Turn the last wafer in the same direction<br />
as the one preceding it and add 3 more<br />
wafers in the same direction. The result is<br />
five wafers in the same direction at the<br />
end of the brush.<br />
• Measure A = 1 1/2" to 1 5/8"<br />
Add 2 wafers in the same direction as the<br />
last one. The result is three wafers in the<br />
same direction at the end of the brush.<br />
Figure 15a<br />
A<br />
A = 3/8" to 1/2" A = 5/8" to 1 1/8"<br />
A = 1 1/4" to 1 3/8" A = 1 1/2" to 1 5/8"<br />
12. Fig.15: Replace the retaining plate (item 7) by<br />
tightening the bolts (item 8) and lockwashers<br />
firmly.<br />
13. Fig.15: Install the bearing and the flanges<br />
(item 13) on the right side (item 5) and reinstall<br />
the right side of the broom. Tighten the bearing<br />
setscrews (item 13).<br />
14. Fig.15: Check the condition of the chain and<br />
realign the chain tensioner (item 12).<br />
15. Fig.15: Reinstall the chain guard (item 1).<br />
IMPORTANT: While installing the new brush,<br />
take care to tighten the bearing setscrews and<br />
to align the chain tensioner.<br />
OM 0182BR47-A 21


