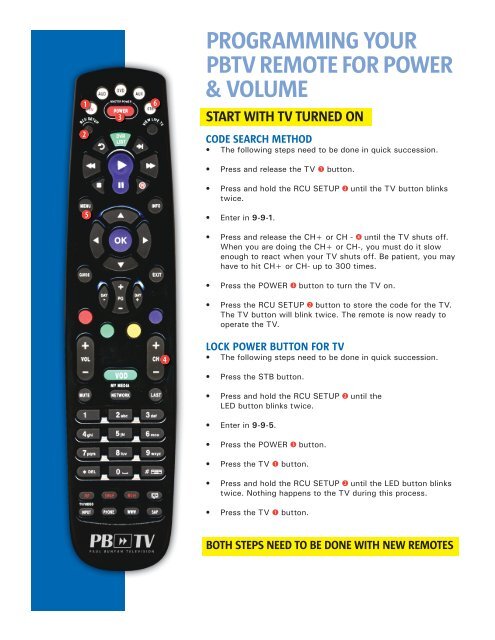
PROGRAMMING YOUR PBTV REMOTE FOR POWER ...
PROGRAMMING YOUR PBTV REMOTE FOR POWER ...
PROGRAMMING YOUR PBTV REMOTE FOR POWER ...

Create successful ePaper yourself
Turn your PDF publications into a flip-book with our unique Google optimized e-Paper software.
<strong>PROGRAMMING</strong> <strong>YOUR</strong><br />
<strong>PBTV</strong> <strong>REMOTE</strong> <strong>FOR</strong> <strong>POWER</strong><br />
& VOLUME<br />
START WITH TV TURNED ON<br />
CODE SEARCH METHOD<br />
• The following steps need to be done in quick succession.<br />
• Press and release the TV button.<br />
• Press and hold the RCU SETUP until the TV button blinks<br />
twice.<br />
<br />
• Enter in 9-9-1.<br />
• Press and release the CH+ or CH - until the TV shuts off.<br />
When you are doing the CH+ or CH-, you must do it slow<br />
enough to react when your TV shuts off. Be patient, you may<br />
have to hit CH+ or CH- up to 300 times.<br />
• Press the <strong>POWER</strong> button to turn the TV on.<br />
• Press the RCU SETUP button to store the code for the TV.<br />
The TV button will blink twice. The remote is now ready to<br />
operate the TV.<br />
<br />
LOCK <strong>POWER</strong> BUTTON <strong>FOR</strong> TV<br />
• The following steps need to be done in quick succession.<br />
• Press the STB button.<br />
• Press and hold the RCU SETUP until the<br />
LED button blinks twice.<br />
• Enter in 9-9-5.<br />
• Press the <strong>POWER</strong> button.<br />
• Press the TV button.<br />
• Press and hold the RCU SETUP until the LED button blinks<br />
twice. Nothing happens to the TV during this process.<br />
• Press the TV button.<br />
BOTH STEPS NEED TO BE DONE WITH NEW <strong>REMOTE</strong>S
<strong>PROGRAMMING</strong> <strong>YOUR</strong><br />
<strong>PBTV</strong> <strong>REMOTE</strong> <strong>FOR</strong><br />
<strong>POWER</strong> & VOLUME<br />
START WITH TV TURNED ON<br />
CODE SEARCH METHOD<br />
Press and hold the TV button. While holding it, press the<br />
OK key for one second.<br />
Release both keys and all the mode keys will flash, then the<br />
selected mode key (TV ) will stay lit.<br />
Press the <strong>POWER</strong> button repeatedly until the TV set turns<br />
off. Once the TV has turned off, press OK to save the<br />
code.<br />
The TV light will go out to indicate a successful setup.<br />
<br />
IF THE VOLUME WORKS, DO THE FOLLOWING STEPS:<br />
LOCK THE VOLUME METHOD<br />
Press and hold the TV button. While holding it, press the<br />
OK key for one second.<br />
Release both keys and all the mode keys will flash, then the<br />
selected mode key (TV ) will stay lit.<br />
Press and hold the MUTE key until the TV light turns off<br />
and remains on.<br />
<br />
Press and release the TV button (it will remain lit when<br />
released)<br />
Press and release the MUTE button to store setting.
<strong>PROGRAMMING</strong> <strong>YOUR</strong><br />
<strong>PBTV</strong> <strong>REMOTE</strong> <strong>FOR</strong><br />
<strong>POWER</strong> & VOLUME<br />
START WITH TV TURNED ON<br />
CODE SEARCH METHOD<br />
Press and hold Setup until LED at the top of the<br />
remote blinks twice.<br />
<br />
Press and release TV button.<br />
Press and hold OK button until the device turns off.<br />
IF THE VOLUME WORKS, DO THE FOLLOWING STEPS:<br />
LOCK THE VOLUME METHOD<br />
<br />
Press the TV button.<br />
Press and hold Setup until TV button blinks twice.<br />
Press Volume + button one time.<br />
<br />
Press the TV button.<br />
Press the STB button.
Controls PLAYBACK of<br />
live and recorded TV<br />
Controla la REPRODUCCIÓN de TV<br />
en vivo y grabada<br />
Used in the program guide<br />
for PAGE and DAY navigation<br />
Se utiliza en la guía de programas para<br />
navegar por las PÁGINAS y los DÍAS<br />
Displays main cable MENU<br />
Muestra el MENÚ principal para cable<br />
EXITs current menu and<br />
returns to current program<br />
SALE del menu en curso y vuelve<br />
al programa en curso<br />
Displays program GUIDE<br />
Muestra la GUÍA de programas<br />
URC2025 URC62440<br />
<strong>REMOTE</strong> CONTROL USER’ S GUIDE<br />
CONTROL REMOTO: GUÍA DEL USUARIO<br />
Used to cycle through video inputs<br />
on TV or Audio Receiver<br />
Se utiliza para recorrer las entradas de<br />
video ajustadas en el TV o Receptor de Audio<br />
Used to enter remote control SETUP<br />
Se utiliza para ingresar la CONFIGURACIÓN<br />
del control remoto<br />
Controls the device related to<br />
whichever mode key was last pressed<br />
Controla el equipo relacionado<br />
a la tecla de modo pulsada por última vez<br />
Accesses ON DEMAND program library<br />
Accede a la biblioteca<br />
de programas A DEMANDA<br />
Displays a LIST of recorded programs<br />
Muestra una LISTA de los<br />
programas grabados<br />
Displays INFO for currently<br />
selected program<br />
Muestra IN<strong>FOR</strong>MACIÓN sobre<br />
el programa seleccionado<br />
Getting<br />
Getting<br />
Started<br />
Started<br />
Primeros Pasos<br />
1<br />
2<br />
Note/Nota:<br />
Make sure all home theater equipment is ON<br />
before starting remote control setup.<br />
Asegúrese de que todo el equipo de cine en casa<br />
(home theater) esté ENCENDIDO (ON) antes de<br />
Remove battery cover.<br />
Retire la tapa del compartimiento<br />
de pilas.<br />
Insert 2 AA batteries. Match<br />
the + and – marks.<br />
Coloque 2 pilas AA. Haga coincidir<br />
las marcas “+” y “-”.<br />
Controls and MUTEs<br />
TV VOLUME<br />
Controla y SILENCIA EL<br />
VOLÚMEN DEL TELEVISOR<br />
Returns to LAST channel<br />
you were watching<br />
Vuelve al ÚLTIMO canal<br />
que estuvo mirando<br />
3<br />
Replace battery cover.<br />
Vuelva a colocar la tapa del<br />
compartimiento de pilas.<br />
Tip/Consejo:<br />
The Mode Key will blink 5 times with each<br />
key-press when batteries need replacement.<br />
La tecla de Modo parpadeará 5 veces con<br />
cada pulsación de tecla cuando sea<br />
necesario reemplazar las pilas.<br />
Setup Method A:<br />
Configuración - Método A:<br />
Popular Brands<br />
Marcas famosas<br />
Press and hold SETUP until<br />
Press the mode key for<br />
Find your device and brand<br />
1 2 3 4<br />
the mode key blinks twice.<br />
device you wish to setup.<br />
from the charts below and<br />
Presione y mantenga<br />
presionada la tecla SETUP<br />
tecla de modo parpadee<br />
dos veces.<br />
SETUP<br />
The mode key stays lit.<br />
Presione la tecla de<br />
modo para el equipo<br />
tecla de modo<br />
permanece encendida.<br />
note the DIGIT key assigned<br />
to your brand. Press and<br />
hold down the DIGIT key<br />
for your device/brand.<br />
Busque su equipo y marca<br />
continuación y observe el<br />
código de DÍGITO (Digit)<br />
asignado a su marca.<br />
Presione y mantenga<br />
presionada la tecla DIGIT<br />
(DÍGITO) que corresponda a<br />
su equipo/marca.<br />
1 2<br />
4 5 6<br />
7 8 9<br />
0<br />
3<br />
Let go of the key when<br />
Setup for that device is<br />
complete.<br />
Suelte la tecla cuando su<br />
equipo se apague. La<br />
equipo se ha completado.<br />
2 PARPADEOS = CORRECTA<br />
1 PARPADEO LARGO = INCORRECTA<br />
DIGIT<br />
Numéro<br />
TV<br />
DIGIT<br />
Numéro<br />
DVD/VCR<br />
DIGIT<br />
Numéro<br />
Audio<br />
Tip/Consejo:<br />
If your brand does not appear in the brand chart, perform setup using either DIRECT<br />
CODE ENTRY or CODE SEARCH.<br />
utilizando ya sea ENTRADA DIRECTA DE CÓDIGO O BÚSQUEDA DE CÓDIGO.<br />
1<br />
2<br />
3<br />
4<br />
5<br />
6<br />
7<br />
8<br />
9<br />
0<br />
Insignia / Dynex<br />
LG / Zenith<br />
Mitsubishi<br />
Panasonic<br />
Philips / Magnavox<br />
Samsung<br />
Sharp<br />
Sony<br />
Toshiba<br />
Vizio<br />
1<br />
2<br />
3<br />
4<br />
5<br />
6<br />
7<br />
8<br />
9<br />
0<br />
Insignia / Dynex<br />
LG<br />
Panasonic<br />
Philips / Magnavox<br />
RCA<br />
Samsung<br />
Sharp<br />
Sony<br />
Sylvania<br />
Toshiba<br />
1<br />
2<br />
3<br />
4<br />
5<br />
6<br />
7<br />
8<br />
9<br />
0<br />
Bose<br />
Denon<br />
LG<br />
Onkyo<br />
Panasonic<br />
Philips<br />
Pioneer<br />
Samsung<br />
Sony<br />
Yamaha<br />
©Copyright Universal Electronics 2011
SWAP<br />
ON/O F<br />
PIP<br />
LIVE<br />
ghi<br />
pqrs<br />
LAST<br />
PAGE<br />
tuv<br />
FAV<br />
abc<br />
jkl<br />
def<br />
mno<br />
wxyz<br />
DAY<br />
VOL<br />
CH<br />
3<br />
7 8 9<br />
0<br />
INFO<br />
GUIDE<br />
OK<br />
EXIT<br />
DVD<br />
ON<br />
DEMAND<br />
AUDIO<br />
SET T IN G S<br />
MENU<br />
WATCHCABLE<br />
LIST<br />
SELECT<br />
D<br />
DAY<br />
TV<br />
CABLE<br />
SETUP<br />
Setup Method B:<br />
Configuración - Método B:<br />
1<br />
Press the TV mode key.<br />
Presione la tecla de<br />
modo TV.<br />
2<br />
Press and hold SETUP<br />
until the TV mode key<br />
blinks twice.<br />
Presione y mantenga<br />
presionada la tecla<br />
hasta que el modo TV<br />
parpadee dos veces.<br />
SETUP<br />
Setup<br />
Setup<br />
TV<br />
TV<br />
Control<br />
Control<br />
Using<br />
Using<br />
Direct<br />
Direct<br />
Code<br />
Code<br />
Entry<br />
Entry<br />
Configuración del Control de TV utilizando Entrada Directa de Código<br />
3<br />
Enter the 1st TV code for<br />
your TV brand from the<br />
code list.<br />
Ingrese el primer código<br />
de TV que corresponda a<br />
la marca de su TV de la<br />
lista de códigos.<br />
1 2<br />
4 5 6<br />
7 8 9<br />
0<br />
3<br />
Press the power button<br />
4 to test TV control. If the 5<br />
1 2<br />
4 5 6<br />
complete.<br />
Presione el botón de<br />
encendido/apagado<br />
para probar el control<br />
del Televisor. Si el<br />
televisor se apaga, la<br />
completado.<br />
B C<br />
MUG62440<br />
MUG62440_MOT_A02<br />
If the TV does not turn<br />
off, repeat the process<br />
using the next code for<br />
your TV brand.<br />
Si el televisor no se<br />
apaga, repita el proceso<br />
utilizando el próximo<br />
código para la marca de<br />
su TV.<br />
Codes: TV<br />
Functional Key Chart<br />
Códigos: TV<br />
Accurian 1803<br />
Action 0873<br />
Admiral 0093, 0463<br />
Advent 0761, 0783, 1933<br />
Aiko 0092<br />
Aiwa 1362<br />
Akai 0812, 1675, 0702, 0765, 0030,<br />
0672, 1207, 1385, 1935, 2232<br />
Akura 1687<br />
Albatron 0843<br />
America Action 0180<br />
Anam 0180<br />
AOC 0030, 1365, 1589, 1590,<br />
2014, 2087, 2402, 2479<br />
Aomni 1623<br />
Apex Digital 0748, 0879, 0765, 0767,<br />
0890, 1217, 1992, 2397<br />
Astar 1531, 1738<br />
Audinac 0180<br />
Audiovox 1564, 0451, 0180, 0092,<br />
0623, 0802, 0846, 0875,<br />
1284, 1766, 1769, 1803,<br />
1865, 1937, 1951, 1952, 2121<br />
Aventura 0171<br />
Axion 1937<br />
Baysonic 0236, 0463, 0180<br />
Bell & Howell 0154<br />
BenQ 1032, 1315, 1756<br />
BGH 0876, 0898<br />
Blue Sky 1254<br />
Boigle 1696<br />
Bradford 0180<br />
Brillian 1007<br />
Broksonic 0236, 0463, 1935, 1938<br />
Byd:sign 1309<br />
Candle 0030, 0056<br />
Carnivale 0030<br />
Carver 0054<br />
Casio 1205<br />
CCE 0037, 0623<br />
Celebrity 0000<br />
Celera 0765<br />
Champion 1362<br />
Changhong 0765<br />
Cineral 0451, 0092<br />
Citizen 0451, 0060, 0030, 0092,<br />
0056, 0561, 1672, 1935<br />
Clarion 0180<br />
Coby 1538, 1634, 2306, 2314,<br />
2315, 2338, 2340, 2343,<br />
2344, 2345, 2350, 2560, 3202<br />
Commercial Solutions 1447, 0047<br />
Concerto 0056<br />
Conia 1687<br />
Contec 0180<br />
Continental 2357<br />
Coradir 2844<br />
Craig 0180<br />
Croma 1011<br />
Crosley 0000, 0054<br />
Crown 0180, 0672<br />
Crown Mustang 0672<br />
Curtis 1200, 1326, 2352, 2397, 2466<br />
Curtis Mathes 0047, 0054, 0154, 0451, 0093,<br />
0060, 0702, 0030, 0145, 0166,<br />
1661, 0056, 1147, 1347, 1959<br />
CXC 0180<br />
Cytron 1326<br />
Daenyx 0180, 0672<br />
Daewoo 0154, 0451, 0092, 1661,<br />
0623, 0661, 0672, 1816<br />
Daytron 0180<br />
Dell 1264, 1080, 1178, 1863<br />
Denon 0145<br />
Diamond Vision 1997<br />
Digistar 1565<br />
Digital Lifestyles 1765<br />
Disney 1665, 2152<br />
Drean 0037<br />
DSE 1565<br />
Dumont 0017<br />
Durabrand 0463, 0180, 0178, 0171,<br />
1034, 1463, 1665<br />
Dynex 1463, 1785, 1810, 2049, 2184<br />
Electroband 0000<br />
Electrograph 1755, 1623<br />
Electrohome 0463, 1670, 1672<br />
Elektra 0017, 1661<br />
Element 1687, 1886, 2183<br />
Emerson 1864, 0154, 0451, 0236,<br />
0463, 0180, 0178, 0171,<br />
1661, 0623, 1394, 1665,<br />
1886, 1944, 1963, 1997<br />
Emprex 1422, 1765<br />
Encross 0876<br />
Envision 0030, 0813, 1365, 1589,<br />
2014, 2087<br />
Epson 1122<br />
ESA 0812, 0171, 1944, 1963<br />
Firstline 0037<br />
Fisher 0154, 1362<br />
Fluid 2964<br />
Fujimaro 1687<br />
Fujitsu 0809, 0683, 0853<br />
Fujitsu Siemens 0809<br />
Funai 0000, 0180, 0171, 1271,<br />
1904, 1963, 1979<br />
Futuretech 0180<br />
Gateway 1755, 1756<br />
GE 1547, 1447, 0047, 0051, 0451,<br />
0765, 0178, 1347, 1922, 2359<br />
General Electric 0047<br />
GFM 1864, 0171, 1665, 1886, 1963<br />
Gibralter 0017, 0030<br />
Global Home 1565<br />
Go Video 0886<br />
GoldStar 0178, 0030, 0037, 0056<br />
Gradiente 0053, 0056<br />
Grundig 0037, 0070, 0672, 0683<br />
Grunpy 0180<br />
H & B 1366<br />
Haier 1034, 1748, 1749, 1753,<br />
2293, 2309, 2494, 3204<br />
Hallmark 0178<br />
Hanns.G 1783<br />
Hannspree 1348, 1745, 1783, 2786<br />
Harley Davidson 1904<br />
Harman/Kardon 0054<br />
Harvard 0180<br />
Havermy 0093<br />
Helios 0865<br />
Hello Kitty 0451<br />
Hewlett Packard 1494, 2540<br />
Himitsu 0180<br />
Hisense 0748, 1314, 1660, 2098,<br />
2355, 2419<br />
Hitachi 1643, 1145, 0145, 0056,<br />
0679, 0797, 1345, 1445,<br />
1904, 2215, 2431, 2433<br />
Hitech 1814<br />
HP 1494, 2540<br />
Hyundai 0849, 1219, 1814<br />
I-Inc 1746<br />
iLo 1463, 1286, 1394, 1603,<br />
1665, 1684, 1990<br />
Initial 1603, 1990<br />
Innova 0037<br />
Insignia 1423, 1564, 0463, 0171,<br />
2751, 2432, 2184, 2088,<br />
2049, 2002, 1963, 1892,<br />
1810, 1785, 1660, 1641,<br />
1517, 1385, 1326, 1204<br />
Inteq 0017<br />
IRT 0451, 1661<br />
ITT Nokia 0180<br />
IX 0877<br />
JBL 0054<br />
JCB 0000<br />
JCM 2256<br />
Jensen 0761, 1299, 1326, 1933<br />
JVC 0463, 0053, 0650, 0731, 1253,<br />
1601, 1774, 1923, 2264, 2271<br />
KDS 1687<br />
KEC 0180<br />
Ken Brown 0236, 0463, 1321<br />
Kenia 0030, 0082<br />
Kenwood 0030<br />
Kioto 0054<br />
KLH 0765, 0767<br />
Konka 1385<br />
Kost 1262, 1483<br />
Kreisen 0876<br />
KTV 0180, 0030<br />
LG 1423, 1447, 0017, 1265, 0178,<br />
0030, 2834, 2731, 2424, 2359,<br />
2358, 2182, 1993, 1860, 1859,<br />
1768, 1721, 1325, 1178, 0856, 0056<br />
Lloyd's 1904<br />
Loewe 0087<br />
Luxman 0056<br />
LXI 0047, 0054, 0154, 0156, 0178<br />
Lynx 1565<br />
M&S 0054, 0236<br />
MAG 1687<br />
Magnavox 1454, 1866, 1755, 0054,<br />
0051, 0030, 0171, 2372,<br />
1990, 1963, 1944, 1904,<br />
1867, 1525, 1455, 1365,<br />
1254, 1198, 0802<br />
Marantz 1454, 0054, 0030, 0037,<br />
0704, 0855, 1398, 1714<br />
Matsushita 0250, 0650<br />
Maxent 1755, 0762, 1211, 1714,<br />
1757<br />
Megatron 0178, 0145<br />
Memorex 0154, 0463, 0150, 0178, 0877, 1665,<br />
1670, 1785, 1892, 1924, 1927, 1938<br />
MGA 0150, 0178, 0030<br />
Midland 0047, 0017, 0051<br />
Mintek 1603, 1990<br />
Mitsubishi 1250, 0093, 0150, 0178, 0836, 1797<br />
Monivision 0843<br />
Motorola 0093<br />
MTC 0060, 0030, 0056<br />
Multitech 0180<br />
Mx Onda 1687<br />
NAD 0156, 0178, 0037, 0056, 0866, 1156<br />
Naxa 2104<br />
NEC 0030, 0056, 0704, 0876, 1398,<br />
1704, 1797<br />
Netsat 0037<br />
NetTV 1755, 0762<br />
NEX 1814<br />
Nexus Electronics 2183<br />
Nikko 0178, 0030, 0092<br />
Nimbro 2104<br />
Noblex 0154<br />
Nokia 0180, 0861<br />
Norcent 0748, 0824, 1365, 1589, 1590,<br />
1591, 1745, 2110<br />
Norwood Micro 1286<br />
NTC 0092<br />
Nu-Tec 2157<br />
NuVision 2158<br />
Olevia 1610, 1144, 1240, 1331<br />
Onwa 0180<br />
Optimus 0250, 0154, 0166, 0650, 1924, 1927<br />
Optoma 1348<br />
Optonica 0093<br />
Orion 0236, 0463, 1463, 1938<br />
Otic 1687<br />
Packard Bell 0092<br />
Panasonic 1480, 0250, 0051, 0650, 1271,<br />
1291, 1345, 1924, 1927, 1941,<br />
1946, 1947, 2240, 2264<br />
Panavox 0861<br />
PARK 2104<br />
Penney 0047, 0156, 0051, 0060, 0178,<br />
0030, 1347<br />
Petters 1523<br />
Philco 0054, 0451, 0463, 0030, 0145,<br />
0171, 0092, 1661, 0082, 1271,<br />
1394, 1665, 1963<br />
Philips 1454, 1866, 0054, 0171, 0037,<br />
0690, 1394, 1455, 1483, 1744,<br />
1806, 1867, 1961, 2372, 2374, 2564<br />
Pilot 0030<br />
Pioneer 1457, 0166, 0679, 0866, 1260,<br />
1398, 2240<br />
Planar 1288, 1589<br />
Polaroid 1523, 0765, 2425, 2121, 2117,<br />
2063, 2002, 1992, 1769, 1767,<br />
1766, 1763, 1762, 1687, 1565,<br />
1538, 1385, 1341, 1327, 1326,<br />
1316, 1314, 1286, 1276, 1262, 0865<br />
Portland 0451, 0092, 1661<br />
Precision 1792<br />
Prima 0761, 0783, 1749, 1753,<br />
1785, 1933<br />
Prism 0051<br />
Proscan 1447, 0047, 0030, 1347,<br />
1922, 2147, 2183, 2256<br />
Proton 0178<br />
Proview 1687<br />
Pulsar 0017<br />
Punktal 2687<br />
Pye 0412<br />
Pyle 1200<br />
Quasar 0250, 0051, 0650, 1291,<br />
1924, 1927<br />
RadioShack 0047, 0154, 0180, 0178,<br />
0030, 0056, 1904<br />
RCA 1547, 1447, 0047, 0051,<br />
0093, 0060, 1661, 2932,<br />
2746, 2434, 2247, 2187,<br />
2002, 1959, 1958, 1953,<br />
1922, 1781, 1347, 1147, 0679<br />
Realistic 0154, 0180, 0178, 0030, 0056<br />
RevolutionHD 1623<br />
Runco 0017, 0030, 1398<br />
Sampo 1755, 0030, 0762<br />
Samsung 0812, 0060, 0702, 0178,<br />
0030, 2814, 2697, 2596,<br />
2137, 2103, 2051, 1959, 1060,<br />
0814, 0766, 0650, 0056, 0037<br />
Sansei 0451, 0092<br />
Sansui 0463, 0171, 1463, 1409,<br />
1670, 1892, 1904, 1935, 1938<br />
Sanyo 0054, 0154, 1142, 1362<br />
Sceptre 0878, 1217, 1360, 1599,<br />
2337, 2506<br />
Scotch 0178<br />
Scott 0236, 0180, 0178, 1711<br />
Sears 0047, 0054, 0154, 0156,<br />
0178, 0171, 0056, 1007, 1904<br />
Semivox 0236, 0463, 0180<br />
Semp 0156, 1356, 1743<br />
Sense 1865<br />
Serie Dorada 0156, 0180, 0178, 0030, 0056<br />
Sharp 0818, 0093, 1459, 1602,<br />
1659, 2360, 2402, 2495<br />
Sheng Chia 0093<br />
Sherwood 1399<br />
Siam 0037<br />
Signature 0054<br />
Signet 1262<br />
SKY 0037<br />
Skyworth 1799<br />
Sole 1366, 1483, 1623, 2075<br />
Sony 0810, 0000, 1685, 1825,<br />
1904, 1925, 2736<br />
Soundesign 0180, 0178<br />
Sova 1952<br />
Soyo 1746, 1824<br />
Space Tek 1696<br />
Spectroniq 1687<br />
Squareview 0171<br />
SSS 0180<br />
Starlite 0180<br />
Studio Experience 0843<br />
SunBriteTV 1420, 2337<br />
Superscan 0093, 0864, 1944<br />
Supersonic 1753, 2104, 3204<br />
Supreme 0000<br />
SVA 0748, 0865, 1963<br />
Sylvania 1864, 0054, 0030, 0171,<br />
1271, 1314, 1394, 1665,<br />
1886, 1944, 1963<br />
Symphonic 0180, 0171, 1394, 1904, 1944<br />
Syntax 1610, 1144, 1240, 1331<br />
Tahoci 0561<br />
Talent 0178<br />
Tandy 0093<br />
Tatung 1286, 1288, 1361, 1756, 2496<br />
TCL 2414, 2434, 3183<br />
Technics 0250, 0051<br />
Techwood 0051, 0056<br />
Teknika 0054, 0180, 0150, 0060,<br />
0092, 0056<br />
Telefunken 0702, 0056<br />
Thomas 1904<br />
TMK 0178, 0056<br />
TNCi 0017<br />
Tophouse 0180, 0672, 1385<br />
Toshiba 1524, 0154, 0156, 1256,<br />
0093, 1265, 0060, 2724,<br />
2006, 1959, 1945, 1936,<br />
1935, 1743, 1704, 1656,<br />
1356, 1343, 1325, 1156,<br />
0822, 0650<br />
TruTech 1665, 1723, 2066<br />
TVS 0463<br />
US Logic 1286<br />
Vector Research 0030<br />
Venturer 1865<br />
VEOS 1007<br />
Victor 0053<br />
Vidikron 0054, 1398<br />
Vidtech 0178<br />
Viewsonic 1755, 1564, 0797, 0857,<br />
0864, 0885, 1330, 1365,<br />
1578, 1627, 1640, 1742,<br />
2014, 2049, 2087, 2277<br />
Viore 1207, 1684, 1811, 2104,<br />
2352, 3118<br />
Visart 1336<br />
Vizio 1758, 0864, 0885, 1756,<br />
2512, 2757<br />
Wards 0000, 0047, 0054, 0017,<br />
0154, 0156, 0051, 0180,<br />
0060, 0178, 0030, 0056,<br />
0866, 1147, 1156, 1347<br />
Waycon 0156<br />
Westinghouse 1712, 0451, 0885, 0889,<br />
0890, 1217, 1282, 1300,<br />
1577, 2195, 2293, 2499<br />
White Westinghouse 0463, 1661, 0623<br />
Winco 0412<br />
Wyse 1365<br />
Xion 1792<br />
Yamaha 0030, 0797<br />
Zenith 0000, 1423, 0047, 0017,<br />
0463, 1265, 0178, 0030,<br />
1145, 0145, 0092, 1661,<br />
1325, 1365, 0037, 1721,<br />
1859, 1904, 2358
PIP<br />
LIVE<br />
FAV<br />
ghi<br />
pqrs<br />
LAST<br />
PAGE<br />
jkl<br />
tuv<br />
def<br />
mno<br />
wxyz<br />
DAY<br />
VOL<br />
LIST<br />
00<br />
PIP<br />
LIVE<br />
abc<br />
CH<br />
33<br />
ghi<br />
pqrs<br />
LAST<br />
FAV<br />
INFO<br />
EXIT<br />
OK<br />
SELECT<br />
GUIDE<br />
ON<br />
DEMAND<br />
DAY<br />
MENU<br />
SE TINGS<br />
DVD<br />
D<br />
PAGE<br />
tuv<br />
def<br />
wxyz<br />
DAY<br />
VOL<br />
abc<br />
1 2<br />
00<br />
CH<br />
33<br />
INFO<br />
EXIT<br />
GUIDE<br />
DAY<br />
MENU<br />
AUDIO<br />
SE TINGS<br />
DVD<br />
TV<br />
CABLE<br />
AUDIO<br />
SE TUP<br />
WATCH CABLE<br />
B C<br />
ON<br />
DEMAND<br />
LIST<br />
OK<br />
SELECT<br />
D<br />
TV<br />
CABLE<br />
SE TUP<br />
Setup Method C:<br />
Configuración – Método C:<br />
Setup DVD and AUDIO using Direct Code Entry<br />
Configuración de DVD y AUDIO utilizando Entrada Directa de Código<br />
Press the mode key for the<br />
Press and hold SETUP<br />
Enter the 1st code for your<br />
Press the power key to<br />
1 2 3 4 5<br />
device you wish to set up.<br />
until the mode key blinks<br />
brand from the code list.<br />
test with your equipment.<br />
Presione la tecla de modo<br />
twice.<br />
if the device turns off,<br />
setup is complete.<br />
para el equipo que desee<br />
Presione y mantenga<br />
presionada la tecla SETUP<br />
tecla de modo parpadee<br />
dos veces.<br />
SET UP<br />
Ingrese el primer código<br />
que corresponda a su<br />
marca de la lista de códigos.<br />
1 2<br />
4 5 6<br />
7 8 9<br />
0<br />
3<br />
SWAP<br />
ON/O F<br />
Presione la tecla de<br />
encendido/apagado<br />
para probar con su<br />
equipo. Si el equipo se<br />
1 2<br />
4 5 6<br />
7 8 9<br />
se ha completado.<br />
B C<br />
WATCH CABLE<br />
If the device does not turn<br />
METHOD C using the<br />
next code for your<br />
brand.<br />
Si el equipo no se apaga,<br />
repita el MÉTODO DE<br />
CONFIGURACIÓN C<br />
utilizando el próximo<br />
código que corresponda<br />
a su marca.<br />
Setup Method D:<br />
Configuración – Método D:<br />
Code Search<br />
Búsqueda de Códigos<br />
Press and hold SETUP until<br />
Press the mode key for<br />
Press and hold down the<br />
1 the mode key blinks twice. 2 the device you wish to 3 OK/SELECT key. 4<br />
setup. The mode key<br />
stays lit.<br />
Presione y mantenga<br />
presionada la tecla SETUP<br />
tecla de modo parpadee<br />
dos veces.<br />
SET UP<br />
Presione la tecla de<br />
modo para el equipo que<br />
de modo permanence<br />
encendida.<br />
Presione y mantenga<br />
presionada la tecla<br />
OK/SELECT<br />
(Aceptar/Seleccionar).<br />
Let go of the OK/SELECT<br />
key when your device<br />
Suelte la tecla OK/SELECT<br />
(Aceptar/Seleccionar)<br />
cuando su equipo se<br />
apague.<br />
4 5 6<br />
7 8 9<br />
jkl mno<br />
SWAP<br />
ON/O F<br />
Setup Method E:<br />
Configuración – Método E:<br />
Setting Volume Controls<br />
Configuración de los Controles de Volumen<br />
Press and hold SETUP until the mode key blinks<br />
Press VOLUME + key.<br />
1 twice. 2 3<br />
Presione la tecla VOLUME + (Aumentar<br />
Presione y mantenga presionada la tecla SETUP<br />
volumen).<br />
parpadee dos veces.<br />
SET UP<br />
Press the mode key that corresponds to the<br />
device you use for volume controls.<br />
Presione la tecla de modo que corresponda al<br />
equipo que está utilizando para controles de<br />
volumen.<br />
Setup Method F:<br />
Configuración – Método F:<br />
1<br />
Press and hold SETUP until the mode key blinks<br />
twice.<br />
Presione y mantenga presionada la tecla SETUP<br />
dos veces.<br />
Locking Input Switch To One Device<br />
Bloqueo del control de entrada con ajuste a un equipo<br />
Press the INPUT key.<br />
Presione la tecla INPUT (Entrada).<br />
SET UP TV INPUT<br />
2<br />
3<br />
Press the mode key that corresponds with the<br />
device you use for changing audio/video inputs.<br />
Presione la tecla de modo que corresponda al<br />
equipo que está utilizando para cambio de<br />
entradas audio/video.<br />
Codes: Blu-ray Códigos : Blu-ray<br />
Denon 2258, 2748<br />
Harman/Kardon 2927, 3228<br />
Insignia 0675, 2428, 2596<br />
Integra 2147<br />
JVC 2365, 2855<br />
Lexicon 2545<br />
LG 0741, 1602<br />
Magnavox 0675<br />
Marantz 2414<br />
Memorex 2331<br />
Olevia 2331<br />
Onkyo 2147<br />
Oppo 2545<br />
Panasonic 1641<br />
Philips 2084, 2434<br />
Pioneer 0142, 2442, 2854<br />
Samsung 0199<br />
Sharp 2250<br />
Sony 1516<br />
Sylvania 0675<br />
Toshiba 2705, 3157<br />
Viore 2553<br />
Vizio 2563<br />
Yamaha 2298<br />
©Copyright Universal Electronics 2011
TROUBLESHOOTING<br />
RESOLUCIÓN DE PROBLEMAS<br />
Problem:<br />
Solution:<br />
Problem:<br />
Solution:<br />
Problem:<br />
Solution:<br />
Problem:<br />
Solution:<br />
Mode key does not blink when a key is pressed.<br />
Replace batteries.<br />
Mode key blinks, but remote does not control my equipment.<br />
Press correct mode key and point remote at equipment you need<br />
to control.<br />
Tried all codes for my brand of device and none work.<br />
Try CODE SEARCH (METHOD D) method.<br />
I want to switch VOLUME LOCK from AUX to TV control.<br />
Follow Setup Method E, but press the TV mode key instead of AUX mode key.<br />
Problema:<br />
Solución:<br />
Problema:<br />
Solución:<br />
Problema:<br />
Solución:<br />
Problema:<br />
Solución:<br />
La tecla de modo no parpadea al presionar una tecla.<br />
Reemplace las pilas.<br />
MUG62400S-MOT-A02<br />
La tecla de modo parpadea, pero el control remoto no controla mi equipo.<br />
Presione la tecla de modo correcta y apunte el control remoto al equipo que<br />
necesita controlar.<br />
Probé con todos los códigos que corresponden a mi marca de equipo y ninguno<br />
funciona.<br />
Solución: Intente con el método BÚSQUEDA DE CÓDIGOS (MÉTODO D).<br />
Deseo cambiar el BLOQUEO DE VOLUMEN pasando de control de AUDIO a control<br />
de TV.<br />
Siga el Método E, pero presione la tecla de modo TV en lugar de la tecla de modo<br />
AUDIO.<br />
Tip/Consejo:<br />
Write the working code here for future use.<br />
Escriba el código de funcionamiento aquí<br />
para una referencia futura.<br />
Codes: Audio<br />
Códigos: Audio<br />
TV code<br />
Código de TV Audio code Código de Audio DVD code Código de DVD<br />
Aiwa 1405, 0189, 1388, 1641<br />
Alco 1390<br />
Altec Lansing 2720<br />
AMC 1077<br />
Anam 1609<br />
Apex Digital 1257, 1430, 1774<br />
Apple 1115<br />
Arcam 1189, 0189<br />
Audiotronic 1189<br />
Audiovox 1390<br />
Bose 1629, 1933<br />
Carver 1189, 0189<br />
Coby 1389, 2127<br />
Curtis 1389<br />
Daewoo 1250<br />
Denon 2706, 2857, 1360, 1460,<br />
2247, 2279, 2516, 2820,<br />
2987, 3001, 2502<br />
Dynex 2971<br />
Fisher 1801<br />
Gateway 1517<br />
Harman/Kardon 0892, 3045, 0110, 0189,<br />
1304, 1306, 2241, 2443<br />
Hitachi 1801<br />
HitPlus 2483<br />
iHome 2435<br />
iLive 2013<br />
Insignia 1030, 1077, 1751, 1893, 2126,<br />
2169, 2175, 2472, 2929, 2966<br />
Integra 1298, 1320, 1805<br />
iSymphony 2442<br />
JBL 0110, 1306, 2241<br />
JVC 1374, 1495, 1871, 2040, 2239,<br />
2331, 2969<br />
Kenwood 1313, 1569<br />
KLH 1390, 1428<br />
Koss 1366, 1497<br />
Left Coast 0892<br />
LG 1293, 2197, 2284, 2676<br />
Linn 0189<br />
Liquid Video 1497<br />
Magnavox 1189, 1269, 0189, 1514, 1831<br />
Marantz 0892, 1892, 1189, 1269, 0189,<br />
1289, 2114<br />
McIntosh 1289<br />
Micromega 1189<br />
Myryad 1189<br />
Nakamichi 1313<br />
NexxTech 1751<br />
Norcent 1389, 1751<br />
Nova 1389<br />
Onkyo 0842, 1298, 1320, 1531, 1805<br />
Optimus 1023<br />
Oritron 1366, 1497<br />
Panasonic 1308, 1518, 1275, 1288, 1316,<br />
1548, 1633, 1763,1764, 2105,<br />
2221, 2452, 2967<br />
Philco 1390<br />
Philips 0892, 1189, 1269, 0189, 1831,<br />
2311, 2459<br />
Pioneer 1023, 1384, 1935<br />
Polk Audio 0892, 0189, 1289, 2270<br />
Proscan 1254<br />
RCA 1023, 1609, 1254, 1390, 1511,<br />
2041, 2426, 2485, 2490, 2611<br />
Rio 1869<br />
Samsung 1295, 1304, 1500, 1868, 2609<br />
Sansui 0189<br />
Sanyo 1801<br />
Sharp 3097<br />
Sherwood 1077, 1517, 1905, 2169<br />
Sherwood Newcastle 2169<br />
Sonic Blue 1869<br />
Sony 1759, 1058, 1441, 1258, 1622,<br />
1558, 1658, 1758, 1822, 1858,<br />
2172, 2227, 2475, 2522, 2610<br />
Stereophonics 1023<br />
Teac 1390, 1528<br />
Technics 1308, 1518, 1633<br />
Thorens 1189<br />
Toshiba 1788<br />
Venturer 1390<br />
Vizio 1517, 2454, 2695<br />
Vtrek 2426, 2483<br />
Wards 0189<br />
Yamaha 2592, 0176, 0376, 1176,<br />
1276, 1375, 1376, 1476,<br />
1815, 2061, 2455, 2467,<br />
2608, 3030, 1797, 2021, 2458<br />
Zenith 1293, 2197<br />
Codes: DVD<br />
Códigos: DVD<br />
ABS 1972<br />
Accurian 0675, 0000<br />
Admiral 0048<br />
Adventura 0000<br />
Aiko 0278<br />
Aiwa 0641, 0037, 0000<br />
Akai 0675, 0695, 0000<br />
Alco 0790<br />
Alienware 1972<br />
Allegro 0869, 0039<br />
America Action 0278<br />
American High 0035<br />
Amoisonic 0764<br />
AMTC 1630<br />
Apex Digital 0672, 0717, 0755, 0796,<br />
1020, 1056, 1061<br />
Asahi 2615<br />
Asha 0240<br />
Astar 1461<br />
Astry 1513<br />
Audio Authority 2555<br />
Audiovox 0717, 0790, 0037, 0278<br />
Beaumark 0240<br />
Bel Canto Design 1571<br />
Bell & Howell 0104<br />
Blaupunkt 0717<br />
Blue Parade 0571<br />
Blue Sky 2623<br />
Broksonic 0695, 0184<br />
California Audio Labs 0490<br />
Calix 0037<br />
Cambridge Soundworks 0690<br />
Canon 0035<br />
Carver 0081<br />
CCE 0278<br />
Cinea 0831<br />
Cineral 0278<br />
CineVision 0869<br />
Citizen 0695, 2116, 0037, 0278<br />
Coby 1107, 2494<br />
Contel 2331<br />
Contex 2066<br />
Craig 0831, 0037, 0047, 0240<br />
Crosley 0081, 0000<br />
Curtis Mathes 1087, 0060, 0035, 0162,<br />
0240, 0278<br />
CyberHome 0816<br />
Cybernex 0240<br />
CyberPower 1972<br />
Daewoo 0705, 0869, 1172, 0045, 0278<br />
Datsun 1233<br />
Dell 1972<br />
Denon 0490, 0634, 1634, 2258,<br />
2748, 0042<br />
DirecTV 0739<br />
Disney 0675, 1270, 2318<br />
Durabrand 2066, 0039<br />
Dynatech 0000<br />
Dynex 2596<br />
E:max 0330<br />
Electrohome 2116, 0037, 0043<br />
Electrophonic 0037<br />
Emerex 0032<br />
Emerson 0591, 0675, 2213, 0037,<br />
0184, 0000, 0043, 0278,1593<br />
Enterprise 0591<br />
F&D 2533<br />
Fisher 0670, 0047, 0104<br />
Fuji 0035, 0033<br />
Funai 0675, 0000, 1593<br />
Garrard 0000<br />
Gateway 1077, 1158, 1972<br />
GE 0522, 0717, 0060, 0035, 0240<br />
General Electric 0717<br />
GFM 0675, 1593<br />
Global Home 2123<br />
Go Video 0744, 0741, 0783, 0869, 1075,<br />
1158, 0240, 0614<br />
GoldStar 0741, 0869, 0037<br />
Gradiente 0651, 0000<br />
Greenhill 0717<br />
Grundig 0539, 0705<br />
Harley Davidson 0000<br />
Harman/Kardon 0582, 0702, 1229, 2927, 3228, 0081<br />
Headquarter 0046<br />
Helios 2192<br />
Hello Kitty 0831<br />
Hewlett Packard 1972<br />
HI-Q 0047<br />
Hitachi 0573, 0664, 0695, 0000, 0042<br />
Hiteker 0672<br />
Howard Computers 1972<br />
HP 1972<br />
Hughes Network Systems 0042<br />
Humax 1588, 0739<br />
Hush 1972<br />
Hyundai 1451<br />
iBUY<strong>POWER</strong> 1972<br />
iLo 1348<br />
Initial 0717<br />
Insignia 0675, 0741, 2095, 2428, 2596<br />
Instant Replay 0035<br />
Integra 0571, 1769, 0627, 1634, 2147<br />
Irradio 0646<br />
IRT 0783, 1654<br />
JBL 0702<br />
JVC 0558, 0623, 1164, 1275, 1550,<br />
1602, 2365, 2855, 0067<br />
Kawasaki 0790<br />
KEC 0037, 0278<br />
Kenwood 0490, 0534, 0067<br />
KLH 0717, 0790, 1020<br />
Kodak 0035, 0037<br />
Koss 0651<br />
Lasonic 0798<br />
Lexicon 2545<br />
LG 0591, 0741, 0869, 1602, 2135, 0037<br />
Linksys 1972<br />
LiteOn 1158<br />
Lloyd's 0000<br />
Logitech 2639<br />
LXI 0037<br />
Magnasonic 0651<br />
Magnavox 0503, 0539, 0646, 0675, 1354,<br />
1506, 0035, 0039, 0081, 0000, 1593<br />
Magnin 0240<br />
Marantz 0539, 2414, 0035, 0081<br />
Marta 0037<br />
Matsushita 0035, 0162<br />
Media Center PC 1972<br />
MEI 0035<br />
Memorex 0695, 0831, 1270, 2213, 2331,<br />
3153, 0035, 0162, 0037, 0048,<br />
0039, 0047, 0240, 0000, 0104, 0046<br />
MGA 0240, 0043<br />
MGN Technology 0240<br />
Microsoft 0522, 2083, 1972<br />
Mind 1972<br />
Minolta 0042<br />
Mintek 0717<br />
Mitsubishi 1521, 0067, 0043<br />
Motorola 0035, 0048<br />
MTC 0240, 0000<br />
Multitech 0000<br />
NAD 0741<br />
NEC 0104, 0067<br />
Nesa 0717<br />
Nikko 0037<br />
Niveus Media 1972<br />
Noblex 1233, 0240<br />
Norcent 1107, 1461<br />
Northgate 1972<br />
Olevia 2331<br />
Olympus 0035<br />
Onkyo 0503, 1769, 0627, 1627, 2147, 2215<br />
Oppo 0575, 2185, 2545<br />
Optimus 1062, 0162, 0037, 0048, 0104<br />
Orion 0695, 0184<br />
Oritron 0651<br />
Panasonic 0490, 0503, 0703, 1579, 1641,<br />
1062, 0035, 0162, 0614, 0616<br />
Penney 0035, 0037, 0240, 0042<br />
Pentax 0042<br />
Philco 0675, 0690, 0733, 0790, 0862, 0035<br />
Philips 0503, 0539, 2056, 2084, 0646,<br />
0675, 1158, 1340, 1354, 1506,<br />
2434, 0739, 0035, 0081, 0618<br />
Pilot 0037<br />
Pioneer 0571, 0142, 0631, 1512, 1571,<br />
2442, 2854, 0067<br />
Polaroid 1020, 1061<br />
Polk Audio 0539, 0081<br />
Portland 0278<br />
Presidian 0675, 1593<br />
Proceed 0672<br />
Proline 2616<br />
Proscan 0522, 0060<br />
Protron 1461<br />
Pulsar 0039<br />
Quarter 0046<br />
Quartz 0046<br />
Quasar 0035, 0162<br />
Qwestar 0651<br />
RadioShack 0000<br />
Radix 0037<br />
Randex 0037<br />
Ranser 3154<br />
RCA 0522, 0571, 1769, 0717, 0790, 0822,<br />
2213, 2587, 0060, 0035, 0240, 0042<br />
Realistic 0035, 0037, 0048, 0047, 0000,<br />
0104, 0046<br />
RE-BL 2555<br />
ReplayTV 0614, 0616<br />
Ricavision 1972<br />
Rio 0869<br />
Rotel 0623<br />
Royal 0690<br />
Runco 0039<br />
Samsung 0490, 0573, 0744, 0199, 0820,<br />
1075, 1470, 2069, 2329, 2369,<br />
2489, 2556, 0240, 0045<br />
Sanky 0048, 0039<br />
Sansui 0695, 0000, 0067<br />
Sanyo 0670, 0695, 2123, 0047, 0240,<br />
0104, 0046<br />
Sceptre 0104<br />
Schneider 0646<br />
Scott 0184, 0045, 0043<br />
Sears 0035, 0037, 0047, 0000, 0042,<br />
0104, 0046<br />
Semivox 0045<br />
Semp 0503, 0045<br />
Sensory Science 1158<br />
Sharp 0630, 0675, 1256, 2250, 0048<br />
Sherwood 1077<br />
Sherwood Newcastle 1077<br />
Shinsonic 0533<br />
Shogun 0240<br />
Signature 0035<br />
Silver 1228<br />
Sonic Blue 0869, 0614, 0616<br />
Sony 1633, 0533, 0864, 0772, 0862, 1033,<br />
1070, 1431, 1516, 0032, 0035, 0033,<br />
0000, 0636, 1972<br />
Stack 9 1972<br />
STS 0042<br />
Sylvania 0630, 0675, 0035, 0081, 0000, 0043, 1593<br />
Symphonic 0675, 0000, 1593<br />
Systemax 1972<br />
Tagar Systems 1972<br />
Tashiko 0037<br />
TCL 2587<br />
Teac 0790, 0000<br />
Technics 0490, 0703, 0035, 0162<br />
Teknika 0035, 0037, 0000<br />
Theta Digital 0571<br />
Thomas 0000<br />
TiVo 1503, 1512, 0739, 0618, 0636<br />
TMK 0240<br />
Toshiba 0503, 1769, 0695, 1154, 1503, 1510,<br />
1588, 1608, 2006, 2277, 2705, 3157,<br />
0045, 0043, 1972<br />
Totevision 0037, 0240<br />
Touch 1972<br />
TYT 0705<br />
Unitech 0240<br />
Urban Concepts 0503<br />
V 1064<br />
Vector 0045<br />
Venturer 0790<br />
Video Concepts 0045<br />
Videomagic 0037<br />
Videosonic 0240<br />
Viewsonic 1972<br />
Villain 0000<br />
Viore 2553<br />
Vizio 1064, 2563<br />
Voodoo 1972<br />
Voxson 1630<br />
Vtrek 2587<br />
Wards 0060, 0035, 0048, 0039, 0047, 0081,<br />
0033, 0240, 0045, 0000, 0042, 0046<br />
WB Electronics 2555<br />
Xbox 0522, 2083<br />
XR-1000 0035, 0000<br />
X-View 1233<br />
Yamaha 0490, 0539, 0646, 0545, 0497, 0817,<br />
1354, 2298<br />
Zenith 0503, 0591, 0741, 0869, 0037, 0039,<br />
0033, 0000<br />
ZT Group 1972
<strong>PROGRAMMING</strong> <strong>YOUR</strong><br />
<strong>PBTV</strong> <strong>REMOTE</strong> <strong>FOR</strong> <strong>POWER</strong><br />
& VOLUME<br />
<br />
Start with the TV turned on.<br />
Press the MUTE button until the light on the remote<br />
flashes rapidly.<br />
<br />
<br />
Press the <strong>POWER</strong> button once. The light will light up and<br />
remain solid.<br />
Press the UP ARROW button slowly and repeatedly to<br />
scan through all TV codes. When you reach the correct<br />
code, the TV will automatically turn off. Note that the light<br />
will flash rapidly once you have scanned through all of the<br />
TV codes.<br />
As soon as the TV shuts off, press the SELECT button<br />
to store the TV code. The light flashes rapidly then stops,<br />
indicating that the TV code has been stored.
SETTING THE <strong>REMOTE</strong><br />
CONTROL ID<br />
IF THIS IS <strong>YOUR</strong> <strong>REMOTE</strong>:<br />
Press the LED button and hold it down until the LED flashes rapidly.<br />
Press the REC button. The LED stops blinking at this point and stays<br />
solid.<br />
Press the A button. The remote is now in programming mode.<br />
Enter the single-digit remote control ID from the table below:<br />
IF THIS IS <strong>YOUR</strong> <strong>REMOTE</strong>:<br />
Press and hold the A button until the light starts to blink.<br />
Press 7 8 9.<br />
Enter stream number (see chart).<br />
<strong>REMOTE</strong><br />
CONTROL ID<br />
0<br />
1<br />
2<br />
3<br />
OPERATES TV<br />
Your TV and Gateway are in the same<br />
room and TV is on channel 3<br />
Your TV operates on channel 3<br />
and Gateway is in another room<br />
Your TV operates on channel 10<br />
Your TV operates on channel 13
<strong>PROGRAMMING</strong> <strong>YOUR</strong><br />
<strong>PBTV</strong> <strong>REMOTE</strong> <strong>FOR</strong> <strong>POWER</strong><br />
& VOLUME<br />
<br />
Start with the TV turned on.<br />
<br />
<br />
<br />
<br />
<br />
Press the LED button and hold it down until the LED<br />
flashes rapidly.<br />
Press the REC button. The LED stops blinking at this<br />
point and stays solid.<br />
Press the <strong>POWER</strong> button. The TV is now in TV code<br />
scan programming mode.<br />
Press and release the UP ARROW button repeatedly to<br />
scan through all the TV codes. When you reach the correct<br />
TV code, the TV will automatically turn off. Note that<br />
the LED will flash rapidly once you have scanned through<br />
all the codes, and then it will continue to go through the<br />
codes again in a continuous wrap.<br />
Press the SELECT button to store the TV code. The LED<br />
flashes rapidly then stops, indicating that the TV code has<br />
been stored.<br />
Repeat the procedure for each remote control.<br />
If you press the UP ARROW button too rapidly, you may<br />
pass the TV code before the time the TV turns off. If you<br />
are not sure you are storing the correct TV code, press<br />
the DOWN ARROW button slowly to cycle back through<br />
codes that have been previously scanned.
RECORDING WITH <strong>PBTV</strong><br />
Program your VCR to record as you always have. However you must m a k e<br />
sure that your VCR is set to record on the SAME CHANNEL THAT <strong>YOUR</strong> RE-<br />
CEIVE <strong>YOUR</strong> <strong>PBTV</strong> <strong>PROGRAMMING</strong> ON <strong>YOUR</strong> TV (channel 3, 10 or 13).<br />
Make sure that your VCR is now turned OFF.<br />
Press GUIDE on your <strong>PBTV</strong> remote.<br />
Using the LEFT/RIGHT ARROW buttons, scroll to the program you wish to<br />
record.<br />
Press INFO.<br />
Scroll to ACTIONS and press SELECT<br />
Using the UP/DOWN ARROW buttons, scroll to SCHEDULE AUTOMATIC<br />
TUNE.<br />
Press SELECT.<br />
Choose whichever selection best fits your needs (JUST ONCE, MON-FRI or<br />
EVERYDAY).<br />
Press SELECT.<br />
You will see AUTOTUNE REQUEST ACCEPTED. There will be a small clock<br />
icon on the Program Guide next to the show you have autotuned. Now press<br />
the EXIT button until you are clear of the Program Guide.<br />
For use with<br />
Residental<br />
Gateway boxes:<br />
IMPORTANT:<br />
Your program should now be set to record. Make sure that you manually turn off your<br />
TV using the power button on the TV or the remote that the TV came with. By using<br />
the <strong>PBTV</strong> remote, you will be “shutting off” the stream that brings you programming.<br />
If at all possible, record using stream 1 (the TV that uses channel 3, usually your<br />
“main” TV) as the other streams have a time limit and will shut themselves off after<br />
a few hours of non-use. If you set up to record on these streams, you run the risk<br />
of your recording failing because the set top box has shut itself off while you were<br />
away.
RECORDING WITH <strong>PBTV</strong><br />
Program your VCR to record as you always have. However you must make<br />
sure that your VCR is set to record on channel 3. Set up timed recording for<br />
the VCR to record channel 3 at the appropriate time.<br />
<strong>FOR</strong> ONE-TIME RECORDING<br />
Using the <strong>PBTV</strong> remote, Press GUIDE.<br />
Use the UP/DOWN and LEFT/RIGHT ARROWS to find the program you want<br />
to record.<br />
Press the OK button.<br />
Arrow down to AUTO PROGRAM.<br />
Press the OK button.<br />
An icon will appear next to the title in the guide.<br />
<strong>FOR</strong> RECURRING RECORDING<br />
Using the <strong>PBTV</strong> remote, Press GUIDE.<br />
Use the UP/DOWN and LEFT/RIGHT ARROWS to find the program you want<br />
to record.<br />
Press the OK button.<br />
Arrow down to SCHEDULE EVENT.<br />
Arrow to the reminder area and change it to AUTO-TUNE.<br />
For use with<br />
Fiber To The Home<br />
set-top box:<br />
Arrow to frequency area and change it to whichever fits your situation (i.e.<br />
weekly, M-F, etc.).<br />
Select DONE when all changes are made.<br />
IMPORTANT:<br />
Your program should now be set to record. Make sure that you manually turn<br />
off your TV using the power button on the TV or the remote that came with<br />
your TV. By using the <strong>PBTV</strong> remote, you will be “shutting off” the stream<br />
that brings you programming.
<strong>PROGRAMMING</strong> <strong>YOUR</strong><br />
<strong>PBTV</strong> <strong>REMOTE</strong> <strong>FOR</strong> <strong>POWER</strong><br />
& VOLUME<br />
Start with the TV turned on.<br />
<br />
<br />
<br />
<br />
In this order, press and hold the SELECT button, then<br />
press the MUTE button. Hold BOTH buttons down TO-<br />
GETHER until the LED button illuminates. Release both<br />
buttons as soon as the LED button illuminates.<br />
Press the press the UP ARROW above the SELECT <br />
button ONE step at a time until the TV turns off. Each time<br />
you press the ARROW button, the LED button will blink.<br />
As soon as the TV turns off, stop pressing the ARROW<br />
button.<br />
Press MUTE if your TV:<br />
Turns back on, press SELECT to lock in this code.The<br />
LED will blink 3 times and go out.<br />
OR<br />
Does not turn back on; press the DOWN ARROW one<br />
step at a time until your TV turns back on. Each time you<br />
press the ARROW button; the LED button will blink and<br />
remain illuminated.<br />
Once you have found a code that turns the device on/off,<br />
press SELECT to lock in this code. The LED button will<br />
blink 3 times and go out.<br />
It might take several minutes to cycle through all the codes<br />
when using the point and press programming method.
TROUBLESHOOTING<br />
<strong>REMOTE</strong> CONTROL NOT RESPONDING<br />
Are the problems related to the programming of the TV functions or the Gateway<br />
functions?<br />
If the lights on your <strong>PBTV</strong> remote are not responding, check your batteries.<br />
If it is TV related (no volume, mute or power functions on your remote) try<br />
“Programming your <strong>PBTV</strong> Remote for Power and Volume”.<br />
Verify that you are on the correct channel. Each remote is programmed for a<br />
specific channel (see “Setting the Remote Control ID”)<br />
If related to Gateway functions (cannot access the guide, menu or change<br />
channels), try reprogramming the remote.<br />
Check antenna connections both at the Gateway and on the TV if applicable.<br />
CANNOT RECORD WITH THE VCR<br />
When you play the tape back, what type of picture do you get? Does it display<br />
“Press Select for Video” with the date and time or is it a plain black/blue<br />
screen?<br />
If “Press Select for Video” is displayed, one of two things is happening. You<br />
may be using your <strong>PBTV</strong> remote to turn your TV off, which turns off the video<br />
stream. If this is the case, turn your TV off using the power button on the TV<br />
instead of the <strong>PBTV</strong> remote. You also may be recording on channel 10 or 13<br />
which times out after twelve hours.<br />
If you are getting a black/blue screen when you play your tape one of two<br />
things is happening. (1) Check to see what channel the TV is on when you<br />
are playing back the tape. Check to see what channel the VCR is set to play<br />
back on. (2) Something with the timed recording is not set right. Re-read the<br />
recording instructions and make sure your VCR is set to record on the TV you<br />
receive <strong>PBTV</strong> on (channel 3, 10 or 13).