Internet Explorer 6 - Paul Bunyan Communications
Internet Explorer 6 - Paul Bunyan Communications
Internet Explorer 6 - Paul Bunyan Communications

Create successful ePaper yourself
Turn your PDF publications into a flip-book with our unique Google optimized e-Paper software.
dial-up service<br />
<strong>Internet</strong> <strong>Explorer</strong> 6<br />
CD INSTALLATION FOR WINDOWS<br />
Windows 98/ME/NT/2000<br />
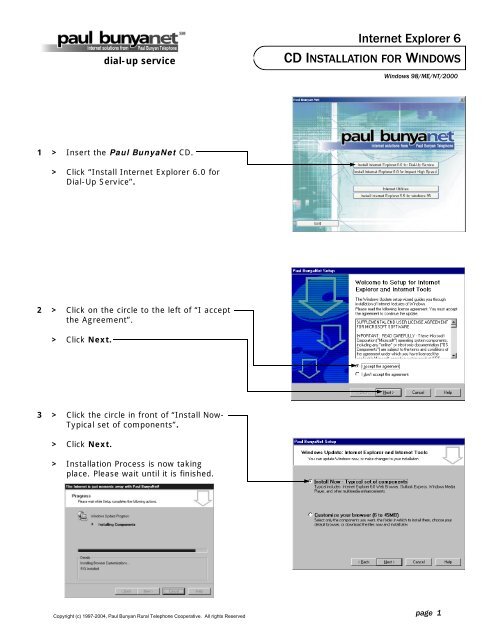
1 > Insert the <strong>Paul</strong> BunyaNet CD.<br />
> Click “Install <strong>Internet</strong> <strong>Explorer</strong> 6.0 for<br />
Dial-Up Service”.<br />
2 > Click on the circle to the left of “I accept<br />
the Agreement”.<br />
> Click Next.<br />
3 > Click the circle in front of “Install Now-<br />
Typical set of components”.<br />
> Click Next.<br />
> Installation Process is now taking<br />
place. Please wait until it is finished.<br />
Copyright (c) 1997-2004, <strong>Paul</strong> <strong>Bunyan</strong> Rural Telephone Cooperative. All rights Reserved<br />
page 1
4 > Click Finish.<br />
5 > After your computer restarts, a window<br />
will cover the desktop and ask you for<br />
your phone number. Type in your<br />
phone number in the text boxes.<br />
> Click Finish.<br />
6 > Click on the image that reads “click here<br />
to Finish”.<br />
> On some computers a screen will appear<br />
asking what you would like to do with<br />
the file. If you see this, choose Open<br />
otherwise proceed to step 7.<br />
7 > If a screen appears like the one to the<br />
right, choose your modem and then click<br />
OK.<br />
8 > Click OK.<br />
Copyright (c) 1997-2004, <strong>Paul</strong> <strong>Bunyan</strong> Rural Telephone Cooperative. All rights Reserved<br />
page 2
<strong>Internet</strong> <strong>Explorer</strong> 6<br />
GETTING STARTED<br />
> To get on the web, the <strong>Internet</strong><br />
<strong>Explorer</strong> icon on your desktop or on<br />
the quick launch bar.<br />
> When the connection screen appears,<br />
enter your username and password.<br />
> Click Connect.<br />
BROWSING AROUND THE WEB<br />
> The easiest way to start moving from<br />
page to page is by clicking on the links.<br />
Links are text or graphics that will take<br />
you to a new page when clicked. (You’ll<br />
notice that your cursor changes from an<br />
arrow to a pointed finger when it on top<br />
of a link.)<br />
> If you want to get back to a page you<br />
were previously viewing, press the Back<br />
button in your Tool Bar.<br />
See the next page for more details on the<br />
Tool Bar buttons.<br />
IF YOU KNOW THE ADDRESS<br />
> Go to the address box and type in the<br />
address of the page you want to see.<br />
(<strong>Internet</strong> addresses are often shown in<br />
newspaper, magazine, and television<br />
advertisements and articles.)<br />
> Press Enter on your keyboard or the Go<br />
button. The page that you wanted to see<br />
will now be in the <strong>Internet</strong> <strong>Explorer</strong><br />
window.<br />
Copyright (c) 1997-2004, <strong>Paul</strong> <strong>Bunyan</strong> Rural Telephone Cooperative. All rights Reserved<br />
page 3
THE BUTTONS AND BOXES<br />
Back - takes you to<br />
the previous page in<br />
the history list. (A<br />
history list is a<br />
chronological order of<br />
all the pages you<br />
have viewed in your<br />
current <strong>Internet</strong><br />
<strong>Explorer</strong> session.)<br />
Forward -<br />
takes you to<br />
the next page<br />
in your history<br />
list. This will<br />
only work after<br />
using the back<br />
button or<br />
history list.<br />
Stop - stops any<br />
transferring of page<br />
information.<br />
Refresh - reloads the page<br />
you are currently viewing.<br />
This will update the page if<br />
any changes were made while<br />
you were viewing it or while it<br />
was in your history list.<br />
Favorites - provides access to a list of your<br />
favorite pages. Also allows you to add the<br />
page you are currently viewing to that list.<br />
Mail - opens your<br />
e-mail program.<br />
Print - prints the<br />
page that you are<br />
currently viewing.<br />
Full Screen -<br />
enlarges the<br />
<strong>Internet</strong> <strong>Explorer</strong><br />
window to fit the<br />
entire screen area.<br />
Address bar - displays<br />
your current location on the<br />
web with the page’s<br />
address, also known as a<br />
URL (Uniform Resource<br />
Locator).<br />
Links bar - these buttons<br />
link to interesting web pages<br />
and web sites. It’s not a bad<br />
place to start if your not sure<br />
where to go.<br />
Search - will take you to<br />
a page that allows you to<br />
search for a variety of<br />
topics that are on the<br />
<strong>Internet</strong>.<br />
Home - takes you to<br />
your designated “start<br />
page.”<br />
History- displays the<br />
pages you have viewed in<br />
your current <strong>Internet</strong><br />
<strong>Explorer</strong> session and allows<br />
you to go to those pages<br />
directly.<br />
Media - provides access to video and<br />
audio information and options.<br />
Edit - allows you<br />
to modify your<br />
homepage or<br />
website if you are<br />
viewing it.<br />
Scroll bars - this is the sliding bar located on<br />
the side of the window and sometimes the bottom<br />
of the window. They are used to view portions of<br />
the page below or beside the present window.<br />
Click on the arrows or click and drag the solid bar<br />
to activate the scroll.<br />
Status Bar - this is located at the bottom of the<br />
window and gives you brief details about links your<br />
mouse hovers over, pages and files while they are<br />
downloading, and the rate downloading information<br />
transfers.<br />
Copyright (c) 1997-2004, <strong>Paul</strong> <strong>Bunyan</strong> Rural Telephone Cooperative. All rights Reserved<br />
page 4
Outlook Express 6<br />
SETTING UP YOUR E-MAIL ACCOUNT<br />
1 > To open Outlook Express, click start<br />
and then the Outlook Express icon<br />
or;<br />
> Click the mail button on the<br />
<strong>Internet</strong> <strong>Explorer</strong> tool bar and then<br />
click “Read Mail”.<br />
2 > If you the window to the right<br />
appears, click the circle in front of<br />
“Create a new <strong>Internet</strong> mail account”.<br />
(If it does not appear, go on to the<br />
next step.)<br />
> Click Next.<br />
3 > Type your first and/or last name in<br />
the “Display name:” text box. (This<br />
name will appear next to your e-mail<br />
address on messages sent by you.)<br />
> Click Next.<br />
Copyright (c) 1997-2004, <strong>Paul</strong> <strong>Bunyan</strong> Rural Telephone Cooperative. All rights Reserved<br />
page 5
4 > Type your E-mail address in the text box.<br />
Your e-mail address is __________@paulbunyan.net<br />
> Click Next.<br />
5 > Make sure that POP3 is selected.<br />
> Type pop.paulbunyan.net in the<br />
“Incoming mail (POP3, IMAP or HTTP)<br />
server” text box.<br />
> Type smtp.paulbunyan.net in the<br />
“Outgoing mail (SMTP) server” text<br />
box.<br />
> Click Next.<br />
6 > Type your user name into the “Account<br />
name” text box.<br />
Your username is: ___ ___ ___ ___ ___ ___ ___ ___<br />
> Type your password into the “Password”<br />
text box.<br />
Your password is: ___ ___ ___ ___ ___ ___ ___ ___<br />
> Click Next.<br />
7 > Click Finish.<br />
Copyright (c) 1997-2004, <strong>Paul</strong> <strong>Bunyan</strong> Rural Telephone Cooperative. All rights Reserved<br />
page 6
Outlook Express 6<br />
SENDING AND RECEIVING MESSAGES<br />
1 > To open Outlook Express, click start<br />
and then the Outlook Express icon<br />
or;<br />
> Click the mail button on the<br />
<strong>Internet</strong> <strong>Explorer</strong> tool bar and then<br />
click “Read Mail”.<br />
2 > To check if you have new mail, click on<br />
the Send and Receive button.<br />
> Open your Inbox by clicking Inbox to<br />
view new and saved messages.<br />
> If you have new mail, it will appear in<br />
the upper-right portion the window<br />
with the name of the sender, the<br />
subject, and the day and time sent.<br />
(You may read your new messages by<br />
either double-clicking on them to open<br />
a new window or by clicking on them<br />
one time to read the messages in the<br />
lower-right portion of the present<br />
window.)<br />
> Use the contact list to store frequently<br />
used e-mail addresses.<br />
Copyright (c) 1997-2004, <strong>Paul</strong> <strong>Bunyan</strong> Rural Telephone Cooperative. All rights Reserved<br />
page 7
3 > To create a new message, click the<br />
button in the <strong>Internet</strong> Mail window.<br />
> Click the To: field and type in the address<br />
of the recipient of the message. (If you<br />
want to send the message to more than<br />
one person, put a semi-colon between<br />
their e-mail addresses.)<br />
> If you would like to send an exact copy of<br />
the message to someone, type their e-<br />
mail address in the Cc: field.<br />
> Click on the Subject: field and type in a<br />
brief note describing what your message<br />
will be about.<br />
> You may now click on the large white area<br />
of the window and type your message.<br />
> When you want to send your message,<br />
click the Send button in the upper lefthand<br />
corner of the window.<br />
THE BUTTONS AND BOXES<br />
Reply - opens a new<br />
message window for you to<br />
reply to the message currently<br />
highlighted in your Inbox.<br />
Reply All - opens a new message<br />
window for you to reply to all of the<br />
recipients from the message currently<br />
highlighted in your Inbox.<br />
Forward - opens the<br />
highlighted message so you<br />
can send it to someone else.<br />
Send and Receive - checks to<br />
see if you have any new mail and<br />
will also send out any messages you<br />
have in your Outbox.<br />
Create Mail -<br />
opens a<br />
message<br />
window, where<br />
you can create a<br />
new e-mail<br />
message.<br />
Inbox - opens<br />
your list of folders.<br />
Print - Prints the<br />
message currently<br />
highlighted.<br />
Delete - sends the<br />
highlighted message to<br />
the Deleted Items folder to<br />
be erased.<br />
Address Book - allows you<br />
to store and access the e-mail<br />
addresses you use most<br />
frequently.<br />
Find - helps you find<br />
messages by name,<br />
address, subject or text<br />
within the message.<br />
Copyright (c) 1997-2004, <strong>Paul</strong> <strong>Bunyan</strong> Rural Telephone Cooperative. All rights Reserved<br />
page 8