Desktop Video
Desktop Video
Desktop Video
You also want an ePaper? Increase the reach of your titles
YUMPU automatically turns print PDFs into web optimized ePapers that Google loves.
16<br />
Getting Started<br />
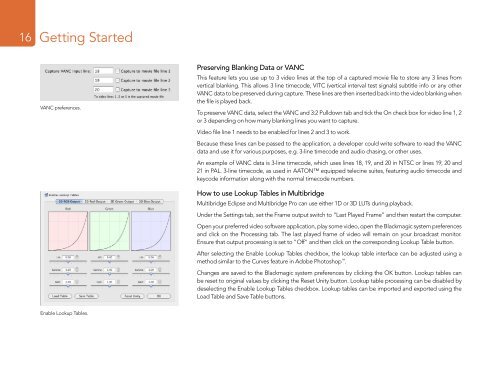
VANC preferences.<br />
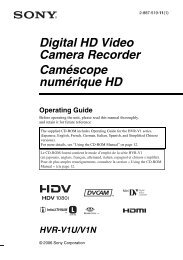
Enable Lookup Tables.<br />
Preserving Blanking Data or VANC<br />
This feature lets you use up to 3 video lines at the top of a captured movie file to store any 3 lines from<br />
vertical blanking. This allows 3 line timecode, VITC (vertical interval test signals) subtitle info or any other<br />
VANC data to be preserved during capture. These lines are then inserted back into the video blanking when<br />
the file is played back.<br />
To preserve VANC data, select the VANC and 3:2 Pulldown tab and tick the On check box for video line 1, 2<br />
or 3 depending on how many blanking lines you want to capture.<br />
<strong>Video</strong> file line 1 needs to be enabled for lines 2 and 3 to work.<br />
Because these lines can be passed to the application, a developer could write software to read the VANC<br />
data and use it for various purposes, e.g. 3-line timecode and audio chasing, or other uses.<br />
An example of VANC data is 3-line timecode, which uses lines 18, 19, and 20 in NTSC or lines 19, 20 and<br />
21 in PAL. 3-line timecode, as used in AATON equipped telecine suites, featuring audio timecode and<br />
keycode information along with the normal timecode numbers.<br />
How to use Lookup Tables in Multibridge<br />
Multibridge Eclipse and Multibridge Pro can use either 1D or 3D LUTs during playback.<br />
Under the Settings tab, set the Frame output switch to “Last Played Frame” and then restart the computer.<br />
Open your preferred video software application, play some video, open the Blackmagic system preferences<br />
and click on the Processing tab. The last played frame of video will remain on your broadcast monitor.<br />
Ensure that output processing is set to "Off" and then click on the corresponding Lookup Table button.<br />
After selecting the Enable Lookup Tables checkbox, the lookup table interface can be adjusted using a<br />
method similar to the Curves feature in Adobe Photoshop .<br />
Changes are saved to the Blackmagic system preferences by clicking the OK button. Lookup tables can<br />
be reset to original values by clicking the Reset Unity button. Lookup table processing can be disabled by<br />
deselecting the Enable Lookup Tables checkbox. Lookup tables can be imported and exported using the<br />
Load Table and Save Table buttons.


