Tectite Push Fit Solutions - Pegler Yorkshire
Tectite Push Fit Solutions - Pegler Yorkshire
Tectite Push Fit Solutions - Pegler Yorkshire

You also want an ePaper? Increase the reach of your titles
YUMPU automatically turns print PDFs into web optimized ePapers that Google loves.
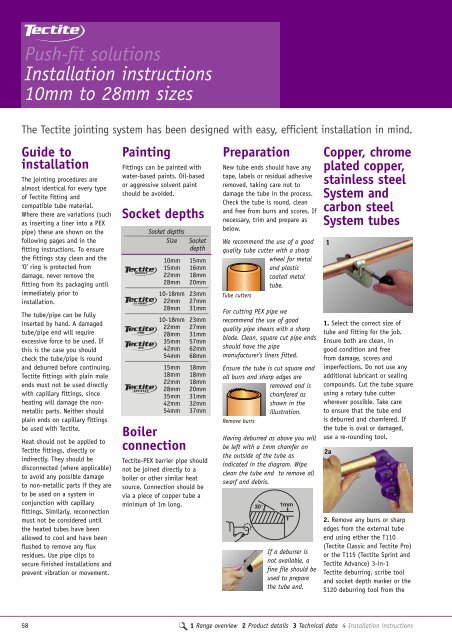
<strong>Push</strong>-fit solutions<br />
Installation instructions<br />
10mm to 28mm sizes<br />
The <strong>Tectite</strong> jointing system has been designed with easy, efficient installation in mind.<br />
Guide to<br />
installation<br />
The jointing procedures are<br />
almost identical for every type<br />
of <strong>Tectite</strong> fitting and<br />
compatible tube material.<br />
Where there are variations (such<br />
as inserting a liner into a PEX<br />
pipe) these are shown on the<br />
following pages and in the<br />
fitting instructions. To ensure<br />
the fittings stay clean and the<br />
‘O’ ring is protected from<br />
damage, never remove the<br />
fitting from its packaging until<br />
immediately prior to<br />
installation.<br />
The tube/pipe can be fully<br />
inserted by hand. A damaged<br />
tube/pipe end will require<br />
excessive force to be used. If<br />
this is the case you should<br />
check the tube/pipe is round<br />
and deburred before continuing.<br />
<strong>Tectite</strong> fittings with plain male<br />
ends must not be used directly<br />
with capillary fittings, since<br />
heating will damage the nonmetallic<br />
parts. Neither should<br />
plain ends on capillary fittings<br />
be used with <strong>Tectite</strong>.<br />
Heat should not be applied to<br />
<strong>Tectite</strong> fittings, directly or<br />
indirectly. They should be<br />
disconnected (where applicable)<br />
to avoid any possible damage<br />
to non-metallic parts if they are<br />
to be used on a system in<br />
conjunction with capillary<br />
fittings. Similarly, reconnection<br />
must not be considered until<br />
the heated tubes have been<br />
allowed to cool and have been<br />
flushed to remove any flux<br />
residues. Use pipe clips to<br />
secure finished installations and<br />
prevent vibration or movement.<br />
Painting<br />
<strong>Fit</strong>tings can be painted with<br />
water-based paints. Oil-based<br />
or aggressive solvent paint<br />
should be avoided.<br />
Socket depths<br />
Socket depths<br />
Size<br />
10mm<br />
15mm<br />
22mm<br />
28mm<br />
Boiler<br />
connection<br />
Socket<br />
depth<br />
15mm<br />
16mm<br />
18mm<br />
20mm<br />
10-18mm 23mm<br />
22mm 27mm<br />
28mm 31mm<br />
10-18mm 23mm<br />
22mm 27mm<br />
28mm 31mm<br />
35mm 57mm<br />
42mm 62mm<br />
54mm 68mm<br />
15mm<br />
18mm<br />
22mm<br />
28mm<br />
35mm<br />
42mm<br />
54mm<br />
18mm<br />
18mm<br />
18mm<br />
20mm<br />
31mm<br />
32mm<br />
37mm<br />
<strong>Tectite</strong>-PEX barrier pipe should<br />
not be joined directly to a<br />
boiler or other similar heat<br />
source. Connection should be<br />
via a piece of copper tube a<br />
minimum of 1m long.<br />
Preparation<br />
New tube ends should have any<br />
tape, labels or residual adhesive<br />
removed, taking care not to<br />
damage the tube in the process.<br />
Check the tube is round, clean<br />
and free from burrs and scores. If<br />
necessary, trim and prepare as<br />
below.<br />
We recommend the use of a good<br />
quality tube cutter with a sharp<br />
wheel for metal<br />
and plastic<br />
coated metal<br />
tube.<br />
Tube cutters<br />
For cutting PEX pipe we<br />
recommend the use of good<br />
quality pipe shears with a sharp<br />
blade. Clean, square cut pipe ends<br />
should have the pipe<br />
manufacturer’s liners fitted.<br />
Ensure the tube is cut square and<br />
all burrs and sharp edges are<br />
removed and is<br />
chamfered as<br />
shown in the<br />
illustration.<br />
Remove burrs<br />
Having deburred as above you will<br />
be left with a 1mm chamfer on<br />
the outside of the tube as<br />
indicated in the diagram. Wipe<br />
clean the tube end to remove all<br />
swarf and debris.<br />
If a deburrer is<br />
not available, a<br />
fine file should be<br />
used to prepare<br />
the tube end.<br />
Copper, chrome<br />
plated copper,<br />
stainless steel<br />
System and<br />
carbon steel<br />
System tubes<br />
1<br />
1. Select the correct size of<br />
tube and fitting for the job.<br />
Ensure both are clean, in<br />
good condition and free<br />
from damage, scores and<br />
imperfections. Do not use any<br />
additional lubricant or sealing<br />
compounds. Cut the tube square<br />
using a rotary tube cutter<br />
wherever possible. Take care<br />
to ensure that the tube end<br />
is deburred and chamfered. If<br />
the tube is oval or damaged,<br />
use a re-rounding tool.<br />
2a<br />
2. Remove any burrs or sharp<br />
edges from the external tube<br />
end using either the T110<br />
(<strong>Tectite</strong> Classic and <strong>Tectite</strong> Pro)<br />
or the T115 (<strong>Tectite</strong> Sprint and<br />
<strong>Tectite</strong> Advance) 3-in-1<br />
<strong>Tectite</strong> deburring, scribe tool<br />
and socket depth marker or the<br />
S120 deburring tool from the<br />
58 1 Range overview 2 Product details 3 Technical data 4 Installation instructions