Tectite Push Fit Solutions - Pegler Yorkshire
Tectite Push Fit Solutions - Pegler Yorkshire
Tectite Push Fit Solutions - Pegler Yorkshire

Create successful ePaper yourself
Turn your PDF publications into a flip-book with our unique Google optimized e-Paper software.
<strong>Push</strong>-fit solutions<br />
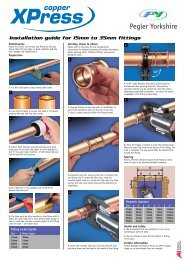
Installation instructions<br />
Demounting<br />
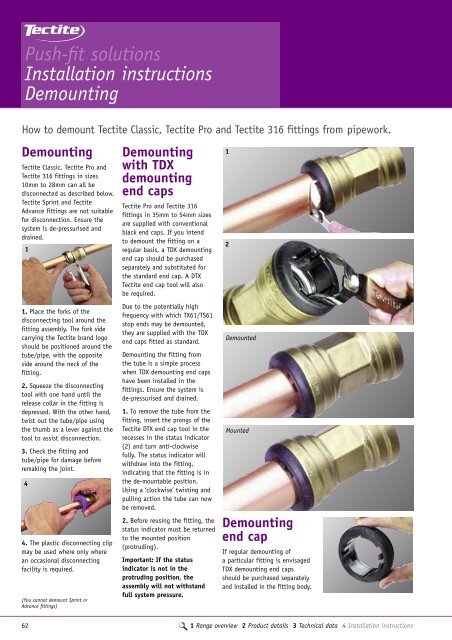
How to demount <strong>Tectite</strong> Classic, <strong>Tectite</strong> Pro and <strong>Tectite</strong> 316 fittings from pipework.<br />
Demounting<br />
<strong>Tectite</strong> Classic, <strong>Tectite</strong> Pro and<br />
<strong>Tectite</strong> 316 fittings in sizes<br />
10mm to 28mm can all be<br />
disconnected as described below.<br />
<strong>Tectite</strong> Sprint and <strong>Tectite</strong><br />
Advance fittings are not suitable<br />
for disconnection. Ensure the<br />
system is de-pressurised and<br />
drained.<br />
1<br />
1. Place the forks of the<br />
disconnecting tool around the<br />
fitting assembly. The fork side<br />
carrying the <strong>Tectite</strong> brand logo<br />
should be positioned around the<br />
tube/pipe, with the opposite<br />
side around the neck of the<br />
fitting.<br />
2. Squeeze the disconnecting<br />
tool with one hand until the<br />
release collar in the fitting is<br />
depressed. With the other hand,<br />
twist out the tube/pipe using<br />
the thumb as a lever against the<br />
tool to assist disconnection.<br />
3. Check the fitting and<br />
tube/pipe for damage before<br />
remaking the joint.<br />
4<br />
4. The plastic disconnecting clip<br />
may be used where only where<br />
an occasional disconnecting<br />
facility is required.<br />
(You cannot demount Sprint or<br />
Advance fittings)<br />
Demounting<br />
with TDX<br />
demounting<br />
end caps<br />
<strong>Tectite</strong> Pro and <strong>Tectite</strong> 316<br />
fittings in 35mm to 54mm sizes<br />
are supplied with conventional<br />
black end caps. If you intend<br />
to demount the fitting on a<br />
regular basis, a TDX demounting<br />
end cap should be purchased<br />
separately and substituted for<br />
the standard end cap. A DTX<br />
<strong>Tectite</strong> end cap tool will also<br />
be required.<br />
Due to the potentially high<br />
frequency with which TX61/TS61<br />
stop ends may be demounted,<br />
they are supplied with the TDX<br />
end caps fitted as standard.<br />
Demounting the fitting from<br />
the tube is a simple process<br />
when TDX demounting end caps<br />
have been installed in the<br />
fittings. Ensure the system is<br />
de-pressurised and drained.<br />
1. To remove the tube from the<br />
fitting, insert the prongs of the<br />
<strong>Tectite</strong> DTX end cap tool in the<br />
recesses in the status indicator<br />
(2) and turn anti-clockwise<br />
fully. The status indicator will<br />
withdraw into the fitting,<br />
indicating that the fitting is in<br />
the de-mountable position.<br />
Using a ‘clockwise’ twisting and<br />
pulling action the tube can now<br />
be removed.<br />
2. Before reusing the fitting, the<br />
status indicator must be returned<br />
to the mounted position<br />
(protruding).<br />
Important: If the status<br />
indicator is not in the<br />
protruding position, the<br />
assembly will not withstand<br />
full system pressure.<br />
1<br />
2<br />
Demounted<br />
Mounted<br />
Demounting<br />
end cap<br />
If regular demounting of<br />
a particular fitting is envisaged<br />
TDX demounting end caps<br />
should be purchased separately<br />
and installed in the fitting body.<br />
62 1 Range overview 2 Product details 3 Technical data 4 Installation instructions