Tectite Push Fit Solutions - Pegler Yorkshire
Tectite Push Fit Solutions - Pegler Yorkshire
Tectite Push Fit Solutions - Pegler Yorkshire

Create successful ePaper yourself
Turn your PDF publications into a flip-book with our unique Google optimized e-Paper software.
4<br />
XPress accessories range. Also,<br />
ensure the internal bore is<br />
deburred. For deburring<br />
stainless steel tube ends a fine<br />
toothed file should be used.<br />
3<br />
PB and PEX pipe<br />
1<br />
Plastic coated<br />
carbon steel<br />
System tube<br />
2b<br />
Then wipe clean the tube end<br />
to remove all swarf and debris –<br />
this helps to avoid damage to<br />
the ‘O’ ring when inserting<br />
the tube.<br />
2c<br />
An alternative method of<br />
preparing copper tube ends<br />
35-54mm before inserting into<br />
the fitting, is to use the<br />
appropriately-sized S122<br />
percussion deburrer (not for<br />
carbon steel tube) featured in<br />
the XPress accessories range.<br />
Place the cup of the deburrer<br />
onto the end of the tube and<br />
strike it with a sharp blow from<br />
a copper-faced hammer. As well<br />
as removing burrs and sharp<br />
edges, this tool also creates a<br />
slight taper that aids insertion<br />
into the fitting. If 10mm R220<br />
annealed copper tube is being<br />
used, ensure a T67 support liner<br />
is fully inserted into the tube.<br />
2d<br />
3. To make a perfect joint, the<br />
tube must be fully inserted in<br />
the fitting until it meets the<br />
tube stop. To confirm that this<br />
is the case, mark the socket<br />
depth on the tube or pipe using<br />
the T110/T115 socket depth<br />
marker (<strong>Tectite</strong> Classic, <strong>Tectite</strong><br />
Pro & <strong>Tectite</strong> 316) or a tape<br />
measure and a marker/pencil.<br />
For the socket depth of each<br />
size of fitting, see tables.<br />
4a<br />
4. When jointing chrome-plated<br />
copper tube with <strong>Tectite</strong><br />
Classic, <strong>Tectite</strong> Pro and Sprint<br />
fittings, scribe the tube using<br />
the T110/T115 (Sprint) scribing<br />
tool to ensure positive grab<br />
ring location. This helps to<br />
accommodate any variance in<br />
chrome plate thickness. Note:<br />
The scribing function is not<br />
suitable for stainless steel tube.<br />
4b<br />
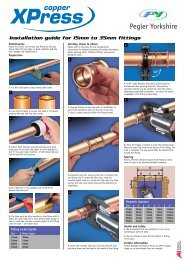
1. Select the correct size of<br />
pipe and fitting for the job.<br />
Ensure both are clean, in good<br />
condition and free from damage,<br />
scores and imperfections. Do not<br />
use any additional lubricant or<br />
sealing compounds. Cut the pipe<br />
square using good quality plastic<br />
pipe shears with a sharp blade.<br />
2. Where <strong>Tectite</strong>-PEX barrier pipe<br />
is used, remove the label from<br />
the pipe end. If the pipe has<br />
been used on a previous<br />
installation cut the tube back to<br />
behind the teeth marks, ensuring<br />
there are no score marks on the<br />
pipe. Also ensure the correct<br />
pipe support liner from the pipe<br />
manufacturer is fully inserted<br />
into the pipe (T66 for <strong>Tectite</strong><br />
flex).<br />
2b<br />
Proceed to jointing (see next<br />
page).<br />
1. Select the correct size of<br />
tube and fitting for the job.<br />
Ensure both are clean, in<br />
good condition and free<br />
from damage, scores and<br />
imperfections. Do not use any<br />
additional lubricant or sealing<br />
compounds. Cut the tube square<br />
using a rotary tube cutter<br />
wherever possible.<br />
2a<br />
2. The plastic coating must be<br />
removed to the socket depth of<br />
the fitting using the S115<br />
stripping tool from the XPress<br />
accessories range. Select the<br />
correct sized tool, fully insert<br />
the tube and twist the tool<br />
until the excess of plastic is<br />
completely detached.<br />
3. Remove any burrs or sharp<br />
edges from the external tube<br />
end using an S120 deburring<br />
tool from the XPress accessories<br />
range. Also deburr the internal<br />
bore. If using plastic coated<br />
tube, the use of the S115 tool<br />
(as point 2), will deburr the<br />
inside of 15mm to 28mm tube.<br />
The same tool will also deburr<br />
the outside of plastic coated<br />
tube – insert the tube into<br />
the opposite end of the tool<br />
and twist.<br />
Proceed to jointing (see next<br />
page).<br />
1 Range overview 2 Product details 3 Technical data 4 Installation instructions 59