Dlr2 & Sl Owner's Manual Supplement - lesrouleuxdewailly - Free
Dlr2 & Sl Owner's Manual Supplement - lesrouleuxdewailly - Free
Dlr2 & Sl Owner's Manual Supplement - lesrouleuxdewailly - Free

You also want an ePaper? Increase the reach of your titles
YUMPU automatically turns print PDFs into web optimized ePapers that Google loves.
120025.PDF<br />
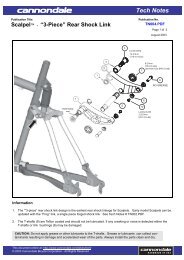
CAUTION<br />
1. Cover the opening of a removed hub/<br />
wheel with a clean towel to prevent<br />
contamination.<br />
2. Protect spindle when wheel removed.<br />
A fall or drop to the ground can<br />
destroy or damage the spindle.<br />
INSTALLATION<br />
1. Inspect the inside of the wheel hub for<br />
contamination and and the condition<br />
of the hub seal. Take corrective action if<br />
necessary.<br />
Wipe all parts clean with a dry shop<br />
towel and apply a high-quality bike<br />
grease to:<br />
I.D. of the larger hub cartridge bearing .<br />
Both spindle bearing lands .<br />
Spindle axle bolt threads.<br />
WARNING<br />
Do not contaminate brake caliper, pads,<br />
or rotor with grease.<br />
spindle so, the larger hub bearing starts<br />
to position on it spindle seat. At this<br />
point, the axle bolt threads can correctly<br />
engage the threaded spindle if the<br />
wheel is held on straight.<br />
NOTE:<br />
Install the front wheel by positioning the<br />
bike horizontally with the spindle facing<br />
up. Then place the hub straight down<br />
onto the spindle, and tighten the axle<br />
bolt.<br />
3. When the axle bolt threads engage<br />
the spindle, turn the bolt clockwise<br />
with finger force slowly to allow the<br />
hub bearings to slide onto the spindle<br />
bearing seats.<br />
Once the hub has been drawn onto the<br />
hub completely, and proper threading is<br />
evident, use torque wrench to tighten<br />
to final 15.0 N•m (133.0 In•Lbs).<br />
4. Reinstall the brake caliper. Tighten bolts<br />
to 78.0 In•Lbf (9.0 N•m.)<br />
CAUTION<br />
LOCATE DISC BETWEEN THE PADS.<br />
Replace shims that are in use, be sure<br />
the shims are positioned between the<br />
caliper (adapter if any) and inner face of<br />
the fork mounts not under the head of<br />
the caliper bolts.<br />
USE ONLY 16 MM (Cannondale kit #<br />
LEFTYBOLTS. Longer bolts can result in<br />
contact with the brake rotor causing<br />
severe damage. Check clearance<br />
between the bolt tips and rotor after<br />
remounting the caliper.<br />
5. Spin the wheel to make sure it spins<br />
freely. Be sure to test the brakes for<br />
proper operation before riding.<br />
2. <strong>Sl</strong>ide the wheel straight onto the<br />
7