SRK20ZGX-S, 25ZGX-S, 35ZGX-S, 50ZGX-S TECHNICAL ... - BVT
SRK20ZGX-S, 25ZGX-S, 35ZGX-S, 50ZGX-S TECHNICAL ... - BVT
SRK20ZGX-S, 25ZGX-S, 35ZGX-S, 50ZGX-S TECHNICAL ... - BVT

Create successful ePaper yourself
Turn your PDF publications into a flip-book with our unique Google optimized e-Paper software.
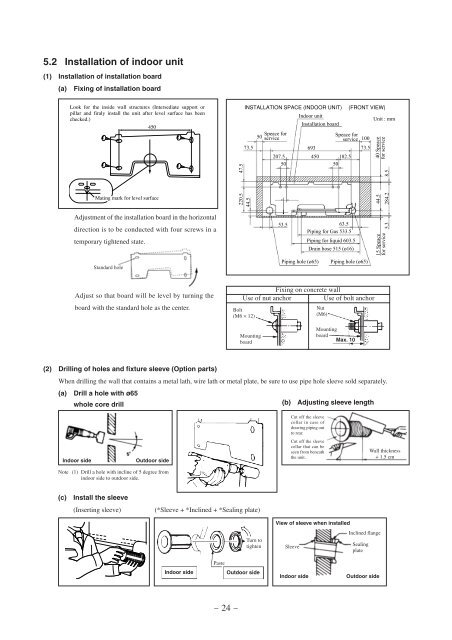
5.2 Installation of indoor unit<br />
(1) Installation of installation board<br />
(a) Fixing of installation board<br />
Look for the inside wall structures (Intersediate support or<br />
pillar and firaly install the unit after level surface has been<br />
checked.)<br />
450<br />
47.5<br />
INSTALLATION SPACE (INDOOR UNIT)<br />
50<br />
Speace for<br />
service<br />
207.5<br />
Indoor unit<br />
Installation board<br />
73.5 693<br />
73.5<br />
450<br />
50 50<br />
Speace for<br />
service<br />
182.5<br />
(FRONT VIEW)<br />
100<br />
Unit : mm<br />
40 Speace<br />
for service<br />
8.5<br />
Mating mark for level surface<br />
220.5<br />
44.5<br />
44.5<br />
284.2<br />
Adjustment of the installation board in the horizontal<br />
direction is to be conducted with four screws in a<br />
temporary tightened state.<br />
Standard hole<br />
53.5 63.5<br />
Piping for Gas 533.5<br />
Piping for liquid 603.5<br />
Drain hose 515 (¿16)<br />
Piping hole (¿65) Piping hole (¿65)<br />
15 Speace<br />
for service<br />
5.3<br />
Adjust so that board will be level by turning the<br />
board with the standard hole as the center.<br />
Fixing on concrete wall<br />
Use of nut anchor Use of bolt anchor<br />
Bolt<br />
(M6 × 12)<br />
Nut<br />
(M6)<br />
Mounting<br />
board<br />
Mounting<br />
board<br />
Max. 10<br />
(2) Drilling of holes and fixture sleeve (Option parts)<br />
When drilling the wall that contains a metal lath, wire lath or metal plate, be sure to use pipe hole sleeve sold separately.<br />
(a) Drill a hole with ø65<br />
whole core drill (b) Adjusting sleeve length<br />
Cut off the sleeve<br />
collar in case of<br />
drawing piping out<br />
to rear.<br />
Indoor side<br />
Outdoor side<br />
Cut off the sleeve<br />
collar that can be<br />
seen from beneath<br />
the unit.<br />
Wall thickness<br />
+ 1.5 cm<br />
Note (1) Drill a hole with incline of 5 degree from<br />
indoor side to outdoor side.<br />
(c)<br />
Install the sleeve<br />
(Inserting sleeve)<br />
(*Sleeve + *Inclined + *Sealing plate)<br />
Turn to<br />
tighten<br />
View of sleeve when installed<br />
Inclined flange<br />
Sleeve<br />
Sealing<br />
plate<br />
Paste<br />
Indoor side<br />
Outdoor side<br />
Indoor side<br />
Outdoor side<br />
- 24 -